Wednesday 30 April 2014

Whoo-hoo! Excited about 1939 Chevy bonnet!

Excellent news from my brother today - he's duplicated my '39 Chevrolet bonnet in resin! And it looks very nice too...


I can now finish off my truck conversion. It will be nice to have this particular make of truck for my Finnish army as it appears on so many photos from the period. :)

Tuesday 29 April 2014

Painting PSC's Late War German Infantry - Pt. 3

Having completed my two guinea pig German figures and experimented with some of the painting techniques and colours I wish to use it's now time to start my first full squad of 'Late War' Germans!

It's pretty much a production line job, applying one colour at a time across the figures, working 'inside out'. I start with the flesh - Vallejo's 955 Flat Flesh - and then move on to the tunics, then equipment and so on...


On the matter of what constitutes 'Field Grey' I have decided to be flexible and create what I feel was probably a late war scenario in the Wehrmacht Heer (army) where uniform quality was 'variable'. I wish to give the impression of a decline in supplies with a somewhat rag-tag look to my soldiers.

Obviously, while uniform quality probably did vary at this point in the war uniforms were most likely issued from supplies in batches, so units probably had uniforms of similar colour and quality - but this would no doubt vary from unit to unit as they received different batches from different manufacturing factories. So my intention to vary colours quite radically within one unit is a bit of exaggeration for effect.

The base coats applied, pre-shading.
So, to make a squad wearing uniforms of mixed colours and shades I set up a triad of colours and mixed and matched them randomly...


I began with laying down a tunic or trouser colour of the lightest shade of my target colour, then when that was dry I gave it a good going over with a wash of the 'out the bottle' target colour itself (to create some subtle shading and modulate the overall colour back toward a 'medium' shade). Then I worked on the shadows and deep creases with a darkened shade of the target colour. And finally, I added some highlight details using a near white version of the target colour.

One thing I found when doing my test figures was that it was best to slightly over-exaggerated effects. Subtle highlighting, for example, was lost somewhat when I vanish coated the figures. Slightly exaggerated highlights remained visible, though a little subdued, after the varnish coat.

You sort of get a feel for how much to over-exaggerate colours so that - hopefully - they turn out the correct target colour at the end of the process. But that's the beauty about doing test figures first.

It's all very interesting and I'm really enjoying the learning experience - but you really get to appreciate it when you see a very well painted figure...Boy! Those experienced guys really put a lot of practise in!

Helmet camo painting...For beginners (like me)!
As these are very early days as far as figure painting is concerned I am trying to keep everything pretty simple. Painting realistic camouflage patterns on Braille Scale soldiers is probably one of the more complicated techniques to learn (along with realistic skin tones) and I would have been happier to have avoided doing camo at this point - unfortunately my PSC Germans nearly all have camo helmet covers. Still, could have been worse and I guess it's a nice introduction to this subject.


I was surprised to discover that the lovely 'Splinter' pattern camo that was used by the Germans was not a late war innovation and actually stemmed from the 1930s!

Buntfarbenaufdruck 31 or, more commonly, Splittertarn (splinter-pattern) was first printed on the newly designed and issued triangular tent/poncho called the dreieckszeltbahn ("3-corner tent"). On the PSC Germans this 'ponch'-come-tent is visible as part of the equipment carried on their backs, and of course the camo is also displayed on their helmet covers.


For more precise information regarding the nature, position and colour of German
army equipment and how it was carried refer to this excellent site: www.mp44.nl/

As an experiment I painted my helmet covers in two ways, one battle-worn and faded (or dirty) and the other cleaner and with more vivid colours (see above picture).

Weathering and shading aside the actual paint process here - and on the rolled up poncho - was pretty simple thanks to Splittertarn's hard-edged, solid coloured geometric design. I simplified the pattern somewhat (for scale) and followed this procedure...


Now a couple of points regarding authenticity. First of all, from all the various reference photos I have looked at of the actual helmet cover there is some variation in the scale (coverage) of the pattern and also some colour drift - sometimes the base colour is khaki-buff and at other times (as with the example above) it has a slight green hue to it. But, secondly, I also didn't try to replicate the very small and fine green 'dash' pattern which was overprinted onto the basic geometric design of the camo simply because at this scale I doubt it would be seen.

(Kamoflague.net in fact described the 'khaki' base colour as '...light field grey or tan background'.)

As with the basic uniform I do intend to create some colour variations within my squad to reflect wear and the position of the camo on the cover (it was not always the same depending where the original cloth was cut from the roll).

NEXT:  Fine details, then the shading washes.

Sunday 27 April 2014

Painting PSC's Late War German Infantry - Pt. 2

It's been a bit of a figure-fest (that sounds wrong) this weekend and I got my 1/72 PSC Late War German test figures finished...


I got a lot out of doing these two models, it was very good practise and will make things a little easier when I undertake the job of painting the two full squads I have sitting on my workbench!

These Germans will be the first of my two Bolt Action practise armies - I intend to build a little American force to oppose them. Just a couple of infantry squads, some fire teams and a couple of vehicles.

So, why not 28mm you ask? ...Simple - cost!

I don't want to fork out large sums on a 28mm Bolt Action army until I know what I am doing. These 1/72 fellows were a minimum outlay as I already had them in my stash. Yes, the Yanks will add some cost but nowhere near the same cost as the equivalent 28mm force.


At this stage it's simply more important to have a couple of armies with which I can learn the Bolt Action rules and try out a few test games. At length I will decide on which army I fancy making in 28mm (I am toying with a British 8th Army force - in honour of my Dad).

Of course, all this figure painting is very good practise for my Finnish Army project...Which is what I will be turning my attention to next.

Saturday 26 April 2014

Strelet's 1/72 Finnish Army 1944 figures review

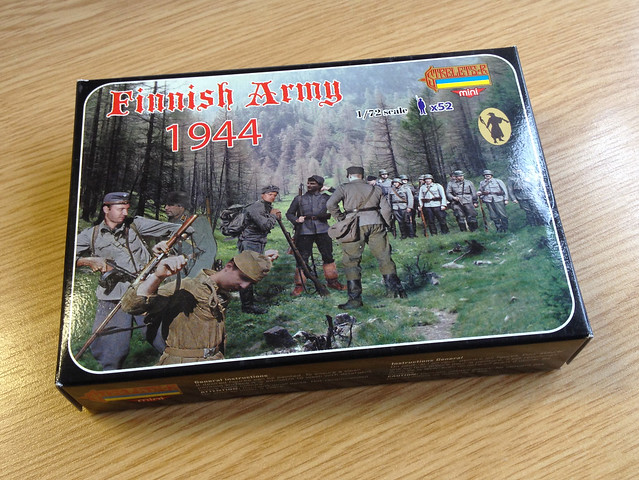
Having fully completed some Strelet's figures for the first time - and realizing I have a bunch of photos of them I haven't used - I thought it would be useful to assemble my thoughts about this product under one post. So here it is - my thoughts on Strelet's Finnish Army 1944 set.


I hadn't heard of Strelets R - to give them their full name - before I did some searching for some 1/72 WW2 Finnish infantry figures. So I had no idea what to expect, I was just very excited that someone actually did make Finnish soldiers in this scale.

Note on scale: I flatly refuse to call 1/72 20mm, as a lot of retailers and modellers do. 20mm figures and models are - in my experience - more generally 1/76 in scale. When I talk about 20mm I mean 1/76!

In the beginning there was Strelet's 1939-42 Winter Finns...

The vast majority of WW2 Finnish soldiers in Braille Scale are 20mm (1/76) and portray the popular Winter War (1940/41) period. The only 'Summer' uniformed Finns I have found thus far are C-P Model's wonderful 20mm 1944 Finnish Army metal figures and Warlord's 28mm Finns. Strelet's represented the only 1/72 Finns on the market with their Winter War set...


So I bought these thinking that they might include some figures I could utilise for my Continuation War (1941-44) Summer Finns - they were cheap enough to use as donor parts if nothing else. It was a bit of a disappointment when I opened the box and looked at a sprue full of over-sized cartoon characters...

In Strelet's defence the 1939-42 Winter set does contain some a very
nice selection of appropriate equipment. It's all just so BIG!

The Strelet's Winter Finns - left - compared with 1/72 Zvezda Germans and
1/72 Airfix Germans to give an idea of scale. Note that these three
Strelet's Finns were the better ones!

The full range of poses from this Finnish Army 1939-42 set can be
seen on The Plastic Soldier Review web site.

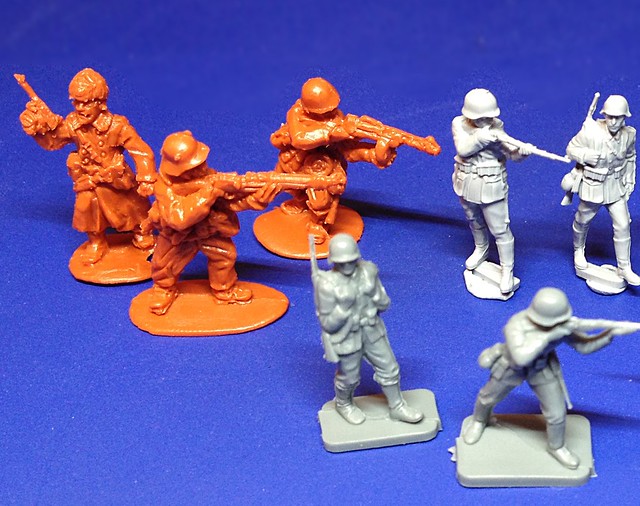
The Strelet's figures are moulded in a reddish-brown greasy soft plastic and are rather caricaturish in their features and poses. Thier exaggerated details and proportions put me in mind of fantasy wargame figures and while they're height is within 1/72 tolerances their girth is a little ample when compared to some of the other - more realistically proportioned - figure sets.

Long story short - I found these figures to be incompatible with the sort of realistic 'look' that I was after and I consigned them to my 'box of shame'!

And now let's talk about Strelet's 1944 Finns...

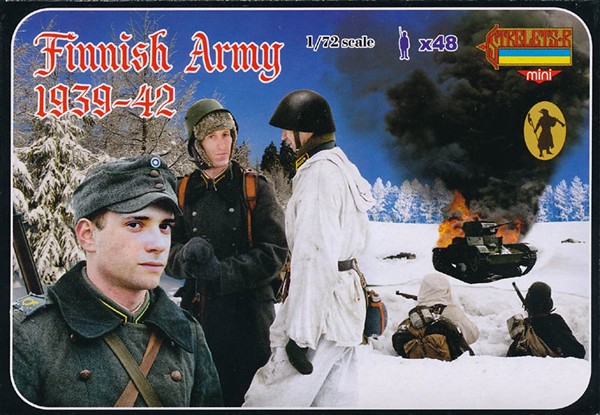
Anyway, a year later - still wrestling with what to do about acquiring suitable Finnish soldiers for my 1/72 Continuation War project - I noticed that Strelets were releasing a second set of WW2 Finns, this time summer uniformed '1944' soldiers! (One does wonder if the earlier set sold enough for them to consider this worth doing? I would be surprised if that were the case!)

Despite my earlier disappointing experience I could not resist buying a set that promised to be exactly the figures from exactly the right period that I am after...I am nothing if not optimistic! And you never know - I thought to myself - they may have improved in their sculpting since the first set.

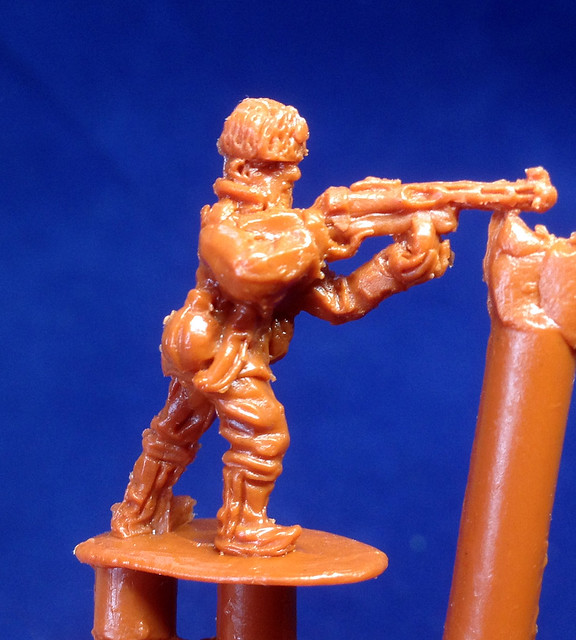
The box duly arrived and I - again - opened it excitedly only to find similarly grotesque figures which made Mr. Potato head seem like Adonis...

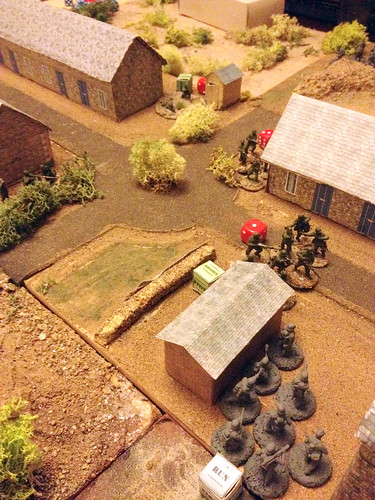
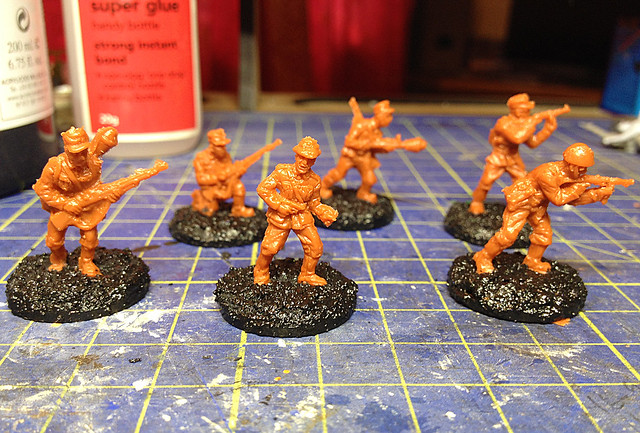
I particularly liked the comedy German helmet on the middle figure!
There are four identical sprues in the set which gives you a total of 48 figures.
Just like the first set these figure are what Plastic Soldier Review called 'chunky' and there is quite a bit of flash and mould lines around the figure which destroys some of the (laugh) 'detail' that there is. Just like the first set the level of authenticity of the type of equipment included is good and they do, indeed, represent Finnish infantry of the late war period, albeit crudely.

Uniforms are likewise realistically chosen and I was impressed that Strelets had even had a go at the distinctive Finnish boots and included nice little touches like the Finnish hunting knives. But, unfortunately, any credit that might have been given to their efforts was quickly lost due to the terrible job that their moulding had done of the primary weapons.

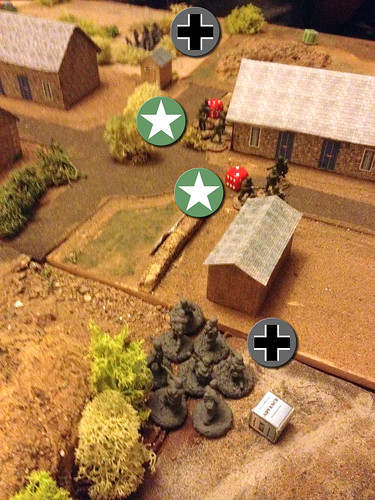
Yay! Another comedy German helmet...Did the Finns only have these
in 'Junior' sizes?
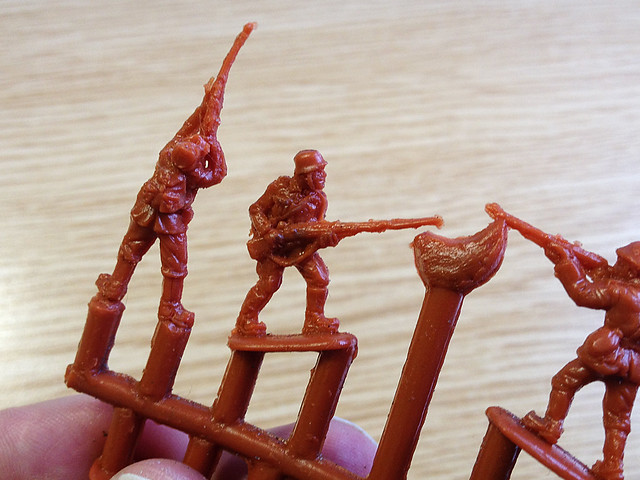
The Finn's M/39 "Ukko-Pekka" rifles (Mosin Nagant variants), 9mm Suomi M/31 SMGs and 7.62 mm Lahti-Saloranta M/26 LMGs were reduced to malformed lumps of plastic. In fact, I'd go as far as to say that these renditions of the Finnish guns are actually worse that they were in the earlier Strelet's set!

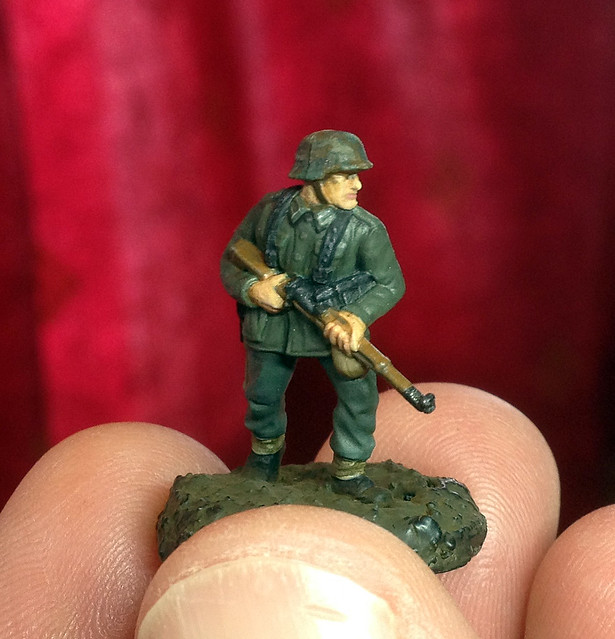
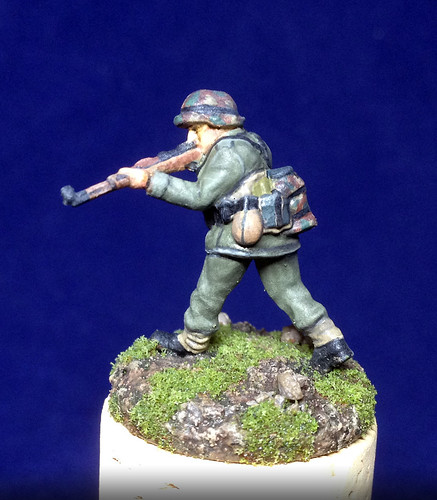
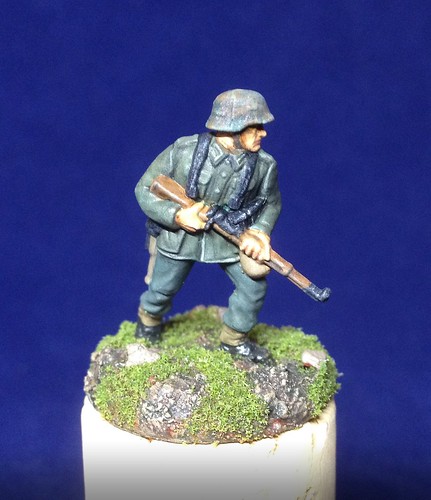
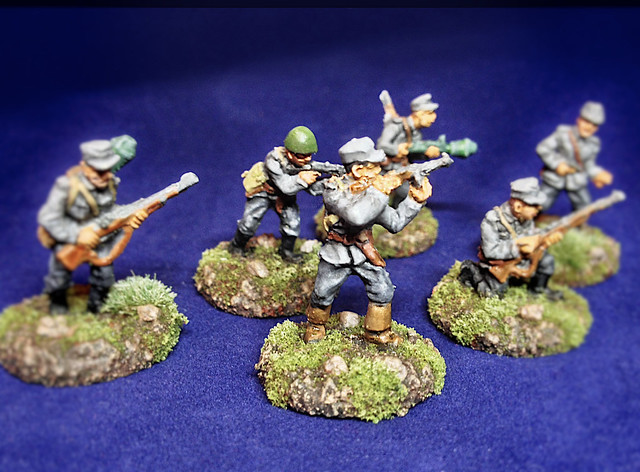
Anyway, I decided - so as not to have another wasted purchase - to use these latest Strelet's figure as guinea pigs for my figure painting lessons. At the very least I thought I could practise some techniques for producing the distinctive light grey uniforms worn by the Finns in the summer of '44...

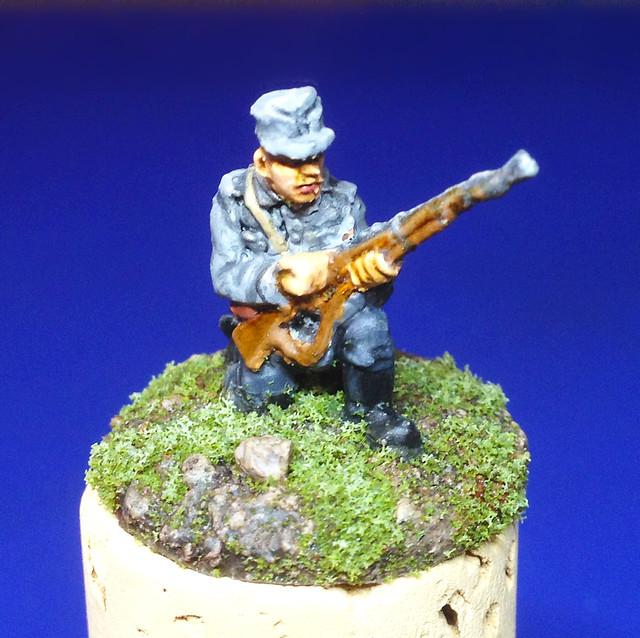
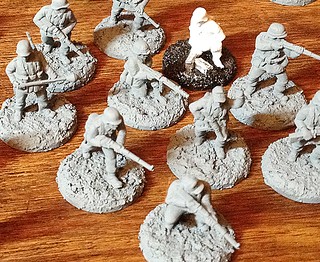
My practice painting victims! These are what I considered the six best
poses in the Strelet's 1944 Finnish set.
I even thought that maybe the models might improve with a lick of paint! As I said, I am an optimist.


And indeed, painting does make things seem a bit better. But I did notice that there was a lot more plastic flash on the figures than I thought, a lot of it only noticeable once you applied some paint. The rather 'wobbly' detail of the figure also made it hard to paint 'hard edges' and some detail bled over and was quite vague. The painting tended to highlight the messily sculpted features.

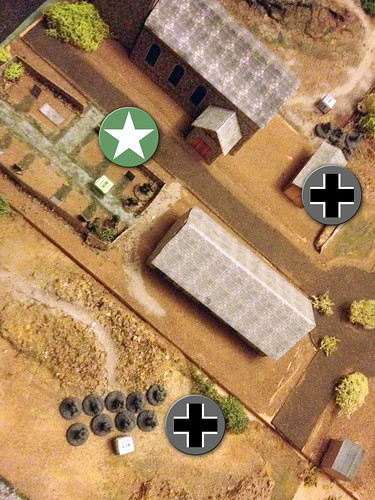
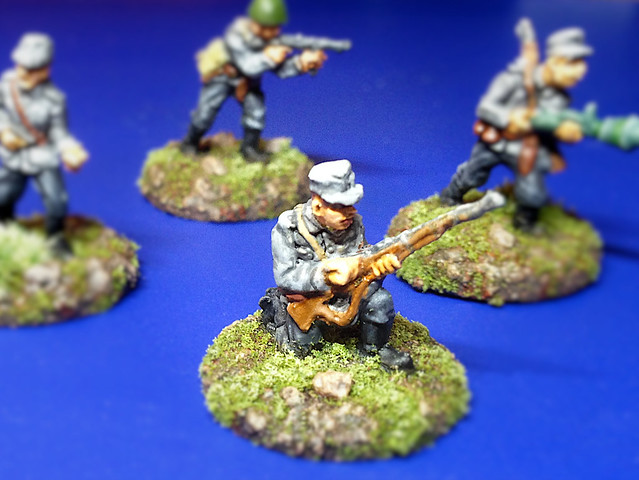
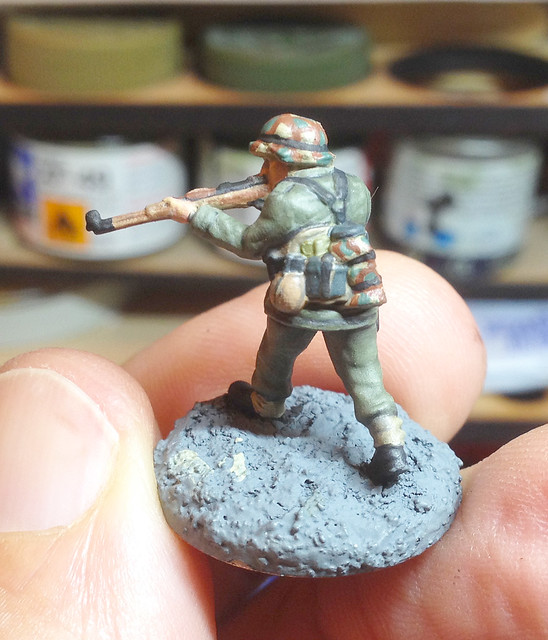
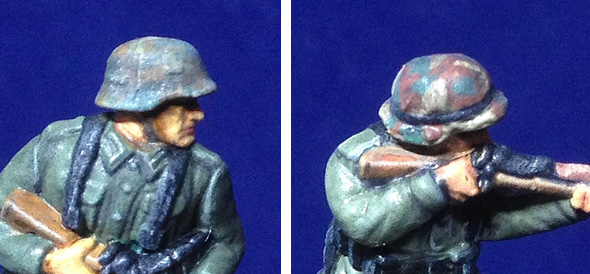
Undoubtedly what I consider the best figure in the pack and
my favourite. For once there is some rather nice facial detail
and the pose is very nice.
Of particular note - if that's the right phrase - were the dreadful faces of some of the figures. There were a few which seem to have been modelled on John Merrick - The Elephant Man! Painting did nothing to improve these imperfections.

Conclusion
I think what annoyed me the most about Strelet's Finns was the the great deal of promise that they held for someone like me, who is after some of the rearer and least modelled armies of WW2. Indeed, if you visit Strelet R's web site and look through their 'Minis' catalogue you will be surprised and intrigued by some of the exciting sets that they have on offer.

Some of Strelet's WW2 Mini sets are: 
• Hungarian Army Winter Dress (Stalingrad)
• Italian Army in Winter Dress (Stalingrad)*
• Romanian Infantry WWII
• Polish People's Army
• Soviet Partisans in Summer & WInter Dress

* Do take a look at the box art for the Italians, I think they got Alexei Sayle to pose for it!

You have to admit, these are very worthy additions to the market place, and were these done by Revell or Caesar or Pegasus or even Airfix I think we would all have reason to be very excited...But they aren't, they are Strelets.

Playing Devil's Advocate I would say that some people might like Strelet's chunky cartoony approach. If I were in the mood to be kind I could say that they certainly have a character of their own!

Unfortunately, I think most modellers and wargamers are after something which looks a little more conventional.

If I had to give an overall score (out of 10) it would be a generous 6 (simply based on the fact they are the only 1/72 Finnish soldiers available). Sorry Strelets - close-ish, but definitely no coconut! :(

Useful links:
Plastic Soldier Review site section for Strelets R

By the way, if anyone has a use for three boxes of Strelet's Finns (2 x WInter War, 1 x Continuation War) just drop me an email with your address. I'll gladly post them to you...First come first served!

Friday 25 April 2014

Finnish infantry v.2 - tests complete

I got my Strelet's Finnish infantry 'test' figures completed this afternoon. Accepting the fact that the Strelets Finns - as I have said several times - are horrendous figures the best I could hope here was some interesting painting experiments. So let's see how they turned out...


As far as the painting went I was quite pleased with how it all turned out. I got some stuff right and some stuff wrong, but came across a few nice techniques that worked for me.

I found painting a realistic light grey tunic a bit of a challenge, if you're not careful wash effects can end up looking 'dirty' on the light coloured clothing (or at least that's what I found).


I think the officer turned out the most subtle of my wash effects. Light grey base with a mid-grey wash over it to bring out the creases in the material and then some dark grey in the deep folds and seams. I finished this all off with some near-white highlights at the edges of the cloth.

I used this same format for the dark grey trousers. But I did find that I went back a couple of times, re-washing certain areas until I was happy with the effect.


The deformed features and details of these figures did make it a little difficult at times and he end effect turned out a little messy because of it. It's a bit of a shame as occasionally there was a glimpse of what could have been if Strelets had taken some care in the sculpting, the kneeling rifleman was my favourite figure in the whole set...


One of the positive effects I discovered with these test figures was the use of artists' inks for shading. I picked up a cheap set of eight primary colours from Amazon and they really lifted my flat washes, particularly the flesh tones.

My favourite ink was the Sienna, a warm red-yellow, which I used around the edges of the faces and between folds of skin, joints and fingers. But the other colour came in useful too to give a rich and vivid highlight to other areas. Black ink gave a nice glossy sheen to the boots.


I guess the final learning exercise was the textured base. Not too difficult really as you can paint the base colours as messy as you like, then give it a lighter dry brush, as long as it's an earthy colour. The mossy flocking I stuck on with PVA and the few small stones did all the work really.

Overall, as I said, I'm quite pleased and do think that with better quality figures the end result will be reasonably good for a beginner. I guess the real test will be with my Pegasus converted Finns, but certainly this test exercise was really useful.

Thursday 24 April 2014

Painting PSC's Late War German Infantry - Pt. 1

While painting my 'test Finns' I started experimenting with one of the PSC Germans I made for last week's Bolt Action game. I hadn't intended to do two figure painting projects at the same time but I wanted to see if a nicely made figure would make any difference to how a painted model would turn out. The results were interesting.

To begin with I started my German figure in exactly the same way as I had my Strelet's Finns, but I had already primed the German with a mid-grey colour.

I haven't really decided what makes a good colour for a primer base as yet - some people say white and some prefer black (for speed painting), so I thought grey was a good compromise!

Anyhoo - first problem. Like most people I know that German infantry wore uniforms of Field Grey...That would be a sort of mid-grey them wouldn't it? Er, after checking out a couple of Osprey reference books I discovered that Field Grey wasn't as grey as I imagined!

Mid-grey, greeny-grey, browny-grey, buffy-grey, more grey, grey...What the
flip? Afraid I don't know the original source of this photo but it regularly
appears on forum threads about German Field Grey.
Osprey reference: Men-At-Arms 'The German Army 1939-45 (5) - Western Front 1943-45'

Plastic Soldier Company recommend Vellejo's 920 German Uniform and 886 Green Grey for their figures, but I found 920 too green and 886 too dark...

Painting my German (far left) along side my Finns, below are my Vallejo
paint swatches, I tried 920 for the jacket first but thought it too green.

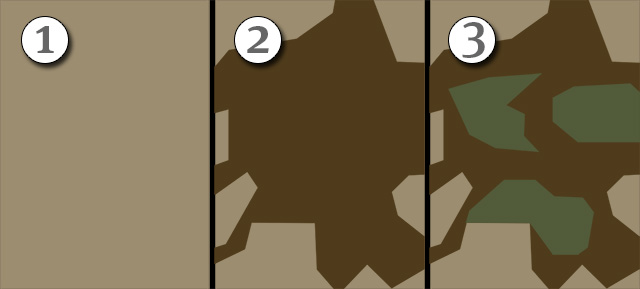
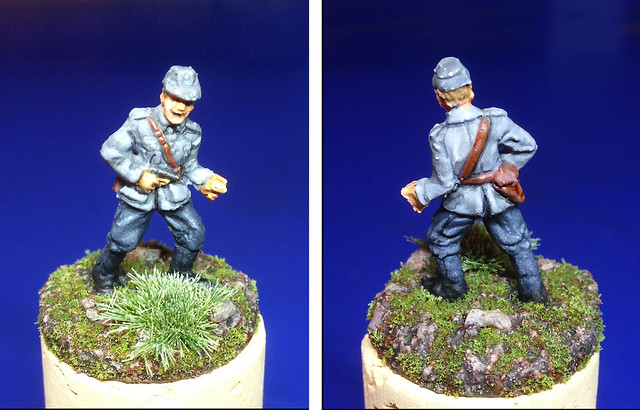
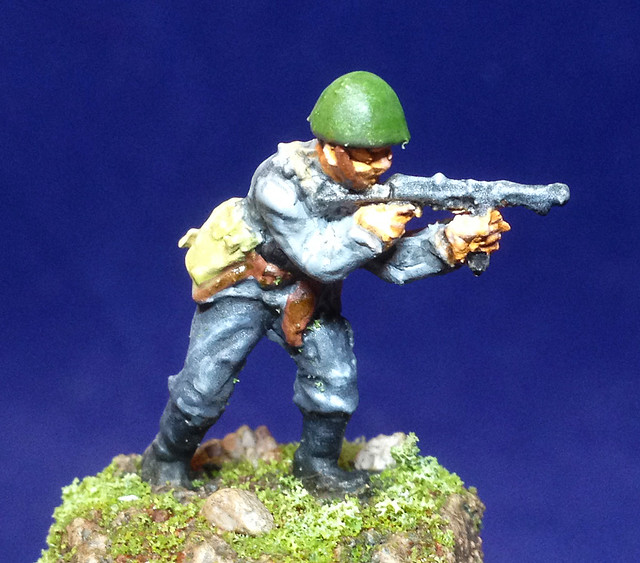
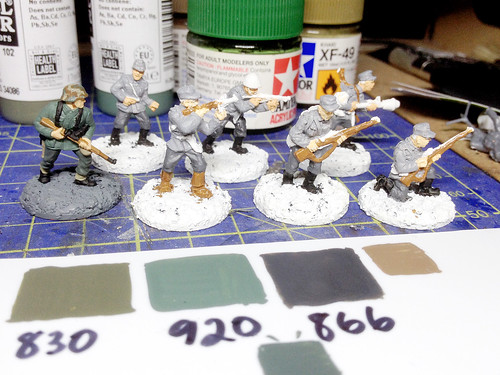
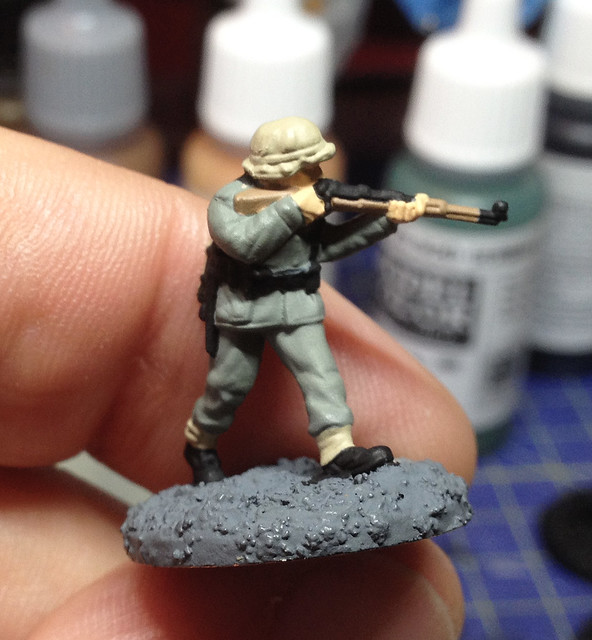
I tried 920 German Uniform at first but had to repaint it with a grey wash as it was far too green for my liking.

Left: My first base coating attempt, the jacket is too green but I like the grey of the trousers, so I later gave the jacket a light wash of the 866 Grey Green to darken it a bit.

I realise that a lot of reference does mention that German Field Grey did have a green tinge to it, but at this small scale I imagined that would be quite difficult to see unless one exaggerated this for effect (which some modellers actually seem to have done). My preference was based on all the old war films I used to watch, Field Grey was mid-grey as far as I was concerned!

So it was back to the drawing board as I began to shade my first attempt at a Late War German. I began by toning down everything so it looked a bit 'war weary', but I did find that the problem was that I had already painted him a medium colour, so in darkening it I was risking the finished model turning out too dark...


Not too bad, but as I suspected probably a bit too dark - dark enough that the colours are muddy and indistinguishable - so I figured that really you do want to exaggerate and over-lighten the main colors so you can get the sense of a distinctive German uniform (and be able to distinguish it on a war game table from other armies). To his end I decided to have a second go - but this time I would start with lighter base colours...


This time I started with - perhaps obviously - Vallejo's German Field Grey WWII (830) but added a couple of spots of white to lighten it one or two shades. I did the same with the Khaki I put down as the base for the equipment, helmet cover and gaiters.

The theory here is when I start to add the shading wash the overall effect will be to darken the lightened base colour back to the medium target colour. So, my lightened 830 Field Grey when shaded should approximate 830 out of the bottle (if I got the mix right)...


It seemed to work! On the left - above - you have my first attempt with the 'out the bottle' Vallejo 830 Field Grey tunic, and on the right my shaded second attempt which started too light but then was 'modulated' back to near 830 again, but with shading!


I'm happier with the second attempt for wargaming purposes. Historically, I *think* my first attempt was closer (though maybe a tad too dark) to the look of WWII German soldiers, but was too muddy and indistinct to act as an easily recognisable marker on the tabletop for a game. My second attempt is perhaps a little exaggerated and too light but is a distinctive colour that would mark it out as German compared to other soldiers on the tabletop.

It's a matter of preference and I won't stop experimenting with shades as I go on the paint the remainder of my Bolt ACtion German force. Bearing in mind the reference photo of the real German tunics I included above I have some latitude for a variation in shades. I think the ideal Field Grey for gaming is probably exactly halfway between the two test samples I have painted.

Monday 21 April 2014

Finnish infantry v.2 - base coats

Back to my Finnish infantry experiment. To recap, I am practising basic figure painting techniques on my 1/72 Strelet's Finnish 1944 infantry as - to be honest - that's about all they are really good for!


I started by trying out a white primer coat, I'm unsure whether starting with a light or dark primer is best so let's see. One things for sure, spraying on a coat of paint doesn't improve these figures any.

I'm working 'inwards out', starting with the bottom layer and working out to the top most layer of the figure. So let's begin with the face and hands...


Painting the faces of these Strelet's figures is painful, the faces aren't so much faces as misshapen potatoes. I can't imagine how I will be able to paint any sort of realistic features (even if I as an experienced painter), it's just as well this is just a practice exercise.


I continued working outwards, but while I was doing that I thought it would be interesting to paint one of my Plastic Soldier Company Germans at the same time to see how a nicely sculpted figure would paint up compared to the Strelet's ones.

The paint swatches are the colours I am testing out for my Germans - I did some research and it turns out that German 'Field Grey' wasn't quite as grey as I thought! But I digress...


I didn't take any more care painting the PSC German than I did over the Strelet's Finn, but I think you will agree that the two paint jobs look completely different levels of quality. I'm not saying that starting with a good quality figure will make a bad paint job look good, but starting with a bad figure definately won't do you any favours either.

Anyway, I'll carry on with these test Finns - as I definitely need the practise - because I have no idea how I will handle the detailing of clothing textures. It will be interesting to see what I can do to shade the clothing and equipment.

Sunday 20 April 2014

Operation Küss mein Arsch - game report

I've decided to post up the game report for Friday night's Bolt Action game here as - really - it finishes off my Operation KMA project nicely (and shows my models in use). In future my game reports will go on my Milgeek gaming blog though...

OK -this is a bit simplistic, but this is my brother and my very first attempt at a war game. Taking the advice of some of the Society of Gentlemen Wargamers forum members we agreed to make our Bolt Action skirmish an infantry only affair (with no indirect fire weapons and no armour)...

THE SET-UP - My brother made an excellent little 'Normandy' village for us to scrap over (we kept it tight as we were just concentrating on learning the rules)...


Our small forces - 2 rifle squads (1 NCO, 7 riflemen), a MMG team and a sniper team each - started at either side of the ville with the objective of capturing and holding the cross-roads at the center of the table. I know this isn't perhaps the most imaginative mission, but we tried not to be too clever.

THE OPENING MOVES: Saw some blatant 'Runs' to get to best position over-looking the main objective with both of us matching move for move fairly equally. My brother included lots of interesting cover so we could try out Bolt Action's 'Line of Sight' mechanics...


MY FIRST TACTICAL MISTAKE: In the rush to get into a position overlooking the middle ground I got rather too cocky and exposed my most useful unit! My MG42 MMG fire team found themselves caught out in the open by my brother's lead GI's. It was a disaster for me - a chancy move trying to steal the initiative. First blood to the Yanks!


BLOCKING FORCE: Losing my MMG left a big hole in my center where the Americans could potentially pour through. Luckily for me my Order Dice came out the bag next and so I was able to move one of my infantry squads up my left flank to try and block any enemy rush...


HALF TIME: Things are looking bad for my Germans. The Americans have already reached the crossroads and are pushing through aggressively to stop me getting anywhere near the objective. But my brother's attempt to steam-roll my Germans seems to have stalled mainly due to a fantastic bit of pinning fire from my sniper in the cemetery (to the south)! Still, at halftime the initiative seems to be firmly with the Americans.


TOO QUICK AND TOO FAR: The Americans seem to have overextended themselves. In moving up to silence my sniper team they have moved close to one of my infantry squads and as the Order Dice favour me for a change I spring an ambush!


THE TIDE TURNS: It's amazing how quickly things can change due to the Order Dice system that Bolt Action uses...I pulled a couple of turns in a row and that was enough for me to spring a flanking move on my right flank which knocks out the US sniper team and whittles away one of the American infantry squads, leaving it scuttling for cover...


CLOSE QUARTER FIGHTING: In an attempt to extricate his lead American infantry squad from my ambush the Yanks hastily move up their MMG, but with some lucky dice throws I dispatch this and then turn my attention back to the US infantry which are now counter-attacking my Germans from their rear. But my superior numbers tell in the end and I have wiped out two American squads in short order!


From having a numerical advantage of four American squads to three German I managed - by a lot of good luck - to turn that around to two German squads to one US squad! ...The poor Americans have little choice but to disengage - or be caught in a pincer movement - and retreat speedily to the hardcover of the cemetery!


It was just a matter of time now and slowly the Yanks succomed to my fire! The graveyard did indeed become the final resting place for my brother's Americans...


END GAME! 

Conclusion: The big surprise was that all this took FOUR HOURS! We were shocked - though a lot of this time was down to us flicking back and forth through the Bolt Action rule book! We cannot claim that we interpreted the rules correctly and there were some dodgy moves, but we did our best to be fair.

...But we made a lot of notes about things we didn't quite understand and we intend to clarify these issues over the coming weeks.

Cutting out the armour and the light mortar squads we were originally going to employ did make things a lot more straight forward, plus we decided to ignore the additional close quarters (Assault) rules and stick to simple movement and shooting rules.

All in all we had a brilliant time - it was terrific fun. Pulling out lucky dice throws was a continued source of hilarity...I still put down my turn of fortunes to one lucky sniper shot (and a roll of 6)!

It was really surprising to us how Bolt Action's Order Dice turn based system could change the whole flow of the game in the blink of an eye. My brother suffered because of the importance of Pinning, while he had numerical superiority for a large part of the game he failed to pin my units effectively. So, I guess, while I had fewer units they were more mobile and able in the end to perform a very effective pincer movement while his units were hampered by being pinned.

 ...A very satisfying nights gaming. War gaming is a very cruel pastime!

A very big thank you to my brother, Ian, for hosting our game and putting so much effort into building such an excellent first game table. Cheers bro!