Sunday 28 June 2020

Battlefield Scenery - Part 2 & 3/4!

While making my test piece for 'modular scenery' (see previous post - 'Road to Nowhere') it struck me that if I decide to go down this road (pun intended) it might take me quite some time to make enough scenery to dress my dinning-room table 'battlefield'! 😂

[I still have to work out how to do modular rivers and hills!]

And so... To hold me over until I have proper scenery made I decided to replace all my old crappy - and very tatty now - paper printed terrain (basically just printed-out stretches of textured patterns) with something newer and neater - felt scenery!

My selection of felt pieces and some printed out templates to
act as guides for cutting out my felt scenery.
There are plenty of examples online of wargamers who have been using felt terrain to great effect...

Felt battlefield example by Ronald Bingham.
For me, one of the greatest advantages of felt scenery items and felt battle mats is their portability. I don't have a shed, basement, spare room or garage where I can set up a permanent wargaming table, so my go-to alternative is the part-time use of our dining-room table!

This means that any game I plan has to be something that can be put together and taken apart quickly and easily. I also need all the relevant parts of my battle table to be easily stored, preferably in a number of small or medium-sized boxes. This is why I decided to make my own modular scenery in the first place.

BUT meanwhile...

As I said, until I can make all the bits and pieces I want for a better-looking battle table, felt seems to be the way to go. It's very cheap, very flexible (in that you can quickly and easily cut-out custom shapes to make new designs for any situation), fold-able and light.

Here you see the paper templates I cut out laid on top of my felt pieces ready
for me to trace the outlines of my scenery onto the felt...

But What About the Look?
Felt is a very simple solution - given - but it can look quite nice even mixed into pre-built scenery. But I actually like the simplistic and clean look of an all-felt battlefield, my favourite battle mat is - after all - a simple piece of green baize cloth (the type used to cover pool and snooker tables).

Cutting out my felt scenery was very easy using paper templates as guides...


The main trick to getting nice neat felt pieces is to use sharp fabric scissors (and have a steady hand). I did a bit of Googling and apparently there is a very handy rotary felt cutter that would be ideal for this, but as it was £20 I settled for scissors! 😁


The end product looks surprisingly OK once a few pieces are laid out. I managed to find some nice mottled textured felt that lends itself nicely to fields. These came in a variety of colours so I could make different 'crops' or perhaps use them to indicate marshy land...


I'm still cutting away with my scissors at the moment so I don't have a full table of scenery objects yet, but I thought it would be interesting to post up what I have so far so you can get an idea about what a minimalist looking table setup might look like...


I just have to work out how to do some little hills and bridges and woodland, then I think I'll do a little test game.

Monday 22 June 2020

Road to Nowhere - Battlefield Scenery Pt. 2

Blimey - I completed something! Par-tae! 😂


OK, it's just a little test tile for a modular road set I'm thinking of making, but it's something. But before I get ahead of myself - here's how I completed the tile...

6... (See previous post for the first 5 steps)... I painted the black primed base with some muddy acrylics colours. I tried to make it quite thin in places so you can see faint patches of the black primer showing through...


I varied the mix of brown as I went along - a dark mahogany with a mid-chestnut - so that it also helped produce
 a patchy multi-tonal effect.

7... Next, I did some dry-brushing to pick out the raised textures to give the road some highlights. I went quite light to create some high-contrast so that - in theory - it would show through the flocking easier. It does look a little messy at this point...


Additionally, I drizzled in some dark wash into the deeper crevasses and around some of the 'rocks and stone', just so they 'popped' out a little more.

8... Onto the flocking. I haven't done a lot of this - just some vehicle bases - and so I was a little nervous about this stage as flocking is seen among modellers as being a bit of an art form! Also, I only have a very limited supply of mainly 'medium' summer green - The Terrain Tutor used a mix of three tones to create shade and highlights to his imitation grass...


After application (above photo) I tapped off the excess then waited for the PVA glue I used to stick the flock to the tile dry. Then I went over the grass with a dry paint brush and carefully brushed off any remaining flock AND to uncover any of the road detail that I wanted to show through - like the track texture pattern and clumps of 'rocks' and 'stones'.

9... Now, just to finish off my road I added some extra highlights (as the PVA I sprayed on the road to 'fix' the flocking in place has dulled down my previous highlighting). Also, because I only had one shade of grass flocking - medium summer green - I added some dry-brushed highlights to this as well using a ochre-beige (a light mustard shade) just to give the grass some tonal variation.

And bob's your aunty...


Conclusion...
Well, technically the test tile turned out 'OK'-ish. I'm both pleased that I have actually completed a bit of modelling AND that I think I did a decent job...BUT (there had to be one)...

As to it being the answer to my need for a modular road system for my 1/100 GF9T games, I am less happy. The main fly in the ointment is that the tile is warping - I managed to hide this fact in the photos I took BUT there is a noticeable bow in the middle... This annoys me as I notice it (it's an OCD thing)!

The whole point of reinforcing the foam board base of this tile with wooden lolly-sticks was to prevent warping...And this clearly hasn't worked. Also, this is project has been quite a lot of work so if I'm going to do it I want it to be damn near perfect with NO niggles.

So, what to do...?

Well, I think I have two options:

Option 1: Find a sturdier board on which to base my road WITHOUT it being too thick, heavy or expensive...

Option 2: Do some mental calculations about just how long a complete roadway set is going to take me to make and decide whether it would be more cost-effective just to buy a pre-made set from Fat Franks...

'Fat Frank's' 15mm Wargame Dirt Roads Set is £7.50 - taking into consideration
how much work it was to create my test tile, is paying £7.50 a better deal?

...To be Continued!

Thursday 18 June 2020

Road to Nowhere - Battlefield Scenery

As said in a previous post, I really wanted to create flat tile modular scenery - like rivers, woods and roads - for my 1/100 scale war-game table...But, typically, I couldn't find a good printable system that would allow me to make up some roads (for free).

Yes, there are quite a few commercial solutions - like the ones from Deep Cut Studio and Fat Franks - but I wanted to keep this 'on the cheap' (the wife is watching my hobby spending like a hawk)! 😣

Deep Cut Studio's Roadway Tile Set - almost exactly what I wanted, but €25!
So, I'm trying to come up with some ideas for home-made flat roads... Then I found this video...


Good old Terrain Tutor, he never lets you down. But I was a little unsure about how flat the roads were using TT's methods and was concerned as it does look like quite a lot of work. So, it seemed like the only way to find out was to knock up a quick test...

1... I cut the base out of 3mm foam board - though I'm not quite sure if that's exactly the same thing as the TT used - I think it is? (Is foam board the same thing as 'expanded PVC'?)


...And I reinforce the edges - to help prevent warping - with some lolly-sticks.

2... Next I cover the board with a thin layer of quick drying PollyFilla, I love using this plaster filler as it lends itself to making natural textures (I threw in a few bumps, just because)...


3... Using diluted PVA glue I stick lightly sprinkled fine sand and 'budgie grit' onto the textured base. It's a bit hard to know when to stop or how much grit to add, but it's a kinda 'less is more' situation...


4... Once the PVA is completely dry I try to create the texture of track lines - the groves in the dirt road made by wheels and tank-tracks - by spreading two thin lines of Pollyfilla the length of the road...


I then run a stick along the lines of filler to create - hopefully - the wheel track patterns. Were this 1/72 scale I would actually go to the length of rolling a spare wheel I have from one of my truck kits over the hardening filler to get a tyre pattern (as TT does in his video tutorial).

5... After yet another period of drying, I depart from TT's instructions and do what I normally do when making vehicle bases and that's to prime the textured base with black primer...


...End of Part 1!
I'll stop here before I move onto the painting and flocking of my road. But even at this incomplete stage I'm a little unhappy with the way this is going...

Overall, the road is thicker than I wanted - filler and texturing on top of 3mm foam board and lolly-stick has resulted in quite a tall roadway. Not huge, but when you remember that I originally had in mind a flat printed road mounted on a 1mm piece of card stock the 5mm tall structure I have now is a bit of a chunky monkey!

...That said, I am enjoying getting back into terrain making and it is fun! So let's see how it turns out.

Apologies to Anyone Who Has Been Reading This Blog!

Well, this is embarrassing! 😮

My blogs have always mainly been just for my own satisfaction, they are my digital diaries intended as records of how I did stuff or what I was thinking in case I needed to look back at a later date...

If other people enjoyed reading them, great but I doubted that I would get that much of an audience as there are loads of better modellers than me out there.

THEN...

Today something weird happened with BLOGGER - I know they have been tinkering with their system and updating it - and when I opened it to write a post THERE WERE LOADS OF VISITOR COMMENTS WAITING FOR ME TO READ, ANSWER AND PUBLISH!!! 😲

Apparently people have been reading my blog! I just wasn't aware until now.

Sure I saw the occasional comment - BUT there were over 100 waiting for me this afternoon, some dating back years!!!

I AM SO SORRY... If you made a comment I was NOT ignoring you, I just did not see any comments coming up in the Blogger system!

NOW I have to sit and read back through a mountain of comments, question and what-not and try and work through the backlog. As a quick fix I have just gone ahead and published ALL comments!

AGAIN - I CANNOT APOLOGISE ENOUGH...

I am gutted that all this time I though there were just a couple of people reading my blog (which to be fair I was happy enough with) but it turns out that I had a little following all this time. I just hope that the lack of any response on my part has not turned anyone off!

Oooops!

Saturday 13 June 2020

1/100 KV-1S Conversion Pt.3

Well, I finished the modelling part of the work on my little KV-1S tank turrets. Working with a 3D printed model - by Butler Printed Models UK - wasn't the traumatic experience I thought it might be. Yes, the material is a bit weird - "It's plastic, but not as we know it, Jim" - and you do have to use a slight different approach to working with it, but it's not completely alien.

Cleaning up was done more by shaving and paring than by filing, I found this gave a sharper finish to the material BUT it can be filed and sanded, I just preferred to use this technique instead...

Using Tamiya's Modelling Chisel.
"A little off the back, Sir?"
Filling was optional and if you are just wanting to get a war-gaming model quickly onto the table you could skip this cosmetic phase. But, I've plenty of time so sorted out a couple of minor things (they were't even what I would call 'issues')...


I didn't try to smooth out the 3D 'stepping' pattern on the model by filling it - though I had thought about it - instead I gave it a quick sand with very fine grit paper and a thin coat of liquid cement followed by another light sanding. You can't get rid of all the 3D print steps as some are in awkward places but this model is what it is and it was never going to be display level quality.

Finally, I added some little details - again you don't have to for war-gaming...


After gluing on these little bits and pieces I filed or sanded them down to shape and that's that really.


I'm quite pleased, especially when you consider that these turret models only cost me £3.30 each. They really helped me out as it's still hard to find a model of the KV-1S in this scale. I was also, impressed that BPM has the good sense to allow you to buy just the turrets themselves rather than the full tank model. It means that, in cases like the KV tank - where the chassis didn't change all that much throughout the tank's development - you can 'upgrade' your model through the series just by replacing the turret you require. Neat.

Next: Onto making the chassis.
-------------------------------------------------------

Link to this project series - 1/100 KV-1S Conversion

Wednesday 10 June 2020

Get Real? Tabletop Battlefield Design.

I'm at the stage with my GF9 TANKS! Kursk project where I'm thinking about the design of my battlefield. Now war-gaming is such a developed hobby/industry now that - to be honest - you can get most anything you want to make a really fantastic and realistic looking miniature battlefield without having to do any real work (aside from clicking on an online store's  'purchase' button).

However, for many war-gamers, part of the enjoyment of the hobby is the crafting of scenery and accessories and making a little historically accurate piece of Waterloo or Normandy or whatever your choice of battle is that you wish to recreate. So, much crafting ensues!

Just how far down the rabbit hole of 'authenticity' you want to go is up to the individual and, certainly, I have seen some amazing examples of realistic looking and beautifully landscaped battle tables...

An wonderful example of some beautifully constructed and realistic landscape!
A magnificently atmospheric recreation of Normandy for
some war gaming, the town painstakingly crafted.
Looking at some of the breathtakingly intricate terrain models that some war-game clubs have taken months to build I find myself brimmed full of admiration BUT at the same time asking myself  this question - how 'realistic' does a game table need to be?

The Galeforce 9 TANKS! Battlefield Philosophy...
One of the things I liked about GF9T was that you could jump straight in with everything you needed by buying one of their starter sets. In the box you got all the bits and pieces you needed to start playing the game immediately, including some tanks and some flat 'scenery' with which you could make your battlefield...

My very first game of GF9T - straight out the box, with the 'scenery' provided
and the tanks aren't even painted yet! LOL
My first few games of GF9T were played on the dinning-room table with just a length of green felt thrown over it and using the flat printed 'scenery' that came in the box. This was perfectly adequate for learning how to play the game AND easily portable if you wanted to set-up at a friend's house.

However, I eventually found that ALL flat scenery had some disadvantages. As you can see from the above picture of my very first game the set-up leaves something to be desired by way of atmosphere - you'd have to really stretch your imagination to feel immersed in the idea that this was supposed to be France in 1944! 😂

Additionally, as I have mentioned in previous posts, GF9T's base mechanic is tank combat using 'line of sight' - in other words, if you can see it you can shoot it. Therefore, the intensive to add some proper 3D scenery becomes desirable, if only to help resolve instances of 'you can't see me from there' disagreements (which are a little more problematic when using flat scenery).

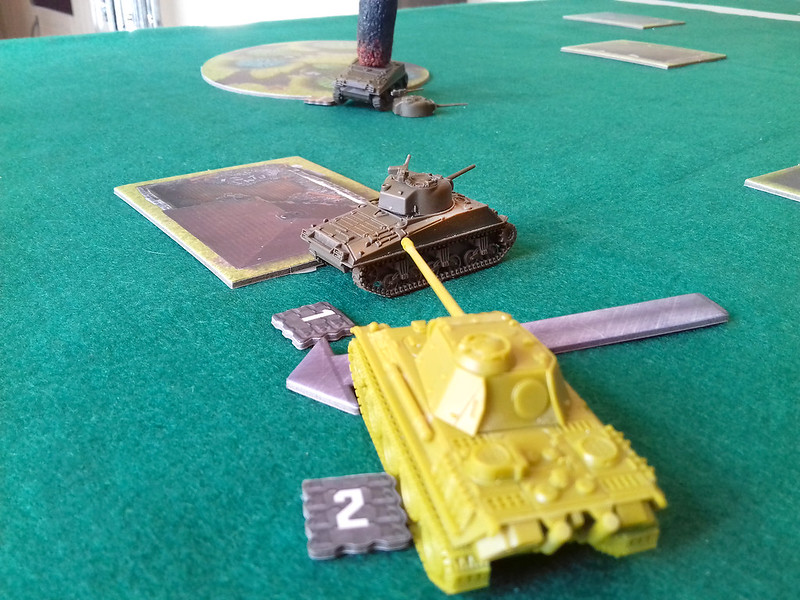
The most important view in GF9T...Line of sight to your enemy. But is that
flat 'cottage' tile blocking your view? Hhhhhmmmm...
So, 3D scenery was the way to go - for me at least - but then did I want to start building little miniature landscapes? The quick answer is 'no' and here's why...

Terrain building is an art in itself and once you start down that slippery slope you have to be very careful to balance your original intent - just to play a quick hour long game - against a project that could then blossom into an obsessive modelling project that could take up weeks of your time!!!

While full-blown wargamers who play games with rules that mean that their games could stretch into days long play (if not longer if they are playing a campaign) might want to have a immerse battlefield because they are spending so much time playing on it, I - on the other hand - just want a quick fix of blast 'em up fun and action.

I very soon began to add simple 3D objects to my games to make the task of
determining line of sight easier and to add some decoration. Adding objects also
adds an extra tactical element to the game as the intelligent use of 'cover'
becomes an essential aspect of the battle.
 I don't care so much if a certain house does't look like the one in the photo reference take in 1943 or whatever, I'm not - generally speaking - out to recreate an historic engagement in order to resolve some armchair general's academic 'what if'.Whether a building is of the exactly correct architecture or whether a particular model tree is exactly native to that particular environment is not so important... Me just want go 'boom boom'!!! 😈

Horse's for Courses...
So the driving force behind my need for scenery is simple, practical and is based on fun rather than on what is strictly factual. I'm make some effort to make my board look pretty - but I'm not going to spend enormous amounts of time planning and making a replica battlefield when I already have three or four (or more) ideas about the next battles I'd like to play banging about in my head.

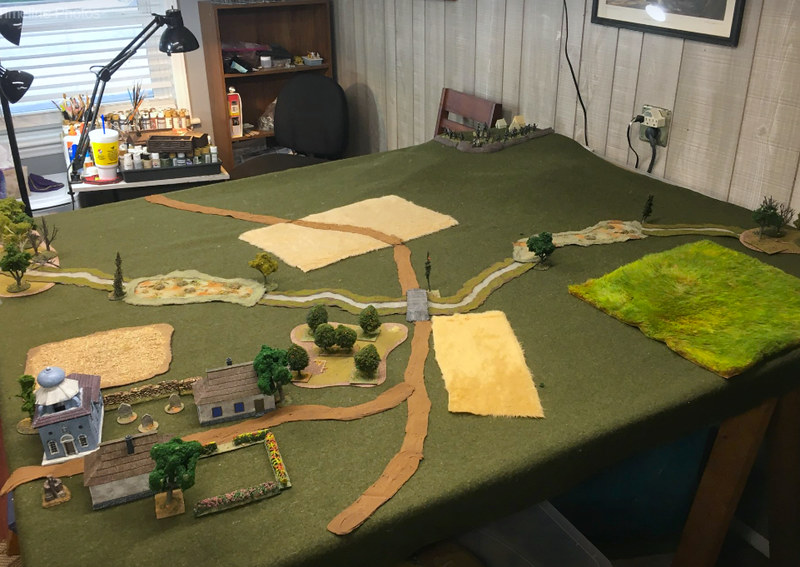
I'm looking at scenery that can be quickly laid down to create a general sense of landscape but which can just as quickly be dissembled and packed away.

This attitude formed the fundamental requirements for how complex my scenery needed to be. It needed to be quick and easy to construct - I might only use it a couple of times so no weird and niche items that will just end up as draw fodder - and they should be rather generic and so re-usable.

Your requirements may differ - it's a sort of sliding scale.

The basis of any tabletop battlefield is the battlefield itself - by this I mean the base on which you place any other scenic items. And for me, my ubiquitous green felt cloth (other colours are available) is the ideal multi-national, all-encompassing 'moderate climate' theatre of war. That said, I have of late been tempted by off-the-peg battle mats that have texture patterns printed on them...

Might one of these printed battle mats finally replace my trusty felt cloth as
my go to battlefield? This is a Deepcut Studio 'Grass Plains' mat.
These seem to have all the advantages of my old felt cloth (you can roll them up and stick them in a draw) while at the same time adding the illusion of real ground texture. The downside is perhaps the expense, although I have noticed that they are getting cheaper all the time. A 3x3' mat - the basic standard size for a GF9T skirmish - is 26 Euros plus shipping, a bit more than the £7 I paid for my felt cloth cut-off! 😊

KISS - Keep it Simple Stupid!
...And having established my preference for a simpler and more 'stylised' approach to making my battlefield everything else sort of just falls into place...

I have already desired that I really like the quick build paper-craft buildings I have been making, they fit right into my 'cheep and cheerful' ideal. Because of this pared-down 'psudo-realism' all my other scenic items sort of need to follow suit. They have to be...

- Cheap
- Easy and quick to make

- Preferably modular and usable in different ways
- Unfussy and simple (preferably not multipart things I have to assemble)
- Portable and kinda disposable
- East to store

Because of my new love affair with papercraft models I am keen to carry this on for different parts of my terrain, such as rivers, roads, etc. In this way I can have a sort of unified aesthetic, so I'm now on the hunt for different pieces I can collect to make a 'battlefield kit'...


I've already found a modular 'flat' printable river kit by Fat Dragon Games. Although this is a stylised 'fantasy RPG' scenery I'm fine with the aesthetic as GF9T is a sort of cartoon caricature of armoured warfare itself. Also, it fits in well with the tiled scenery items that came with the basic starter kit, all I have to do is print out the river tiles I need and mount them on card and place them on my battle mat. Simples! (Do people still say that?) 😆

And so the search for papercraft terrain begins!

Tuesday 9 June 2020

1/100 Kursk Project - Scenery Pt. 3

I finished off the 'Rusgorov' paper-craft hamlet models yesterday, and I have to admit that I am quite pleased with them. I was a bit unsure about them at first because they seem to lean towards the fantasy rather than historical end of the hobby, being a little on the stylised and colourful side.

But, in the end, I don't think they look too outlandish or unrealistic...


Building these paper and card models was very enjoyable and I look forward to making some more when the opportunity presents itself. (Predictably, I already have an idea for another project in the back of my mind.) 😊

The purpose of these little buildings are to provide some scenery and tactical cover for my planned Battle of Kursk war-game. GF9 TANKS! is intrinsically a 'line of sight' game and therefore having scenery and objects that can obstruct a direct view between a tank and it's target can help to make the game more interesting and challenging. Well, at least this is what I have come to believe from the games I have played so far and this is why I wanted to include a little Russian hamlet as a key objective in my Kursk themed game.


Well, what else will I include on my game table? I can't just have a village in the middle of nowhere.

I've had a good look at a lot of photographs of the landscape on which the Battle of Kursk took place in 1943 and what strikes you most of all is how well suited the countryside was to 'The Biggest Tank Battle in History'! I suppose that's probably putting the cart before the horse as it was as likely as it was the flat and open nature of the region that made it a obvious choice for a set-piece tank battle.


Obviously, I don't think I'll add rolling hills, dense forests or lakes to my battlefield, rather I'll be constructing a pretty flat board with large grass plains interspersed with the occasional hovel and field. Therefore, any obstructions to line of sight will have to be artificial.

Natural landscape 'To do' list:
- How to make 1/100 scale fields.
- How to make some small dirt roads.

What these obstructions ill be will be the next challenge.


Sunday 7 June 2020

Trains Are Big... VERY BIG!

OK, I had this idea that I would like to add a locomotive to my next GF9 TANKS! game as a bit of battlefield bling. A sort of set-piece that would also act as cover for the moment of tanks, I thought this would be quite novel and look cool.

Long story short - I eventually managed to source a 1/100 scale locomotive model (ready built display ornament) and it arrived the other day. It looked great BUT it also looked really BIG!


The eBay listing definitely said '1/100' scale but when I saw the model it looked like enormous and I thought I might of bought the wrong scale (perhaps HO). 😟

Before getting too upset (the model was only £2.50 so I hadn't wasted too much) I thought I would check online to see if I could find out what size actual locomotives were compared to a WW2 tank. It took a bit of Googling but eventually I found a photo that seemed to answer my question...


Wow! Locomotives are BIG! I never realised...

Now, just to be sure I decided to take a comparative photo. I have a M4 Sherman in my 1/100 collection so set them up side by side like they are in the above picture. Let's see if this engine is the right scale as my tanks...


What do you think?

It looks like it's right - I think - and maybe it's just that I'm not used to seeing steam locomotives that has me surprised at their sheer size? OR, maybe I had in mind a smaller tank engine (like Thomas the Tank Engine, LOL) which might not have dwarfed my Sherman quite as much?

Incidentally, the train is exactly the sort I want for a WW2 diorama. It's a German P8 class which was active throughout the Second World War, so that was a piece of luck.

It will be a big piece on the game table (which will be either 3 foot x 3 foot or 4x4), but will definitely be eye catching! I will, however, scratch build my own rolling stock - a few flat-bed transport trucks with some cargo aboard. And to justify why a train would be in the middle of battlefield I will model the train as being derailed, which a section of blown up track.

Lots still to think about.

Thursday 4 June 2020

1/100 KV-1S Conversion Pt.2

I'm very slowly getting back into modelling, but I'm finding it tricky. I am suffering from a bit of anxiety about getting down to it because - I think - after such a long break any modelling I do now may not be up to the standard that I managed to get to three years ago. It's frustrating and is causing me to procrastinate about putting craft knife or file to plastic.

However, today (finally) I took some baby steps towards actually doing something!

Having spent some time trimming the excess flash and support filaments from the turrets I got them in a state where I could look at them properly and decide what they needed doing to them ...


As you can see from the accompanying picture the 3D printed turrets are a little rough with the stepping effect of the 3D printing pretty obvious. I will have to do something about that, but - first of all - I really wanted to tackle the overly thin and fragile main guns.


I managed to find a piece of copper tubing that was approximately the right size for use as a replacement barrel. I checked these dimensions against one of the T-34/76 models I had already done as both the T-34 and the KV-1S were equipped with the same 76.2mm ZIS-5 gun.

I had to do a little bit of sanding and filing of the soft copper to get it close to the right diameter and then I trimmed the 3D printed gun off the turret. The new barrel needed socket to fit into so I drilled a hole in the mantlet to accommodate it...

Excuse the filthy hands but sanding and filing copper is a messy business!
I got a bit of a surprise when I drilled into the turret as I discovered that the 3D printing process produced a hollow part. I didn't know that - This is my first 3D model!

Anyway, I super glued the tube into place and checked it off against my T-34 model. It is still a tiny bit thicker but I reckon at 1/100 and it being a tabletop gaming piece nobody will complain too much!


I'm much happier with a metal barrel as - being game pieces - these models will be handled quite a lot and they will have to be sturdy enough to put up with use.

Next: Now onto smoothing out the turret and cleaning up the fine detail...
-----------------------------------------------------------

Link to this project series - 1/100 KV-1S Conversion

Monday 1 June 2020

1/100 Kursk Project - Scenery Pt. 2

While still searching for all my tools and materials among the plethora of random junk in my attic I have managed to locate enough of my basic modelling tool set to have a stab at building something. Honestly, nothing is quite where I expected it should be which is very, very frustrating.

Anyway, I found enough bits and pieces to try putting together one of the little houses from the 'Rusgorod: Russian Hovels' paper-craft set I downloaded. I just wanted to see what the little models looked like built and to check that my size reduction from the set's original 28mm scale had worked.


Now, I don't have a great printer, it's just a cheap home-office HP and the resolution isn't fantastic (even when set to 'Best Quality'), but even so I was quite pleased with print-out I got and got down to cutting it out...


This is one 'Russian Hovel No. 1' - out of a set of 6 buildings - and as you can see is a log cabin with a (very) high 'A' frame roof (I know nothing about architecture). I'm not sure how authentic this is, but it looks quite cute and kinda similar to some of the log buildings I've seen in photos of the Russian countryside taken during WW2... So let's go with it!

Well, as you can see, it ain't the most complicated model to put together, the ones I did for my 1/100 Normandy game were a lot more fiddly. But, LOL, I still managed to get myself covered in Pritt Stick! 😂

I put together the inner shell or framework using 3mm Kappa board (as we used to call it in art school) - that's foam board if you prefer - and pasted the print-out onto it. The roof, however, was heavy card stock instead as I didn't want it too think...


For once, all my measurements seemed to be spot on and everything came together without any gaps at the seams.  This may have been to do with my cutting the board fractionally bigger, sticking the print onto it and then trimming off any excess? (For my Normandy card buildings I stuck all the printout onto the heavy card stock AND THEN cut everything out. I think my new way is better.)


Finally, with the walls glued together to form an open box, I cut out a rectangle of foam board for the floor and ground floor roof and then stuck them inside the box. This gave the building extra rigidity.

With the roof glued in place to complete the model I could't resist taking a photo of the cabin next to one of my 1/110 T-34s (Early Model)...


I think the scale looks just right - although I don't have any 15mm figures to check for sure - and next to the T-34 the model really does give off that rural Russian vibe.

This - as you can see - was a very quick build and there are a few things I would like to do to improve these models when I start banging out the rest of the set. For example, the exposed white card under the roof doesn't look good, I'll need to colour that (maybe a dark brown. And, also, I'll put on a darker roof cap along the length of the point, just to hide the little cut I made so I could fold the roof.

But, aside from these little niggles I am quite pleased with the model. It's what I was after - something cheap and easy and quick to put together. And I do prefer using foam board in order to create an inner supporting box as I noticed that after a while my 'card only' Normandy houses did warp a bit after being in storage in a cold, damp attic. These new models should last a bit longer.

Now, onto the other five buildings!

-------------------------------------------------------------

'Rusgorod: Russian Hovels' are by Finger and Toe Models and are available from Wargamevault.com ($5 download).


PS... I'm almost tempted to but their onion domed church (above) as well and they also have other houses in the series that are worth a look.