Showing posts with label review. Show all posts

Thursday, 18 January 2018

1/100 Plastic T-34/76 Kits - Part 1

Curiosity got the better of me and instead of just buying four 1/100 T-34s of the same make for my 'Project Kursk' I decided to buy different makes of model so I could compare them (I did something similar when I made some 1/72 wargame T-34 models). The models I bought were by Zvezda, Plastic Soldier Company (PSC) and Battlefront.

Note: As my project is a Battle of Kursk (July/August 1943) themed game, the Mod. 43 (Model 1943) T-34/76 (76mm gunned version) tank would make the most appropriate choice, so my purchases were based on this fact...
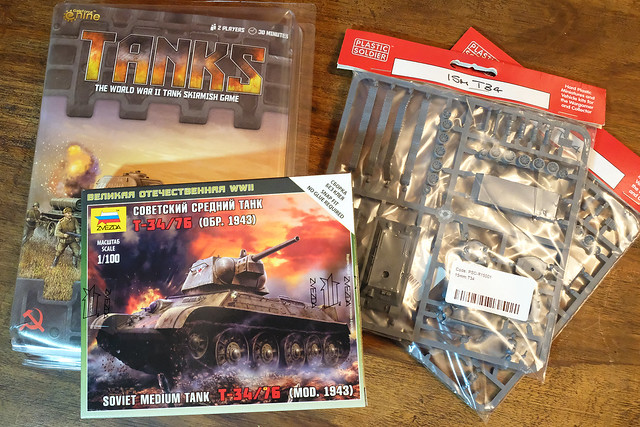


When reading about these various kits I noticed each seemed to have their own pros and cons and from my point of view, not one of them seemed to be the 'killer' T-34 kit that would make me plump for just that one manufacturer. So here's my overview of the three makes I decided to try out...

Sprue Review
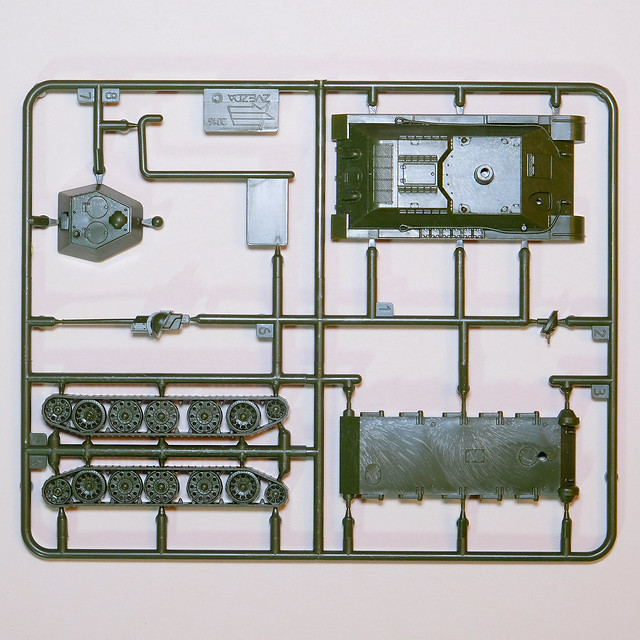
I noticed immediately that each manufacturer had it's own ideas about what was necessary to make an acceptable wargame tank model. Zvezda takes a minimalist approach based on a strict budget, while PSC and Battlefront take the view that 'extras' and optional parts are what the gamer is after.

Both Zvezda (£3.15) and Battlefront (£5.95) supply a single tank in their packs, while PSC is more specifically geared towards the troop level game and their models usually come in a multipack (5 tanks for £18.64). However, a single PSC T-34 model is available if you go onto their website and look for their 'reinforcement' pack, which is an individual sprue of their T-34 tank set for just £5.99.

And here is what you get...

ZVEZDA
PLASTIC SOLDIER COMPANY
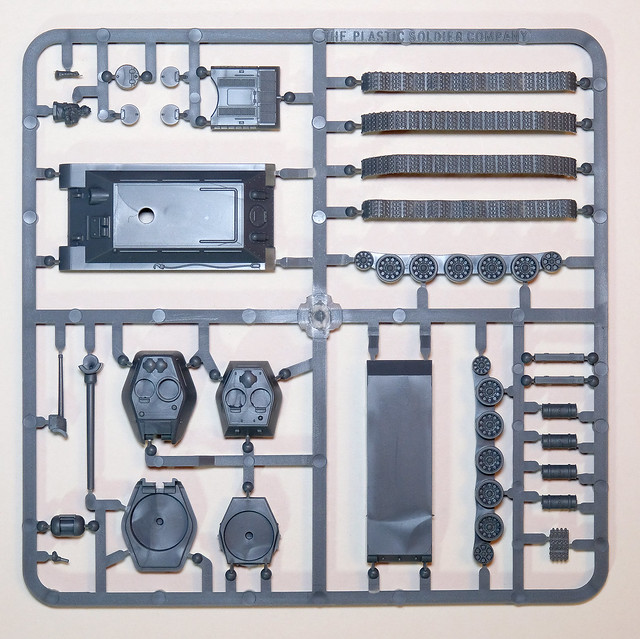
BATTLEFRONT
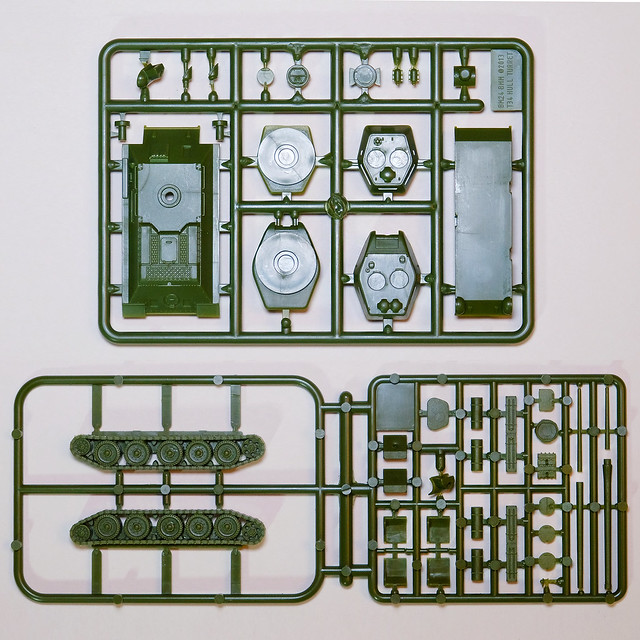
As you can see the amount of parts tends to escalate relative to the cost, even so Battlefront's two sprue set seems to offer very good value for money. While Zvezda does win the cost battle hands down you do have to bear in mind that with both PSC and Battlefront you are really getting two tanks for the price of one as they included the extra parts to make a T-34/85 variant turret which you can swap out. A nice option.

If, like me, all you want is the T-34 76mm gunned version the Zvezda budget kit makes sense. But having the ability to 'upgrade' your model by swapping turrets means that with PSC and Battlefront you can play games which are set from 1943 to the end of WW2 in Europe. The Zvezda tank is generally more suited to games set in 1943 to early 1944, the Soviets having accelerated the upgrade process from T-34s to T-34/85s in earnest in 1944 (the final version of the 76mm gunned T-34 was designated the 'Mod 44' - or Model 1944' - and was called the T-34/76E by the Germans).

A Model 1943 76mm gunned T-34 on display in Gdansk, Poland
Source: Wikipedia 
And so, on to the quality and technical authenticity of the kits. Let's start with those turrets...

T-34 Turret Components
All three turrets for the T-34/76 models are the late production Hexagonal Turret of the 'hard edge' (flat panel) versions equipped with the 76.2mm F-34 gun. This was indicative of the penultimate 76mm gunned T-34 version which was built from May 1942 to 1944, but is generally known as the Model 1943 (or the 'T-34/76D' by the Germans).

For complete list of the evolution of the 76mm gunned T-34 see: T-34 variants on Wikipedia.

Aside from the 'hexagonal' shape, this turret was an improvement over the original (model 1940-1942) T-34 turret principally because of it's two crew hatches in the roof. Amusingly, when these hatches were open, their side-by-side arrangement prompted the Germans to give the Model 1943 the nickname 'Micky Mouse'!

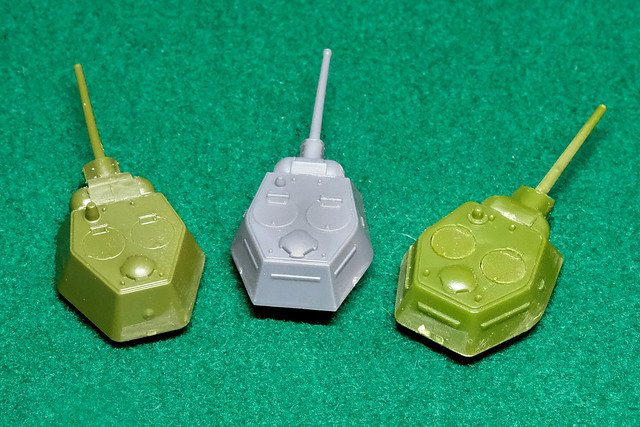
Top to bottom: Zvezda, PSC and Battlefront.
The Zvezda hatches are moulded into the turret component, but both the PSC and the Battlefront turrets have separate hatch components. Because you have to glue these hatches in they are slightly more raised than the Zvezda's, which I think looks a little better (generally the Zvezda's surface detail, while crisp and accurate, can be a little too subtle at times, at 1/100 scale).

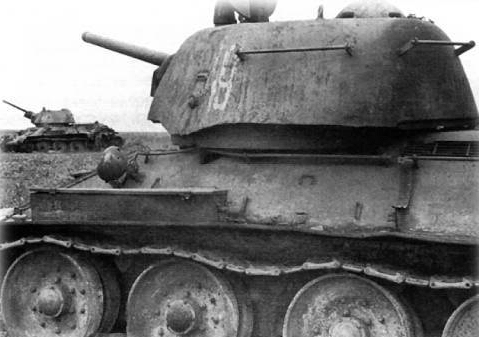
Picture of a T-34/76 'Mod. 42' (known to the Germans as the T-34/76C) which
clearly shows the distinctive 'hand rails' which attached to the hull and the turret
so that infantry had something to hold onto when riding atop the tank. This '1942'
version of the T-34 featured a new shaped turret which were either of a welded
or - as in this case - slightly rounder 'stamp cast' made by the Ural or 'UTZM'
factory. Also note the 'Early Dish Wheels'.
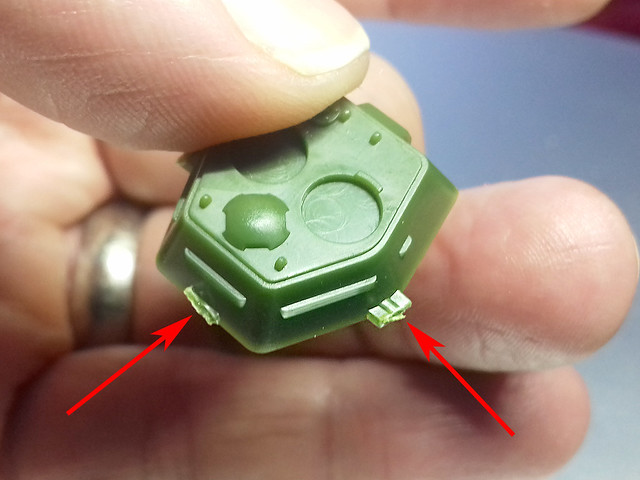
One prominent point of detail that's a bit 'iffy' is the implementation of the turret's hand-rails, which were arranged around the turret's sides. Zvezda decided not to include these at all at this scale, while PSC and Battlefront simplified the rails to mere plastic 'bumps'. I can understand why they chose this very superficial means of embellishment at 1/100 scale, but I personally prefer Zvezda's approach of omitting these details altogether...

Left to right: Zvezda, PSC and Battlefront.
Finally, there is a bit of a problem with dimensions. The PSC and Battlefront turrets are a little too wide at the back, while the Zvezda's rear panel is the correct width.

T-34 Hull Components
Further dimensional problems are obvious in the difference in sizes between the three makes of hull. While the Zvezda and the Battlefront are similar in overall length, the PSC hull is shorter by a couple of millimetres...

Left to right: Battlefront, Zvezda and PSC. Note how shorter in length the
PSC T-34 model is.
Other differences - placement and size of detail - are relatively minor, though they do vary significantly stylistically. This is most easily illustrated by the differences in how the various tank's engine decks have been modelled.

As is becoming clear, the Zvezda model is the most historically accurate, while PSC and Battlefront have employed some 'artistic licence' in the way they have simplified certain detail...
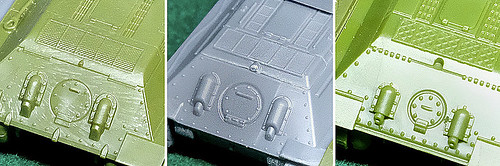
Left to right: Zvezda, PSC and Battlefront.
The Zvezda detail is historically accurate, dimensionally correct and is also stylistically faithful to the original T-34 design. This is most evident in the engine's mesh grills on the rear hull, Zvezda's is a delicate criss-cross design, with PSC has gone for a very simple slatted design and Battlefront has a rather horrible over-scaled 'diamond' hatch. (I should also note that Zvezda was the only manufacturer to get the slightly rounded rear slope of the engine deck looking right, the other two went for a more angular look.)

Short to long, PSC, Zvezda and the Battlefront (though the difference
between the Zvezda and the BF isn't quite as noticeable).
However, I should mention that - in my initial builds of the three models - I have omitted a lot of the extra optional extras from the PSC and Battlefront kits that come already moulded onto the Zvezda model. Things like storage boxes and external fuel tanks (which, incidentally, the Zvezda kit does not come with at all) are separate components in the PSC and BF kits. I left them off so all three tanks looked externally similar, for comparison purposes.

The Battlefront kit, in particular, comes with a very good amount of 'extras', which allow you to vary the look of tank models - if you make a troop - or make slightly different versions of the basic tank. (Interestingly, it also looks like they include some extra parts not intended for the T-34 at all, but rather T-34 variants, such as the SU-100 tank destroyer. Presumably they utilise a common sprue?)

T-34 Tracks and Wheel Components
The Zvezda kit come swith a beautiful set of mixed ‘Half Spider Wheels’ and full steel perforated wheels. On the real tank, the Half Spider wheels were added at the front and rear to negate the vibration and wear and tear caused by the full steel wheels. These wheels are characteristic of late 1943 T-34s *only* (T-34/85s were not equipped with solid steel wheels).
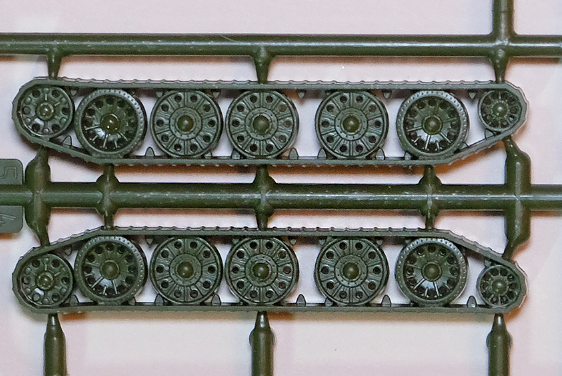

Though I should mention - on a historical note - that 'Early Dished Wheels' (solid steel with rubber 'tyres') were also used on T-34 throughout their deployment, it just seems to have depended what was available in whichever factory that the T-34 was manufactured.
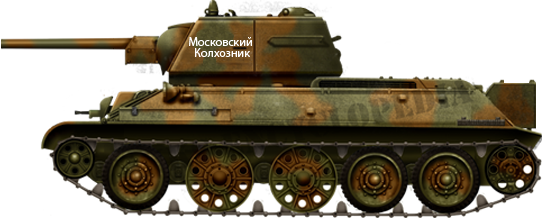

T-34/76 model 1942 at Kharkov. Note the mixture of all steel perforated wheels
and solid 'dish' style wheels with rubber tyres. The all steel wheels were originally
brought in when material shortages (particularly rubber) were at their height. As
the war progressed rubber became more widely available so all steel wheels were
withdrawn. By the advent of the T-34/85 all steel wheels were no longer used.
Picture source: Tank-Encyclopaedia.com
The PSC T-34 kit is equipped with the spoked type ‘Full Spider Wheels’. These came into use in late 1943 and so are suitable for late variant WW2 T-34s and very late war and post-war T-34/85s. The moulding is characteristically ‘chunky’ (for PSC) and the perforations in the wheels are not ‘drilled out’.


And Finally, the Battlefront kit comes with a full set of ‘Early Dished Wheels’, which were solid steel wheels but with perforated rubber ‘tyres’. Once again, these are common for both T-34s and T-34/85s from late 1943.
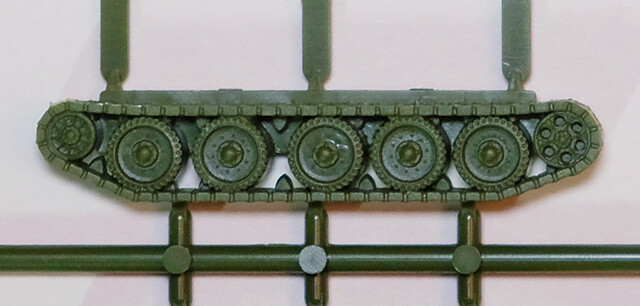

Summary: The PSC wheels, while adequate, are the least satisfying of the three makes (being a bit 'chunky'). The Battlefront wheels are nice and even show the correct perforations in the ‘tyres’. But the Zvezda wheels are magnificent (for the scale) and their only drawback is that they are specific to the T-34 *only*, while PSC and Battlefront have chosen wheel designs that are suitable for both the T-34 and the T-34/85. (Though Zvezda makes a separate T-34/85 kit with the appropriate wheels.)

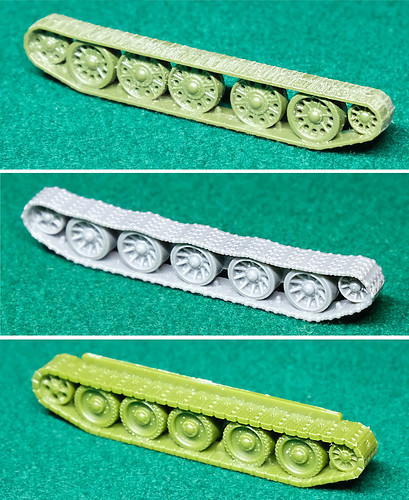
1/100 T-34 models - Tracks
Without getting too technical, one of the most characteristic aspects of the T-34 series was it’s wide ‘waffle pattern’ tracks. Unfortunately, as is fairly common in 1/100 plastic wargaming kits this feature  simplified to various degrees...
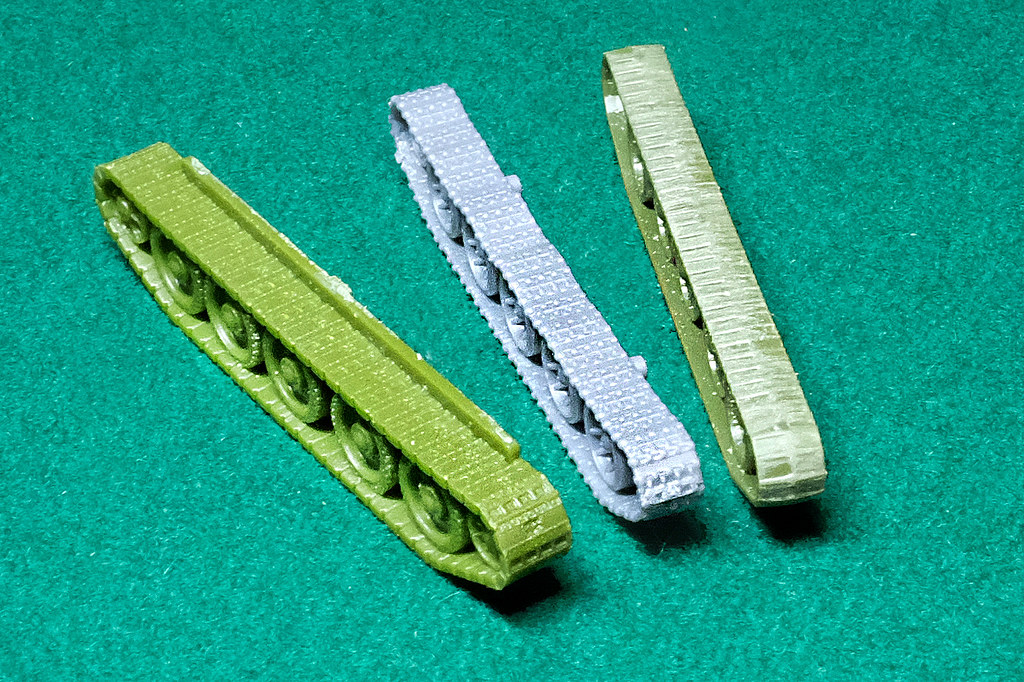
The Zvezda tracks (right) look even worse than they actually are because I
had to sand down an obvious moulding seam that runs down the middle!
Of all the makes, PSC does the most commendable job of trying to recreate the texture of the T-34's track links. They do this by providing you with three separate parts to make one track set - a 'wheels' component, an upper track part and a lower track part. Once glued together, this multi-part unit makes a very nice representation of the T-34's excellent tracks...

Top to bottom: Zvezda, PSC and Battlefront.
Both Battlefront and Zvezda got for a 'one piece' track component, with integrated tracks and wheels. The way they have gone about this has its pros and cons, for while both have nicely done wheels (the Zvezda has, again, terrific wheels) both tracks have differing problems.

The Battlefront has had a stab at creating a track link pattern (inside and outside of the track), but it's a lot less detailed as PSC's. However, perhaps in order to tick all these boxes, the tracks are excessively and unattractively thick (which the T-34's tracks were not).
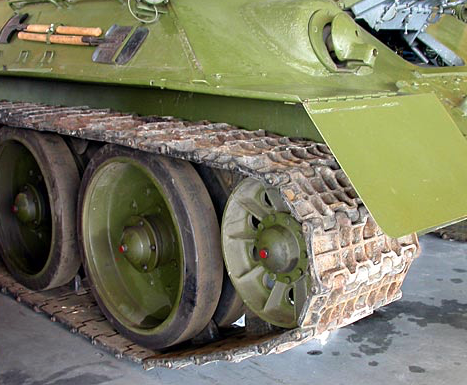
A nice shot of the real T-34's 'waffle' tracks. Source: Bill Maloney
Zvezda, on the other hand, has the thickness of the track correct but then have abandoned any attempt at trying to model the track pattern at all! Instead they have settled for a very unsatisfactory slatted pattern on just the outside of their track, perhaps in the hope that at 1/100 and on a table nobody would notice. Well, I noticed!

Summary: I'd love to have seen Zvezda compliment it's lovely wheels with lovely tracks, but it wasn't to be. Zvezda's 1/100 tanks have a poor track record (!) in providing an acceptable link pattern on their models. Battlefront has made a spirited attempt at good tracks in a one-piece format, but don't really pull it off. PSC, I have to admit, have taken the best approach to a satisfactory final product by making a three-part track system. OK, their wheels aren't the best, but out of the two - good wheels or good tracks - I prefer to have the acceptable tracks.

Overall Summary and Conclusions
Well, every manufacturers' set of components seems to have pros and cons, and my overall conclusion is that - perhaps - the 'perfect' 1/100 T-34/76 model doesn't quite exist. However, having said that - bearing in mind that these models are for gaming and are not display quality scale models - being too critical over details that will not effect the effectiveness of these models purpose as game markers would be a little unfair.
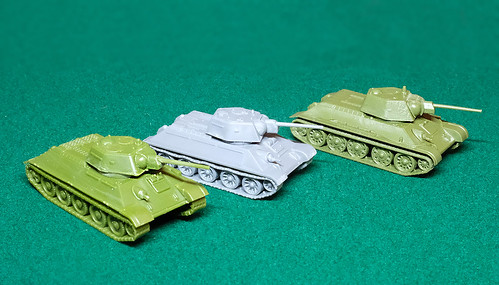

Still, even though much of the detail may not be fully appreciable at 1/100 scale at tabletop distance it's satisfying to have a model that's an accurate representation of a historically important tank. And so, which of the three models did justice to the legendary T-34?

It's actually easier to say which of the three that is least satisfying, and that is the Battlefront T-34. After building a couple of their rather nice M4 Sherman models I was a bit disappointed that their T-34s weren't of a similar standard. The main problem, from my point of view, is the level of simplification and how ham-fisted they have stylised some of the signature features of the T-34, like the engine deck and the tracks.
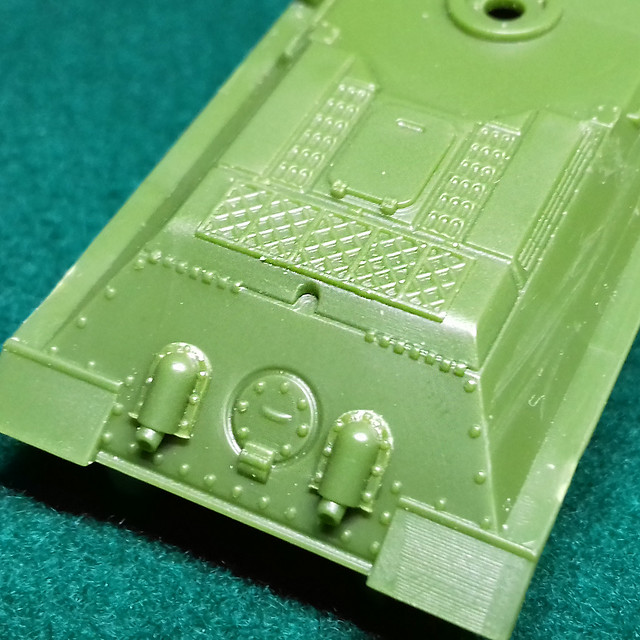
Battlefront's detailing can be a little clumsy looking on occasion.
While, PSC's T-34 - like the Battlefront one - seems a little 'chunky' (and occasionally over-scaled) in it's depiction of certain features, the moulding does seem a little cleaner and crisper. In fact, this reminds me of one of my main niggles with the Battlefront model - the sprue attachment points are far too thick and can cause problems when trying to separate the part from the sprue cleanly!

Battlefront sprue attachment points - lots to trim off!
It's not a huge deal, but is a bit annoying as not matter how careful you try to be when trimming the tabs off they sometime leave a bit of a mark on the model surfaces. I only mention it as both Zvezda and PSC managed to use thinner and more discrete sprue attachment points that did not impact the model themselves.

In the end, just a little too untidy for me. Even all Battlefront's extras couldn't
win me over!
So, third place to Battlefront, but out of Zvezda and PSC is the best 1/100 plastic T-34 kit?

Well, I'd love to say Zvezda. It has so much going for it, undoubtedly it is the most technically authentic looking. I love it...But those tracks! If I could have the Zvezda turret and hull, but the PSC's tracks incorporating Zvezda's Half Spider Wheels I really think you would have a fantastic 1/100 Mod. 43 T-34/76. But, that's not the case. 😭

What I think people really want to know is if I could only buy just one make, which one would it be?

I would have to plump for the PSC T-34 set as the best all-rounder, with the caveat that if cost is your primary concern then the Zvezda is the best alternative choice.
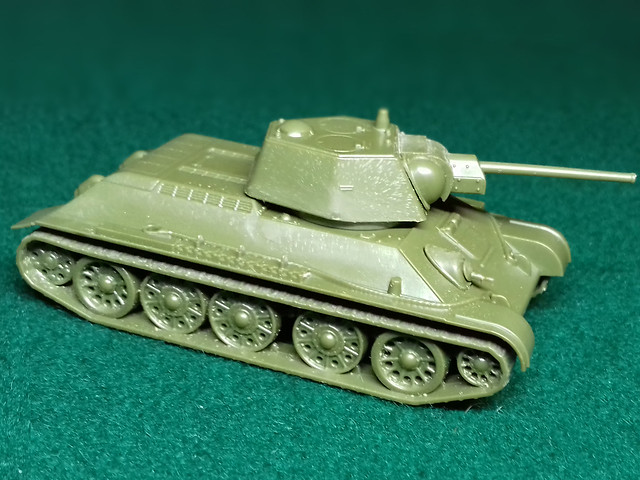
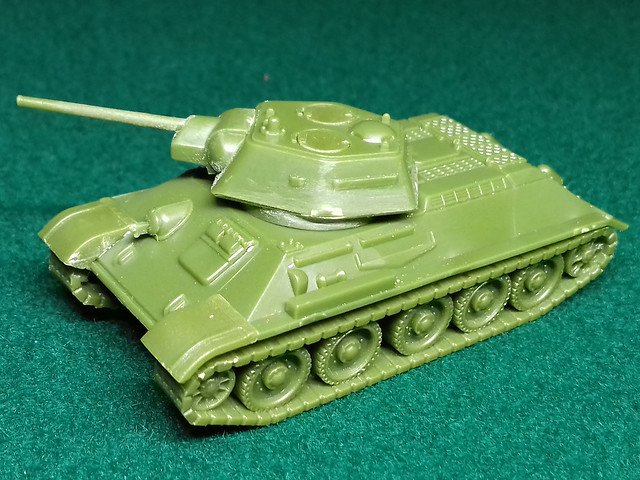
Isn't she lovely! (Just don't look at the tracks, this is her best angle.)
The PSC is a chunky monkey - though ironically the smallest of the models of the group - but the detail is crisp and over-scaled with a purpose. Given the small scale the slightly exaggerated detail is great for war-game painters, allowing salient features to be picked out even at tabletop distance.

One cannot ignore the extras one gets with the PSC sprue, it may not be as much as Battlefront gives you but it is a nice little selection of parts and even comes with a commander figure. (One thing I do like about Battlefront's options is that it does come with the Mod. 44 raised commander's cupola allowing you to make the final version of the T-34/76.)

Battlefront and PSC both give you optional parts to make open turret hatches and both BF & PSC give you the option to build a T-34/85 turret with which you can alternatively equip your tank. Very handy. (Though, here is one area PSC falls down - with it's famously horrendous 85mm T-34/85 gun which is grossly over-sized, looking much more like a 120mm gun.)

The bottom line is that as a war gamer you will probably want to buy several models of the T-34 to play with - to make up a tank troop - and with PSC offering a five tank box set (with the cost working out at just £3.75 a tank) the extra variety made available with the optional parts is an attractive feature. Whereas the simple - although beautiful - Zvezda's lack of options means that you would have to make your own extras to provide a bit of variety.
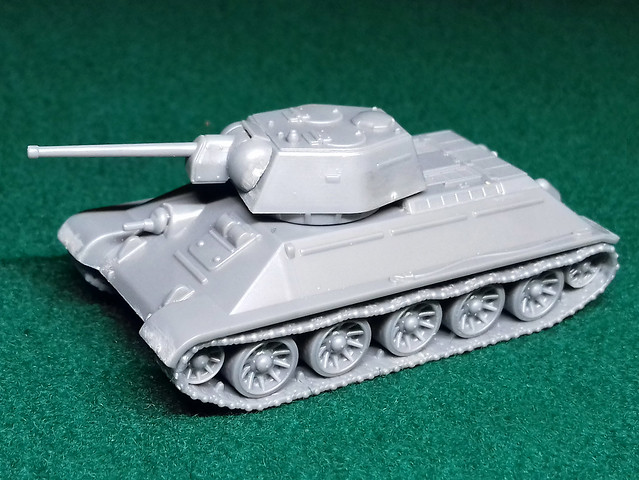
Not outstanding, but a competent all-rounder. Just like the real T-34 really!
...It's tempting to just ignore Zvezda's pathetic tracks for the price. But, PSC's overall package of tidy detailing and ability to add some extras should you want them ultimately wins the day (in 1/100 scale at least).

In Part 2: I see what these little beasts look like painted.

Wednesday, 14 January 2015

Beats of War v-blog review of PSC Churchill tank

I'm posting this up not because I'm particularly a Chruchill fan, or because I think it's a terrific review, but because it's an interesting little move which highlights the different set of requirements and preferences of war game modellers as opposed to those of display modellers.


Despite the Churchill being a technological dinosaur I can see that there is a certain Steampunk-ish attractiveness to the design that would make you delight in fielding these in a game. The real tank, however, was probably less welcomed (Churchill himself despised his armoured name-sake) but it did a certain amount of sterling service, particularly in one of it's 'Funnies' specialist configerations.

Anyhoo, nice to see a model review like this on a video blog like Beasts of War as it opens up an important historical era to young gamers, which is important.

Endnote: I have made several comments about PSC kits when I have made them about them being slightly over-scaled compared to other '1/72' kits on the market. So, it was interesting to hear the opening statements by the reviewer where he mentioned that the scale was '1/72 or possibly 1/73' - even war gamers notice that PSC have 'gone their own way' with scaling! Although I think he has it confused as I think PSC kits are more like '1/70'.

Monday, 21 July 2014

Pegasus 1/72 German Army Truck - Part 1

Preface: Last week I started what I hoped would be a very quick 'bodge' conversion of a Pegasus 'German Army Truck' into a Finnish c. 1940s Volvo 'Roundnose'. Well this project didn't get far before it ran into a problem - in short, the Pegasus truck seemed - in my opinion - a little over-scaled for 1/72 and appeared larger in comparison to the other trucks I have in my Finnish collection.

And so, I have ditched this Volvo conversion until I find another suitable donor vehicle and have decided to build the Pegasus kit 'as is' to make a German Army truck for my Bolt Action collection instead.


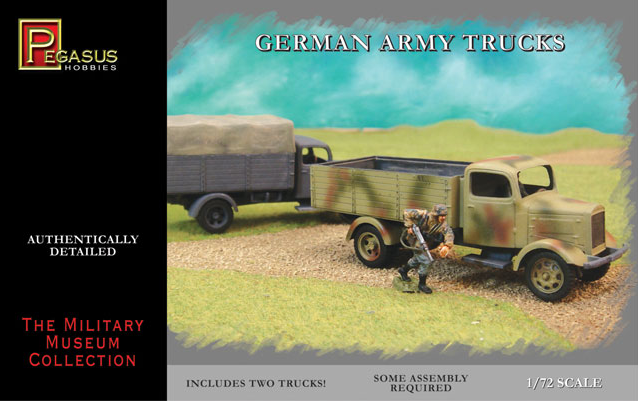
The Pegasus German Army Truck - background
As mentioned in my Volvo 'Roundnose' preamble the Pegasus German Army Truck is not the ubiquitous Opel Blitz that many models and war-gamers seem to think it is. It is, in fact, a simplified model of the Mercedes L3000 4x2, a 3 ton cargo transport produced by the Germans between 1938 and 1942.

Top is the Mercedes L3000 compared to the Opel Blitz at the bottom.

This is quite crafty on the part of Pegasus as the 1/72 market is already well-endowed with good quality Opel Blitz kits so producing a 'easy build' kit of the Mercedes means their product does not compete with the multitude of Blitz kits. Which is good for us modellers.

Incidentally, to make this model a true 'Mercedes' all you would have to do is make a tiny Merc badge for the front radiator (I believe Pegasus doesn't call it a Mercedes for licensing reasons).

What's in the box?
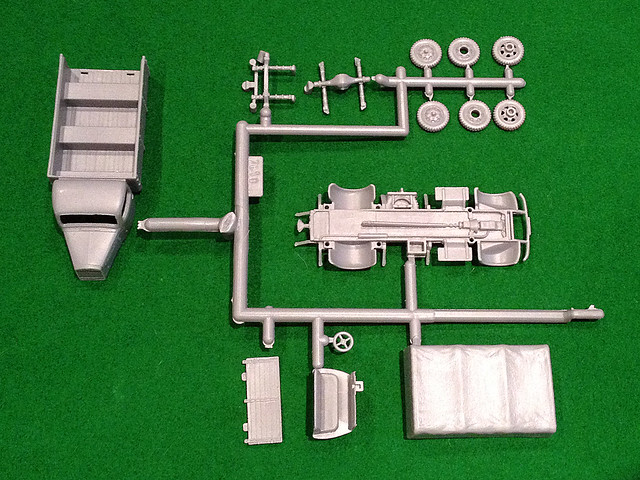
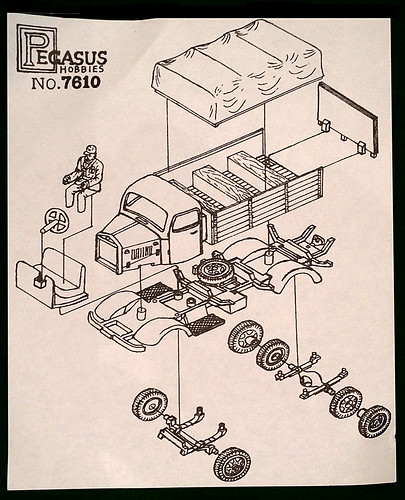
There are two sets of sprues - allowing you to build two vehicles - each of which has just 15 components. Really, you can bang together this simple model in minutes.

One thing that's missing there is the driver figure. He seems to have gone
AWOL! There are two identical sprues like this in the box.

However, don't be fooled into thinking that this means a huge sacrifice when it come to detail. Sure, a lot of the smaller parts of the real truck have been excluded - things like headlamps, horns, tools, etc - but what detail there is on the parts included is very nice and crisp.

I'd say that if you wanted to you could build this kit into a very acceptable display quality model by adding the small extra items which aren't included. A nice proposition as the Mercedes truck is only available in kit form in 1/72 from some of the more expensive and niche resin/short-run manufacturers.

Construction
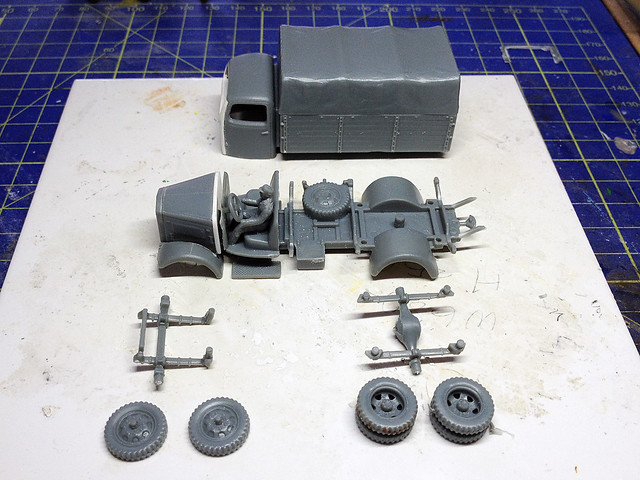
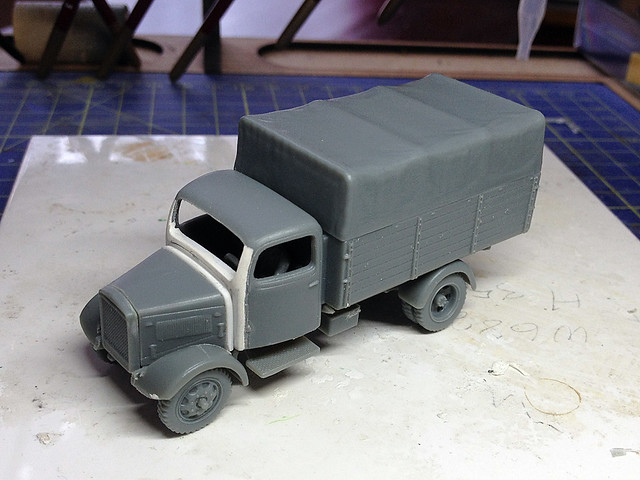
Well, obviously, the first of the two trucks I built from the box is actually a 're-build' as I had already started modifying it to make the Volvo conversion I had planned! (So, annoyingly, I had to stick back together parts I had already cut apart...Luckily I hadn't thrown any of these bits away!)

The reconstructed truck (had to use some plasticard to put the cab and bonnet
back together again) nearly ready for assembly again.
Everything goes back together again very easily and it's a very crisp model.
Obviously I will have to use some putty to smooth out my repair job.

But the second I built exactly as the instructions recommended (at least to begin with). As with their other 'easy build' WW2 truck - the equally unsparingly named 'US Army Truck' - there are no windscreens included in the kit (nor any decals for that matter). But I am getting used to cutting out and fitting transparent plastic windshields now (the trick is to cut out a paper template so you can check the fit first).

Honestly, I can't say much about the construction as there isn't much to do. Everything goes together well and I didn't encounter any problems - and hardly any flash or mould lines at all! So this model is ready to paint in minutes if you want.

Painting
The box art gives a very unspecific colour scheme, but there again there is just so much colour reference material available on the 'web' that you shouldn't be short of inspiration. Admittedly the Mercedes is a little rarer than it's more famous Opel stablemate, but I think Blitz paint schemes would be quite suitable for this model. Specific unit information - and the related decals - is quite another thing though.

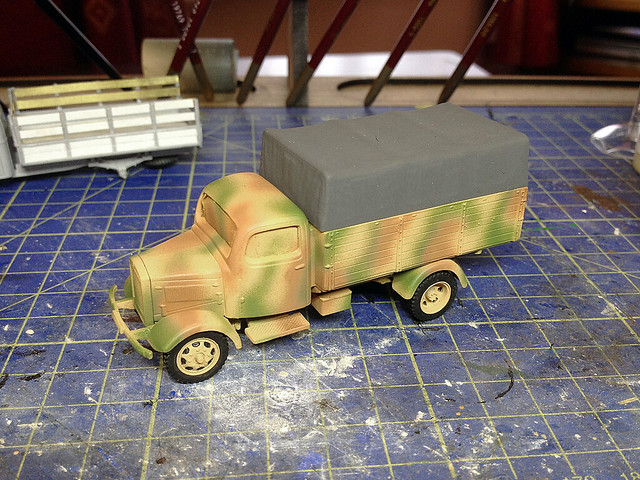
My repaired version of the truck will have a German three-colour camo scheme
with the standard 'Dunkelgelb' (dark yellow) base. But before you begin the
exterior painting you have to paint the cab interior first.

The spray I used was Humbrols 'Sand Yellow' which turns out to be an exact
match with Vellejo's 'Desert Yellow' (977), great for touching up. I never really
understood the German's use of Dunkelgelb, it seems such an illogical
colour for anything but the desert yet it was used widly use in Europe.

My very first attempt at a German camo pattern and my first attempt at
airbrushing a camo pattern freehand! It's a bit slap-dash but I'm rather
pleased with the outcome.

What do I think of them so far?...(Not rubbish!)
This a surprisingly nice model. Like their 'US Army Truck' Pegasus allows the war-gamer to bang together a really tidy representation of a 'generic' WW2 truck quickly and cheaply, but with some degree of quality. Yes, I think it is a little big and you may find it looks a little odd beside some of your other vehicles in the same scale, why this is I do not know.

The cab of the Pegasus 'Merc' (far right) compared to two other 1/72 truck
cabs. Left is the Pegasus 'American Army Truck' and in the middle is a
Valiant Ford V3000. As you can see the other cabs are significantly
narrower.  You can see how the 'Merc' looks almost a bigger scale.

I am happy to use this model in combination with my PSC Late War German soldiers as they are somewhat chunky for 1/72 as well, both laying at the upper end of 1/72 scale.

Next: I finish off the trucks and while I'm at it add some extras to the second example to show what can be done to make them a little more accurate.

Tuesday, 17 June 2014

WT's 20mm Unpainted 'Cafe Gondree' review

Looking for reasonably priced 20mm laser-cut buildings on the web I came across an unpainted MDF kit by Wargames Tournaments described as the 'Cafe Gondree'. It's a model of two-story, sort of split-level or conjoined pair of buildings which is meant to represent the historic cafe in Normandy that - for a long time - was thought to have been the first liberated house on D-Day...

'The Gondrée Café, located at 20 m from the Pegasus Bridge and the whereabouts of Teresa and George Gondrée, is often presented as the first house in mainland France have been released. However, the historian Norbert Hugedé published in his book dedicated to Deadstick operation that is the house opposite, belonging to Louis Picot was controlled first in combat. Home Gondrée has opened its doors to Allied soldiers in the early morning of D-Day.' [Source: Wikipedia]
Cafe-Gondree [Source: Public Domain]
What's in the bag?
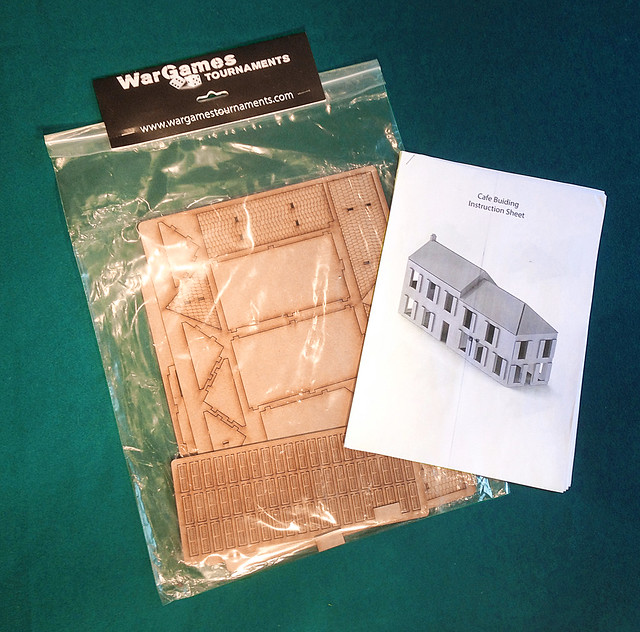
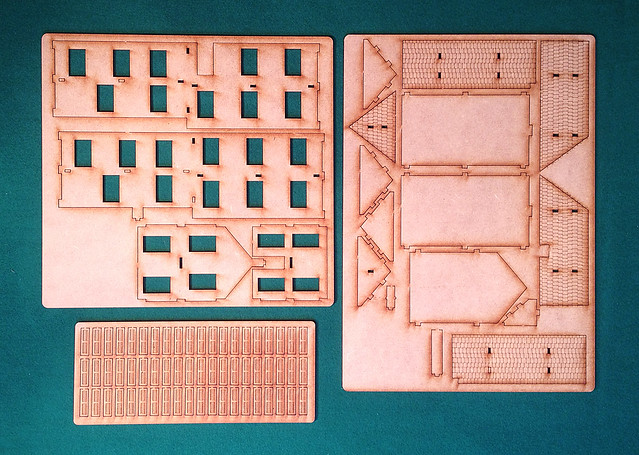
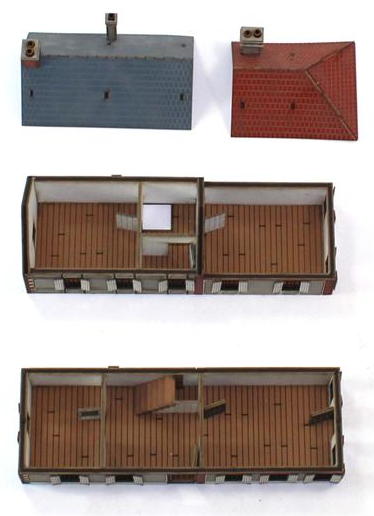
The model comes on three 3mm MDF sheets with the components attached to these 'sprues' by tiny tabs. The basic material that the model is made from is simple bare MDF so it's a reddy-buff colour. As usual there are the slight scorching around the cutout parts which is the signature of laser-cutting. But I rather like this slight discolouration, otherwise the kit is very plain.


Construction
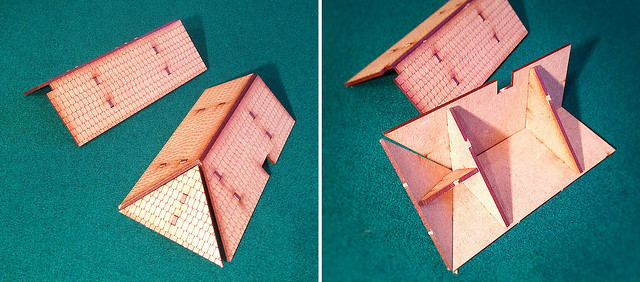
The photocopied instructions suggest you start with the roof, or rather the roofs as there is a seperate roof section for either side or level of the house. You just pop the component parts off the encompassing sheet and slot the parts together by means of the usual tab and slot system.

It was at this point I began to suspect that this MDF model was not really designed to be easily disassembled again for convenient storage (like the Star Fort MDF buildings I have made). The WT structure is, I think, intended to be a more permanent one.


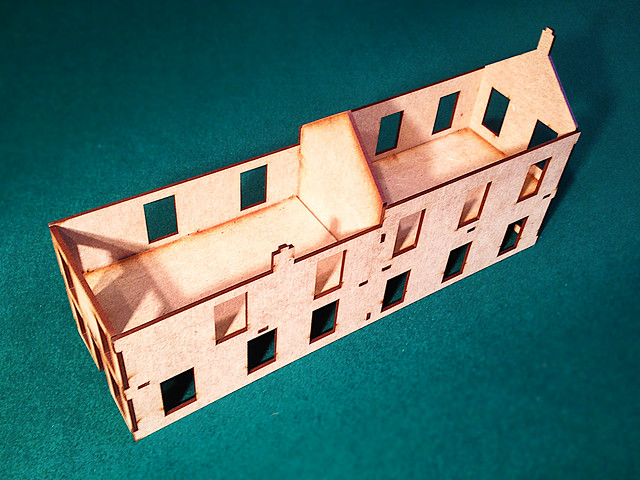
Sure enough, when it came to the insertion of the first floor it was clear that this model would not be easy to take apart and also was not designed to allow easy access to the ground floor. The first floor sections snapped tightly  into place within the surrounding walls and there was then no way to take them out again without taking the whole building apart!

This was very disappointing and I started to think of ways that I could modify this kit to be more like the ones I bought from Star Fort Miniatures. At the same time I also began thinking about how I might paint the house so that it would fit in with those other buildings I already had.


(Painting is not absolutely necessary I suppose. As a piece of scenery it's adequate as is and I have seen pictures of war games where these vanilla MDF buildings have been used 'in the buff'.)

The issue of accessing the ground floor so that you could place infantry in the house and also easily disassemble it for transportation or storage was a more frustrating one. It looked like I would have to remove some of the integral tabs and then make some of my own in different places to solve this.

In the meantime, however, I resolved to complete the basic construction as directed so I could see what the 'finished' cafe looked like.


As I had resolved to definitely paint the model I did not attach the many window shutters that the kit comes supplied with. This gives the finished building a rather bare and characterless look - I'm sure it does look a bit better with the shutters in place.

Conclusion
Obviously my MT cafe is not really finished, I'll now start 'upgrading' it - first by modifying the way it assembles (and disassembles) and also I will apply some attractive exterior decoration.

But for £14.99 do I think I got value for money? Well, the obvious answer is not really - Star Fort's MDF models are far superior to this effort and are either the same price (for their cottages) or a couple of pounds more for their own cafe (which I reviewed yesterday). In fact, while it was a complete co-incidence that SF's cafe model arrived by post just a couple of days after buying WT's cafe the ability to compare the two like-for-like really highlight the Wargames Tournaments model's deficiencies.

In short, I will have to do a lot of work to bring the WT model 'up to scratch' which negates any sense of value for money that one might have derived from this eBay 'bargain'. I highly recommend you save your money and buy Star Fort Miniatures 20mm painted cafe instead, the extra couple of quid would be well spent!

One last thing about Wargames Turnaments models - other than eBay I found their catalogue of 20mm buildings hard to track down. Thier website - wargamestournaments.com - neither seems to list their 20mm offerings nor this kit.

Postcript
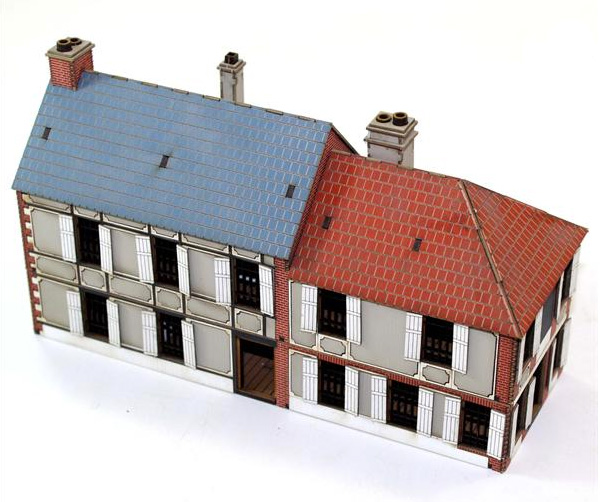
Finally, here's an interesting tidbit (talking of value for money). While looking for some photo reference material for the 'Cafe Gondree' I came across what I initially thought was the WT model all painted up and customised...

Photo source: 4Ground models

But...This isn't the WT model all fancied up, it is a different 20mm version of the historic cafe made by 4Ground Models - available pre-painted and with lots of additional decorative detail!

Photo source: 4Ground Models
Interestingly, the 4Ground version does allow you to access the ground floor by making each complete floor of the house a separate unit which stack on one another.

So why not buy this instead - you may ask yourselves?

Typically of 4Ground - who I think count themselves as the premium laser-cut model makers - they charge an eye-popping £32 for this model!

This is what started me looking for alternative suppliers of 20mm MDF kits in the first place, their prices are far more than I am happy to pay for a piece of scenery. (And I don't think I am the only one that think so either - Plastic Soldier Company has had to slash the prices of the 4Ground models they sell on their website. I presume they weren't selling!)

Anyway, the good thing about this little find is that it both gives me an idea about a colour scheme for my WT 'Cafe Gondree' and some hints about how to make it more accessible.

Monday, 16 June 2014

Star Fort 20mm Painted MDF 'Café de Normandie'

Owing to Star Fort's generosity I have an example of their new laser cut buildings, one of their growing range of painted 20mm MDF architectural scenics. Having been impressed by the initial 'ruined cottage' I had purchased from them I was very keen to add items of a similar quality to my collection.

Finding building models of this quality in 20mm (1/72 scale) is something of a challenge as the vast majority of such laser cut building kits seem to be in 15mm or 28mm to suit the needs of war gamers who seem to prefer these later scales. 20mm war gamers apparently make do with 1/72 or HO/OO scale card, resin or plastic constructions and the proliferation of these laser cut kits is, as yet, not so widespread in this marketplace. Star Fort seem to want to change this.

Description - "Listen very carefully, I shall say this only once..."
This new building model is a two-story affair of a commercial type typical of the towns of Northern Europe (including Eastern Europe) during the First and Second World Wars. I personally find it reminiscent of the sort of small-town or suburban Belgian or Dutch hôtel which would include a cozy café bar or restaurant on the ground floor.

Star Fort Miniatures have given the model the title of 'Café de Normandie', but they say that they will provide a choice of two cafe signs in the production model; Cafe Exmes (Normandy) and Krakauer Cafe (Berlin). Additionally, they will be pleased to produce custom signs to order so that '...if you want a personalised name or want a boulangerie, boucherie, drogerie or bäckerei, just let us know when ordering.' Now that's a very nice touch. The cost of this model is £16.99 (plus postage).


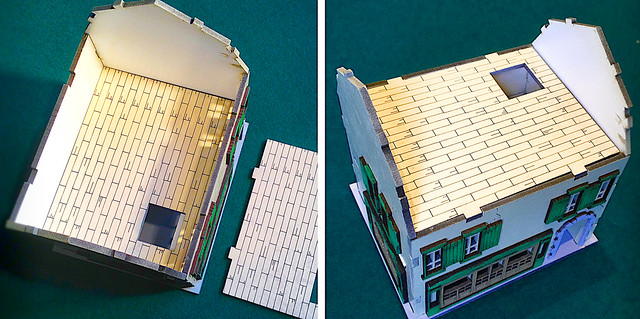
The key advantage of these MDF laser-cut kits, however, is their ability to be easily assembled and disassembled allowing easy access to the various floors during a wargame and convenient transportation to and from games. This model is no exception as it allows the roof, attic floor and first floor to be removed so that infantry can be placed inside.

Unboxing - "Oh, my God! The Gateau from the Chateau!"
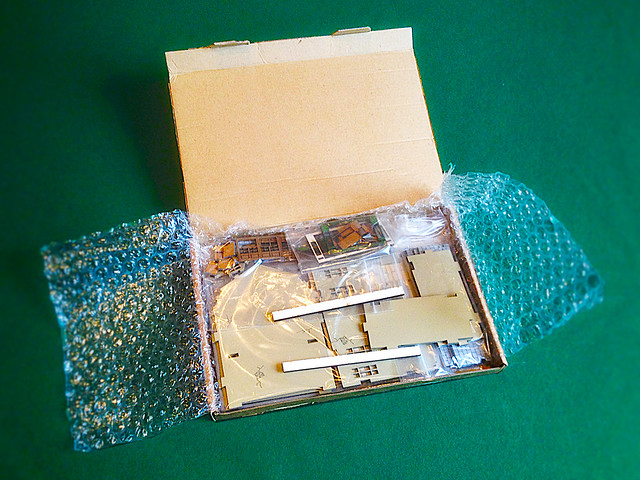
The kit comes in a compact little box which fits nicely through your letterbox. Now this is a small detail but I personally hate missing parcel deliveries and so the fact this model can be delivered when you are not in is a good thing in my book! Though, of course, this may change if you go for one of Star Fort's larger city dwellings.


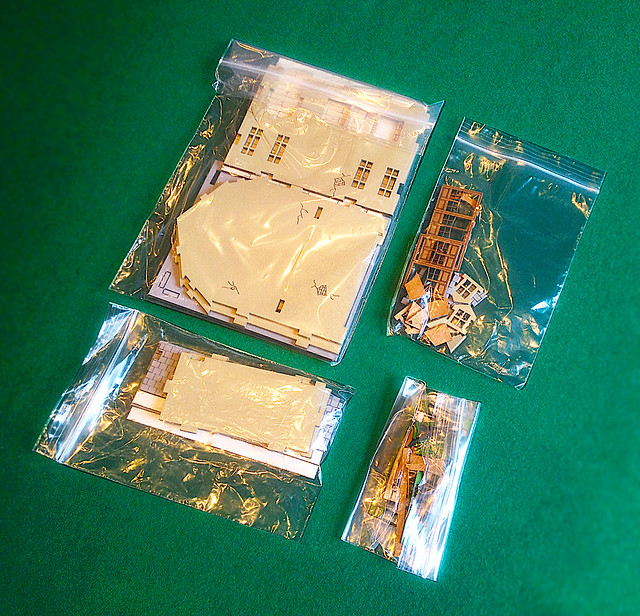
Everything is wrapped in bubble-wrap and organised into several small plastic bags. As I found with their 'ruined cottage' Star Fort give you quite a number of small delicate MDF embellishment with which to decorate you building.


The major components - being made from 3mm MDF sheet - are quite sturdy, but do be careful about how you handle the smaller components. The small architectural details have been beautifully and intricately laser-cut and there are some very fine and delicate pieces. Obviously these are intended to be glued to the main components so will eventually benefit from the mutual solidity that that joining provides, but until then do handle with care!

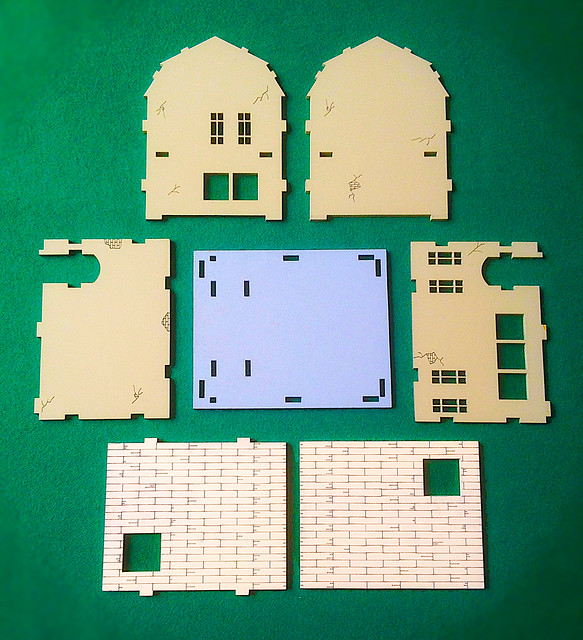
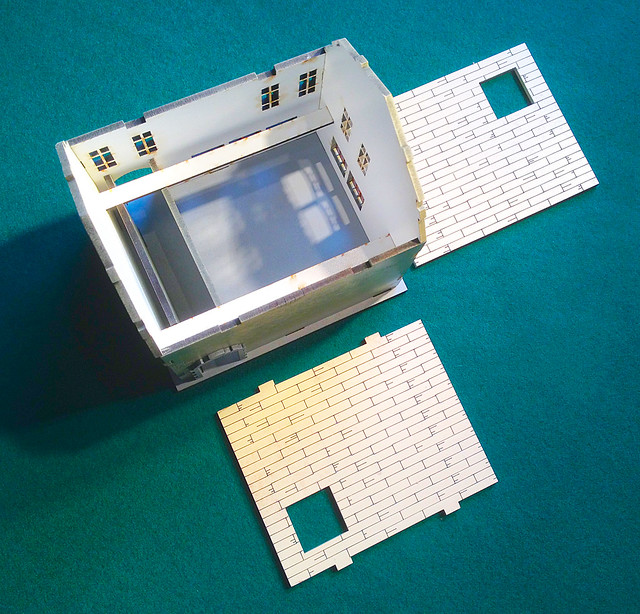
The four main wall sections are painted - on the exterior sides - in a browny-buff-cream colour (all interior or 'hidden' surfaces are white) and the base is done in a mid-grey colour. Floors are patterned with a floorboard design in a buff colour and have a hole cut in them to represent where a staircase might be. I say 'might be' because a staircase is not actually included in this kit.

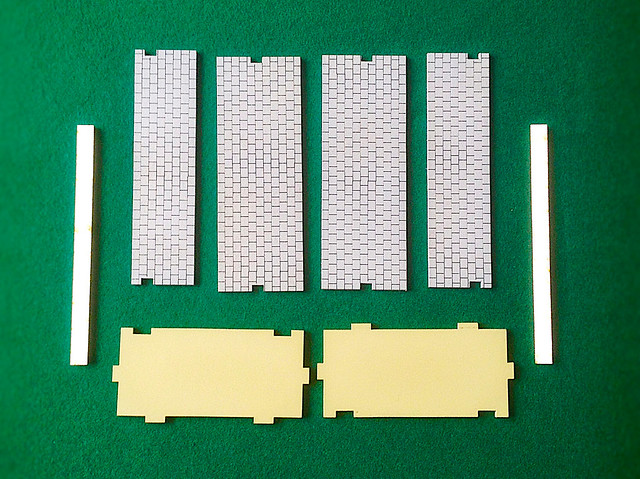
The second packet of main components are the roof sections and the ground floor passageway. This is a particularly novel aspect of this building - Star Fort have chosen to give the cafe an entrance which is hidden down an enclosed alley which runs from the front to the back of the place. Inexplicably, though, they have not added the entrance itself on either of these alley walls. I know, technically, this is a 'hidden' feature but I would have liked to have at least have had a door etched onto the wall.

The two bottom panels are the alleyway walls with subdivide
the ground floor - note the lack of an entrance! The thin white
panels are the 'planks' that support the first floor. At the top are
the four roof sections. 
[Actually, while you might think that this alleyway is something of a strange design I have been to a pub in Brussels that is almost exactly like this. Access to the pub is by means of a little alley to one side of the ground floor...Only they do have a door!]

The 'fiddly bits' are next, and occupy two smaller plastic packets. One has the three small attic windows which must fixed to one of the larger roof sections, the stone alleyway surrounds and parts of the cafe window frames. The second has all the 'green' wooden window frames and shutters.

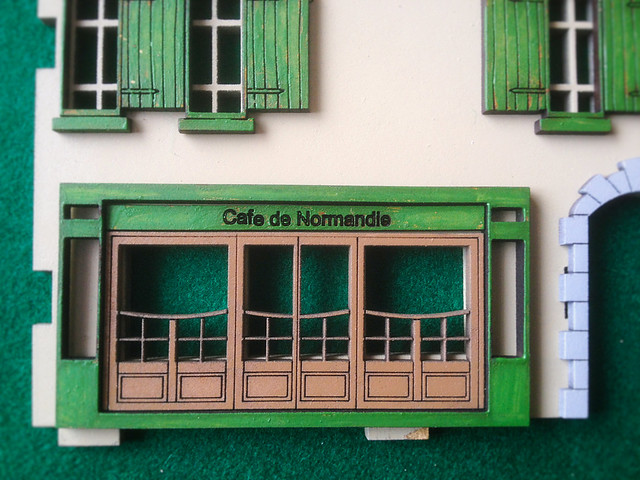
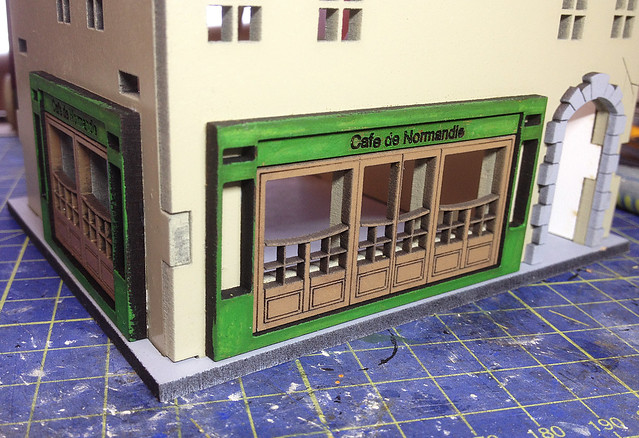
I particularly like the lovely decorative ground floor window frames. These are very delicately produced and are very effective. Also, the green window furniture and cafe signs are a lovely colour and really evocative of the period.

At this point I should point out that - unlike Star Fort's cottages - this building is apparently not being offered in a choice of colour combinations. I think this is because it is such a unique design of building that two in the same model town would be a little much. Though if you wish to add a second of these in a row of commercial buildings it would be easy enough to repaint it in your desired colour scheme.


Construction - "You may wonder what I am doing...."
My kit did not come with a printed instruction sheet. Star Fort, I understand, will be hosting all of the instructions for their buildings on their website but - as you can imagine - putting these little models isn't exactly difficult. Still, there are some parts which may have you scratching your head as to their final orientation so it will be as well that there is some construction notes somewhere.

All the main parts use a tab and groove system so you can dovetail them together or slot them into the base. This is, of course, central to the model's solidity and key in allowing it to be put together easily and then taken apart again - no glued required (in theory).

At this point you may wish to decide whether you want to glue on the exterior detail before you try putting together the main walls or do put them one once you have the main walls in place. I suggest gluing them on after you assemble the main shell of the building as some of the decorative items are designed to fit flush with the base so you will want to glue them on with the walls fixed in position.

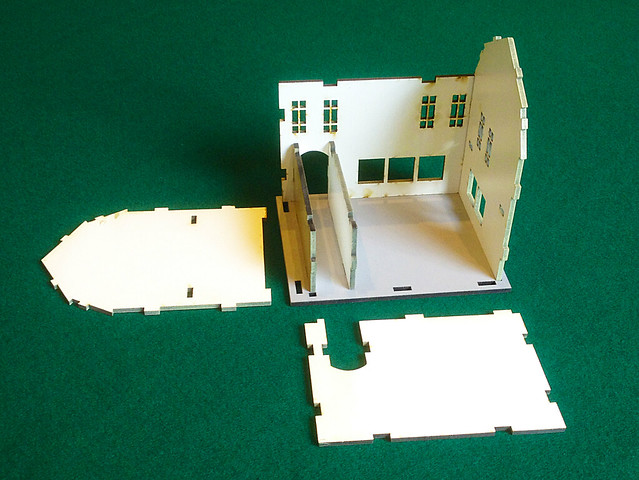
Let's start putting up the main shell of the cafe - the exterior walls - and the two interior walls of the subdividing alleyway on the ground floor...


Having got those in place I can start to add some of the exterior details - at least those that I think would benefit from being glued in place with the main walls erected (the cafe's main ground floor windows and 'stone' arches that decorate the entrances to the alleyway).


You can opt to disassemble the main walls again now to add the rest of the exterior detail if you wish as the windows and shutters might be more easily glued in place while the walls are laid flat.

Next I reassemble everything and add the first and second floors. At this point you might - like me - have a bit of a grumble about the lack of interconnecting stairs between the floors but this is something you can easily remedy yourself if it bothers you that much (this may be a future project).

Incidentally, I didn't worry too much about gluing the windows on too straight. If they are a bit wonky it just adds to the rustic charm!

This shot of the interior shows other the subdividing 'alleyway' on the
ground floor and the supporting 'planks' which you place the first floor on.
As mentioned, Star Fort do not include sets of stairs but do put stairwells,
in the form of two holes, in the two upper floors.
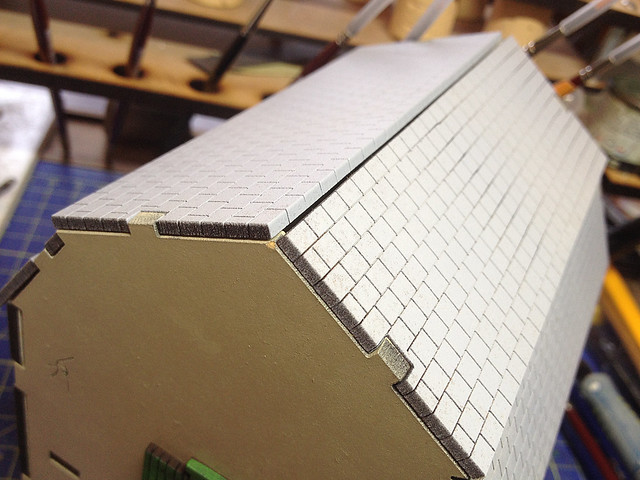
Finally we come to the roof. I have to say that while I understand that Star Fort have come up with the simplest and most logical design for this sort of roof the gaps left between the apex of the uppermost roof section is a little unattractive.

Again, due to personal preferences I might have to do something about this and add a simple decorative peak just to finish it off. And while I am at it I might add a chimney. But neither of these two items affects the function of this model at all.

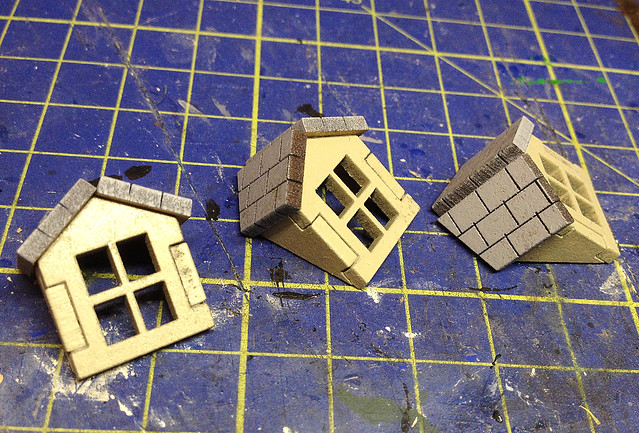
The attic 'dormer' windows, however, are another story. These are a little bit more fiddly, both to put together and to fit to the appropriate roof section. PVA is a particularly slidey glue after all!


For me, in a way, these additions are the least satisfactory parts of the model IF your priority is for the model to fold flat for transportation and storage. The dormer windows should be constructed and glued permanently in place, there are no slots to temporarily fix them to the roof and so make them detachable. Is this a big deal? Not really, they only add a little more space when you pack the kit up.

Be sure to leave these components so that the glue has time to dry before
attempting to fix them to the roof section. I would have preferred an additional
 set of slot and tabs so you could fit them securely to the roof.

Well, that didn't take long! Before you know it you have a fully painted and ready to go cafe. Am I happy with the result? Mais bien sûr, il est magnifique! [That's a big 'yes', by the way!]

In conclusion - "Simple plots are always the best."
René Artois - Cafe owner
The purpose of Star Fort's range of MDF laser-cut buildings is, I think, pretty specific and as such will appeal to wargamers looking for a particular set of features. They are quick and easy to build, require little modeling and no painting skills, are sturdily constructed and can be assembled and disassembled very simply.

This sort of model will appeal to the travelling wargamer who is perhaps more interested in playing his war games than spending time producing historically accurate and ultra-realistic period architecture. Also, 20mm wargame aficionados will appreciate this addition as the availability of such kits in this scale is still a little thin on the ground.

As to style, I know some modellers and gamers criticise MDF building models as being too simplified and somewhat 'cartoony' for their liking. But as I remarked when I made my first Star Fort model, I think this sort of characterture of a building lends itself well to the less serious and 'casual' styles of tabletop wargaming, like Warlord's Bolt Action. To my mind these sort of games are to wargaming what publications like 'Battle' and the 'Commando' comics were to war fiction, they aren't meant to be realistic takes on what war is - they are pure escapism.

Ambush!
For people like myself who are wanting to get into Bolt Action via the cheaper - and more varied - route of 20mm instead of the full-blown 28mm Star Fort Miniature's range of buildings are a very welcome addition to the marketplace indeed.

Finally, a note on quality. As I pointed out earlier the components are cut from 3mm MDF sheet so the larger supporting items are very sturdy indeed. With the decorative embellishments firmly glued on - with a strong PVA - these buildings are a lot more hardy than cheaper card or plastic models. Also the paint seems to be quite durable and I don't think it will be apt to chip (I guess it's washable too, by using a moist cloth if that's important to you).

Star Fort Miniature intend to produce a 'ruined' version of their cafe, as
they have done with their series of cottages.
At the end of the day it is a case of horses for courses and whether Star Fort's offering will suit you has much to to do with what kind of wargaming you do. If you are one of those chaps who painstakingly recreates historical battlefields down to authentic period landmarks and buildings for club demos and events then perhaps these are not your 'cup of tea'. But for people like me who have a more casual interest in tabletop gaming and where storage space is a crucial consideration and want to spend more of their time making little armies and playing with them than they do making little towns then these charming little buildings will be right up your street!

I cannot wait to see what the chaps at Star Fort come up with next. In the meantime here's the link to their new website (which they are still working on): www.starfortminiatures.co.uk

Price: The cost of SF's Cafe is £16.99 (which is markedly cheaper than the 20mm MDF buildings made by 4Ground, and yet I can see very little difference in quality).
---------------------------------------------

Link to Star Fort's official web site and online store: www.starfortminiatures.co.uk
- Please note: This site is brand new and still under construction, therefore you might be as well contacting Star Fort by email and asking about availability until their online store is fully populated.
Star Fort email: starfortminiatures@gmail.com | Telephone (UK): 078580231362

A special 'thank you' goes out to Colin from Star Fort Miniature
for supplying me with the review model.