Sunday 20 September 2015

Quick '39 Chevy Truck Part 7

(The idea that was a 'quick' project gets ever more laughable! Once again I apologise for how long it takes me to do things, work and real life have slashed my available free time.)

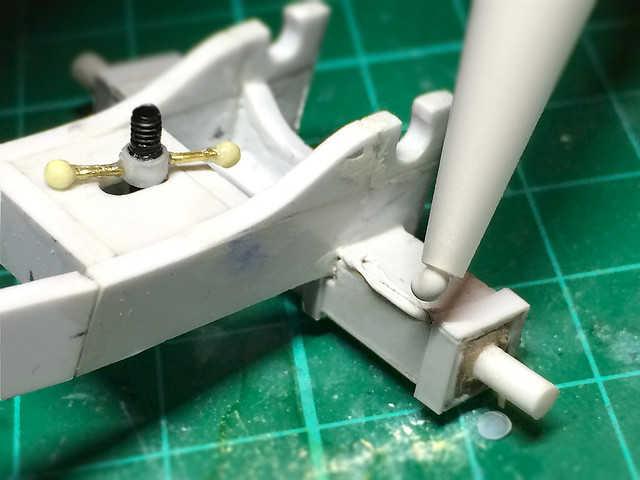
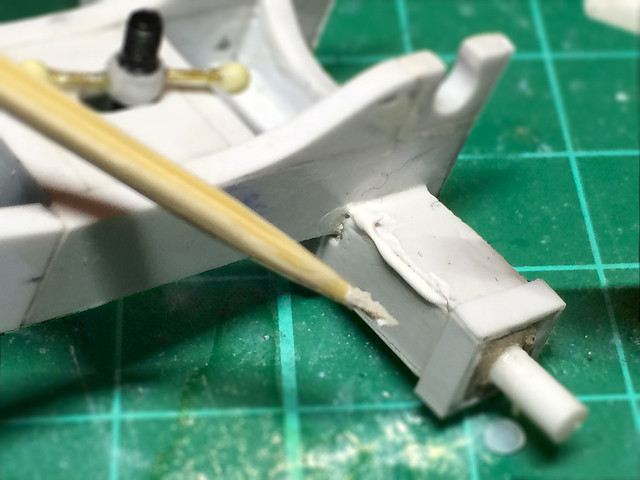
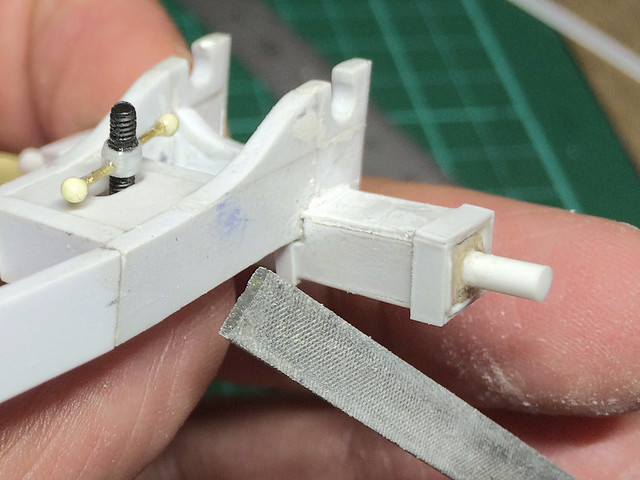
Anyhoo, remember my 'Quick 1939 Chevy Medium Truck' project? Probably not, so I will re-cap - It's another 'kit-bash' hybrid based on Valiant's very nice 1/72 Fordwerkes V3000 resin war-gaming model. In this case I mount a scratch-built Chevy bonnet and wheel arches onto the back-half of the V3000 cab to make a (hopefully) passable 1939 1.5 ton Chevrolet cargo truck.


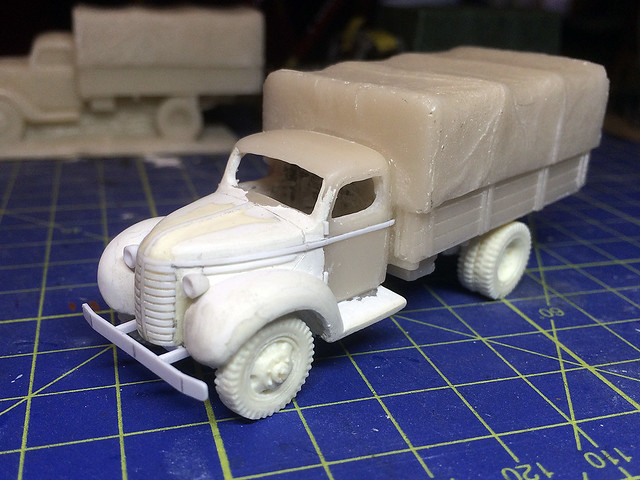
I had to do a bit of 'cheating' and enlarge the bonnet slightly to get it to mate seamlessly with the V3000 cab, but it looks OK as long as you don't put it side-by-side with a proper 1/72 1.5 ton Chevy truck kit!

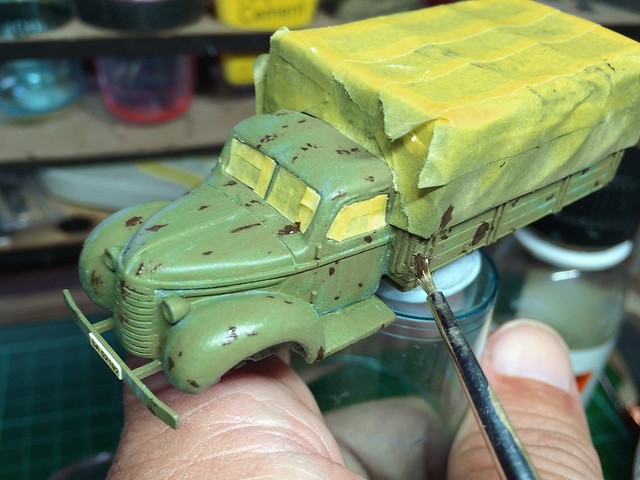
Weathering - working with oils
I'm getting my basic 'war game' style of weathering pretty much down pat now. I say 'war game' style because it's a little more exaggerated in it's use of effects than were I doing a display model. The idea is that it looks 'cool' at table-top distance so things like weathering and chipping are a little OTT.

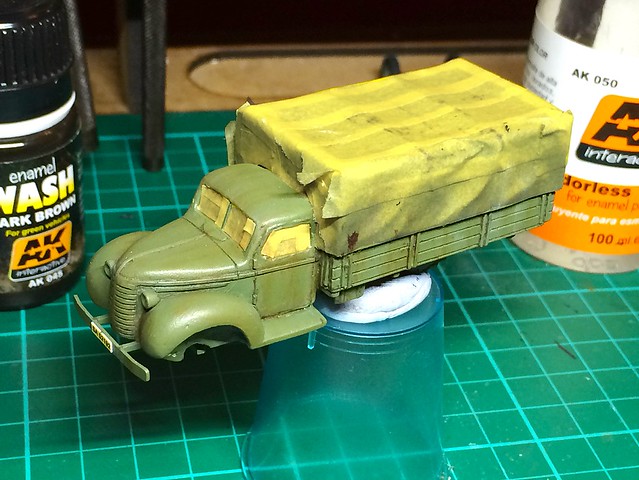
I have developed what I call my 'leopard' technique for weathering with oils where I apply successive layers of coloured spots. I lay down a random spotty pattern of one colour, then I smear it with a wide brush dipped in thinners (but then wiped so it's only just a little wet) to create the streaking effect I'm after...


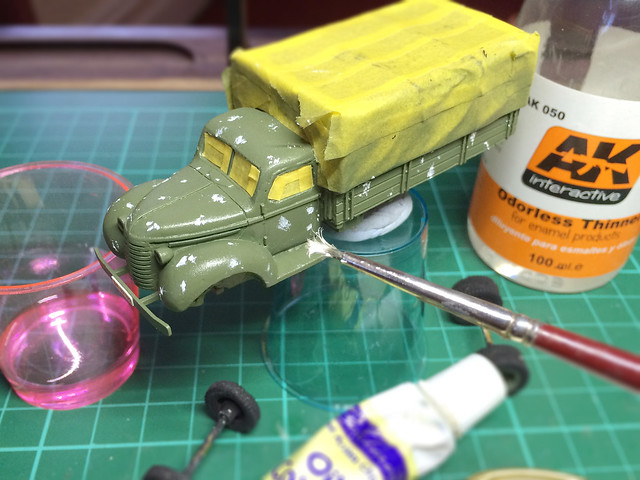
I usually start with white spots which, when smeared, will (hopefully) create a 'bleached' look on old paintwork. The Finnish army trucks by the end of the war were pretty worn and battered and originally bright paint schemes were faded and patchy.

In all I usually do three different colour schemes of spots, each progressively darker (depending on the truck's base colour). For green vehicles I usually like to end with a oily brown stain effect...


Between each layer of streaking I apply a light coat of Humbrol Satin Acrylic Varnish, this protects the work I have done before I add the next coat of oils (and, obviously, I begin the whole process with a coat of varnish to protect the model's base paint coat).


A dusting of varnish is applied again before I go onto the next stage, which is the pin-washing. I use AK Interactive - Enamel Wash: Dark Brown for Green Vehicles and I have found this works best with a gloss varnish base, just to help the enamel wash 'run' into and along all the panel lines detail.

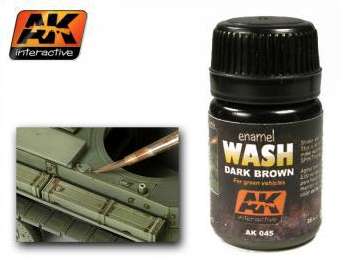
This enamel wash is also great for adding additional grimy streaks on your vehicles. The AK range includes special washes for 'oil streaks', 'grime', 'fuel stains', 'light rust', but this is the one that I used the most.


As well as the top of the truck I do some weathering to the underside of the vehicle as I go along. Obviously, this being a war-gaming 'ready to roll' model there isn't so much detail, but I like to give what there is a little treatment as some of it is visible. I begin with some base colour, then weather that before adding some dust and mud effects...


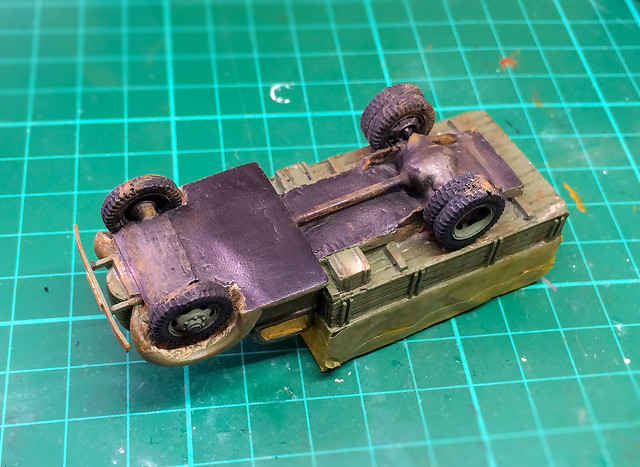
Having finished the weathering of the underside I could finally fix the wheels
in place and cover over the holes I left for the axles. Underside done!
I don't spend too long on the underside as it's not meant to be on display. But having gotten that out the way I turn my attention to the fun bit of weathering (in my opinion) - chipping!


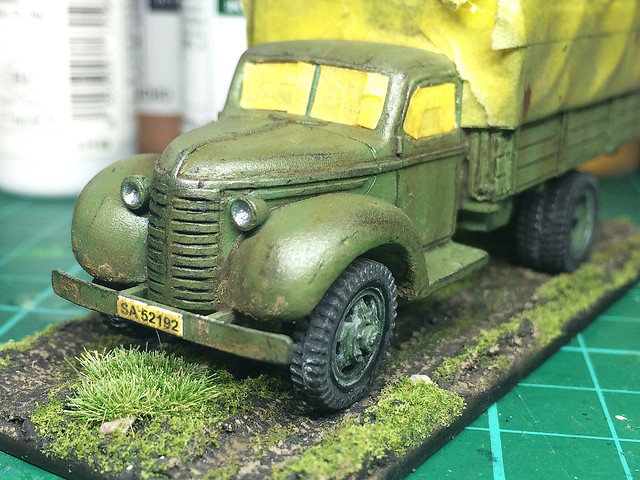
And then I end with some light rust effects and, finally, the addition of a layer of dust and mud. In this case I have decided on a light application of dust and mud.

The final treatment is a coat of satin and matt varnishes. I like to lightly mix the vanish coats as I think vehicles alway look nice with a little sheen to their paintwork - so I give a quick 'puff' of satin to the cab and matt varnish everywhere else. And that's that.

Next: Basing the vehicle.

Sunday 6 September 2015

Craft micro and precision saw tools

I've been working with styrene rods since I very first started modelling again (seriously this time as opposed to the modelling I did as a kid). At first my use of modelling plastic consisted of patching and some detailing but lately I've started undertaking slightly more ambitious scratch-build projects.

A 1/32 scratch-built gun carriage I'm working on.
Now, while I was working with smaller and thinner strips and rods of styrene my craft knives were perfectly adequate for cutting, trimming and shaping the plastic, but bigger projects means bigger bits of styrene and my craft knives are starting to struggle with these.

I have, actually, already got a small hobby saw - X-Acto extra fine razor saw of the type most commonly available in hobby stores - but although it's great for general sawing and large jobs it's not suited to precision jobs...

It's also not very good at getting into awkward little areas of a model as the blade is so big. What I wanted was something the size of my craft knife blades but which had a saw type of edge.

As is usual in the world of modelling tools, if you come across a 'specialist' need some clever clogs has developed a specialist tool to deal with the problem.

A quick search on the Web came up with a selection of micro saw blades of exactly the form that I had in mind. And the good news - for once - is that none of these specialist tools cost a fortune, so I soon had a couple of examples ordered and on their way to me. (I am already at the end of this month's allowance!)

The saws sets are rather unusual in that they look like bits of etched metal accessories of the type you buy to add detail to models. One set (small) is by RB Productions and simply called 'Nano Saws' and the second (large) set is by Model Craft and labeled 'Precision Saw Set'...


Both sets are provided as blades only, you have to provide your own handles to turn the set's pieces into actual saws. But these sets are designed to be used in combination with standard craft knife handles of the type you will probably have in your hobby tool box already (or which can be got at practically any good hobby store).

Model Craft 'Precision Saw Set'
The larger of the two sets is what I would consider for material preparation (although it is still markedly smaller than my X-Acto saw). These are longer bladed tools with larger saw and more aggressive teeth...


These would be great for cutting thick styrene (or Balsa) blanks into roughly the right sizes prior to the assembly of your model. They are designed to work in combination with a Swan & Morton (or similar) No. 3 medical scalpel handle...


I found that these fine metal tools slotted on to the No. 3 handle OK, but as is usual with scalpel blades sometime there was a little 'wiggle'. I usually cure this by securing the blade at the rear by wrapping some tape around the 'tang'.


While the problem could be solved by having a thicker blade the thicker the blade the wider the cut, and you don't want that. So I will just persevere by using my tape method to hold the blade securely. It's no biggy.

RB Productions 'Nano Saws'
The smaller set of blades are very nicely designed for getting into small or awkward spaces in your model or for doing exceptionally precise work.


In this case these blades are designed to work with standard craft knife handles of the slot and screw type. They are very quick to pop in and - unlike the Model Craft ones - can be very securely fastened and don't wobble about!


The saw teeth in these tiny blades are extra-extra fine and with the metal being exceptionally thin too you can expect a gnat's hair of a precision cut. The shapes of the saw blades in this set are uniquely designed to allow you to get into tight spaces or cut at tight angles.


I can imagine these specialist blades will be invaluable when I start to take on more scratch-builds. But even for modifying and converting plastic kits these tiny blades will be very handy additions to my ever growing modelling took box.

As to actual proficiency of cutting and sharpness I'm afraid I haven't had a chance to use them yet - but they feel sharp enough. I will wait until my next scratch-build to make a proper report.

Likewise, as to how long they will stay sharp will only be determined after use, but to be honest these sets were enough of a reasonable price to make regular replacement fairly inexpensive.

Model Craft Precision Saw Set - £5.82

RB Productions Nano Saw Set - £4.87

I bought mine from the Scale Model Shop (UK) - www.scalemodelshop.co.uk

Thursday 3 September 2015

A better putty - Deluxe Materials

Well, it's been a while - due to several months of intense work stuff and then my summer vacation - but I've dusted off the workbench and I am off and going again...

A better way to fill seams and cracks in models
Since I started modelling again I have been using Milliput two-part putty to fill seam and repair cracks and other damage in my plastic models. Milliput is a great medium, it's easy to work with, is very malleable and it hardens extremely hard - the down side is that it takes up to 8 hours* to dry properly.

* After 3-4 hrs hardening, it needs same amount of time to fully cure, i.e. reach a level of settled hardness to allow for predictable sanding results.

Milliput is great to work with and hardens wonderfully, but is easy to sand or
file. It also produces a very smooth finish. But it does have one drawback...
As you can imagine this really makes a dent in your production time. Every repair or fill needed to be left overnight, and if you didn't get it right the first time you had to repeat the process all over again (another 8 hours wait). Very frustrating, so I have been looking for a faster drying alternative and I think I may have found one - Deluxe Material's 'Perfect Plastic Putty'.

Working with 'Perfect Plastic Putty'
A 40ml tube of Perfect Putty is about £5.39, and although thats hard to compare to what you get in a Milliput putty set I think it's a safe guess to say that you do actually get more material using Milliput. But that's not necessarily the most important thing.


My main concern is drying time, and also comparing the quality of the two putties. So I am trying the Perfect Putty out on a little project I am doing...

A 1/32 scratch built artillery carriage I'm working on, and unfortunately I have
a couple of gaps in the styrene framework I have made.
Perfect Plastic Putty looks like PVA glue, but it's a bit more like cake icing in
it's firmness (it isn't runny). It will stay where you place it.
First thing that's nice about Perfect Putty is that there is not mixing involved, it's ready to use straight out the tube. Mixing the Milliput can be a little tricky and messy sometimes - if you get the mix wrong it can effect how hard the Milliput drys. Another negative aspect of using Milliput is that you inevitably alway mix up too much (as you don't want to run out), this can lead to a bit of waste - this isn't the case with Perfect Putty.

Once applied you can start filling and smoothing out the putty. But bear in mind
that unlike Milliput it's a lot softer. You almost have to 'trowl' or skim it on like
plaster or Pollyfilla, then sand it smooth when dry.
Working with Perfect Putty once it's out the tube is relatively easy, although as a 'liquid' it's not quite as well behaved as a true putty (like Milliput) can be. It's a little smushy! It's reminds me a bit of Pollyfilla in that it has to be smeared onto the area you want to repair and the neatening up is mostly done once it is dry and you sand it smooth. With Milliput putty you can do a certain amount of smoothing off when it's still 'soft' - you can even smooth off soft Milliput with water (as you would a clay).

Which brings us to the most interesting property of a modelling putty (as far as I am concerned) - drying time. As I said, Milliput can take up to 8 hours to harden properly which isn't really convenient, and so my hope is that Perfect Putty speeds up the production time of modelling.

The good news is that my test application of Perfect Putty dried in 20 minutes! This is a huge difference and means that repairs can be done and you can get on with your modelling on the same day. Furthermore, the hardness of Perfect Putty was very good as well - maybe not as hard as Milliput but within half an hour I was sanding and filing my test repairs, that's amazing!

As good a repair as I get with Miliput, and even if it isn't perfect I can reapply
Perfect Putty and get on again within half and hour!
Conclusion - Perfect Putty perfect?
On the surface this little experiment seems to suggest that Perfect Putty is superior to Milliput. It does the job that I mostly use Milliput for - filling seams and cracks in plastic models - but does that mean it has made Milliput obsolete?

No. Perfect Putty is a good filler putty, a perfect filler putty in fact (as far as repairing indentations is concerned). But Milliput has other properties that make it an indispensable part of your modelling tool kit. Milliput has many of the same properties as a clay, it's mouldable, you can sculpt with it, you can use it to build up broken sections of an object. You can't do that with Perfect Putty as it's simply too 'sloppy'. (Edit: 'Sloppy' is perhaps not the right word, it is slightly firm - like cake decorating icing - but it is not runny.)

So, as with so many modelling materials, it is really a case of horses for courses. That said, Deluxe Material's Perfect Plastic Putty is a superb material for one of the most routine jobs in plastic scale modelling - filling gaps and seams. And it does what it does in double quick time! This will be a new standard item in my modelling toolbox. Very impressed.

Link to the UK web site for Deluxe Materials - makers of Perfect Plastic Putty.