Wednesday 19 August 2020

1/100 KV-1 Tanks Primed

 Yes, it really has taken me this long to get this job done - a whole month. There again a lot has been going on in my life this month, including a week in hospital! (All sorted now though.)

Anyway, my KV-1 tanks have progressed and I've finally got them primed. As usual I did this with a coat of Humbrol's Light Olive acrylic spray - my go to quick-prep for my 1/100 green tanks.

I've mentioned it before but it's worth repeating, I love this product. Not only does it go on very smoothly - giving a fine base coat - but it's an excellent jumping off green which you can then modulate into any of the greens used by the major armies in WW2; British Bronze Green, American Olive Drab or Soviet Russian Green.

As you can see I am now have KV tanks suitable for early WW2 or mid-war, just by switching out the turrets. It is - in reality - a bit of a fudge as the chassis of these models of KV did actually differ slightly. But for 1/100 war gaming I think I can get away with it!

Now to plan the next stage - adding the decals.

Tuesday 21 July 2020

...Just One More Thing! 1/100 KV-1.

Yes, I did say that I had completed the construction on my 1/100 KV-1S tanks... But... I hadn't! 😂

While the main feature of this projects is the conversion process of making a couple of KV-1S tanks my tinkering left me with a couple of KV-1 variant turrets. It seemed a pity to waste these parts and even though I don't foresee me wanting to play an Operation Barbarossa scenario (the German invasion of the Soviet Union in 1941) you never know! 😏

And so...

Having converted the KV-1 model's turret rings to accommodate the 3D printed turret's larger 10mm 'plug' attachment I would now have to modify the original Zvesda turrets - with their little pin attachment post - so that they would work with the new 'socket' mods.

The principal of this upgrade is pretty straight forward. I now have to make two 10mm x 3.5mm cylindrical 'plugs' which I will glue onto the bottom of the KV-1 (Model 1940) turrets. However, I will also magnetising these turrets in a similar way to the way I did with my KV-1S turrets and hence the need for cylindrical 'plugs'. The magnet will be glued inside the tubular plugs.

I had to order in the 10mm diameter styrene tubes as my local craft store have a very limited range of styrene pieces. It took me a while to find exactly what I wanted online but I eventually tracked down the items to Dorsping Models of Cornwall, UK. Unfortunately, to keep costs down I opted for 2nd Class postage and so a annoyingly long wait ensued...


(I should add that I tested the uncut tube for size before I started sawing off 3.5mm rings. I was most satisfied when it slipped nicely into the hole in the hull I had cut for my turret plugs. I love it when a plan comes together!)

Anyway,  having created my new KV-1 attachment plugs I then had to stick a couple of the little button magnets I had into them. I did think about just super-gluing the magnets inside the cylinders but, in the end, I opted to secure the magnets to the turret floor and the plug ring by means of a nest of Milliput putty...


Now the annoying wait until the putty dries... 😫

And then...! Taa-daaaaah!


The new (old) KV-1 turrets snapped into place perfectly. I now have the ability to field a pair of KV heavy tank for scenarios fro 1940 to 1941 and another pair o KV variants to suit operations from late 1942 to mid-1943!

Job done... Now let's get 'em painted.

Sunday 12 July 2020

KV-1S Conversions - Construction Complete

Well, finally I've gotten round to finishing off the conversion and construction of my 1/100 Soviet KV-1S tanks. It's been dragging a bit as I was trying to video the process but that turned out to be a complete shambles and so I decided to wait until I have my man-cave workbench sorted before I try vlogging my kit making.

Still, quite pleased with the end result of my Frankenstein shenanigans...


As you can see, I built the original Zvesda kit's KV-1 turrets as well as I want to convert these so I can swap out the two different types of turrets. I'll magnetise the kit turrets but will need some 10mm plastic tube to make the larger size 'plug' attachments to make them work. In this way I can field either the KV in it's early (1940 'Operation Barbarossa' period) configuration OR the later KV-1S 1943 variant.

NEXT: Priming and painting.

Monday 6 July 2020

KV-1S - A Series of Unfortunate Events...

Part 4 of my KV-1S conversion started with a bit of a 'oh, crap' moment! 😡

Turret blown off a KV-1E, Soletsky District, Novgorod Oblast - July 1941!
What is Russian for 'oh, crap'? 😄

In my last post on this project I had just cut the hole in the chassis for the turret 'plug' (for want of a better word) so I could fit the two together. The hole was 'snug'...Very snug. So snug, in fact that one in the turret didn't want to come back out or even turn!

Never mind, I thought, a couple of good twists with free it , I thought...And then...

...SNAP! 😖 😭

I forgot that a 3D printed component like my turret is a flimsy hollow part with quite thin walls. Twisting the turret wrenched the turret plug off the bottom completely off...


Oooopsie! BUT, after the initial shock I realise that this was actually a bit of fortuitous accident. I was still trying to decide the best way in which to add a small magnet to the turret and the separation of the plug element gave me a good idea how I might, now, achieve this.

After I tapped the snapped-off plug out of the turret ring it became obvious that I now had a nice neat little 'pocket' I could glue my magnet into...


That done I then super-glued the plug attachment back onto the base of the turret (I wisely did some sanding of the turret ring hole to make sure that the fit wasn't so snug this time)! 😂

...All I had to do then was mount another magnet into the hull of the tank and the two parts should then snap together perfectly! (As long as I have the magnets' POLARITY correct!)

Some very rough measuring and mental arithmetic ensued and I worked out that I needed to raise the hull magnet up about 4mm so that it met with the turret plug and it's magnet. These little magnets are quite strong so they don't need to be directly connecting with each other, they just need to be very close to each other.

I glued together a couple of 2mm thick styrene pieces to act as my platform and glued them onto the floor of the hull and a magnet (ensuring it's polarity was correct) onto the plastic strips...


And then came the moment of truth! I placed the turret in the hole and with a  satisfying 'snap' (a good one this time) it popped into place, attracted by the hull's magnet! HOORAH!!! 😁👌


Phew! Time for a cakie... (Interlude music!)


Well, that's the majority of the construction of my KV-1S conversion (there were only 6 parts to the Zvesda KV-1 kit in total), all that remained were the tracks but they are of the one-piece type...


NOW...I could attach these now - a lot of war-game modellers would - but I prefer to prime and paint these parts separately as it's a bit awkward to get the top of the tracks done as there ain't a lot of space once they are fitted onto the chassis. But that's a personal preference.

NEXT: Priming and painting.

--------------------------------------------------------

👉 Link to the KV-1S Conversion Project Series of Posts.

Friday 3 July 2020

1/100 KV-1S Conversion Pt.4

I've been a bit distracted with other things and have neglected my KV-1S conversion project, so it's time to get moving again!

Here's the various parts I shall be working with in this next stage of this build.
It's time to attach the 3D printed KV-1S turret to my Zvesda KV-1 hull, but there are a couple of things I need to do along the way. The first is to modify the hull's turret ring so I can attach the turrets plug into it...


The Zvesda hull has a pin-type turret attachment hole, this is going to have to be considerably enlarged, to 10mm. But even before that I will have to cut a nice clean circular hole precisely in the centre. I do have a circle cutter tool - like a drawing compass but with a small blade instead of a pencil - but I will need to fill the existing hole so I can draw the circle using it...


The hole filled, I can now set the hole cutter pin firmly in the middle of the turret ring and draw the blade around in a circle. This will provide me with an accurate guide by which I can cut out the new attachment socket...


Using a small drill bit I drilled a pilot hole on the inner edge of the guide and then used a Dremmel cutting bit to cut all the way round the guide. Although the quick way of getting the hole the bit left the soft plastic a little rough, so I then neatened up the edge of the circle - right up to the guide line - using a file...


I kept trying the turret in the socket hole until I eventually got a snug fit. After a wee while in she popped and I had a tank with a turret!


Well, that's the first part of my turret attachment plans - next I want to add a couple of small magnets to the model so that the turret stays in place but is easily removed and exchanged (I'll explain why later - as I have a 'cunning plan')! 😉

Next: Adding the magnets!

-----------------------------------------------

Link to the KV-1S Conversion Project series.

Sunday 28 June 2020

Battlefield Scenery - Part 2 & 3/4!

While making my test piece for 'modular scenery' (see previous post - 'Road to Nowhere') it struck me that if I decide to go down this road (pun intended) it might take me quite some time to make enough scenery to dress my dinning-room table 'battlefield'! 😂

[I still have to work out how to do modular rivers and hills!]

And so... To hold me over until I have proper scenery made I decided to replace all my old crappy - and very tatty now - paper printed terrain (basically just printed-out stretches of textured patterns) with something newer and neater - felt scenery!

My selection of felt pieces and some printed out templates to
act as guides for cutting out my felt scenery.
There are plenty of examples online of wargamers who have been using felt terrain to great effect...

Felt battlefield example by Ronald Bingham.
For me, one of the greatest advantages of felt scenery items and felt battle mats is their portability. I don't have a shed, basement, spare room or garage where I can set up a permanent wargaming table, so my go-to alternative is the part-time use of our dining-room table!

This means that any game I plan has to be something that can be put together and taken apart quickly and easily. I also need all the relevant parts of my battle table to be easily stored, preferably in a number of small or medium-sized boxes. This is why I decided to make my own modular scenery in the first place.

BUT meanwhile...

As I said, until I can make all the bits and pieces I want for a better-looking battle table, felt seems to be the way to go. It's very cheap, very flexible (in that you can quickly and easily cut-out custom shapes to make new designs for any situation), fold-able and light.

Here you see the paper templates I cut out laid on top of my felt pieces ready
for me to trace the outlines of my scenery onto the felt...

But What About the Look?
Felt is a very simple solution - given - but it can look quite nice even mixed into pre-built scenery. But I actually like the simplistic and clean look of an all-felt battlefield, my favourite battle mat is - after all - a simple piece of green baize cloth (the type used to cover pool and snooker tables).

Cutting out my felt scenery was very easy using paper templates as guides...


The main trick to getting nice neat felt pieces is to use sharp fabric scissors (and have a steady hand). I did a bit of Googling and apparently there is a very handy rotary felt cutter that would be ideal for this, but as it was £20 I settled for scissors! 😁


The end product looks surprisingly OK once a few pieces are laid out. I managed to find some nice mottled textured felt that lends itself nicely to fields. These came in a variety of colours so I could make different 'crops' or perhaps use them to indicate marshy land...


I'm still cutting away with my scissors at the moment so I don't have a full table of scenery objects yet, but I thought it would be interesting to post up what I have so far so you can get an idea about what a minimalist looking table setup might look like...


I just have to work out how to do some little hills and bridges and woodland, then I think I'll do a little test game.

Monday 22 June 2020

Road to Nowhere - Battlefield Scenery Pt. 2

Blimey - I completed something! Par-tae! 😂


OK, it's just a little test tile for a modular road set I'm thinking of making, but it's something. But before I get ahead of myself - here's how I completed the tile...

6... (See previous post for the first 5 steps)... I painted the black primed base with some muddy acrylics colours. I tried to make it quite thin in places so you can see faint patches of the black primer showing through...


I varied the mix of brown as I went along - a dark mahogany with a mid-chestnut - so that it also helped produce
 a patchy multi-tonal effect.

7... Next, I did some dry-brushing to pick out the raised textures to give the road some highlights. I went quite light to create some high-contrast so that - in theory - it would show through the flocking easier. It does look a little messy at this point...


Additionally, I drizzled in some dark wash into the deeper crevasses and around some of the 'rocks and stone', just so they 'popped' out a little more.

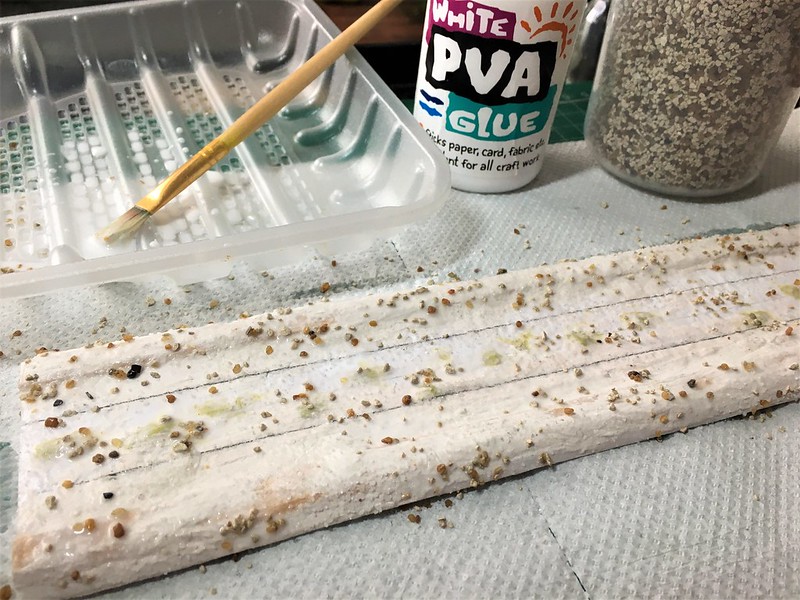
8... Onto the flocking. I haven't done a lot of this - just some vehicle bases - and so I was a little nervous about this stage as flocking is seen among modellers as being a bit of an art form! Also, I only have a very limited supply of mainly 'medium' summer green - The Terrain Tutor used a mix of three tones to create shade and highlights to his imitation grass...


After application (above photo) I tapped off the excess then waited for the PVA glue I used to stick the flock to the tile dry. Then I went over the grass with a dry paint brush and carefully brushed off any remaining flock AND to uncover any of the road detail that I wanted to show through - like the track texture pattern and clumps of 'rocks' and 'stones'.

9... Now, just to finish off my road I added some extra highlights (as the PVA I sprayed on the road to 'fix' the flocking in place has dulled down my previous highlighting). Also, because I only had one shade of grass flocking - medium summer green - I added some dry-brushed highlights to this as well using a ochre-beige (a light mustard shade) just to give the grass some tonal variation.

And bob's your aunty...


Conclusion...
Well, technically the test tile turned out 'OK'-ish. I'm both pleased that I have actually completed a bit of modelling AND that I think I did a decent job...BUT (there had to be one)...

As to it being the answer to my need for a modular road system for my 1/100 GF9T games, I am less happy. The main fly in the ointment is that the tile is warping - I managed to hide this fact in the photos I took BUT there is a noticeable bow in the middle... This annoys me as I notice it (it's an OCD thing)!

The whole point of reinforcing the foam board base of this tile with wooden lolly-sticks was to prevent warping...And this clearly hasn't worked. Also, this is project has been quite a lot of work so if I'm going to do it I want it to be damn near perfect with NO niggles.

So, what to do...?

Well, I think I have two options:

Option 1: Find a sturdier board on which to base my road WITHOUT it being too thick, heavy or expensive...

Option 2: Do some mental calculations about just how long a complete roadway set is going to take me to make and decide whether it would be more cost-effective just to buy a pre-made set from Fat Franks...

'Fat Frank's' 15mm Wargame Dirt Roads Set is £7.50 - taking into consideration
how much work it was to create my test tile, is paying £7.50 a better deal?

...To be Continued!

Thursday 18 June 2020

Road to Nowhere - Battlefield Scenery

As said in a previous post, I really wanted to create flat tile modular scenery - like rivers, woods and roads - for my 1/100 scale war-game table...But, typically, I couldn't find a good printable system that would allow me to make up some roads (for free).

Yes, there are quite a few commercial solutions - like the ones from Deep Cut Studio and Fat Franks - but I wanted to keep this 'on the cheap' (the wife is watching my hobby spending like a hawk)! 😣

Deep Cut Studio's Roadway Tile Set - almost exactly what I wanted, but €25!
So, I'm trying to come up with some ideas for home-made flat roads... Then I found this video...


Good old Terrain Tutor, he never lets you down. But I was a little unsure about how flat the roads were using TT's methods and was concerned as it does look like quite a lot of work. So, it seemed like the only way to find out was to knock up a quick test...

1... I cut the base out of 3mm foam board - though I'm not quite sure if that's exactly the same thing as the TT used - I think it is? (Is foam board the same thing as 'expanded PVC'?)


...And I reinforce the edges - to help prevent warping - with some lolly-sticks.

2... Next I cover the board with a thin layer of quick drying PollyFilla, I love using this plaster filler as it lends itself to making natural textures (I threw in a few bumps, just because)...


3... Using diluted PVA glue I stick lightly sprinkled fine sand and 'budgie grit' onto the textured base. It's a bit hard to know when to stop or how much grit to add, but it's a kinda 'less is more' situation...


4... Once the PVA is completely dry I try to create the texture of track lines - the groves in the dirt road made by wheels and tank-tracks - by spreading two thin lines of Pollyfilla the length of the road...


I then run a stick along the lines of filler to create - hopefully - the wheel track patterns. Were this 1/72 scale I would actually go to the length of rolling a spare wheel I have from one of my truck kits over the hardening filler to get a tyre pattern (as TT does in his video tutorial).

5... After yet another period of drying, I depart from TT's instructions and do what I normally do when making vehicle bases and that's to prime the textured base with black primer...


...End of Part 1!
I'll stop here before I move onto the painting and flocking of my road. But even at this incomplete stage I'm a little unhappy with the way this is going...

Overall, the road is thicker than I wanted - filler and texturing on top of 3mm foam board and lolly-stick has resulted in quite a tall roadway. Not huge, but when you remember that I originally had in mind a flat printed road mounted on a 1mm piece of card stock the 5mm tall structure I have now is a bit of a chunky monkey!

...That said, I am enjoying getting back into terrain making and it is fun! So let's see how it turns out.

Apologies to Anyone Who Has Been Reading This Blog!

Well, this is embarrassing! 😮

My blogs have always mainly been just for my own satisfaction, they are my digital diaries intended as records of how I did stuff or what I was thinking in case I needed to look back at a later date...

If other people enjoyed reading them, great but I doubted that I would get that much of an audience as there are loads of better modellers than me out there.

THEN...

Today something weird happened with BLOGGER - I know they have been tinkering with their system and updating it - and when I opened it to write a post THERE WERE LOADS OF VISITOR COMMENTS WAITING FOR ME TO READ, ANSWER AND PUBLISH!!! 😲

Apparently people have been reading my blog! I just wasn't aware until now.

Sure I saw the occasional comment - BUT there were over 100 waiting for me this afternoon, some dating back years!!!

I AM SO SORRY... If you made a comment I was NOT ignoring you, I just did not see any comments coming up in the Blogger system!

NOW I have to sit and read back through a mountain of comments, question and what-not and try and work through the backlog. As a quick fix I have just gone ahead and published ALL comments!

AGAIN - I CANNOT APOLOGISE ENOUGH...

I am gutted that all this time I though there were just a couple of people reading my blog (which to be fair I was happy enough with) but it turns out that I had a little following all this time. I just hope that the lack of any response on my part has not turned anyone off!

Oooops!

Saturday 13 June 2020

1/100 KV-1S Conversion Pt.3

Well, I finished the modelling part of the work on my little KV-1S tank turrets. Working with a 3D printed model - by Butler Printed Models UK - wasn't the traumatic experience I thought it might be. Yes, the material is a bit weird - "It's plastic, but not as we know it, Jim" - and you do have to use a slight different approach to working with it, but it's not completely alien.

Cleaning up was done more by shaving and paring than by filing, I found this gave a sharper finish to the material BUT it can be filed and sanded, I just preferred to use this technique instead...

Using Tamiya's Modelling Chisel.
"A little off the back, Sir?"
Filling was optional and if you are just wanting to get a war-gaming model quickly onto the table you could skip this cosmetic phase. But, I've plenty of time so sorted out a couple of minor things (they were't even what I would call 'issues')...


I didn't try to smooth out the 3D 'stepping' pattern on the model by filling it - though I had thought about it - instead I gave it a quick sand with very fine grit paper and a thin coat of liquid cement followed by another light sanding. You can't get rid of all the 3D print steps as some are in awkward places but this model is what it is and it was never going to be display level quality.

Finally, I added some little details - again you don't have to for war-gaming...


After gluing on these little bits and pieces I filed or sanded them down to shape and that's that really.


I'm quite pleased, especially when you consider that these turret models only cost me £3.30 each. They really helped me out as it's still hard to find a model of the KV-1S in this scale. I was also, impressed that BPM has the good sense to allow you to buy just the turrets themselves rather than the full tank model. It means that, in cases like the KV tank - where the chassis didn't change all that much throughout the tank's development - you can 'upgrade' your model through the series just by replacing the turret you require. Neat.

Next: Onto making the chassis.
-------------------------------------------------------

Link to this project series - 1/100 KV-1S Conversion