Tuesday 31 January 2017

Gaz 55 Ambulance - Part 6

The Great Green Debate (Still Haunts Me...)
Time to put paint to plastic. I'm a little nervous about this as I feel very rusty, and my airbrush breaking did not help the situation (back to rattle cans and brush painting for the foreseeable future).

This next stage in my Gaz 55 project is to lay down the main colour block, or base coats. I'd picked my preferred colour scheme and had originally intended to airbrush on a coat of Vallejo's Model Air 'Russian Green', but with no airbrush, I had to revert to Humbrol's 'Matt Light Olive' Acrylic Spray can for the basic green coat.

This has pros and cons, proper 'Russian Green' is usually considered to be a deeper, richer green, as can be seen from my YAG 6 Heavy Truck model...

Vallejo's 'Russian Green' was used on this truck, it has nice rich yellow tones,
and seems like a deep and warm green.
But, Humbol's 'Light Olive' is a 'bluer' medium olive which can be modulated to take on a darker tone, once weathered, as in this example...

Humbrol's 'Light Olive' is a versatile generic olive that can be modified to take
on different tones of green with washes or filters. But, basically, it does have
a slightly colder cast to it. I also 'dirtied' this Zis-6 up a bit!
When I did my research for Finnish war-time trucks, my main point of reference was this photo of a very rare museum example...


Again, here, I used Humbrol's 'Light Olive' but then modulated it with the
previous reference photo in mind.
You be the judge of which green paint - 'Russian Green or 'Light Olive' - is closer to this original example. Sadly, there just aren't enough original example of Finnish military colour schemes left to be definitive about this, and there is as much a debate about Finnish colours as there is with those other great modelling controversies of what constitutes 'Olive Drab' or, indeed, what 'Russian Green' is.

My preference leans toward the 'Light Olive' approach, and with this in mind, I was quite happy with how my Gaz 55 came out after it's base coats were added...


The black and green two-tone scheme I am going for an original Soviet scheme, the Gaz being a vehicle that was 'liberated' from its previous owners by the Finns. So, I may modulate this olive green to be a bit darker, similar to the Zis-6 truck example that I picture above. Or, I may try a bit of filtering with a 'yellow' to create a deeper 'Russian Green' effect...We shall see...

Sunday 29 January 2017

Bolt Action 1/72 Normandy StuG III

StuG III Ausf. F/8 (Sd.Kfz.142/1) at Belgrade Military Museum.
Author - Slaven Radovic. Source: WIkipedia
After my hiatus, I desperately need to get some painting practice. I don't want to jump straight back into my main project until I blow away some of the cobwebs on my brushes!

I had a good look through my stash and old project shelf for something that would ease me back into splashing on acrylics. Something that didn't need to be 'display quality' painting. Then I remembered my 1/72 Bolt Action project and that I had bought an Armourfast 'Easy Build' Stug III, ideal for a simple paint job.

The version of Armourfast's Stug III kit that I had was the older, original, model.
This was the 'earlier' version of the assault gun, without the upgraded side shields.
The kit itself - created especially for war gamers - is a pretty simple one with an uncomplicated level of detail, meaning there isn't a lot of fiddly parts to paint. In all, there are only 25 parts to the kit and the majority of the assault gun's design elements are moulded directly onto the main hull parts...


This uncomplicated model should allow me to concentrate on getting my painting mojo back, and without me getting too engrossed in minutia. Yet, it should turn out (unless I completely mess it up) good enough for use in my 1/72 Bolt Action gaming set.

Although the Stug III represented by this kit is an earlier version of the Stug (StuG III Ausf. F/8, I believe), without the spaced side-shield armour, this version of the Stug lingered on in use well into late war...

Sturmgeschütz III Ausf. F/8 coded “001” from Pz.Jg.Abt.61, 11th Panzer
Division, France, September 1944. Source: Unknown

The above colour scheme seems ideal for my purposes, as even though I may be a touch rusty I still think I may be able to pull this off. Certainly, the build poses no problems whatsoever, as it only takes five minutes to put the basic kit together...


Next: Too simple? Do I add at least a few pieces of stowage? We shall see...

Friday 27 January 2017

Zvezda 1/72 20mm Flak38 AA Gun - Part 3

Gun Crew Conversion
It's part of my slightly OCD-like propensity that I could not simply put up with the slight variation in size between the heads of my various Finnish AA crewmen, even when they were part of a completely different gun crew!

The Zvezda 1/72 figures, while beautifully sculpted (in my opinion), are a little on the larger side of the scale figure spectrum. Certainly, they are a smidgen larger than the usual Airfix/Revell/Ceasar plastic 1/72 figures that I have been using. So, as with my Bofors crew, I ended up feeling that I had to do a bit of corrective surgery.

Flak 38 crew, front row, left and middle figures.
In fact, one of the figures - the standing loader - ended up with his legs chopped off so I could reduce his height a little bit as well. But, the upshot of all this anality is that all my various AA crewmen look like they are in the same scale now...So, I feel better. :)

It's onto the priming now, but I will leave off painting until I assemble the last crew figures for my AA units - the Landsverk (SP AA gun) crewmen.

A feeling of trepidation ceased me at this point, as I suddenly realised that I will have to go through all this converting of figures again when I come to assemble my field artillery units. Oh, dear!

Wednesday 25 January 2017

Zvezda 1/72 20mm Flak38 AA Gun - Part 2

I feel a little mean just posting this meagre piece up, but it does emphasise just how quick it is to build this kit...


Ta-da! And it was done. The little Zvezda Flak 38 went together in minutes, and there weren't any issues. Well, unless you count my inability to handle tiny parts without breaking them that is!

If I have any criticism (and this is sort of similar to my niggle about their Bofors model) it is that you cannot elevate or depress the gun, it's in a fixed position. Other than that though, a nice little kit with a reasonable amount of detail.

One thing, though, in future I may start priming intricate little kits like this on the sprue before I put them together. Priming the model now it's together will be a little challenging, with all its nooks and crannies.

Flak 38 in Transportation Mode
As with my Bofors AA gun, under the Rapid Fire war game rules, I should really make a version of this model to represent the gun in its transportation mode (towed configuration). As mentioned in the first part of this project journal, the Zvezda kit does not come with the wheeled carriage to represent it 'mobile', so I had to source this. Luckily, I already had this model as part of a separate purchase I had made...


The above photo shows the Altaya Flak 38 that came with their Steyr 1500 light truck, a happy coincidence (I bought the Steyr for use as a command vehicle). The model is a wee bit rough round the edges but should clean up well enough for my use.

One noticeable difference between the Altaya and my Zvezda Flak 38 is the inclusion of a gunners shield just in front of the reflector sight. This may be a because the Altaya model is based on a later variant of the AA gun, in any case, it's easy enough to remove.

Next: Modelling the crew and priming the guns.

Tuesday 24 January 2017

'Finnish' Bofors - Part 3

Crewing the gun
Under the Rapid Fire game rules that I'm using as a guide for my Finnish army collection, the Bofors AA unit needs a crew of three. The Zvezda kit does come with figures, but the WW2 pattern British Army uniform is just too difficult to modify to make passable Finns, so I'm having to look elsewhere.

Finnish Bofors crew in 1941, mostly wearing German M40 helmets. Though, it
seems they were still in short supply as the foremost crewman needs a bigger size!
In order to modify myBofors gun - to look like the Finnish variant - I purchased a couple of boxes of Zvezda's Soviet M1939 37mm AA gun (which itself is a variation of the Bofors 25mm AA gun). This set comes with a couple of Soviet crew, which will be easier to convert into Finnish soldiers (I'll probably use one of the Pegasus Soviet infantry figures I have to create a third member of the crew).

One of the Soviet AA gun crew fitted with the arms from the British Bofors crew.
The good thing about the Zvezda gun crew figures is that they are multipart, with separate limbs (which makes it easier to pose them correctly on the gun model). So, I can swap around arms to make the Soviets fit the British Bofors properly. All I need then is some suitable heads, but I have a plan...

I am going to try out some of Ceaser Model's mid-WW2 German infantry as noggin-doners. The Finns use the German M40 coal-scuttle ('Stahlhelme') helmet as standard during the Continuation War, so I will have to do some brutal transplant surgery.

Figures with the new heads. Just trial fitting positions for the fitting of arms.
There was a slight difference in scale between the Zvezda and the Ceasar figures, the Ceasar heads being a bit small for the bodies I grafted them onto. But I'm hoping this will not be so noticeable as they are in a sitting pose...

Dr, Frankenstein would be proud! :)
Well, they are a bit of a hack job, but they will have to do. Now, onto the painting, though, I may wait a while until I'm ready to paint a batch of Finnish figures (I have a few drivers in the works).

Monday 23 January 2017

Zvezda 1/72 20mm Flak38 AA Gun

Moving along quickly (for me), I'm now beginning the next kit for my Finnish anti-aircraft contingent. The Finns had a number of German 2cm Flugabwehrkanone (Flak) 38 light anti-aircraft guns, which they designated the '20 ItK/38 BSW'. The Rapid Fire war game rules specify that my Finnish HQ Company should be equipped with one of these guns, so I looked around for a suitable model.

Finnish 20 ItK/38 in action. Photo taken in Karvala September of 1941.
(SA-kuva photo archive, photo number 53274). 
Luckily for me, Zvezda do a lovely little simplified Flak 38 model (with crew) specially designed to suit wargaming purposes. And a very nice bonus was that this little kit only cost me £2.50 plus postage!


Now, unlike my Bofors AA gun kit, the Zvezda Flak 38 comes with a crew I can use unmodified. The figures included - in German infantry uniform - would pass very well for Finns once an appropriate paint job was applied. Phew, less work.

What's in the (little) box?
There are only two small sprues to this kit, with just 19 parts to this kit (including the two multipart figures)!


Aside from the plastic parts, there is also the usual paper instructions (a small two sided A5 sheet) and Zvezda's 'Art of Tactic' wargame card (which looks a bit complicated compared to 'Bolt Action', but I've not played AoT).

Like the Bofors kit I'm already working on, this Zvezda kit is made from a slightly softer plastic than the usual plastic injection kits.

Mobile Configuration Version?
Because I am building this model using war game rules as a guide, I have to include a second version of this unit in its mobile mode. Part of the real Flak 38's strengths was its manoeuvrability, with a special two-wheeled carriage designed to carry the gun to its position at which point the gun could be removed from its trolly and deployed on the ground.

A German Flak 38 in its mobile configuration (from which it could still be used).
Seine-et-Oise, France, August 1944. Source: Wikipedia
Now, the Zvezda kit does not come with the wheeled carriage, but, purely by chance, I had already solved this problem as I have a mobile Flak 38 which I got as part of a die-cast vehicle set...

My Deagostini Steyr 1500A/01 truck & 20mm Flak 38 combo. An eBay cheapy!
So, I just have to repaint the Deagostini model to match my Zvezda kit and Bob's your Uncle, static and mobile versions of the Flak 38. Albeit a little chunkier than the finely moulded Zvezda version.

Painting the Finnish Flak 38
For once, there isn't my usual puzzling over what the exact paint scheme of a piece of Finnish equipment was. I had already been informed in a post on the Axis History Forum that the Finn's guns were repainted in their Moss Green, but I also found a very nice colour photo of the gun over on the Jaegar Platoon site confirming that this was the case.

Hooray!

This looks like it should be a very quick project with no hassle at all. :)

Saturday 21 January 2017

Hunor Model 1939 Ford V8 Truck - Part 5

We'll start this post by having a quick look at how I intend to produce a couple of driver figures for my Hunor trucks. Annoyingly, these kits do not come with generic 1/72 drivers (I wish manufacturers would, by default, supply a driver, it's sad that so many do not).

Because these trucks will be part of my Finnish Continuation War collection the drivers will have to look the part, so I will have to cobble together something suitably 'Finnish' looking!


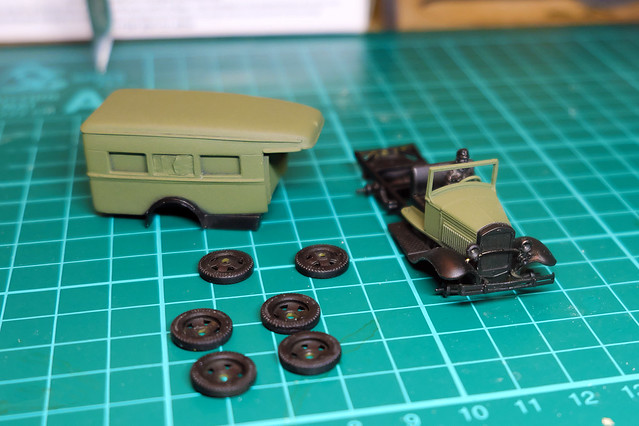
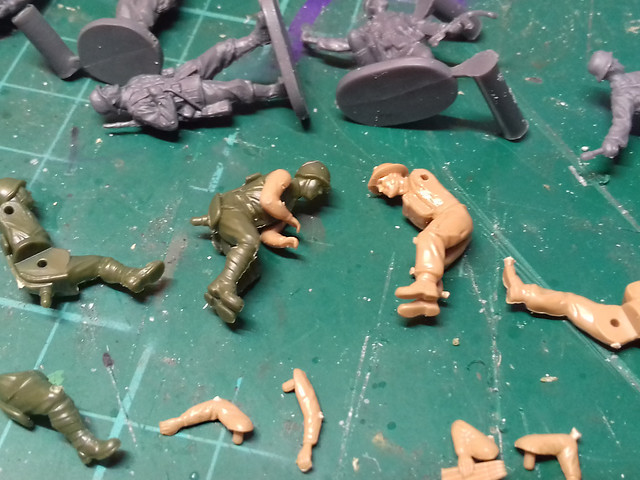
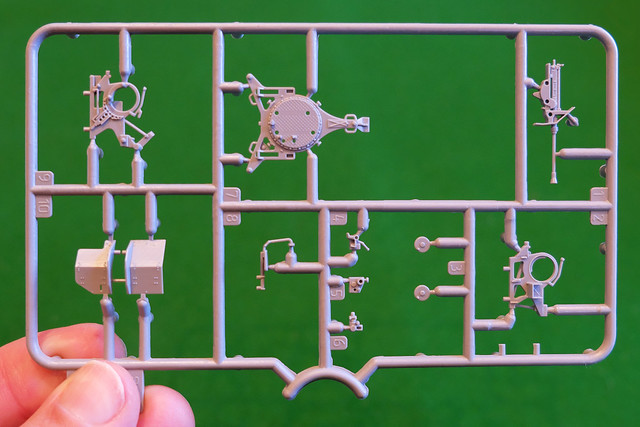
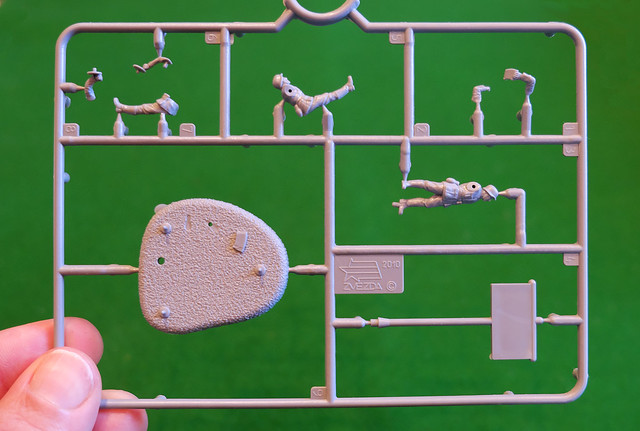
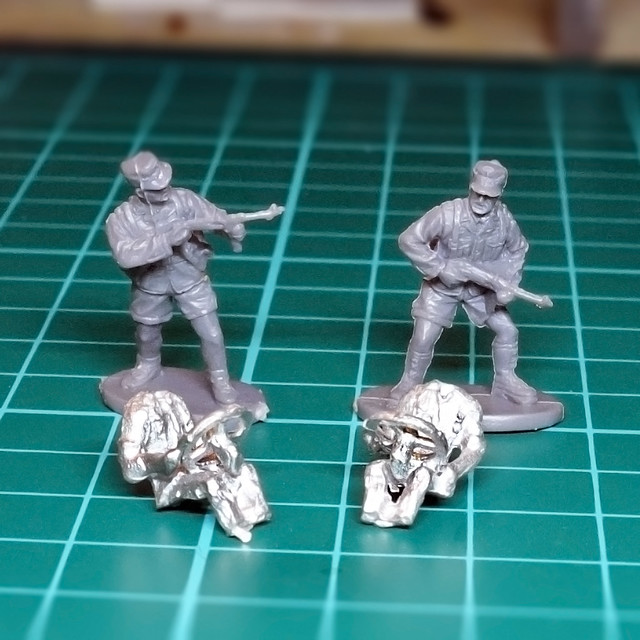
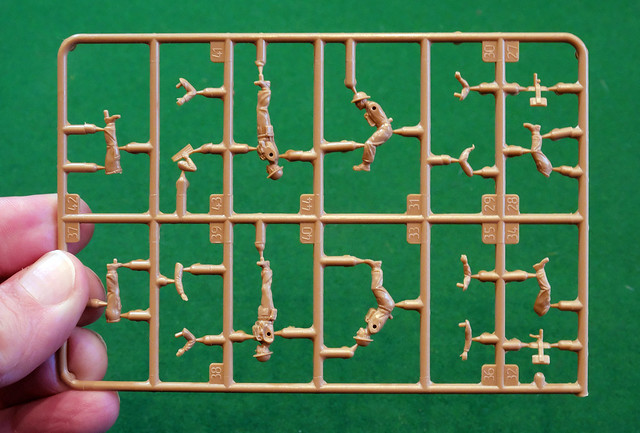
What I decided to use were two of my S&S Models 1/76 white metal Generic Driver bodies, and then I will transplant the heads from two of Ceaser's Africa Korps infantry onto them. The German field caps on these particular 1/72 figures look very close to the Finnish issue field cap of WW2.

As you can see, I have gone for a body that also includes a steering wheel, this is just convenient for me because - although Hunor does include a resin steering wheel - I don't want to muck about with tiny and delicate resin components like steering wheels (which are super delicate and, once again, are attached to a slab of resin). I figure that once the completed driver is mounted inside the model's cab you won't be able to notice this fudge.

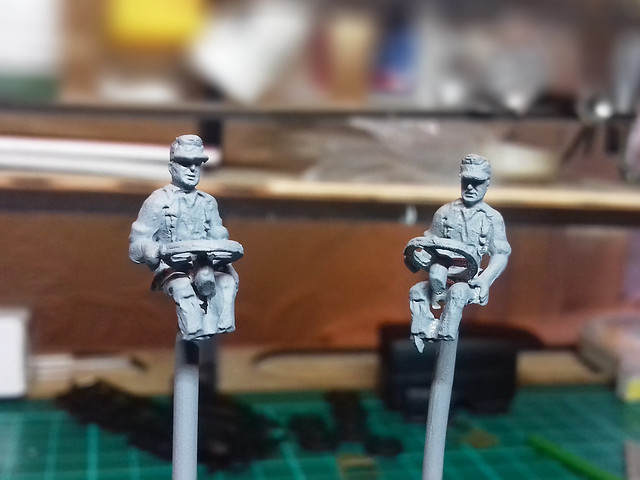
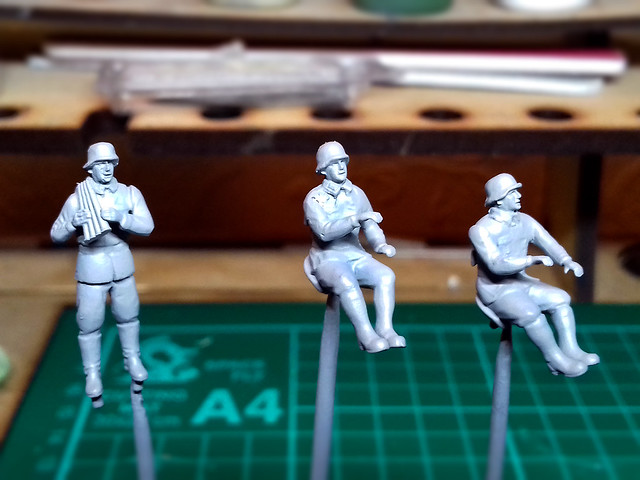
Head transplant completed and primed, I am quite pleased with these figures.
Anyhoo, I have decided to have a go at making my own cargo flatbed to replace the resin parts that were supplied. Now, I have to say you do not have to do this, the supplied parts aren't great but they are useable. But, I want to build a canvas tilt cover onto the top of my flatbed, so I wanted something a little more sturdy (the walls of the Hunor flatbed were very flimsy and a little warped).

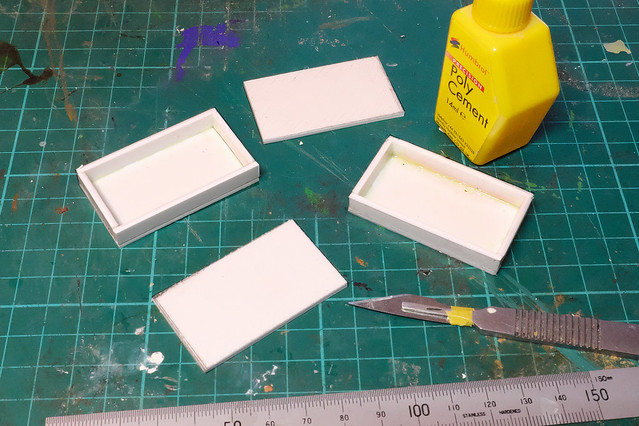
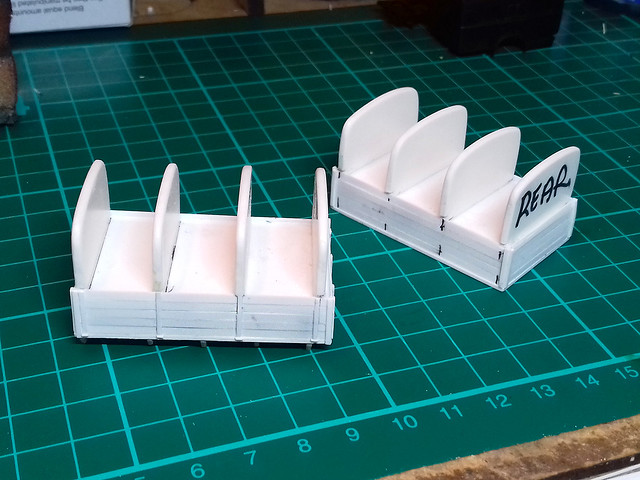
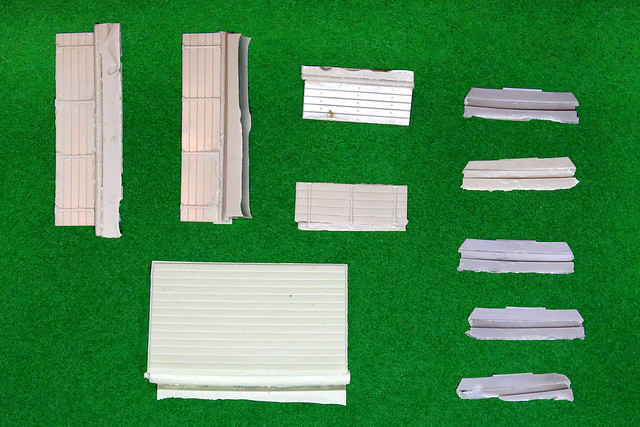
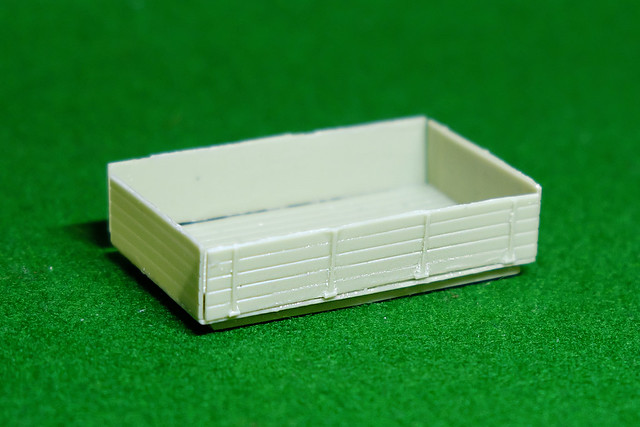
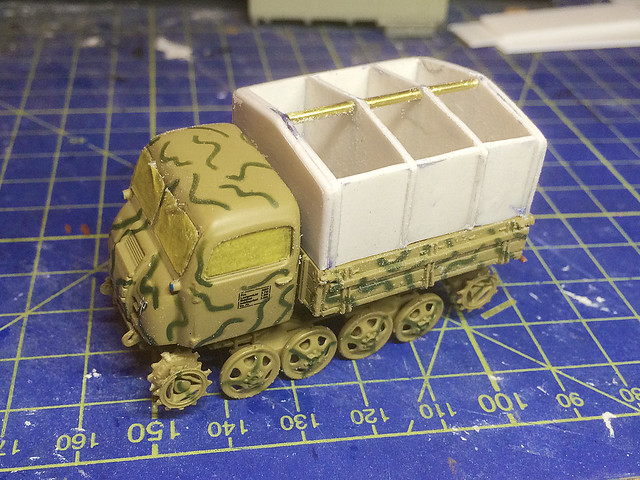
I started my flatbed by making two simple styrene boxes...


These would be a nice, square (as in, evenly proportioned) and very solid platform onto which I could add the detail and the additional 'canvas' cover construction.

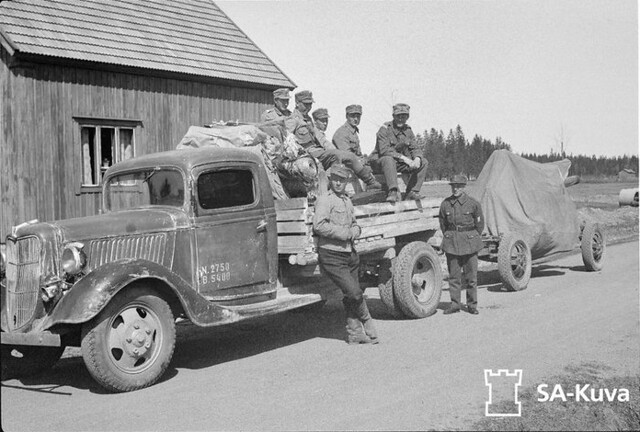
Historical note: In actual fact, while having a canvas cover suits my wargaming aesthetic preferences, the real 1939 American commercial Ford trucks don't seem to have had them. In fact, most of the commercial trucks imported to Finland from the US seem to be what are called 'stake trucks', which don't have a cover, just wooden slated side-walls. The German-made Ford V8s - designated Ford G91[9]7T, 3-ton, 4x2, 'Ford Einheitslastwagen' [Universal truck]- did have canvas covers, but that's probably because these were manufactured with the military in mind. So my interpretation is a bit of a hybrid model of convenience!
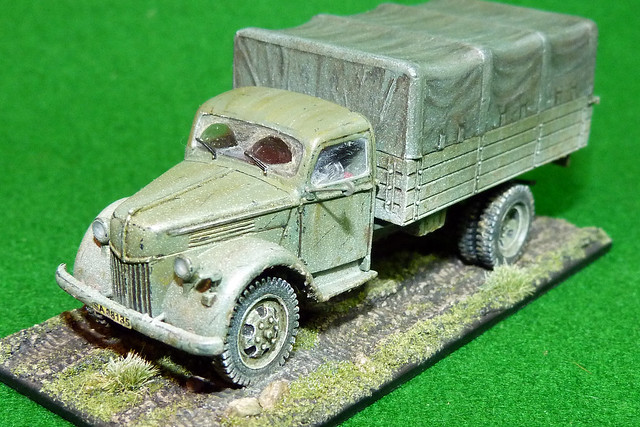
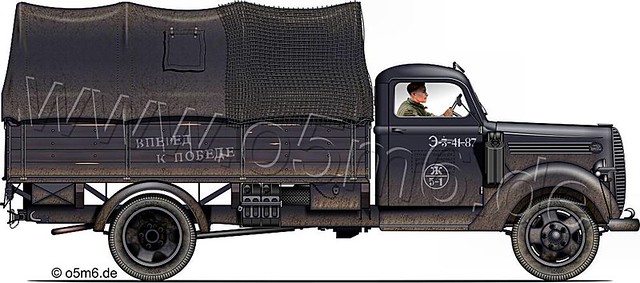
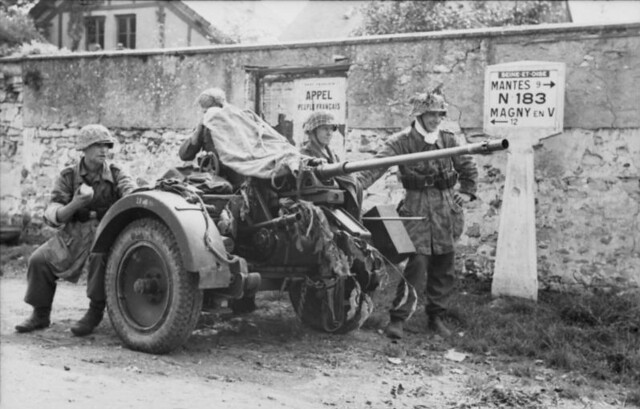
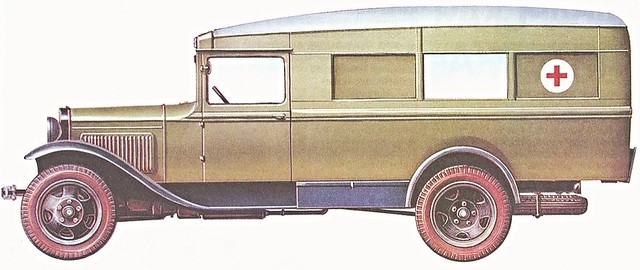
The German-built Ford (yes, the Americans made a profit from this as they were
yet to enter the war), these were modified to suit military use. Additions included;
rear mudguards, 'jerry cans', tool boxes, roof-mounted convoy signal and the
standard Wehrmacht type of canvas tilt cover. The German M39 Ford also had
a single piece windscreen, all things that the American version didn't have.
Picture source: Engines of the Red Army in WW2
So, I reiterate, I am actually cheating by adding a canvas tilt to a commercial American Ford M39. That's not to say that they never had a canvas cargo cover, I've found pictures of US Ford '39s with locally made canvas covers, but they seem to be the exception rather than the rule. But, these covers suit wargaming as it means you don't have to make removable passengers to represent the troops that accompany this vehicle. :)

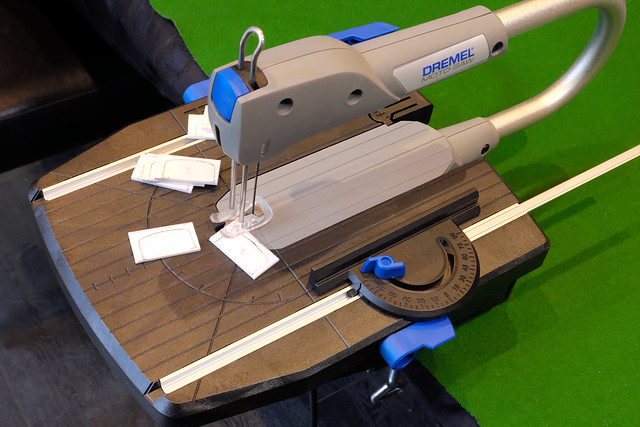
Now, here's an opportunity for me to use my fancy-nancy Dremmel Fretsaw!
With the basic boxes (cargo flatbeds) constructed, I start making the canvas covers. I'll be making a couple of simple ribbed-framed boxes, much in the same way as I did when I converted my 
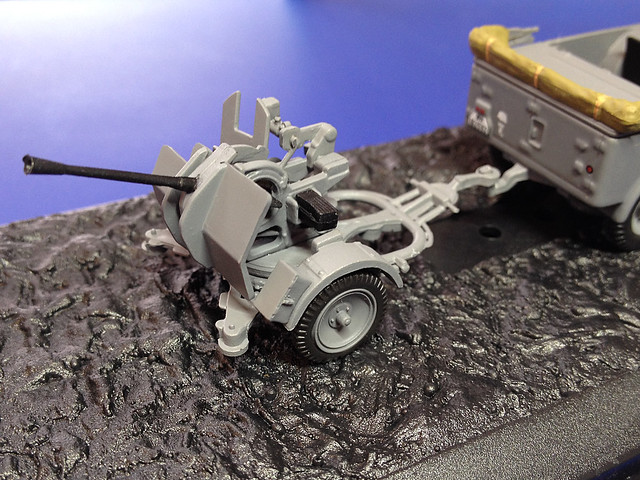
Steyr Raupenschlepper (RSO) Prime Mover...

A 'canvas tilt cover' frame construction, which I added to my RSO.
The RSO had a nice easy squarish canvas cover, but my Fords will have a more arched cover, with rounded edges, so here's where my Dremmel Fretsaw comes in. It's ideal for cutting out freehand shapes neatly...


I used styrene card, as that's what I just happened to have to hand at the moment, but this could have been just as easily done using ply or even balsa wood. However, using plastic card means that the frames should be nice and sturdy and will glue nicely onto the flatbeds I made.

One word of caution - if you are going to give this a try - the fretsaw is primarily designed for cutting wood and thin metals, while it does cut plastic you will have to make shorter cuts on slower speed settings. Long cutting session on high speeds creates HEAT, and - as I found - you could actually melt the plastic you are cutting so you SEAL up the cut as you are going along! (I kid you not!)


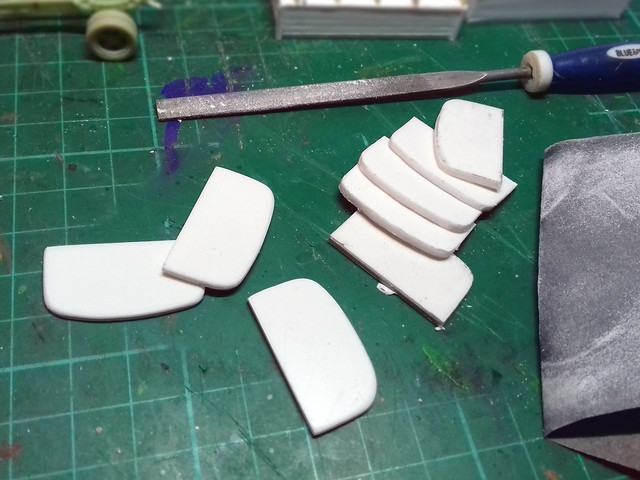
With some sanding to finish off any rough edges, my plastic arched ribs are ready to attach to the flatbed. I've also started adding the detail to the flatbed boxes, like side planks and 'metal' side strips...


I'm still undecided as to what material I will make the actual canvas cover - maybe masking take or tissue - as the tin foil (kitchen foil) I used for my RSO cover was a bit of a pig to work with and paint. I think I'll have to do some experiments.

BUGGER...Another fly in the ointment!
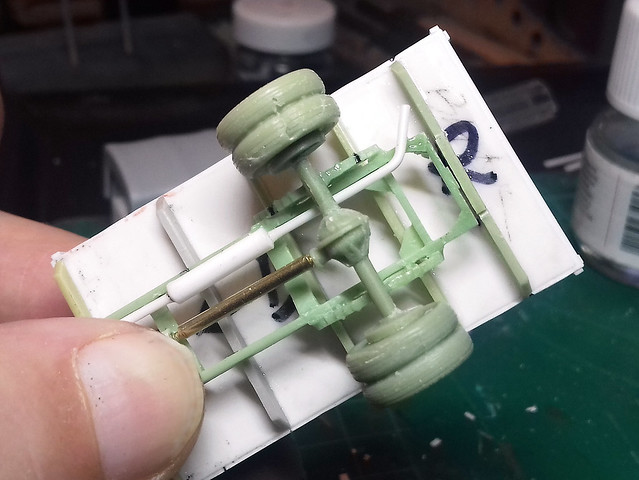
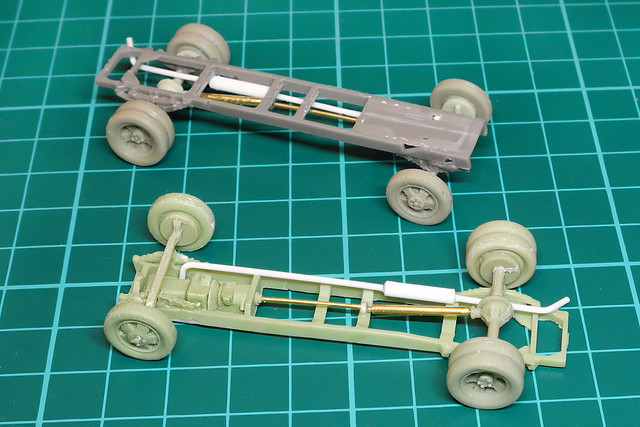
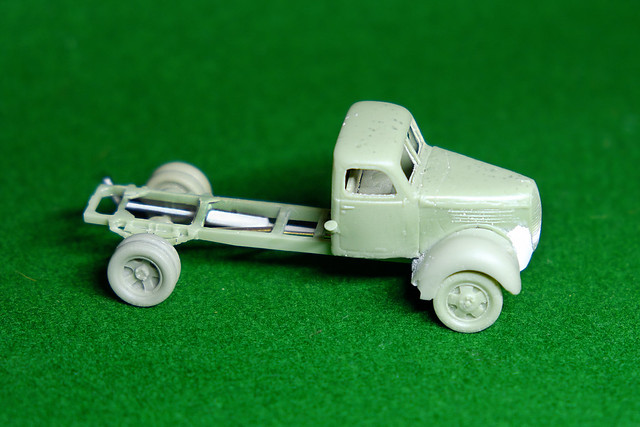
...On testing the fit of the flatbed to the chassis frame I discovered that there seems to be a possible issue with the dimensions of Hunor's chassis. It may be too short. If you attach the support spars where Hunor suggests you do on the bottom of the flatbed (and they are very specific in their instructions) the rearmost spar overshoots the chassis...


After going back to the reference material I have and some Googling, I think I have solved the puzzle of this issue. Hunor - as with their Ford V3000 truck - do two versions of this vehicle, one based on the American design and another based on the German licenced-build version. However, to save time and money, it looks like they have cheated and used the same chassis for both models and this may be inaccurate as I believe the German chassis and chassis support arrangement differs slightly from the original American version. Still, there are some dimensional issues as well.

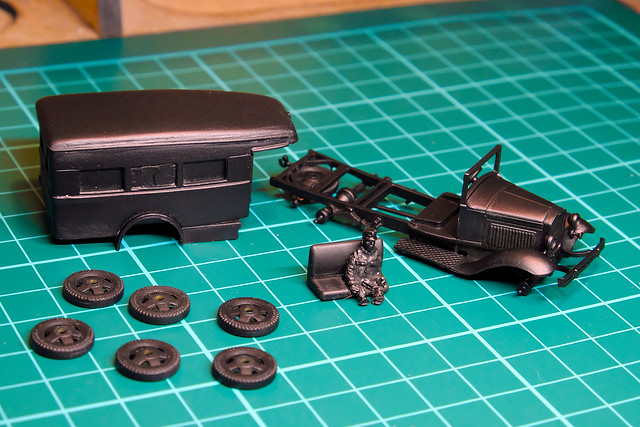
What makes me think they have included the German chassis is that they have also included the rear mudguards - which the American version didn't have - and some additional accessories that relate to the German militarised Ford G91[9]7T version of the truck.

It's not a major disaster, just another annoyance and means you will have to show some initiative when constructing this model (which seems to be a pre-requisite for building resin models)!

Friday 20 January 2017

Gaz 55 Ambulance - Part 5

Primed and ready to go!
Some progress with the Gaz 55, despite being particularly ham-fisted and breaking a couple of small parts off a couple of times, I eventually managed to complete my construction of the major assemblies and got the model primed. On a recommendation, I tried Tamiya's Matt Black Acrylic spray can to prime this time...


It is a fairly smooth coat - my usual primer is Halfords or Autocar black, which can be a little thicker - but I am slowly starting to think that the way forward may be to spray on a primer using my airbrush. I may try this on my next model using something like Vallejo's Model Color Polyurethane Primer (I'll still stick to black though).

Incidentally, you may have noticed that the doors are missing from the above photo, this is because they will need careful fitting once the chassis and ambulance body are put together. There may be a bit of sanding and trimming needed to get them to drop in properly, so I'm holding off priming the doors until that's done.

Next: On to the masking of the vehicle body, ready to airbrush on the Russian Green coat. Here's an illustration of the colour scheme that I'm going for...

Thursday 19 January 2017

'Finnish' Bofors - Part 2

Construction of the Zvezda 'British Bofors 40mm AA Gun' and its conversion into a faux-Finnish version was relatively painless (aside from a surprise appearance of the dreaded carpet monster).


You can easily tell the parts that I converted - so that the Bofors looked more like the Finnish version - as these parts are the ones in green plastic. This isn't a truly authentic conversion, just my superficial take on the 'continental' Bofors. In truth, I should perhaps have waited and seen if I could have sourced the proper version as made by 'First to Fight', but hey-ho.

Aside from the absence of the gun shield, the 'continental' Bofors had different wheels and a different means of attaching them to the static support and the side support arms were square tubes rather than the round British tubes. This is just from my inexpert observations, you'll need to do some proper research to understand what the exact variations are between all the different makes and variants (practically every nation involved in WW2 had their own version of this hugely popular gun).

Finnish Bofors 40 mm. This gun mounts the original reflector sights, and
lacks the armor found on British examples. Source: Wikipedia

Thoughts on the Zvezda Kit
I was surprised at just how many parts there were in this kit, it wasn't the simplified 'easy build' war game model I have come to expect from Zvezda's 'Art of Tactics' range. Some of the little parts were quite fiddly (and, frustratingly, I lost two of the support 'feet' to the carpet monster).

The most noticeable feature of the kit - from a modeller's point of view - is the plastic from which it is made. It isn't exactly 'hard' plastic, it's sort of halfway in feel between the normal hard injection moulded plastic and the 'soft' plastic of Airfix soldiers. It tends to fray a little more than usual when you file or sand it, and I found that trimming or shaving with a scalpel was a neater way of getting rid of flash and mould seams, etc.

The gun itself felt a little bendy, although it wasn't actually bent. It just felt like it would easily bend and I did consider replacing it with a Millicast brass barrel, but I decided not to as the whole reason I went for this Zvezda kit was to save money.
Simplified 'wire' sights.
Rivet counters will take issue over the simplified sights on the gun, which are not only the wrong type for the Finnish version but also 'filled in' as the delicate wire construction of the real British sights would be impossible to replicate in scale plastic form. Again, Millicast do make a brass upgrade set for the 1/76 Bofors if you are a real stickler.

My final niggle is that the gun doesn't rotate, but is fixed by pins in one of four 90 degree positions. I would much rather that Zvezda had made the kit with a peg and plug arrangement so the Bofors could have been rotated, particularly as this model is intended for war gaming.

The four position gun mount which corresponds to two pins in the base of the
gun itself. You can mount the gun looking forward, left, right or back.
Overall, I think this is a rather nice looking model, it builds well if you are willing to spend the time cleaning off mould seams. There are no fit problems and everything just slots into place nicely.

Quite satisfied (aside from qualms over historical accuracy, but this is my fault and not Zvezda's).

Tuesday 17 January 2017

Zvezda British Bofors


I  decided that January would be 'Anti-Aircraft Month', but I'm only just getting round to making my first AA gun (so expect this project to creep into February)!

The model I had chosen to represent the Finn's '40 ItK/35-39 B Bofors' (Finnish designation for the imported Swedish Bofors) is Zvezda's 'British Mk. I/II'. I'll be honest, I bought this because it's cheap(ish) and simple, but good. I've been very impressed with all the other Zvezda models I have bought, detail and moulding is always crisp.

(I could get exactly the right 'Swedish' (style) version - minus gun-shield - if I really wanted and was willing to search one out, but the Zvezda version is readily available. An option might have been to go for the 'First to Fight' Polish Army Bofors 40mm, but they weren't available when I looked.)


Superb original colour photo of a Finnish Bofors unit on the outskirts of Nokia
township in April 1944. Source: SA KUVA
Anyhoo, I reckon, to make the gun 'Finnish' I need only remove the gun-shield, source some different wheels (easy as I have plenty spare Gaz/Zis wheels which look about right) and change the figures. Easy-peasy-lemon-squeezy!

So, let's begin by having a look at the instructions...


First thing I noticed is that, this isn't the usual Zvezda simplified wargaming model, there are actually quite a few parts to this kit. And, as usual, I take their claim that this is a 'snap together' kit with a pinch of salt.

My impressions that this model is a little more than an 'easy build' was further reinforced when I started to examine the sprues. For starters, there are four sprues containing some quite small and detailed parts...

The crew sprue! Four figures, but for the Rapid Fire game rules I only need
to model three crew. We shall cross that bridge when we come to it.

The kit comes with this base for modelling the deployed gun. Also, here we
have the 'British wheels', I will have to replace these for the Finnish variant.
The Bofors, plus gun-shield (won't need that) and a wee flag! :)
As I said, plenty of parts, which should build into quite a nice little model. And, because I am building this under the Rapid Fire game rules, I have two of these kits - one to represent a deployed AA gun and another in the transportation mode (I was thinking of building this and adding some sort of canvas cover, maybe).

Finnish AA crew pose on a 1937 Ford truck, with a medium AA gun  (possibly
a 76 ItK/29 B, Bofors) in tow. Note the canvas gun cover. Source: SA KUVA
I'm hoping this will be a 'quick build' which will be completed about the same time as I finish my Hunor Ford M39 truck project (as this will be the towing vehicle for this gun). Luckily, the HUnor kit is turning out to be such a start and stop build - due to all the problems with the kit - that I should have plenty of time to get the Bofors built and painted...In theory...

The two versions I will be building; transportation mode and deployed.

Saturday 14 January 2017

Hunor Model 1939 Ford V8 Truck - Part 4

While I continue to wrestle with the Ford's cab (a lot of work there), I have managed to prepare one of the other main sub-assemblies, the chassis...


In the above photo are the unprepared resin parts - aside from the chassis frame itself, which I freed from its slab of resin earlier - and below is the chassis components of my second Ford prepped and ready to assemble.


There are other components, or rather, there should be a selection of other components to complete the chassis, but some are missing! One of the kits has a missing exhaust and driveshaft, and even the kit that does have these parts bits the exhaust component is broken. Furthermore, and I have to be honest, I really can't be bothered cutting the rudimentary driveshaft that I do have from its resin block, it would be easier just to make a new one from a bit of styrene or brass rod.

So, after a bit of tinkering and glueing...


Yes, it's a bit of a dog's dinner, but due to lack of clarity in the instructions (and the lack of a complete exhaust component to work from) I had to use a bit of poetic license in my interpretation of what a 1939 Ford truck chassis looks like (I did Google for images, but just couldn't find the reference material I needed). Obviously, if this had been a model for display or a competition, I would have gone the extra mile and joined a few Ford vintage truck forums and requested some pictures or advice, but as this is for a wargame model and the underside will be hidden, I forewent that!

The third main sub-assembly in this kit is the cargo flatbed (the others being the cab and the chassis) and this is perhaps the simplest part of the model and won't give me too much trouble...


There's the four 'walls' of the cargo flatbed, the floor and then five support spars for the underneath of the floor (which attach the bed to the chassis frame). As usual, there is some trimming to do to get rid of excess resin.

And this is where the construction ground to a halt (again) as I realised what a shoddy fit the flatbed assembly is - not really surprised, though...


I'll stop here, as I now have to decide whether to persevere with the supplied flatbed parts OR do I have a go at making my own. They aren't that complex, but, also, I want to add 'canvas' tilt covers to the cargo area of these trucks, so it's perhaps just as easy to go the whole hog and build the whole section myself...

I shall think on this.

....But, I couldn't resist doing a little test fit...