Tuesday 31 January 2012

T-34 track mod - Part 4

Some quick snaps of the latest progress with my Armourfast one-piece track improvement project.

I've stuck the painted tracks on another experiment I'm doing - the Armourfast SU-85 - as both are exploring 'weathering' techniques. I've tried out some mud on the tracks as well as finishing off the wheels with some highlighting...

Sunday 29 January 2012

Featured work - Florin's fantastic feline!


Thought it would be nice to feature the work from other modelling blogs which have really impressed me. This one is from the Braille Scale Enthusiast blog and is a wonderfully weathered King Tiger in 1:72 scale.

What I particularly like about this blog is that the author - Florin David - documents his process so you can get an idea how he achieved his results. And as you can see they are gorgeous results!

Pop over to Florin's blog for more Braille Scale treats: Braille Scale Enthusiast blog

Wednesday 25 January 2012

T-34 track mod - Part 3

Well, started the painting today. I used the tutorial at scalemodelguide.com as a guide for the process and I used a mixture of washes and pigments (including the Vallejo pigments)... 


It's a messy process! Or maybe it's just my newbie efforts that are sloppy...In any case it was hard for me to judge just how much pigment to use and when to stop as I didn't know how each subsequent layer would affect the final result. I suppose once I have done a few of these I will know the correct 'recipe'.

Here's the incomplete paint job plonked on the side of another experiment I'm doing just to get an idea how it might look when finished... 


The final stage was dry brushing some silver for the metal finish. 

There is still a lot to do, the wheels are to be painted Russian Green and then weathered - and I have to decide how to paint the inside (the back) of the tracks. 

One interesting thing about the pigments - I actually couldn't tell the difference between using the expensive Vallejo pigments and my cheap conte crayon (sanded into powder)! >head scratch< 

What do you think? Is it working? 

Maybe I should finish with a thin dark wash to give some depth and tone down the vivid colours? 

Monday 23 January 2012

Armourfast T-34/85 build - Part 3

OK, not a major piece of progress but I hope it's of interest to someone out there...


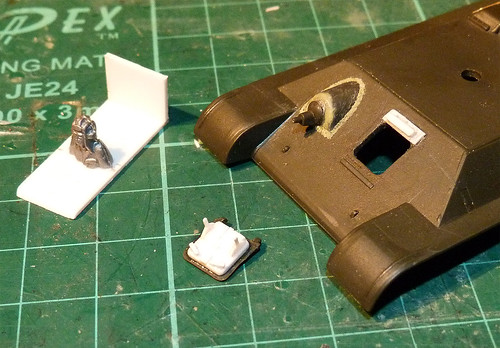
I have made a small platform for my driver - the driver itself is one of the figures from Orion's 1:72 Soviet Tank Crew in Summer Dress set. I couldn't find any clear photos of the driver's postion with the hatch open so I sort of guessed how much of his head would show - I hope it's near enough!


The hatch also needed some detailing - with stuff like the hatch levers and handles. Quite easy to make but fiddly.  :) 

I don't know about you but I find photographing bare white plasticard constructions very challenging. If I use a flash it bleaches out the detail (as in the first photo above) so I end up having to under-expose.

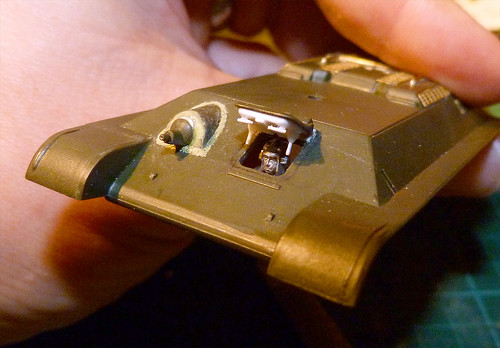
Anyway, you can see from the picture on the left that I have simplified the inside hatch arrangement, but it should look OK at scale. Though I must do some research on how the inside of the Soviet T-34 hatches are painted as I've seen different colours used - sometimes a light cream colours (the same as the tank interior) and sometimes the same green as the outside. Also, the hatch handles are sometimes picked out in red, and sometimes just base green.

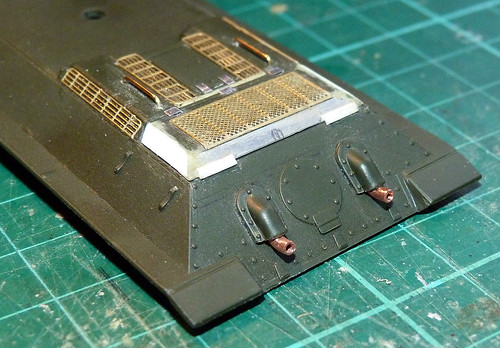
NEXT: Finishing the hull detail.

Saturday 21 January 2012

Panel shading expriment with SU-85 - Part 2

I guess I should start by admitting that this experiment was a bit of a flop. If anything it has taught me that any good job starts with having the right tools. In my case I didn't have a proper airbrush kit - I tried to get a panel shaded effect using spray can paint. Experienced modelers will then nod and say that this project was doomed from the start, but as usual it was a useful learning experience for me.

Here's what I learned…


Wednesday 18 January 2012

Armourfast T-34/85 build - Part 2

Managed to get a bit further, and although these are very small additions I'm quite pleased with both of them. I've finished off the rear hull modifications by doing an improvement to the exhaust pipes and I have cut the hatch for the driver on the front of the hull...


For the exhausts I trimmed off the Armourfast pipes and cut a grove in the back of the covers to hold the new pipes I was making. The new pipes were just pieces of copper tubing cut to length and bent to shape.

Before I got to cutting the driver's hatch I did do one other modification, this was to the front MG cupola. The stock Armourfast one was too vertical at the front compared to the reference material I was using (Kagero's 'T-34/85 Topshots #32') so I trimmed it so that it slanted back a little. I smoothed off with Milliput and while I was at it added the welding marks around the edge of it...

Cutting the hatch was a bit scary for a novice like me - I was worried that I if I made a mistake I would ruin the whole hull. But as i was I was able to cut out the 6.5x6.6mm hole and file the edges down so it looked OK. Next to the hull you can see the back of the hatch cover which I have started detailing - I've added extra thickness for the inside.

NEXT: Detailing the driver's hatch and making a 'cockpit' for the driver figure.

Sunday 15 January 2012

Armourfast T-34/85 build - Part 1

Description: Adding extra detail and generally improving the Armourfast T-34/85 tank.


It's time for another quick-fire practise model as an antidote to my getting bogged down in a couple of protracted projects. This time the subject is the Soviet T-34/85 Medium tank, but once again it's an Armourfast quick build model of this armoured fighting vehicle.

I'm starting with the hull and the part of the Armourfast T-34 model which I dislike the most - the engine deck. Using the Hauler photoetch detailing upgrade - which was made for the HaT version of this model - I want to improve the look of the engine vents.

Next: Moving on to the front of the hull and the driver's hatch.

Friday 13 January 2012

Panel shading experiment with SU-85 - Part 1

As I wanted to try out a painting technique I am unfamiliar with - panel shading - I decided that the Armourfast SU-85 would be the perfect model to try it out on because of the large surfaces on this tank destroyer. Aside from that I love the Soviet tank destroyers, so here's a post series following my construction and painting experiments with this kit as well as some comments about the Armourfast model iteself...

Image source: Wikipedia - Amazingly, despite having had it's front right sprocket blown off this SU-85 just keeps on trucking!

Thursday 12 January 2012

T-34 track mod - Part 2

Description: Adding a more realistic tread pattern to an Armourfast one-piece track.

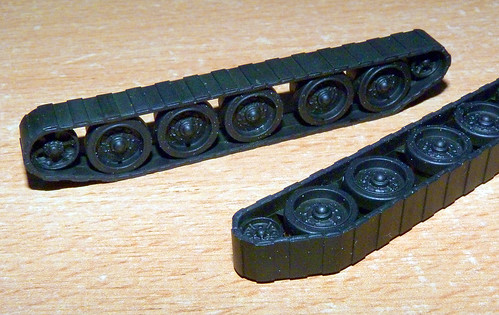
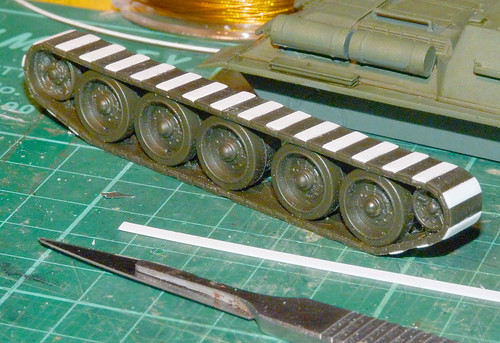
To recap, having decided which areas of the one-piece tracks I had to modify - those being the parts of the tracks which could be clearly seen at the front and back - I began to fill in the recessed gaps between the raised treads. This was done to give a flat level surface onto which I would glue my improved tread section.

I used a strip of thin plasticard (about 2.3mm wide) to fill in the gaps. I did this from the front of the track, over the top and down the rear section. Despite the fact you won't be able to see the top of the tracks I filled the gaps in on this section as you would be able to see the unmodified stepped design when looking at the model from the side...

Wednesday 11 January 2012

T-34 track mod - Part 1

Description: Improving the realism of the quick build Armourfast T-34 single-piece plastic tracks.


While I am still very much a kit noob I thought I would try my hand at my very first modelling competition - why not? So I am preparing an entry for this month's Armourfast Forum 'Track improvement' competition. The idea is to take a stock set of Armourfast one-piece tracks and modify them so that they look a little more realistic. I have chosen to try my hand at pimping a set of T-34 tracks...

Tuesday 10 January 2012

What's going on?

If you have found the Kit Noob blog then it will be obvious that this is a work under construction (unfortuately you can't build a Blogger blog off-line prior to launch). This blog will is an off-shoot of my Milgeek blog but will entirely focus on my model making projects in detail.

Until I get my first real posts up here you can refer back to my Milgeek blog where I do have some of my early stuff or check out the photos on my Flickr account:

> Milgeek.co.uk - military related hobbies blog

> Milgeek's modelling Flickr galleries