Saturday 31 March 2012

New out - Armourfast LEFH 18 Howitzer 105mm

Once again Armourfast has taken us by surprise! After the release of thier wonderful StulG 33B SPG they have sneakily come up with another new model out of the blue - the impressive WW2 German LEFH 18 Howitzer.

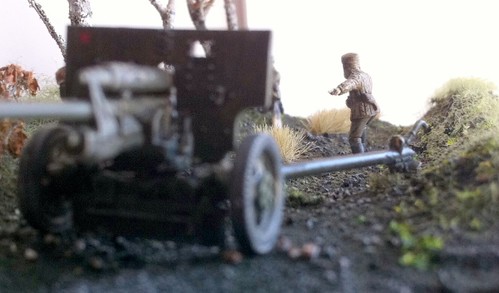
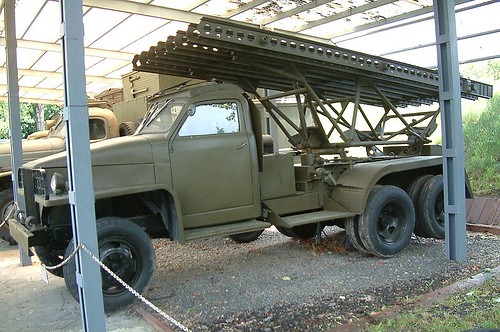
"The 10.5 cm leFH 18 was the standard divisional field howitzer used by the Wehrmacht during the Second World War. It was designed and developed by Rheinmetall in 1929-30 and entered service with the Wehrmacht in 1935. Generally it did not equip independent artillery battalions until after the Battle of Stalingrad in 1943. Before 1938 the leFH 18 was exported to Hungary and Spain. 53 were also exported to Finland, where they were known as 105 H 33. 166 leFH were exported to Bulgaria in 1943 and 1944 (until February 1st, 1944)[1] Sweden purchased 142 leFH 18 howitzers from Germany between 1939 and 1942, designating it Haubits m/39. It was decommissioned from Swedish service in 1982." [Wikipedia: 10.5 cm leFH 18]

Photo source: Wikipedia

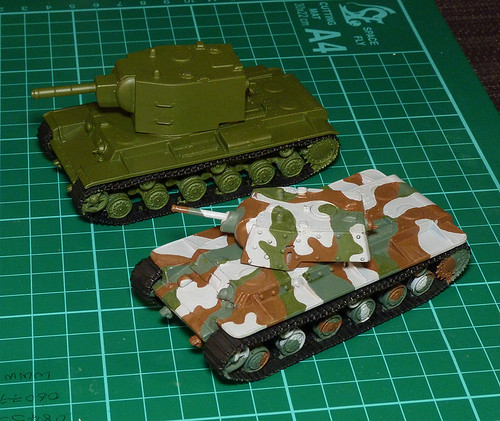
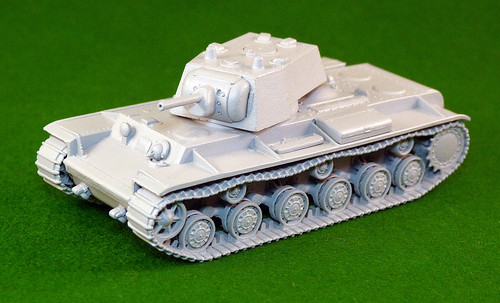
Now, what interests me about this big beast is that it was exported to Finland. I've been getting quite interested in the role of Finland during WW2 and have already made a Finnish KV-1 and what to build more models in Finnish colours, so this gun might make a good artillery piece for this little army.

In any case it shows excellent marketing judgment by Armourfast in a very competitive arena. I am liking thier lateral thinking and hope they apply this same inginuity in choice of models to Soviet or British arms and armour (a big Soviet 152mm or British 5.5 inch gun would be very nice thank you).

Wednesday 28 March 2012

Featured work - Scale Military Modeller magazine

Magazines used to be the bread and butter of the hobbits before the interweb came along. But you only have to visit your local news agent to see that among the modelling fraternity printed monthlies are still very popular.

I put this down to modellers being tactile people who are also very visually minded, they like to see nice big high resolution photos of models, after all that's what all that painstaking detailing is all about! I have flipped through several - shockingly expensive - mags before I settled on buying Scale Military Modeller International. It seems to regularly feature a good variety of projects across the scales and isn't too skimpy with the pages, though I still cringe a little at the £4.25 cover price.

Even so, I only buy a magazine when it has at least a couple of articles that specifically interest me, and that's true of this months SMMI. There's a terrific feature on 'winterizing' a Sherman and an even more impressive step-by-step guide to producing a 'what if?' improved Sherman concept.


To me, this is what so good about scale modelling, the quest for accuracy is all well and good but having the ability to build what you want means that all sorts of concepts - that did and didn't get off the drawing board - can be modelled as well. The featured Sherman concept is a very good case in point and Shermaholics regularly debate the M4s features and weaknesses so it's nice to see how designers of the time also shared the concerns about the tanks less desirable design aspects and were thinking about how they could have been improved upon.

I really felt I got my money's worth with this issue.

Tuesday 27 March 2012

SU-122M conversion - Part 4

War gaming base

I have liked the look of the minimalist war gaming bases that I have seen being used for armour. I realise that opinion differs as to whether armour actually needs a base for war gaming - some players prefer to have their vehicles unbased - but I think the little bit of terrain under the vehicle looks attractive. So, as it is another area I need to practise I thought I would have a crack at doing a simple base.

The vehicle I decided to base is my SU-122(3) experiment - which is nearing completion - because this would also give me a chance to experiment with a snowy scene.


The basics
First of all I cut a piece of plasticard to the rough size of the footprint of the tank, allowing a 5mm margin all around. I then masked a little border around the edge of the base as I wanted to paint a narrow dark green edge to my terrain. This is purely optional, as some gamers terrain goes right to the edge of the base, and some don't.

Next I plastered on some Polyfilla to give the rough ground I wanted, mixing in some cheap bird cage grit for texture (£1 for a big bag from Wilkos). Then I lift this to dry out before applying a mid-earth wash based on Tamilya's Flat Earth acrylic - the same colour I used on the tank's tracks.

Then when that was dry I first washed over with a darker and more diluted version of the earth colour so that I got some shadow into the nooks and cranes and then dry brushed a light mix of the Flat Earth over the top.

Above: Here you see just how tight the margin is around the vehicle - the white border
will be painted a dark green to finish it off nicely. Additionally you can see my
nearly complete Mk. II T-34 tank tracks.

Next: The snow!

Sunday 25 March 2012

Track Day - painting one-piece tank tracks

Moving on with my 'basic training', I have started work on a few of my one-piece tracks for my quick build models. I haven't really nailed doing tracks yet and this is an opportunity to experiment with a few new techniques.

Above: Three pairs of one-piece tank tracks, on the left are the tracks fro my Pegasus KVs and
on the right is my modified Armourfast T-34 tracks.

I'm not flying solo though, I'm using a few useful tutorials for painting tracks. My main source of reference is Alex Clark's 'Small-Scale Armour Modelling', and excellent book which has gotten me through my first few models. Then there is this online tutorial...

> ScaleModelGuide.com - Painting tank tracks

I started with a base coat of black, then applied a wash of Tamiya's Flat Earth XF-52. I didn't want to go too rusty, a pit-fall that some war gamer modellers are apt to fall into.  I think I did this with the T-34 tracks pictured above, so I am toning down the redness of my wash and going more earthy instead.

Once I laid down the lighter earth and it dried completely I ran a quick thin darker wash over it to accentuate the shadow areas and provide some depth to the earth colour. Hopefully the end result will look like there is a mixture of mud and dry earth on the tracks.

Finally I might do some gentle pin-washing - to deepen the detail - and then some very light dry brushing with some silver to give the metal highlights to the tracks. I may also add some graphite pencil to the prominent areas. We shall see...

Friday 23 March 2012

Featured work - Bah! I hate some folk!

LOL - Seriously, these Pegasus Soviet Troops in Summer Uniform are gorgeous. Though I am a bit sick as I have had my eye on this set myself for a while and now I daren't try them now as I'll not equal the fine job that Peabody has done with his...


This really gives me something to aim at, and the bases are very nice too. I particularly liked the ingenuity used in the various shapes. I've gotten kinda obsessed with the idea that war gamers use particular shapes and sizes of bases, but Peabody has no such reservations. His support troops with their hexagonal bases just blew me away, I love 'em...


Link: Check out Peabody's ImageShack gallery.

Thursday 22 March 2012

Featured work - Soviet ZiS-3 AT gun vignette

Here's a little action diorama by Darkbird based on Italeri's (now discontinued?) 1/72 SiS/ZiS 3 76mm anti-tank gun featured on the Armourfast forum. I like vignettes and I think this one is very nice indeed, it really captures a moment in time with the help of some good photography.


The model of the gun itself has been very nicely done and as I am about to start working on Soviet artillery after my current batch of Soviet tanks it's given me some much needed inspiration.


Link to the Armourfast Forum

Monday 19 March 2012

Featured work - Kiwi Sherman IB

Photos of models like this just make me sick (with envy)! I realize just how much I have to learn before I reach the standard of Ryan Davis's magnificent 1/72 New Zealand Sherman...


This is the 105mm Howitzer armed Sherman M1 variant, complete with masterful stowage and beautifully weathered to boot. It's featured in The Society of Gentleman Gamer's 'Tank Park' section and I highly recommend you register for this forum as there are some amazing work going on there.

I still have a Armourfast M4 which I am working on and if it ends up looking half as good as Ryan's I will be over the moon.

Sunday 18 March 2012

Inspiration - Soviet Austin ambulance

I thought it would be a good idea to record some of the inspiration for future projects that I find (otherwise I will forget where I found them)! This one was particularly random as I was looking for something completely different when I found it. It's not lend-lease but a donation made by the people of my adopted home town - Scarborough - to the people of the Soviet Union during the Second World War.

Source: Engines of the Red Army web site, attributed to Mr, Alex Hill.

Apparently a good quantity of British trucks were shipped to the Soviet Union to help them out including a number of these Austin K2 ambulances. I was intending on adding support vehicles like this to my Soviet fleet but had in mind a indigenous ZIS 5 or GAZ truck, but how can I not make a model that ties in with my town's own history?

Because this is special I imagine I will make this as a display quality model and not a quick build so I am now on the look out for a good quality 1/72 K2 kit to add to my already overflowing stash!

Saturday 17 March 2012

Featured work - Tim's make-do Soviet staff car

One of the reasons I like war gamers so much is that they often show a level of lateral thinking and sense of humour that is less apparent in the 'serious' world of display modelling. Take Tim Gow's wonderful WW2 Soviet staff car, he has utilised a kid's toy as a stand-in for this type of vehicle.


Obviously the level of scrutiny when it comes to authenticity is different on a war game table than it is on a display competition table but you have to admire the ingenuity shown by Tim. The car is actually a Hot Wheels classic Ford and it looks just the job, especially with the excellent figures included on this command base.

In fact, Tim has inspired me as I have been looking for a cheap Soviet ZIS 5 truck and so I'll be looking at what's available in die-cast.

Check out Tim's blog - Megablitz and more...

Thursday 15 March 2012

A Comedy of errors - when kits go bad!

I'm not sure whether modellers make more errors during a build than they admit to - certainly those lovely tutorial builds you see in the glossy magazines always seem to go without a hitch - but my experience so far is that every model hits snags or I mess up somewhere along the line. Last night's modelling is a prime example of my 'bodge it' style of model making.

I was working on two different models and maybe this has something to do with my lack of perfect concentration as I had problems with both of them. With my Finnish KV I made an elementary boob with the painting and I also had some minor construction problems with my Soviet rocket launcher build.

My Finnish KV went a bit pear shaped when I was touching up my shoddy camouflage job. I tripped up and selected completely the wrong green to over-paint the ragged areas of my dark green camo pattern! Oooops!


Because of the light - or my eye sight - I didn't notice the mistake until I took a snapshot, the harsh flash bringing out the differences in the greens!

Next, I had a problem with the material I chose to make the rocket launcher with. I selected a delicate styrene 'I' frame rod which was roughly the right shape. But the thin sections of plastic proved a little too flimsy and bent slightly, despite my careful efforts. Not badly but enough to annoy me.


As you can see from the photo the bending isn't huge but it is apparent, especially at the ends. I now have to decide whether to live with it or re-make the frame in a more ridged material (believe it or not I am looking at wooden coffee stirrers at the moment).

With the green paint job I may have to over-paint the rest of the dark green areas to match. I'm already unhappy with this first stab at camouflage painting and further tinkering will only make it more messy. But them's the breaks!

Wednesday 14 March 2012

Featured work - 20mm Soviet FAI Armoured Car

I hate to use the word 'cute' to describe military vehicles, but every so often a model comes along that is exactly that. The 20mm and then some... blog features a wonderful early WW2 Soviet armored car which just looks terrific.

The real thing - which saw service in the 1930s to 1940 - was simply an armoured version of the Soviet built GAZ car (a licence built Ford).

This model is a resin one - with metal wheels - and is just £4.99 from RH Models/Liberation Miniatures. Check out more photos at 20mm and then some...

Tuesday 13 March 2012

SU-122M conversion - Part 3

Well, another first for me - this time the 'hairspray technique' for doing a winter wash. I wanted a highly weathered and chipped finish, so this startes with a very flakey and faded snow camo layer....


I think the Humbrol spray acrylic is a little thick and 'sticky' for this technique to work absolutely the way it's supposed to, so I will try spraying other types of paint in future attempts (an airbrush - once again! - would help I think).

The tutorial for this technique which I followed can be found here: Mig Jemenez Blog - The Hairspray Technique

NEXT: Pin wash and weathering.

Monday 12 March 2012

Pegasus US Army truck to BM-13-16N conversion - Part 3

I was hoping to get the launcher frame completed tonight but got side-tracked. Instead I finished off the chassis and flat-bed of the GMC-come-US6 truck.


I think I have just included enough simplified detail to produce a passable impression of the truck. I've kept it all very quick and easy to make, with no small or fiddley components. I can't wait to get the launcher frame on!

Pegasus US Army truck to BM-13-16N conversion - Part 2

The first half of this conversion job is to make the platform on which the rocket launcher will sit. And this is where the first problem cropped up.

The Pegasus US Army truck is based on the GMC CCKW, in turn the Soviet US6 is a version of this American lend lease vehicle, BUT the BM-13-16N vehicle is a modified version of the US6. Short story - they ain't all exactly the same vehicle!

Above: The real BM-13-16N differs in configuration from the GMC CCKW truck on which the Pegasus Hobbies model is based. I have to work around these differences if I want to produce a 'quick build' model. Source: Wikipedia

There are small differences in the layout of the BM-13-16N truck in order for it to accommodate the large rocket launcher system. Most noticeably, the fuel tank and spare wheel are reversed, and the wheel is mounted vertically (on the right side) instead of horizontally on the left side as it is on the Pegasus model. Now I could spend some time chopping and sawing and remounting these components to be completely accurate, but bearing in mind my goal of producing a 'quick and dirty' Katyusha rocket launcher - that's easy to make for war gaming - I don't really want to muck about too much.

Were this a display model naturally I would take the time and effort to make this model as accurate a possible, but will the placement of the spare tyre really have an impact on the models intended use as a war gaming piece? Better that the conversion is easy to do with the minimum of structural changes (though this up to you - the modeller).

So, first of all I made a raised flat bed platform designed to incorporate the horizontally positioned spare wheel into it's framework...

Above: Here you see - in white plasticard - the simple box structure I built on the chassis so
that the spare wheel could be easily incorporated.

This method does means a inaccurately high platform, but it's a fudge I am willing to accept in order to make the construction something you can do with the 'out of the box' Pegasus model.

Next there is the rear wheel mud guards, and again we have to make a design decision based on ease versus accuracy. This decision is necessary as the real truck's mud guards had nicely curved fenders matching the shape of the wheels, not a very complicated piece of modelling I guess but thinking in 'quick build' mode it does seem logical that this element could be simplified to just a straight edged structure...

Above: I went for the easy option and simplified the rear mud guards with this angular shape. Three rectangles of plasticard glued together in no time at all.

Now, you will have to look at these two design simplifications yourself and decide just what level of accuracy (or rather inaccuracy) YOU can live with. My model is obviously the most simplified option based wholly on ease of construction over authenticity - just because I want to see how quickly I can do this - but you can adjust the level of detail to match your particular tastes based on just how much time you have to spare.

Next: The rocket launcher framework

Sunday 11 March 2012

Pegasus US Army truck to BM-13-16N conversion

While I do have several projects on the go at the moment they are all in the painting stages, which - to be honest - isn't my favourite part. I like to build! So I though a quick conversion job would keep me entertained.

I wanted some Soviet artillery to go with my WW2 Red Army tanks, and naturally the infamous 'Stalin's Organ' must be included in my war gaming fleet.

Above: The Soviet BM-13N was based on the American lend-lease Studebaker truck, which was given the designation US6 by the Soviets. Source: Wikipedia

While there are plenty of display kits for the mid-war model BM-13-16M - which was the standardized version build on lend lease and licence built Studerbaker trucks - there aren't any quick build alternatives for the war gamer. I want to see if I can make a quick and dirty conversion designed with the war gamer in mind.

Luckily Pegasus Hobbies produce a quick build set called - rather vaguely - 'US Army Trucks'. You get two trucks in the set for about £8 and they are quite nice - if simplified - representations of the GMC CCKW, otherwise known as the Studebaker 'Deuce and a Half'. This hugely successful truck was the basis for the Soviet US6, which in turn was the platform for the Katyshua rocket launcher system.


The conversion process
Pegasus's version of the truck is the cargo carrying variant with a flat bed built onto the rear. We need to get rid of this before we can start building the launcher framework onto the chassis. Unfortunately the flat bed and cab are a single component of the model, so it's time to get your saw out!


The two major truck components of the model are the lower one-piece chassis and the upper cab/flat bed, these clip together once you add the cab interior details (seat, dashboard, steering wheel, etc). So I used my Dremmel multi-tool and it's cutting wheel accessory to separate the cab from the flat bed. It's quite solidly attached and will need some shaving and sanding once detached to smooth out the join.

I should mention something about the general quality of the Pegasus Studebaker. When I started modelling again, not so long ago, the first model I made was the Airfix GMC CCKW and I have to say that although the Pegasus kit is obviously simplified some of the detail is quite nice. Areas that are obviously dumbed down are the front grill and there is no 'glass' wind-shields included. It is perfectly adequate for war gaming and in fact quite an attractive model.

Next: Making the new launcher flat-bed.

Armourfast T-34/85 build - Part 5

Well, I guess the tank crew are finished...


The tank commander is holding a flag pole, so I had to modify his arm and make a new hand for him. The flag is still in production and I will probably finish them off with a touch of satin varnish.

I started by undercoating the figures in black (as that is the main colour of the uniform), then dry brushed in mid-grey so I could see the detail again. Then painted the flesh, and finally did some washes on the uniforms and oil painted the highlights. The commander's jacket was given a wash of black ink to try and simulate leather.

Next: The flag!

Friday 9 March 2012

Armourfast T-34/85 build Part 4 - Figure painting

And now for something completely different (sort of)!

I've got a little weary of tanks this week - I have a little Soviet tank factory going on at the moment - so I thought a change of subject would be good. I turned to a little job I've been putting off for a while, my Armourfast T-34/85 crew.

This is my very first attempt at painting model figures and I'm very much feeling my way by trial and error with this. Having undercoated in black - as the main uniform colour is black - I started with the flesh layer and then dry brushed the uniform to bring out the highlight detail.


It looks a bit odd at the moment, but the next stage is to work into the detail with oil paints and hopefully this will start to create a more realistic look.

The figures - which have been chopped down - are from Orion's WW2 Soviet Tank Crew (Summer Uniform) box set.

Thursday 8 March 2012

Experiment No. 3 - Camouflage Part 3

Having gone through the various stage of masking with Blu-Tack and spraying a separate colour for the camo I have finally finished the basic pattern...


I have to say it didn't seem to be entirely successful, as you can tell from the photo there are clearly visible marks around the edges of the pattern where one paint layer joins the other. This hard edged effect isn't as clean as I was hoping it would be and now I will have to do a fair amount of remedial touching up.

Of course this can be partially explained by the fact that I am using spray aerosol cans instead of an airbrush as I am guessing that an airbrush can put down a finer layer of pain, thus negating any noticeable borders between paint patterns.

I can't help but be a little disappointed and have to wonder if I might have done a better job by just brush painting the camo?

Certainly these more subtle paint effects do seem to be best done with an airbrush, but I don't want to buy one of these until I can afford a very good quality one. I shall try a couple more experiments with this Blu-Tack masking technique on some spare plastic packaging to see if altering the hard mask to a softer one can alleviate the noticeable lines between colours.

Wednesday 7 March 2012

Experiment No. 3 - Camouflage Part 2

Camo colour 2 - Hazel Brown
Having laid down the base camo colour - mid-grey - I was ready for the next paint layer in the three-colour pattern. The second part of this experiment is to try out the BluTack method for masking out camouflage schemes, so here we go...


Applying the BluTack is - it has to be said - a little pain-staking, but it is quicker than the masking tape method AND it is better for making organic and rounded shapes. I do worry a little about how easy it will be to lift off, but we shall see.

The spray paint I used was Tamiya's TS-1 acrylic Red Brown and it's exactly the colour shade I wanted, though it is slightly glossy...


My main concerns are as follows:
1. WIll the various layers, sprayed one over another, leave a noticeable hard edge between the colours?
2. How easy will the BluTack be to remove?
3. Will the additional over-spraying cover up fine detail on the model?

Number one is the critical one. Not being very experienced in masking the couple i have done have produced noticeable ridges where one colour meets another, this seems partly due to my dependance on spray can paint which puts down a thicker coat of paint than airbrushing.

Tuesday 6 March 2012

Pegasus KV box set - Part 4


Having rectified my initial mistake with the KV-1 I have now progressed a little and applied the primer coat to both KVs. I don't like the make of primer I bought as it's a little too thick and a friend has suggested that I try Halford's grey primer instead. However I will wait until I finish this project to see if I like the idea of using a grey primer at all - so far I'm not altogether happy with the technique.

On the other hand, I am very pleased with the Pegasus KV models. They are quick and easy to make - though there are quite a few parts in the tracks - and a passably accurate (certainly excellent for war gaming if not for display). I especially appreciate the fact that you get all the extra build options.

Next I am applying the base coats and camo patterns.

Sunday 4 March 2012

Pegasus KV box set - Part 3

You can't get it right all the time and as a modelling 'noob' I guess I was going to make a mistake sooner or later. Well, I made a boo-boo with my Pegasus KV-1 model. It was a pretty elementary mistake really, I didn't do my homework about the subject and rushed straight in as I just wanted to get to the painting experiment I had planned for this model.

I am painting this KV-1 in the scheme of a captured tank which was used by the Finnish army against the Soviets in 1944. I had thought that the tank was a KV-1 model 1940, but it turned out that what I really needed was the applique armoured version that was - coincidentally - available in the Pegasus box set as a build option. So I ended up having to strip back part of the model and build and modify the second KV hull to reflect the changes made by the Finns.

Above: Left is the standard KV hull, right is the modified Finnish KV hull. Note the new shape of the rounded off fenders.

The biggest change was the addition of the turret side armour - an easy job, but I had to sand back the primer - and the modification of the tank's fenders. The Finns changed the shape of the back and front sections of the fenders to a rounded shape (I don't know why), this meant I had to cut off the end sections and make new ones with plasticard. Finally I had to run a thin styrene strip around the fenders.

Other changes were a bit easier and included a small modification to the front applique armour, the leaving out of the external fuel tanks and the addition of some new applique strips on the side of the hull.

I do get a lot of satisfaction from doing this sort of tinkering, but I wasn't really expecting to do it on what I thought would be a 'quicky' model with which to practice a new painting technique. Still, you live and learn, that will teach me to do my research better in future...

On a happier note, the KV-2 from the box set went together very easily (I used the hull from my aborted KV-1 1940 for this so that saved any major waste). The only thing I added ere the very distinctive ladder runs on the side of the turret, but these are dead easy to do.


So there you have it, one step back and one step forward on this project. I feel like it's been a bit of a wasted weekend because I thought I would be further on than this, but I supposed I would have been a lot unhappier if I had completed my Finnish KV-1 and then discovered I had made the completely wrong model of KV.

If you would like to see some photos of the Finnish KV that I'm basing my model on you can find an excellent walk-around gallery at http://www.andreaslarka.net/ (photos taken at the Finnish ARmour Museum).

Thursday 1 March 2012

Experiment No. 3 - Camouflage Part 1

The primer coat
Working my way through the modelling basics it's time to look at camouflage paint schemes. So far the practise models I have done have all been olive drab (or variations of). The Pegasus KV box set is the subject for this experiment and I think I have picked an interesting colours scheme for one of the models.

I have chosen a 3 colour pattern based on KV-1s captured by the Finnish army, a scheme made up of mid-grey and chestnut brown over a dark green base. However, using a painting technique which entails masking the various patterns using Blue-Tac means that I shall be laying down a base coat of the lightest colour first.


Coincidently, a friend of mine who is also a modeller suggested that I try priming my vehicles with a grey base coat before applying further coats of paint. So this is a good opportunity to kill two birds with one stone - try out a new paint procedure as well as a new more advanced technique.

Next: Masking out the camoflague with Blue-Tac