Thursday 28 January 2016

Altaya 1/72 T-50 - Part 3

My little T-50 plods on. Working with metal is not fun - not for me anyway - so it's taken me some time to modify the front fenders to my liking. In the end, I resorted to adding some styrene strips to get the look I was after...


I'm beginning to realise that I have a habit of putting off jobs I don't enjoy (which is why I have a special draw I keep for jobs that are 'on ice'). Prevarication isn't good, but it becomes a little war of wills with myself and I do feel good when I finally overcome my irrational anxiety about certain jobs. Tiny though it may be, I was disproportionally pleased when I finished this modification.

The task was completed with the creation of the headlamp covers - a feature of early Soviet tanks that the Finns seemed to like. These hinged 'domes' of metal enclosed a headlamp and could be flipped up and down when needed, the Finnish army retrofitted these to many of it's 'newer' Soviet trophy tanks. (They seemed to have a good supply of them from the large quantity of scraped T-26 tanks the Finns took from the Soviets during the Winter War.)

Worth showing again, this wonderful photo of the Finn's sole T-50 shows it 'late
war' (early 1944, I think). By this time it has been re-fitted to the post-1943
'standard' for Finnish armour, with the cowled headlamps and the three-colour
camouflage scheme. Source: SA Kuca archive.
Just for reference, here's an artist's impression of the T-50 with the headlamp covers up. I *think* they were only put up when travelling at night in safety - having them up like this when in actual battle seems a bit risky...

1/35 HobbyBoss 'Finnish T-50' box artwork. A couple of things wrong here,
they haven't included the Finnish cross emblems and the fenders are 'unclipped.
And don't get me started on the camo colours (not again)!
Making the covers was a fiddly little job which had me sanding some rectangular styrene strips into the correct shape...

My headlamp covers still need some shaping and detailing but I'm please with
the basic shape.
Who'd have thought that such small jobs would take me so long (I tried hiding my T-50 behind some pots of paint on my little workbench, but I knew it was still there)!


The rest of the work on this conversion should - in theory - be plain sailing. It's just a case of painting the little blighter (...I say 'just')!

Postscript: Note that, I am making a post-1943 version of the Finn's T-50. This tank was captured from the Soviets in 1941, and between its capture and 1943 (when Finnish armour received new guidelines for outfitting and paint schemes) it is thought to have retained it's Red Army plain green scheme or have been painted Finnish dark green and given Finnish crosses. Here's a nice example of a model of this earlier period (the clipped' fenders don't seem to have been applied at this point, or have Mirage boobed?)...

Model by Danny Van Beneden. 1/35 scale kit by Mirage.
Historical note on the Finn's T-50: 'The popular nickname was "Pikku-Sotka" (Small Pochard), which referred to its physical resemblance with larger T-34 medium tank, which Finnish soldiers had already earlier nick-named as "Sotka" (Pochard) after a tugboat of that name.' Source: Jaegerplatoon.net

The Finn's T-50 was in service with them from 1942 until June of 1944, when it suffered serious mechanical problems and was designated 'non-operational'. Bear this in mind if you are wargaming the later 'Lapland War', the Finn's T-50 was not available during this campaign. This tank remained on Finland's military inventory until 1955, though it seems not to have been used again.

Sunday 24 January 2016

Chevrolet Radio Van conversion - Part 9

On the final stretch now. My Chevy van nears completion as I go a bit mad with the weathering!

I decided from the start that I wanted a really dirty, war-weary vehicle this time. The reasoning behind this being that, by 1944 my 1939 vintage Chevrolet van would have seen better days, and, therefore, the weathering would be pretty heavy.


As you can see, the van is the worse for wear with chipping and plenty of mud and dirt. In fact, I had the usual worry about when enough was enough. Hopefully, I haven't gone too far.

All that's left to do is apply the last coat of varnish (matt) and the removed the windscreen masks. At this point, I'll have to decide how I will deal with the windows - I guess they should be dirty too.

I also made the base for the model. The usual process...


I have a feeling I should be looking to improve my 'grass' technique, but the problem is that I want this base to match those I have already done. So, I can go changing my approach too much or start using a new static grass medium.

Well, that's about it. Last thing to do will be to add the headlamps using some PVA. I'll pop in a couple of drops of Formula '560' Canopy Glue by Pacer, these should dry crystal clear and make nice 'glass' headlights.

Next: The completion photos (I hope).

Wednesday 13 January 2016

Is modifying diecast models a job too far?


First of all, apologies for the following, rather rambling, 'thinking out loud'...

I have quite a few diecast models (mainly Altaya) that I have accumulated for my Finnish project. I've picked them up a bit at a time as I saw bargains on eBay, but I never really intended to include so many in what is, primarily, intended to be a 1/72 plastic kit based project.

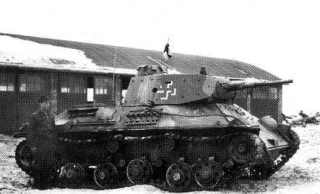
The problem is modifying them, as I discovered with my current T-50 project. Although cutting parts off diecast metal models is possible - thanks to my trusty Dremel tool - the result is perhaps not ideal and may not, in the end, be desirable...

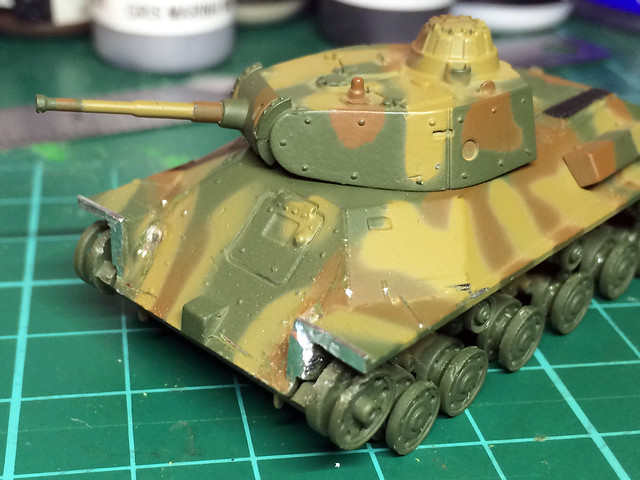
The problem with metal models is they were never designed to be mucked about
with in the way I am doing. The thickness of the construction does not lend itself
to structural conversions.
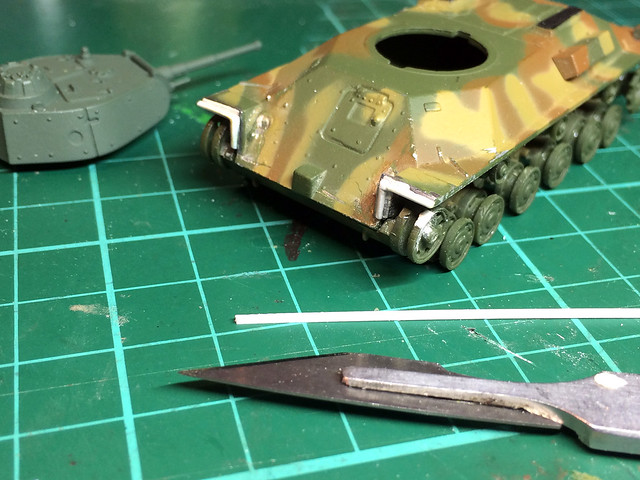
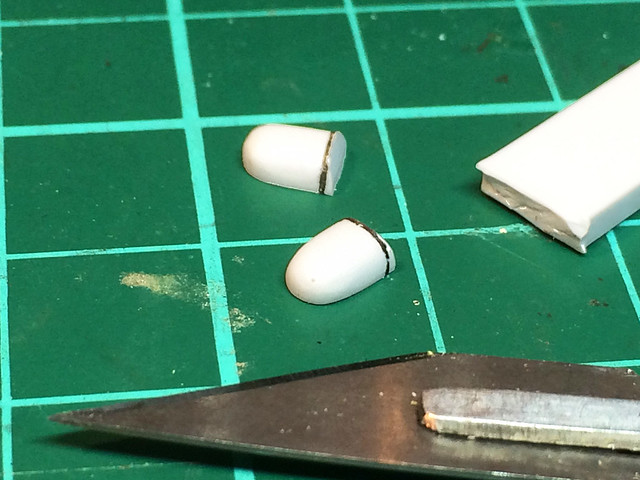
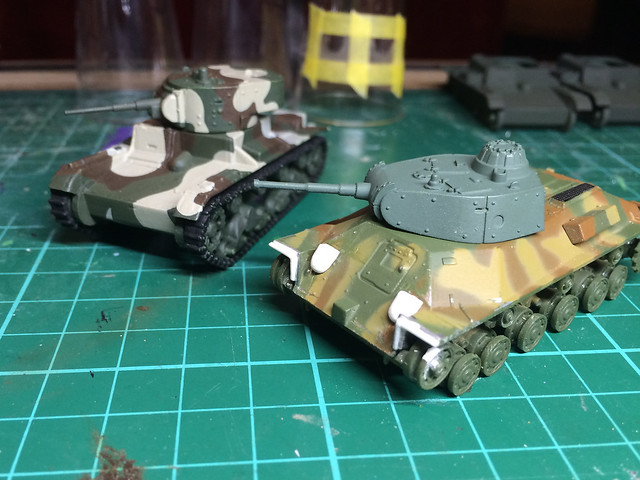
The above photo shows the result of some of my diecast surgery. This was a pretty simple modification, but some of my other vehicles - like the Bussing-NAG truck I have - will require even more intricate work. As diecast models were never intended for this kind of modelling you have to ask, is all the work worth the effort?

Of course, that is a personal preference. But for wargaming the answer may be a simple 'not really'. My trouble is that my project, although based on the premise of being a wargaming collection, is really a hybrid of wargaming and display level models. It's a bit of a messy concept really, but - simply put - if I just wanted a 'marker' to represent a type of vehicle for a game it's perhaps not so critical that that 'marker' is exactly accurate or historically detailed.

So, to modify diecast or not?
To be sure, I have made a rod for my own back. Because I have started trying my best to create fairly accurate vehicles, in the spirit of the original historic ones, suddenly saying 'meh, I'll just make do' is a very hard thing to do. But, on the other hand, I cannot ignore the fact that diecast vehicles are not suited to my style of 'Frankenstein' conversion (which I have been happily carrying out on my resin models).

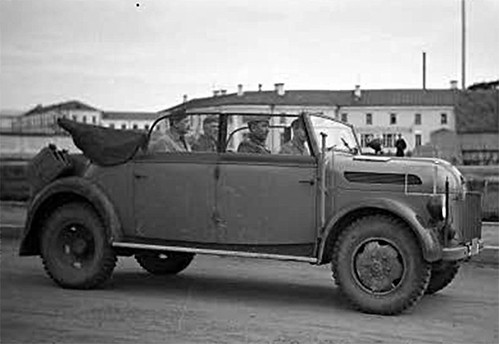
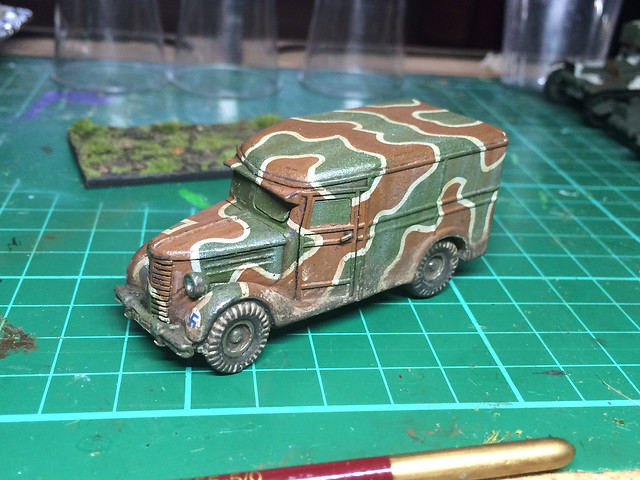
My Altaya Steyr 1500 troop wagon, which I hope to convert into the staff
wagon version. I have done this sort of 'cut'n'shut' conversion with resin models
several times, but doing it with a metal model is a different kettle of fish!
The staff car version of the Steyr 1500. I hope to make this vehicle by using the
bonnet of my diecast Steyr and joining it to the back of a Kfz.21 kit.
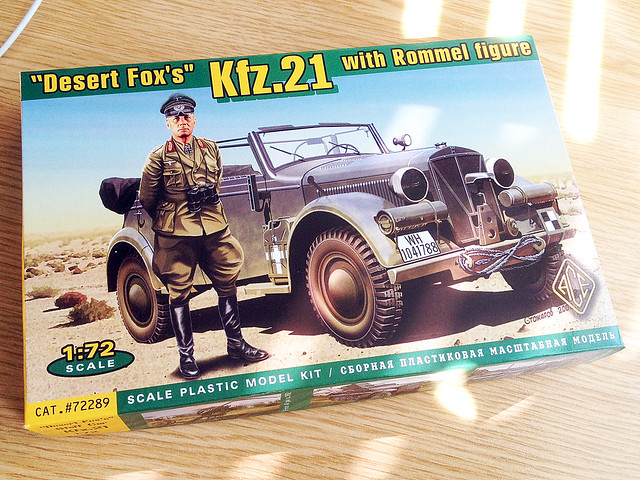
The Kfz. 21 has exactly the same crew compartment (rear) as does the Steyr
staff car. Technically, a 'simple' meld of two models?
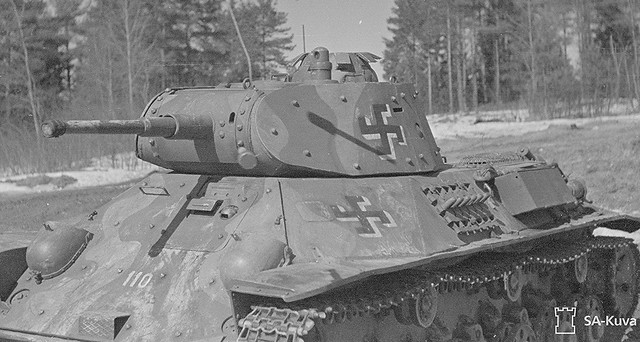
As you can see from my T-50, to try and convert diecast models can be to open up a whole can of worms, and in the end, may be more trouble than it's worth for wargaming (for sure). And even for display modelling, one could say that were I wanting to do the job right it would be better to spend the extra money to get one of those expensive short-run resin kits or even to scratch-build if accuracy is the main priority.

The worst of both worlds?
In modifying diecast models, I may very well be setting myself up to fail. Because my premise was to buy the diecast models because they were a cheap and easy solution but then to spend twice the amount of time it would take me to build a plastic kit version of the same model but end up with a model that may not be quite as good, I have to ask myself 'am I mad'?

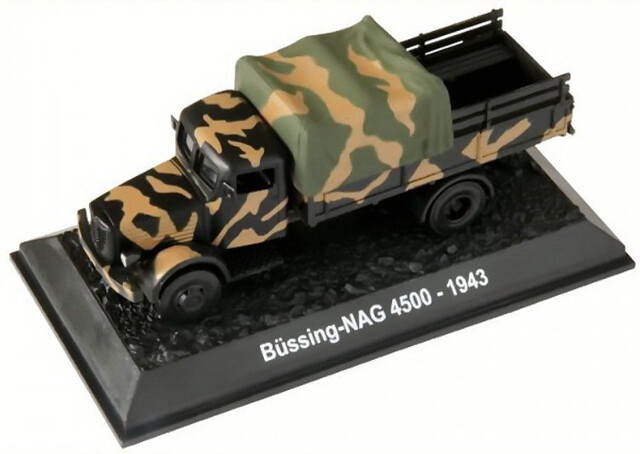
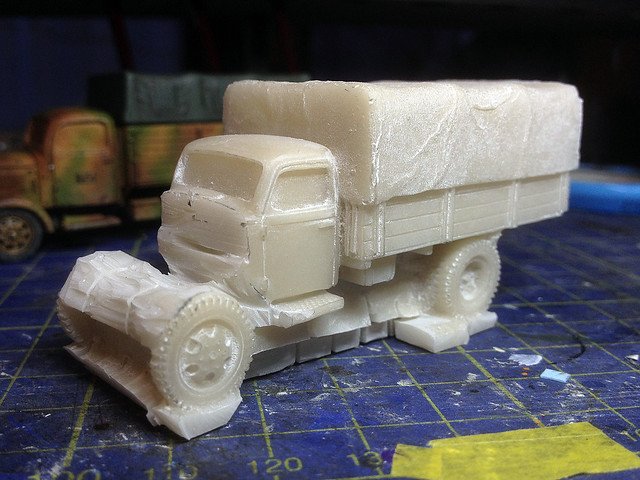
The diecast models I have accumulated are not restricted to tanks. I have three
different wheeled vehicles, of which this Bussing-NAG truck will pose one of
the most difficult conversion jobs of any of my diecast models.
The Bussing-NAG 4500s with Bilstein crane. An example of where I may have
bitten off more than I can chew for a diecast conversion? This is available in
plastic kit for by TP Models. But at €29 plus shipping would an attempt
at a conversion on a cheap diecast be cost-effective?
I do get a lot of enjoyment out of my conversion projects, it isn't just about trying to make something better than something that is available on the market in kit form. Look at my Chevy Van project, for example - that isn't as nice looking as a good quality plastic kit, but I have really enjoyed it and, in the end, have produced something unique. But, then, resin is easy to work with.

Conclusion
It irks me, but I simply think my diecasts should be used for what they are best at - quick 'fillers' with which to populate the large number of units I need for my 'army'. In essence, this is what I have done with my plastic T-26 models - I have bought two lovely, highly detailed, examples of T-26s by Mirage as exemplars for the type, but then filled out the rest of the units I need with cheaper Pegasus T-26s.

In the case of my diecast tanks, these are for my second Heavy Tank company, the first of which will consist of more accurate plastic models.

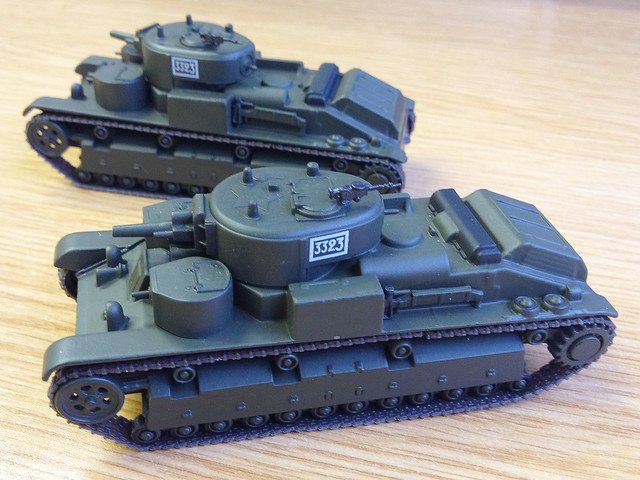
My lovely Altaya T-28 diecast tanks. A case where these are the only models
available of this tank in 1/72, there is no plastic alternative. I won't even bother
making the Finnish modifications to this diecast, as the differences are so small
as not to make the work worthwhile.
To be honest, had I realised what a quandary these diecasts would cause me I would have avoided them completely. The only exception being where the model I want is only available in diecast form (like my T-28 tanks, which are simply not available in plastic kit in 1/72).

I think I will just paint my diecasts, complete accuracy be damned!

Monday 11 January 2016

Altaya 1/72 T-50 - Part 2

Modification to make a Finnish T-50
As I mentioned in my previous post on this project, there isn't a lot to do to the standard Soviet T-50 in order to make it into a Finnish version. Although the Finns took to changing captured armour to their tastes their one and only T-50 only had a couple of new hooded headlamps added and the very front of its fender mudguards 'clipped'.

A lovely photo of the front detail, including the areas modified by the Finns.
Source: SA-Kuva archive
I'm afraid I have no source for this photo, but it is a very interesting one. It clearly
shows that the Finn's solitary T-50 was given the Finn's 3-colour camo scheme
and it shows the 'sawn-off' mudguards at the front.
Still, any modification to the fenders is sort of bad news for me as my Altaya is diecast metal (at least, its main hull is) this means I'll have to get my trusty Dremel out to clip off the mudguards. It also means I may have some issues with the scale thickness, as the model's diecast fenders are a bit thicker than they should be.

Here's the area of the T-50 that I will me modifying...


And here is the same area after I made the initial changes in order to facilitate the Finnish WW2 modifications...


As you can see, the thickness of the model's fenders are far too over-scale. I'm going to have to thin them down a little. Removing the original headlamps to make way for the hooded Finnish lamps was easy enough, though, they were just plastic.

While I work out how I am going to finish off the fenders, I thought I would try priming the turret (which needs no modifications). Using Humbrol's aerosol Dark Green, I gave the turret a couple of light passes and was pleased to discover that this covered the model's original paint scheme very well!


This 'Dark Green' (I don't think it's all that dark) is, I found, a nice base for the Finnish 3-colour camo scheme that I have been trying to fathom. Anyway, next I will be completing the minor modifications and then giving the rest of the tank it's primer coat.

Sunday 10 January 2016

Chevrolet Radio Van conversion - Part 8

Weathering
This stage is - particularly for the novice/intermediate modeller - is something of a dark art. I feel like getting out my charms and spell book and uttering a few incantations before I begin the weathering of my models.

I am always dreadfully nervous and worried that this is the stage that I am most likely to ruin any good work that I might had done thus far! Which is why I prevaricate so much and am hesitant to put brush to plastic...

Bleaching and staining.
First thing I do is what I call 'bleaching and staining'. This is supposed to represent water and sun damage to paintwork, how much you do depends on the age or the vehicle, which theatre of war it served or how neglected/used it might have been.

My Finnish Chevy van is supposed to be an early war era vehicle that has chugged along to 1944 (I have photographic reference on which I can base my work). This is why the truck has a non-standard camo scheme and early war Finnish insignia. By 1944 this venerable van should be pretty banged about so my level of weathering will reflect this.

As usual, I begin by streaking white artists oil paint to indicate paint bleaching. The untouched areas between the streaks - where the original paint scheme is left quite vivid - serves to give the impression of water damage or streaks. I follow this up with subsequent streaks of grime, light rust and fuel stains with different colours of oils - narrowing the streaks to indicate 'drip damage'.

Dust, mud and chipping
After this colour modulation, I begin to add dirt and minor paint damage. For this, I mainly rely on a mix of Vallejo pigments and Tamiya Weathering sticks.

The chipping is various spots of panzer grey or dark grey and purple mix. In my opinion, a touch of purple gives a nice impression of bare metal that is just starting to develop a touch of surface rust. But in this case, I have decided not to go over the top and the chipping is quite subtle (hopefully).

Not so the dirt...I fancied a dirty old van!


As you can see in these photos, I have part-completed the vehicles base. However, I have not added the static grass - which I have been adding to my Finnish model's bases - as I wanted to match the colour of the mud on the base to the colour of dirt I was adding to my model.

I think I will add some final mud splashes, before I call the weathering complete and finish the base. Then I'll peel off the masking tape, which is protecting the windscreens, and add some dust to the windows.

Thursday 7 January 2016

Finnish T-26 m1933 - Part 7

Well, I think this is part 7 anyway (having done some intermediary work that involved the Pegasus T-26 models). In any case, this is just a small update to show the completed brace of little Pegasus tanks...


The little Pegasus E-Z Build T-26s went together as advertised, with just  one slight adjustment to the tracks. As I mentioned in a previous post, the track components stick out a bit so you need to sand the retaining pegs to get them to sit nice and flush with the fenders.

A minor niggle, as the two other 'improvements' I made were personal choices. For pure war gaming play, they build perfectly well 'out the box'.

Next is the basic painting of the camo scheme to bring the three new models up to the same state as my pilot example.

Wednesday 6 January 2016

Interlude - Repairing broken T-34/85 track!

I found this video facinating. It shows a working example of a T-34/85 having a broken track repaired by volunteers at Finland's Parola armour museum in 2012.

Plenty of detail for the modeller and a treat for those who despise Health & Safety practises! :)


Sadly, this isn't an example of one of the museums T-34/85s in Finnish colours. Interesting tank crew dress though, quite a cosmopolitan collection!

Sunday 3 January 2016

New stuff for 2016

Just in case I haven't said it yet...Happy New Year!

I received a fantastic gift from my lovely wee wifey at Christmas, a Dremel Moto-Saw. It's a sort of light-weight, motorised cross between a scroll saw and a fret-saw...


Now, I am a big Dremel fan - I love my Dremel multi-tool and am always looking for an opportunity to use it for my plastic modelling projects. But the fact is that the speed and power of the multi-tool means that - for cutting and sanding - it melts most plastic, so I reserve it for drilling mostly.

None-the-less, when I saw the Moto-Saw advertised I immediately thought it would be ideal for the resin model conversions I am so keen on. Although this IS a medium that my multi-tool is good for, the sharp angles I need to cut aren't best achieved with it's disc-cutters.

One of my resin model conversions. You can see the amount of cutting away that
can be involved, tricky work with a disc-cutter. My new Moto-Saw will allow
me to more easily and precisely cut into the majority of these nooks and crannies!

Special filter 'pods' can be added to the sides.
Additionally, and importantly, the multi-tool generated great clouds of resin dust. This stuff is exceedingly bad for you and although I have taken some precautions when doing this sort of work - using those cheap paper dust masks - my set-up has been very amateur and far from ideal.

The Dremel Moto-Saw has a proper dust extraction facility, by way of a vacuum cleaner pipe attachment, so this - along with the Moto-Saw's ability to saw into very tight corners - makes it far more suited to working with hard resin. Though, I have also taken the step up into a better quality dust mask as well.

Finally, to make use of the Moto-Saw's dust extraction adaptor I bought myself a basic compact vacuum cleaner from Argos. It's their 'value range' Bagless Cylinder Vacuum Cleaner and although it's only £32 it has a lot of good reviews. Best of all, it's very light and small and is great for keeping in my attic 'man cave' to do the occasional carpet cleaning instead of dragging our big Dyson up and down stairs!

My new vacuum cleaner! Killing two birds with one stone, a powerful
dust extractor for my new Moto-Saw and a means of keeping my man-cave
tidy. Importantly, it's bagless - so if I 'sook' up any model parts, I can
retrieve them (in theory). Unfortunately, this picture doesn't show the pipe
attachments it has.
Well, all very fancy but you might be thinking 'that's a lot of expense for chopping up the occasional resin conversion', and you would be right. Although there are other general scale modelling uses for my new Moto-Saw (it's going to make cutting model bases a doddle, for example) I do have an additional cunning plan for 2016...

Without a doubt, the biggest surprise to me about my modelling hobby has been how much enjoyment I have gotten out of my dodgy conversions and scratch building. So much so, in fact, that I would like to go a bit further AND explore a new medium...This year I want to move into making some 'traditional' style wooden models!

A bit advanced for me yet, but this example gives you an idea about my toy
making ambitions. I'll be starting with something a lot simpler!
 Credit: Toymakingplans.com

Now, I am not sure whether this is within the remit of this blog - I may want to keep it exclusively plastic and resin based - and it's sort of a cross-over with my other modelling interest over on my Molatero Blog. The 'traditional' toy style just seem to work nicely into the 'Funny Little Wars' format...But that's another story!