Product description: HaT 1/72 Putilov 76mm M1902 Gun (Set 8173)
Right - I have a cunning plan, as the venerable Baldric would say (oh, dear, I've even started speaking like a war gamer now!). To see what it's like to actually make an army for war gaming I'm creating a small formation of WW2 Finnish, not a full battalion but a 'half company' so I can get to grips with what it's like to plan and create large scale collection.
I've already made some basic administrative decisions about what will constitute this mini-army which I will discuss in a separate post, but to kick off the more enjoyable bit I have bought my first section of artillery support. My choice of guns are medium field guns which made up the backbone of the Finnish artillery throughout WW2, the Russian Putilov 76mm field piece.
The Finns had over 200 of these World War 1 vintage guns and by all accounts thought highly of it because of it' simplicity and ruggedness. New ammunition was developed for it to keep it viable including HEAT (High Explosive Anti-tank) in 1944.
The HaT model is very competitively priced, particularly as you get 4 guns in the set. I acquired mine from eBay (Arcane Scenery & Model Supplies) for £6.15 plus postage.
As you can imagine it is a slightly simplified model for war gaming, but I have read in a couple of reviews that it is generally quite accurate. Plastic Soldier Review note that it's made of a hard plastic and I have to say it does look crisply done.
One slight draw back is that this set come with no crew. But HaT does do it's own separate Russian WW1 artillery crew set to accompany these guns. My particular problem is that I want to crew my Putilovs with WW2 Finns in summer uniform, something that is a bit tricky as no specific sets apear to exist (there is one 1/72 Finnish gun crew in winter uniform and SHQ do a 1/76 crew in summer garb).
NEXT: I put together the gun section and crew them with my make-shift solution.
More information about WW2 Finnish artillery can be found here - www.jaegerplatoon.net/ARTILLERY1.htm
Diary of a novice scale model maker and his adventures in the wacky world of Braille Scale.
Showing posts with label quick build. Show all posts
Wednesday, 18 April 2012
Sunday, 1 April 2012
SU-122M conversion - Part 5, The End!
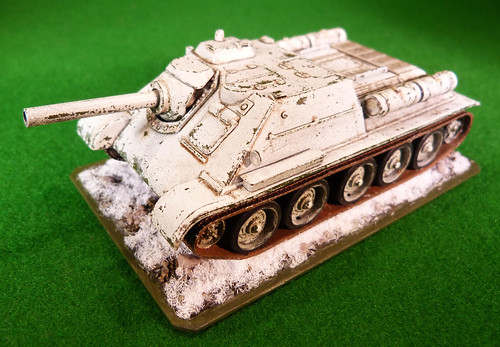
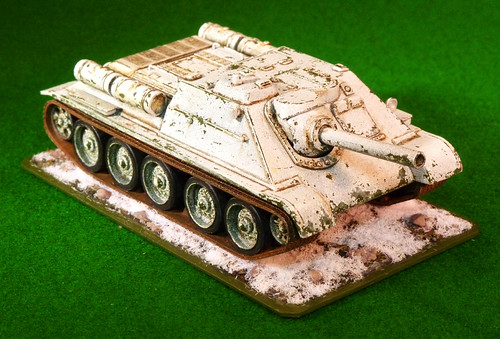
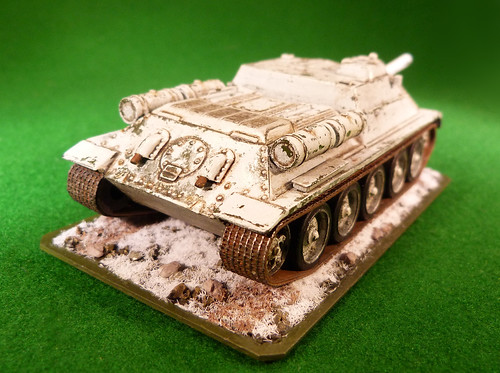
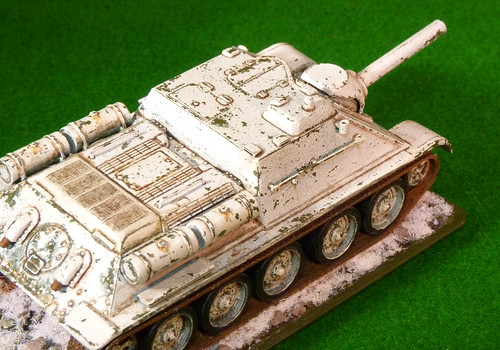
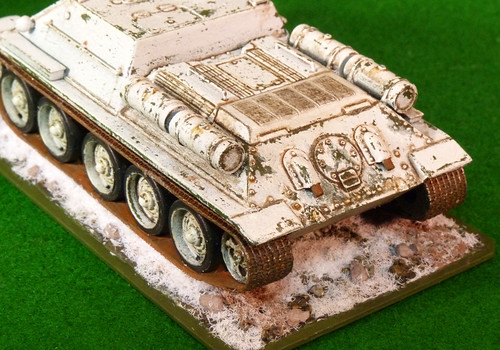
Today I finished my experiment in winter camouflage, my Armourfast SU-85 conversion - the SU122M(3). I'm quite pleased with the weathered chipped effect, it's really fun but you can get a little carried away (as I did). But what the heck, it's a 'what if?' model anyway so who's to say it's not right.
Tuesday, 27 March 2012
SU-122M conversion - Part 4
War gaming base
I have liked the look of the minimalist war gaming bases that I have seen being used for armour. I realise that opinion differs as to whether armour actually needs a base for war gaming - some players prefer to have their vehicles unbased - but I think the little bit of terrain under the vehicle looks attractive. So, as it is another area I need to practise I thought I would have a crack at doing a simple base.
The vehicle I decided to base is my SU-122(3) experiment - which is nearing completion - because this would also give me a chance to experiment with a snowy scene.
The basics
First of all I cut a piece of plasticard to the rough size of the footprint of the tank, allowing a 5mm margin all around. I then masked a little border around the edge of the base as I wanted to paint a narrow dark green edge to my terrain. This is purely optional, as some gamers terrain goes right to the edge of the base, and some don't.
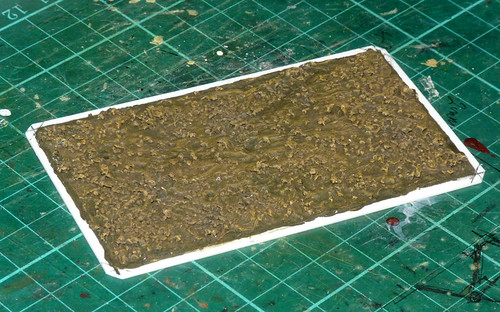
Next I plastered on some Polyfilla to give the rough ground I wanted, mixing in some cheap bird cage grit for texture (£1 for a big bag from Wilkos). Then I lift this to dry out before applying a mid-earth wash based on Tamilya's Flat Earth acrylic - the same colour I used on the tank's tracks.
Then when that was dry I first washed over with a darker and more diluted version of the earth colour so that I got some shadow into the nooks and cranes and then dry brushed a light mix of the Flat Earth over the top.
Next: The snow!
I have liked the look of the minimalist war gaming bases that I have seen being used for armour. I realise that opinion differs as to whether armour actually needs a base for war gaming - some players prefer to have their vehicles unbased - but I think the little bit of terrain under the vehicle looks attractive. So, as it is another area I need to practise I thought I would have a crack at doing a simple base.
The vehicle I decided to base is my SU-122(3) experiment - which is nearing completion - because this would also give me a chance to experiment with a snowy scene.
The basics
First of all I cut a piece of plasticard to the rough size of the footprint of the tank, allowing a 5mm margin all around. I then masked a little border around the edge of the base as I wanted to paint a narrow dark green edge to my terrain. This is purely optional, as some gamers terrain goes right to the edge of the base, and some don't.
Next I plastered on some Polyfilla to give the rough ground I wanted, mixing in some cheap bird cage grit for texture (£1 for a big bag from Wilkos). Then I lift this to dry out before applying a mid-earth wash based on Tamilya's Flat Earth acrylic - the same colour I used on the tank's tracks.
Then when that was dry I first washed over with a darker and more diluted version of the earth colour so that I got some shadow into the nooks and cranes and then dry brushed a light mix of the Flat Earth over the top.
Above: Here you see just how tight the margin is around the vehicle - the white border
will be painted a dark green to finish it off nicely. Additionally you can see my
nearly complete Mk. II T-34 tank tracks.
will be painted a dark green to finish it off nicely. Additionally you can see my
nearly complete Mk. II T-34 tank tracks.
Next: The snow!
Monday, 12 March 2012
Pegasus US Army truck to BM-13-16N conversion - Part 3
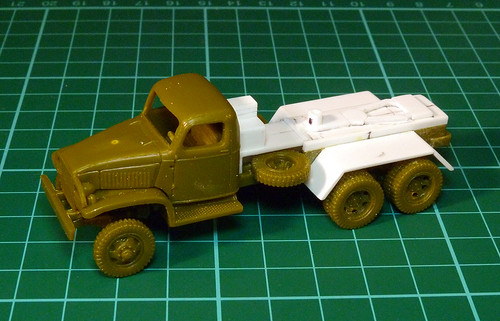
I was hoping to get the launcher frame completed tonight but got side-tracked. Instead I finished off the chassis and flat-bed of the GMC-come-US6 truck.
I think I have just included enough simplified detail to produce a passable impression of the truck. I've kept it all very quick and easy to make, with no small or fiddley components. I can't wait to get the launcher frame on!
Pegasus US Army truck to BM-13-16N conversion - Part 2
The first half of this conversion job is to make the platform on which the rocket launcher will sit. And this is where the first problem cropped up.
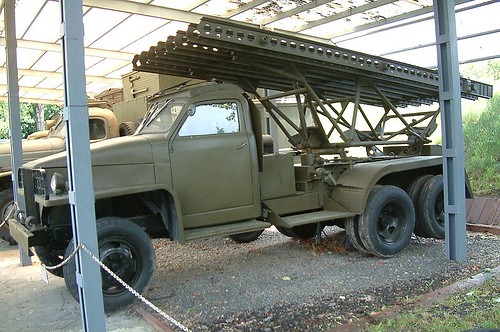
The Pegasus US Army truck is based on the GMC CCKW, in turn the Soviet US6 is a version of this American lend lease vehicle, BUT the BM-13-16N vehicle is a modified version of the US6. Short story - they ain't all exactly the same vehicle!
There are small differences in the layout of the BM-13-16N truck in order for it to accommodate the large rocket launcher system. Most noticeably, the fuel tank and spare wheel are reversed, and the wheel is mounted vertically (on the right side) instead of horizontally on the left side as it is on the Pegasus model. Now I could spend some time chopping and sawing and remounting these components to be completely accurate, but bearing in mind my goal of producing a 'quick and dirty' Katyusha rocket launcher - that's easy to make for war gaming - I don't really want to muck about too much.
Were this a display model naturally I would take the time and effort to make this model as accurate a possible, but will the placement of the spare tyre really have an impact on the models intended use as a war gaming piece? Better that the conversion is easy to do with the minimum of structural changes (though this up to you - the modeller).
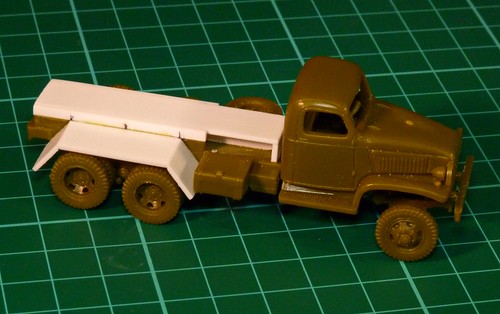
So, first of all I made a raised flat bed platform designed to incorporate the horizontally positioned spare wheel into it's framework...
This method does means a inaccurately high platform, but it's a fudge I am willing to accept in order to make the construction something you can do with the 'out of the box' Pegasus model.
Next there is the rear wheel mud guards, and again we have to make a design decision based on ease versus accuracy. This decision is necessary as the real truck's mud guards had nicely curved fenders matching the shape of the wheels, not a very complicated piece of modelling I guess but thinking in 'quick build' mode it does seem logical that this element could be simplified to just a straight edged structure...
Now, you will have to look at these two design simplifications yourself and decide just what level of accuracy (or rather inaccuracy) YOU can live with. My model is obviously the most simplified option based wholly on ease of construction over authenticity - just because I want to see how quickly I can do this - but you can adjust the level of detail to match your particular tastes based on just how much time you have to spare.
Next: The rocket launcher framework
The Pegasus US Army truck is based on the GMC CCKW, in turn the Soviet US6 is a version of this American lend lease vehicle, BUT the BM-13-16N vehicle is a modified version of the US6. Short story - they ain't all exactly the same vehicle!
Above: The real BM-13-16N differs in configuration from the GMC CCKW truck on which the Pegasus Hobbies model is based. I have to work around these differences if I want to produce a 'quick build' model. Source: Wikipedia
There are small differences in the layout of the BM-13-16N truck in order for it to accommodate the large rocket launcher system. Most noticeably, the fuel tank and spare wheel are reversed, and the wheel is mounted vertically (on the right side) instead of horizontally on the left side as it is on the Pegasus model. Now I could spend some time chopping and sawing and remounting these components to be completely accurate, but bearing in mind my goal of producing a 'quick and dirty' Katyusha rocket launcher - that's easy to make for war gaming - I don't really want to muck about too much.
Were this a display model naturally I would take the time and effort to make this model as accurate a possible, but will the placement of the spare tyre really have an impact on the models intended use as a war gaming piece? Better that the conversion is easy to do with the minimum of structural changes (though this up to you - the modeller).
So, first of all I made a raised flat bed platform designed to incorporate the horizontally positioned spare wheel into it's framework...
Above: Here you see - in white plasticard - the simple box structure I built on the chassis so
that the spare wheel could be easily incorporated.
This method does means a inaccurately high platform, but it's a fudge I am willing to accept in order to make the construction something you can do with the 'out of the box' Pegasus model.
Next there is the rear wheel mud guards, and again we have to make a design decision based on ease versus accuracy. This decision is necessary as the real truck's mud guards had nicely curved fenders matching the shape of the wheels, not a very complicated piece of modelling I guess but thinking in 'quick build' mode it does seem logical that this element could be simplified to just a straight edged structure...
Above: I went for the easy option and simplified the rear mud guards with this angular shape. Three rectangles of plasticard glued together in no time at all.
Now, you will have to look at these two design simplifications yourself and decide just what level of accuracy (or rather inaccuracy) YOU can live with. My model is obviously the most simplified option based wholly on ease of construction over authenticity - just because I want to see how quickly I can do this - but you can adjust the level of detail to match your particular tastes based on just how much time you have to spare.
Next: The rocket launcher framework
Sunday, 11 March 2012
Pegasus US Army truck to BM-13-16N conversion
While I do have several projects on the go at the moment they are all in the painting stages, which - to be honest - isn't my favourite part. I like to build! So I though a quick conversion job would keep me entertained.
I wanted some Soviet artillery to go with my WW2 Red Army tanks, and naturally the infamous 'Stalin's Organ' must be included in my war gaming fleet.
While there are plenty of display kits for the mid-war model BM-13-16M - which was the standardized version build on lend lease and licence built Studerbaker trucks - there aren't any quick build alternatives for the war gamer. I want to see if I can make a quick and dirty conversion designed with the war gamer in mind.
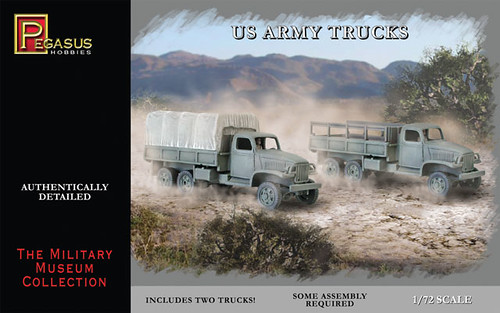
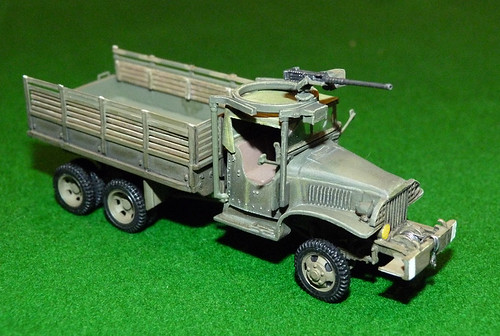
Luckily Pegasus Hobbies produce a quick build set called - rather vaguely - 'US Army Trucks'. You get two trucks in the set for about £8 and they are quite nice - if simplified - representations of the GMC CCKW, otherwise known as the Studebaker 'Deuce and a Half'. This hugely successful truck was the basis for the Soviet US6, which in turn was the platform for the Katyshua rocket launcher system.
The conversion process
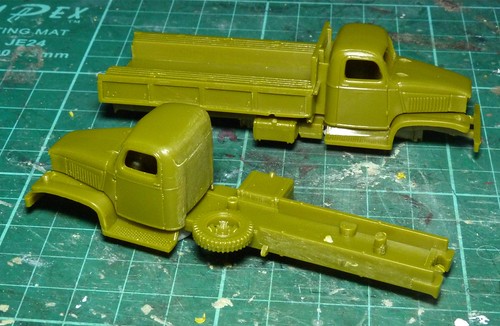
Pegasus's version of the truck is the cargo carrying variant with a flat bed built onto the rear. We need to get rid of this before we can start building the launcher framework onto the chassis. Unfortunately the flat bed and cab are a single component of the model, so it's time to get your saw out!
The two major truck components of the model are the lower one-piece chassis and the upper cab/flat bed, these clip together once you add the cab interior details (seat, dashboard, steering wheel, etc). So I used my Dremmel multi-tool and it's cutting wheel accessory to separate the cab from the flat bed. It's quite solidly attached and will need some shaving and sanding once detached to smooth out the join.
I should mention something about the general quality of the Pegasus Studebaker. When I started modelling again, not so long ago, the first model I made was the Airfix GMC CCKW and I have to say that although the Pegasus kit is obviously simplified some of the detail is quite nice. Areas that are obviously dumbed down are the front grill and there is no 'glass' wind-shields included. It is perfectly adequate for war gaming and in fact quite an attractive model.
Next: Making the new launcher flat-bed.
I wanted some Soviet artillery to go with my WW2 Red Army tanks, and naturally the infamous 'Stalin's Organ' must be included in my war gaming fleet.
Above: The Soviet BM-13N was based on the American lend-lease Studebaker truck, which was given the designation US6 by the Soviets. Source: Wikipedia
While there are plenty of display kits for the mid-war model BM-13-16M - which was the standardized version build on lend lease and licence built Studerbaker trucks - there aren't any quick build alternatives for the war gamer. I want to see if I can make a quick and dirty conversion designed with the war gamer in mind.
Luckily Pegasus Hobbies produce a quick build set called - rather vaguely - 'US Army Trucks'. You get two trucks in the set for about £8 and they are quite nice - if simplified - representations of the GMC CCKW, otherwise known as the Studebaker 'Deuce and a Half'. This hugely successful truck was the basis for the Soviet US6, which in turn was the platform for the Katyshua rocket launcher system.
The conversion process
Pegasus's version of the truck is the cargo carrying variant with a flat bed built onto the rear. We need to get rid of this before we can start building the launcher framework onto the chassis. Unfortunately the flat bed and cab are a single component of the model, so it's time to get your saw out!
The two major truck components of the model are the lower one-piece chassis and the upper cab/flat bed, these clip together once you add the cab interior details (seat, dashboard, steering wheel, etc). So I used my Dremmel multi-tool and it's cutting wheel accessory to separate the cab from the flat bed. It's quite solidly attached and will need some shaving and sanding once detached to smooth out the join.
I should mention something about the general quality of the Pegasus Studebaker. When I started modelling again, not so long ago, the first model I made was the Airfix GMC CCKW and I have to say that although the Pegasus kit is obviously simplified some of the detail is quite nice. Areas that are obviously dumbed down are the front grill and there is no 'glass' wind-shields included. It is perfectly adequate for war gaming and in fact quite an attractive model.
Next: Making the new launcher flat-bed.
Thursday, 8 March 2012
Experiment No. 3 - Camouflage Part 3
Having gone through the various stage of masking with Blu-Tack and spraying a separate colour for the camo I have finally finished the basic pattern...
I have to say it didn't seem to be entirely successful, as you can tell from the photo there are clearly visible marks around the edges of the pattern where one paint layer joins the other. This hard edged effect isn't as clean as I was hoping it would be and now I will have to do a fair amount of remedial touching up.
Of course this can be partially explained by the fact that I am using spray aerosol cans instead of an airbrush as I am guessing that an airbrush can put down a finer layer of pain, thus negating any noticeable borders between paint patterns.
I can't help but be a little disappointed and have to wonder if I might have done a better job by just brush painting the camo?
Certainly these more subtle paint effects do seem to be best done with an airbrush, but I don't want to buy one of these until I can afford a very good quality one. I shall try a couple more experiments with this Blu-Tack masking technique on some spare plastic packaging to see if altering the hard mask to a softer one can alleviate the noticeable lines between colours.
I have to say it didn't seem to be entirely successful, as you can tell from the photo there are clearly visible marks around the edges of the pattern where one paint layer joins the other. This hard edged effect isn't as clean as I was hoping it would be and now I will have to do a fair amount of remedial touching up.
Of course this can be partially explained by the fact that I am using spray aerosol cans instead of an airbrush as I am guessing that an airbrush can put down a finer layer of pain, thus negating any noticeable borders between paint patterns.
I can't help but be a little disappointed and have to wonder if I might have done a better job by just brush painting the camo?
Certainly these more subtle paint effects do seem to be best done with an airbrush, but I don't want to buy one of these until I can afford a very good quality one. I shall try a couple more experiments with this Blu-Tack masking technique on some spare plastic packaging to see if altering the hard mask to a softer one can alleviate the noticeable lines between colours.
Sunday, 4 March 2012
Pegasus KV box set - Part 3
You can't get it right all the time and as a modelling 'noob' I guess I was going to make a mistake sooner or later. Well, I made a boo-boo with my Pegasus KV-1 model. It was a pretty elementary mistake really, I didn't do my homework about the subject and rushed straight in as I just wanted to get to the painting experiment I had planned for this model.
I am painting this KV-1 in the scheme of a captured tank which was used by the Finnish army against the Soviets in 1944. I had thought that the tank was a KV-1 model 1940, but it turned out that what I really needed was the applique armoured version that was - coincidentally - available in the Pegasus box set as a build option. So I ended up having to strip back part of the model and build and modify the second KV hull to reflect the changes made by the Finns.
The biggest change was the addition of the turret side armour - an easy job, but I had to sand back the primer - and the modification of the tank's fenders. The Finns changed the shape of the back and front sections of the fenders to a rounded shape (I don't know why), this meant I had to cut off the end sections and make new ones with plasticard. Finally I had to run a thin styrene strip around the fenders.
Other changes were a bit easier and included a small modification to the front applique armour, the leaving out of the external fuel tanks and the addition of some new applique strips on the side of the hull.
I do get a lot of satisfaction from doing this sort of tinkering, but I wasn't really expecting to do it on what I thought would be a 'quicky' model with which to practice a new painting technique. Still, you live and learn, that will teach me to do my research better in future...
On a happier note, the KV-2 from the box set went together very easily (I used the hull from my aborted KV-1 1940 for this so that saved any major waste). The only thing I added ere the very distinctive ladder runs on the side of the turret, but these are dead easy to do.
So there you have it, one step back and one step forward on this project. I feel like it's been a bit of a wasted weekend because I thought I would be further on than this, but I supposed I would have been a lot unhappier if I had completed my Finnish KV-1 and then discovered I had made the completely wrong model of KV.
If you would like to see some photos of the Finnish KV that I'm basing my model on you can find an excellent walk-around gallery at http://www.andreaslarka.net/ (photos taken at the Finnish ARmour Museum).
I am painting this KV-1 in the scheme of a captured tank which was used by the Finnish army against the Soviets in 1944. I had thought that the tank was a KV-1 model 1940, but it turned out that what I really needed was the applique armoured version that was - coincidentally - available in the Pegasus box set as a build option. So I ended up having to strip back part of the model and build and modify the second KV hull to reflect the changes made by the Finns.
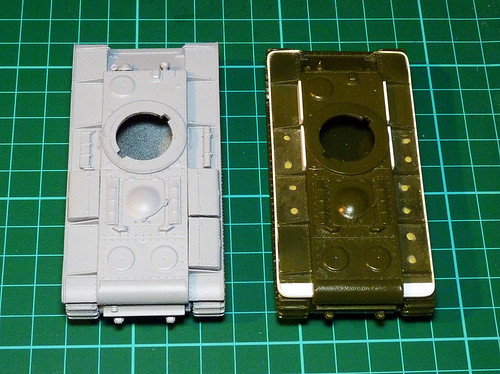
Above: Left is the standard KV hull, right is the modified Finnish KV hull. Note the new shape of the rounded off fenders.
The biggest change was the addition of the turret side armour - an easy job, but I had to sand back the primer - and the modification of the tank's fenders. The Finns changed the shape of the back and front sections of the fenders to a rounded shape (I don't know why), this meant I had to cut off the end sections and make new ones with plasticard. Finally I had to run a thin styrene strip around the fenders.
Other changes were a bit easier and included a small modification to the front applique armour, the leaving out of the external fuel tanks and the addition of some new applique strips on the side of the hull.
I do get a lot of satisfaction from doing this sort of tinkering, but I wasn't really expecting to do it on what I thought would be a 'quicky' model with which to practice a new painting technique. Still, you live and learn, that will teach me to do my research better in future...
On a happier note, the KV-2 from the box set went together very easily (I used the hull from my aborted KV-1 1940 for this so that saved any major waste). The only thing I added ere the very distinctive ladder runs on the side of the turret, but these are dead easy to do.
So there you have it, one step back and one step forward on this project. I feel like it's been a bit of a wasted weekend because I thought I would be further on than this, but I supposed I would have been a lot unhappier if I had completed my Finnish KV-1 and then discovered I had made the completely wrong model of KV.
If you would like to see some photos of the Finnish KV that I'm basing my model on you can find an excellent walk-around gallery at http://www.andreaslarka.net/ (photos taken at the Finnish ARmour Museum).
Monday, 27 February 2012
Pegasus KV box set - Part 2
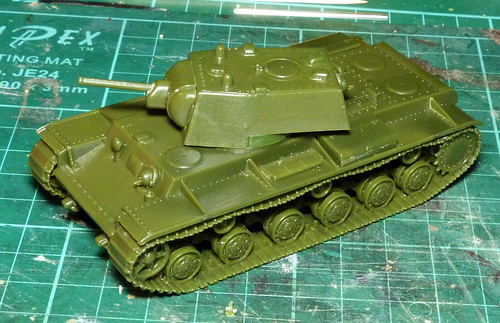
Popped the KV-1 together. Decided to go with the earlier version without the applique armour. Nice looking tank, although the track running gear was maybe a little complicated for a quick build.
I have chosen this model for my next painting experiment - camouflage.
Friday, 24 February 2012
Simple SU-85 to SU-122M conversion
As I didn’t want to build my two Armourfast SU-85s exactly the same I started looking for some options for a variation. I considered building the later SU-85M version, which would entail some scratch building including making a whole new commander’s cupola based on the T-34/85 commander’s hatch. But really, I wanted something simpler to make.
Luckily I did find a really nice looking variant called the SU-122, an assault gun (which some term a self-propelled gun) that was armed with a 122mm artillery howitzer and was used for infantry support. Interestingly, despite it’s numerical designation, the SU-122 actually came before both the SU-85 and the SU-100 – in around December 1942.
However, as attractive as this idea was, once again it would provided a bit of a challenge for my novice building skills as the 122mm gun was housed in a large gun mantlet that looked quite complicated to scratch build at this point in my modeling career. It is based on the Soviet 122mm field howitzer, which happens to be available – very cheaply – in 1/72 scale from Zvezda (in case you are interested).
Anyroads, it was while I was researching the SU-122 that I came across a prototype variant that caught my interest. The SU-122 proved both popular and very useful in service so it was decided that a modernized version should be created to replace it – this was to be the SU-122M.
There were two prototype designs and I was interested in the second - the SU-122-3. What's special about the second SU-122M version was that it was the prototype that first incorporated the distinctive ‘ball mount’ mantlet that was later used in the SU-85 tank destroyer!
In fact the SU-122M was basically the SU-85 with a larger caliber gun stuck on the front. A REALLY simple conversion job that even I could manage.
There is one small problem though. The SU-122M was only ever a prototype – in the end the Red Army decided to skip this assault gun, due to it’s production costs, keep using the original version and move on to the SU-85 (keeping the specially developed ball mount).
So, although important and interesting, the SU-122M could only be modeled as either a prototype or as a ‘what if?’ element for a war game.
Still, it is an attractive proposition for the war gamer that wants – as I did – something a little different. You can justify it’s use in a game as you could use the technical characteristics of the SU-122 in play, and if your game rules allow ‘what if?’ prototypes in your scenario.
As for me, I am building it for the fun and because I need a quick platform on which to try out a new painting technique for me – the ‘hairspray technique’.
Hope you find this potted outline of interest. Certainly it’s a quick and dirty way to get a Soviet 122mm SPG onto your gaming table for mid-war scenarios.
(Note: Although the 122mm SU-122 was primarily developed as an assault gun there was a hollow charge developed for it to be used – in an emergency I guess – in the anti-tank role. While the effectiveness of this might be debatable, when compared to specialist AT rounds, I for one wouldn’t have wanted to be in a Panzer IV with one of those foot wide projectiles coming at me! However, you should be aware of this ability if you do decide to put this machine on your game table.)
NEXT: Finished details and basic coat.
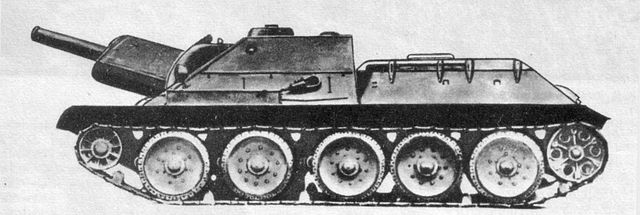
Luckily I did find a really nice looking variant called the SU-122, an assault gun (which some term a self-propelled gun) that was armed with a 122mm artillery howitzer and was used for infantry support. Interestingly, despite it’s numerical designation, the SU-122 actually came before both the SU-85 and the SU-100 – in around December 1942.
Above: The production SU-122 version. The most distinctive feature - which differentiates it
from the later SU-85 - was the large gun-howitzer mount.
However, as attractive as this idea was, once again it would provided a bit of a challenge for my novice building skills as the 122mm gun was housed in a large gun mantlet that looked quite complicated to scratch build at this point in my modeling career. It is based on the Soviet 122mm field howitzer, which happens to be available – very cheaply – in 1/72 scale from Zvezda (in case you are interested).
Anyroads, it was while I was researching the SU-122 that I came across a prototype variant that caught my interest. The SU-122 proved both popular and very useful in service so it was decided that a modernized version should be created to replace it – this was to be the SU-122M.
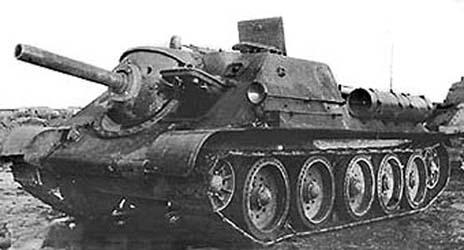
There were two prototype designs and I was interested in the second - the SU-122-3. What's special about the second SU-122M version was that it was the prototype that first incorporated the distinctive ‘ball mount’ mantlet that was later used in the SU-85 tank destroyer!
Above: The second prototype version of the modernised SU-122 - designated the SU-122-3.
In fact the SU-122M was basically the SU-85 with a larger caliber gun stuck on the front. A REALLY simple conversion job that even I could manage.
There is one small problem though. The SU-122M was only ever a prototype – in the end the Red Army decided to skip this assault gun, due to it’s production costs, keep using the original version and move on to the SU-85 (keeping the specially developed ball mount).
So, although important and interesting, the SU-122M could only be modeled as either a prototype or as a ‘what if?’ element for a war game.
Still, it is an attractive proposition for the war gamer that wants – as I did – something a little different. You can justify it’s use in a game as you could use the technical characteristics of the SU-122 in play, and if your game rules allow ‘what if?’ prototypes in your scenario.
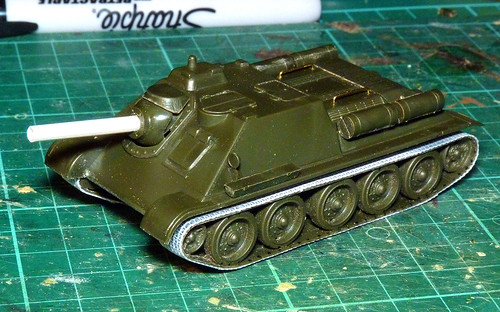
Above: Initial stages of a very simple conversion. I still have some small details to add - but I think this picture shows you just how easy a job this is! Note that I am including my Mk. II track mod.
As for me, I am building it for the fun and because I need a quick platform on which to try out a new painting technique for me – the ‘hairspray technique’.
Hope you find this potted outline of interest. Certainly it’s a quick and dirty way to get a Soviet 122mm SPG onto your gaming table for mid-war scenarios.
(Note: Although the 122mm SU-122 was primarily developed as an assault gun there was a hollow charge developed for it to be used – in an emergency I guess – in the anti-tank role. While the effectiveness of this might be debatable, when compared to specialist AT rounds, I for one wouldn’t have wanted to be in a Panzer IV with one of those foot wide projectiles coming at me! However, you should be aware of this ability if you do decide to put this machine on your game table.)
NEXT: Finished details and basic coat.
Tuesday, 14 February 2012
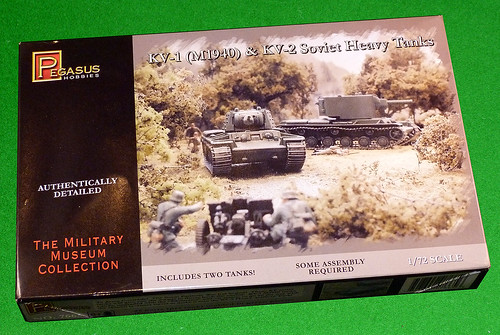
Pegasus 1/72 KV-1 & 2 quick build set review - Part 1
Fans of German WW2 AFV modeling enjoy a huge variety of vehicles to choose from, and even the Western Allied inventory is quite diverse. But modelers who want to immerse themselves in Red Army fighting vehicles might be forgiven for thinking that the only real choice you have is which variant of T-34 to build.
Luckily Pegasus Hobbies have come to the rescue of the quick build modeler with a selection of Soviet armored vehicles that represent both the early war years and the latter. In this case the KV series of heavy tanks were a nasty surprise for the Nazis during Operation Barbarossa that eventually provoked a German response in the form of the Tiger and the Panther tanks...
Sunday, 12 February 2012
Armourfast T-34/85 build - Part 5
Moving on to the basic work on the turret it's worth mentioning the problems with the Armourfast T-34/85 turret:-
1. It's slightly too wide (by a few millimetres), this is most noticeable at the rear of the turret...
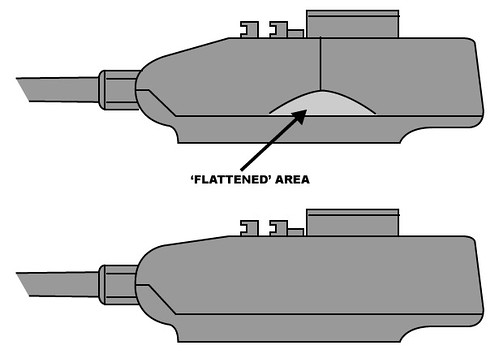
2. The flattened triangular area on each side of the turret is exaggerated...
3. The front profile is too acute, coming too sharply down from the roof to the gun mantlet...
4. The gun mantlet is the wrong shape, and the gun overly off-set.
ACCURACY?
There were several types of T-34/85 turret made by different Soviet factories during WW2, each had it's own distinctive production technique which produced a specific finished turret design. The Armourfast turret appears to be one of the 'flattened style' turret types, this refers to the triangular area on either side of the turret.
The Armourfast turret could be modeled after either the Zavod Factory Spring 1944 turret, or the Summer 1944 turret, or the final prodution 1945 production turret (which confusingly appeared in late 1944). Each of these three turrets displays the flattened triangular facet. However, the rest of the Armourfast turret's features are simplified to a point that it makes zeroing in on exactly which of these turrets it is really supposed to be nearly impossible.
Above: Top is a drawing of the Armourfast T-34/85 turret profile showing the 'thin nose' and flattend area. Below this is what I did to the turret...
I DID IT MY WAY...
...As it happens I decided to completely ignore the above and go my own way!
As the Armourfast turret is too wide and the flattened area exaggerated I began by sanding some of the width off. This smoothed off the profile and as a result my turret was now closer in shape to one of the other variants of turrets that were made without the flattened area - specifically the Summer 1944 'Angle-Joined' version...
Aside from this rounding out of the sides I built up the nose of the turret so that the drop from the roof to the gun wasn't so acute. Using Milliput putty I rounded off the nose and added a replacement resin mantlet made by CZECH MASTER (which comes with a nice turned aluminium gun). As you can see from the above photo this means I had to make a new mantlet cover from a rectangle of brass sheet.
I also, used Milliput to create the 'Angle-Joined' weld marks around the bottom of the turret and some weld marks around the bottom of the commander's cupola.
Finally, I trimmed off the bearly discernible Armourfast turret periscopes and replaced them with some neat Czech Master resin ones.
NEXT: Finishing off the turret and adding the commander.
By the way, if you want to look a bit more into the differences between the T-34/85 turret types try out this link at Missing-lynx.com: The T-34-85 in WWII: A Closer Look by Ray Peterson
1. It's slightly too wide (by a few millimetres), this is most noticeable at the rear of the turret...
2. The flattened triangular area on each side of the turret is exaggerated...
3. The front profile is too acute, coming too sharply down from the roof to the gun mantlet...
4. The gun mantlet is the wrong shape, and the gun overly off-set.
ACCURACY?
There were several types of T-34/85 turret made by different Soviet factories during WW2, each had it's own distinctive production technique which produced a specific finished turret design. The Armourfast turret appears to be one of the 'flattened style' turret types, this refers to the triangular area on either side of the turret.
The Armourfast turret could be modeled after either the Zavod Factory Spring 1944 turret, or the Summer 1944 turret, or the final prodution 1945 production turret (which confusingly appeared in late 1944). Each of these three turrets displays the flattened triangular facet. However, the rest of the Armourfast turret's features are simplified to a point that it makes zeroing in on exactly which of these turrets it is really supposed to be nearly impossible.
Above: Top is a drawing of the Armourfast T-34/85 turret profile showing the 'thin nose' and flattend area. Below this is what I did to the turret...
I DID IT MY WAY...
...As it happens I decided to completely ignore the above and go my own way!
As the Armourfast turret is too wide and the flattened area exaggerated I began by sanding some of the width off. This smoothed off the profile and as a result my turret was now closer in shape to one of the other variants of turrets that were made without the flattened area - specifically the Summer 1944 'Angle-Joined' version...
Aside from this rounding out of the sides I built up the nose of the turret so that the drop from the roof to the gun wasn't so acute. Using Milliput putty I rounded off the nose and added a replacement resin mantlet made by CZECH MASTER (which comes with a nice turned aluminium gun). As you can see from the above photo this means I had to make a new mantlet cover from a rectangle of brass sheet.
I also, used Milliput to create the 'Angle-Joined' weld marks around the bottom of the turret and some weld marks around the bottom of the commander's cupola.
Finally, I trimmed off the bearly discernible Armourfast turret periscopes and replaced them with some neat Czech Master resin ones.
NEXT: Finishing off the turret and adding the commander.
By the way, if you want to look a bit more into the differences between the T-34/85 turret types try out this link at Missing-lynx.com: The T-34-85 in WWII: A Closer Look by Ray Peterson
Wednesday, 8 February 2012
Armourfast T-34/85 build - Part 4
Some small progress on this build - I've just put the finishing touches to my T-34/85 hull. The principal 'improvements' (minus those already mentioned) include:
> Addition of infantry grab rails
> Extra additional external fuel tank (the T-34/85 carried 3 and not 2 as included in the stock kit)
> added detail to the external fuel tanks including new retaining straps, fuel caps and side handles
> 'Improved' head lap (drilled out) and lamp wiring
> Slightly improved tool box
> Addition of PSC spare T-34 track on front and Pegasus saw on side
> Modification of front fenders from early rounded to later angled ones
I did the angled fenders to represent a later model T-34/85, but I also wanted to include these parts as brass components so I could dent them up to show some wear and tear. I will bend the edges with some pliers later to show damage.
I could have gone further but I want to move on with this model and I think there is sufficient detail now to satisfy me. besides, some of teh remailing detailing I could have done would tax my eyesight too much! ;)
NEXT: On to the turret!
Wednesday, 1 February 2012
T-34 track mod - Part 5
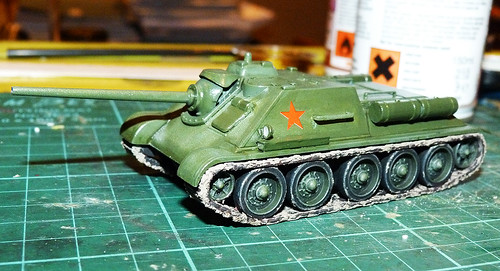
Well, I have reached a conclusion to this project and at the same time completed the work I was doing on my SU-85 weathering experiment. The two items seem to complement each other nicely (the SU-85 was a specially designed hull based on the T-34).
I finished off this very enjoyable build with a photo session and here are the results...
Tuesday, 31 January 2012
T-34 track mod - Part 4
Some quick snaps of the latest progress with my Armourfast one-piece track improvement project.
I've stuck the painted tracks on another experiment I'm doing - the Armourfast SU-85 - as both are exploring 'weathering' techniques. I've tried out some mud on the tracks as well as finishing off the wheels with some highlighting...
Wednesday, 25 January 2012
T-34 track mod - Part 3
Well, started the painting today. I used the tutorial at scalemodelguide.com as a guide for the process and I used a mixture of washes and pigments (including the Vallejo pigments)...
It's a messy process! Or maybe it's just my newbie efforts that are sloppy...In any case it was hard for me to judge just how much pigment to use and when to stop as I didn't know how each subsequent layer would affect the final result. I suppose once I have done a few of these I will know the correct 'recipe'.
Here's the incomplete paint job plonked on the side of another experiment I'm doing just to get an idea how it might look when finished...
The final stage was dry brushing some silver for the metal finish.
There is still a lot to do, the wheels are to be painted Russian Green and then weathered - and I have to decide how to paint the inside (the back) of the tracks.
One interesting thing about the pigments - I actually couldn't tell the difference between using the expensive Vallejo pigments and my cheap conte crayon (sanded into powder)! >head scratch<
What do you think? Is it working?
Maybe I should finish with a thin dark wash to give some depth and tone down the vivid colours?
It's a messy process! Or maybe it's just my newbie efforts that are sloppy...In any case it was hard for me to judge just how much pigment to use and when to stop as I didn't know how each subsequent layer would affect the final result. I suppose once I have done a few of these I will know the correct 'recipe'.
Here's the incomplete paint job plonked on the side of another experiment I'm doing just to get an idea how it might look when finished...
The final stage was dry brushing some silver for the metal finish.
There is still a lot to do, the wheels are to be painted Russian Green and then weathered - and I have to decide how to paint the inside (the back) of the tracks.
One interesting thing about the pigments - I actually couldn't tell the difference between using the expensive Vallejo pigments and my cheap conte crayon (sanded into powder)! >head scratch<
What do you think? Is it working?
Maybe I should finish with a thin dark wash to give some depth and tone down the vivid colours?
Wednesday, 18 January 2012
Armourfast T-34/85 build - Part 2
Managed to get a bit further, and although these are very small additions I'm quite pleased with both of them. I've finished off the rear hull modifications by doing an improvement to the exhaust pipes and I have cut the hatch for the driver on the front of the hull...
For the exhausts I trimmed off the Armourfast pipes and cut a grove in the back of the covers to hold the new pipes I was making. The new pipes were just pieces of copper tubing cut to length and bent to shape.
Before I got to cutting the driver's hatch I did do one other modification, this was to the front MG cupola. The stock Armourfast one was too vertical at the front compared to the reference material I was using (Kagero's 'T-34/85 Topshots #32') so I trimmed it so that it slanted back a little. I smoothed off with Milliput and while I was at it added the welding marks around the edge of it...
Cutting the hatch was a bit scary for a novice like me - I was worried that I if I made a mistake I would ruin the whole hull. But as i was I was able to cut out the 6.5x6.6mm hole and file the edges down so it looked OK. Next to the hull you can see the back of the hatch cover which I have started detailing - I've added extra thickness for the inside.
NEXT: Detailing the driver's hatch and making a 'cockpit' for the driver figure.
For the exhausts I trimmed off the Armourfast pipes and cut a grove in the back of the covers to hold the new pipes I was making. The new pipes were just pieces of copper tubing cut to length and bent to shape.
Before I got to cutting the driver's hatch I did do one other modification, this was to the front MG cupola. The stock Armourfast one was too vertical at the front compared to the reference material I was using (Kagero's 'T-34/85 Topshots #32') so I trimmed it so that it slanted back a little. I smoothed off with Milliput and while I was at it added the welding marks around the edge of it...
Cutting the hatch was a bit scary for a novice like me - I was worried that I if I made a mistake I would ruin the whole hull. But as i was I was able to cut out the 6.5x6.6mm hole and file the edges down so it looked OK. Next to the hull you can see the back of the hatch cover which I have started detailing - I've added extra thickness for the inside.
NEXT: Detailing the driver's hatch and making a 'cockpit' for the driver figure.
Sunday, 15 January 2012
Armourfast T-34/85 build - Part 1
Description: Adding extra detail and generally improving the Armourfast T-34/85 tank.
It's time for another quick-fire practise model as an antidote to my getting bogged down in a couple of protracted projects. This time the subject is the Soviet T-34/85 Medium tank, but once again it's an Armourfast quick build model of this armoured fighting vehicle.
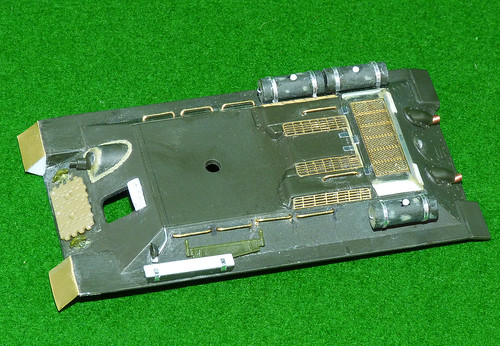
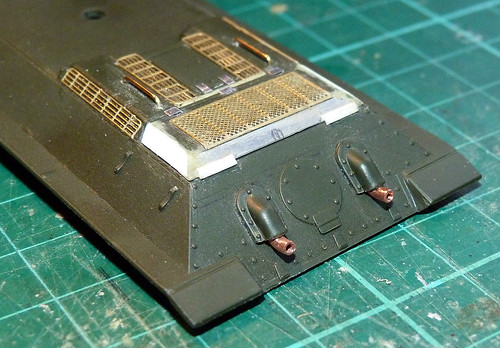
I'm starting with the hull and the part of the Armourfast T-34 model which I dislike the most - the engine deck. Using the Hauler photoetch detailing upgrade - which was made for the HaT version of this model - I want to improve the look of the engine vents.
Next: Moving on to the front of the hull and the driver's hatch.
It's time for another quick-fire practise model as an antidote to my getting bogged down in a couple of protracted projects. This time the subject is the Soviet T-34/85 Medium tank, but once again it's an Armourfast quick build model of this armoured fighting vehicle.
I'm starting with the hull and the part of the Armourfast T-34 model which I dislike the most - the engine deck. Using the Hauler photoetch detailing upgrade - which was made for the HaT version of this model - I want to improve the look of the engine vents.
Next: Moving on to the front of the hull and the driver's hatch.
Wednesday, 11 January 2012
T-34 track mod - Part 1
Description: Improving the realism of the quick build Armourfast T-34 single-piece plastic tracks.
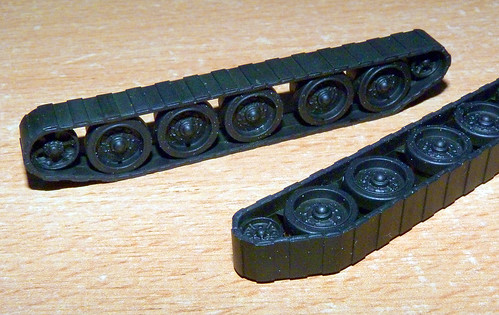
While I am still very much a kit noob I thought I would try my hand at my very first modelling competition - why not? So I am preparing an entry for this month's Armourfast Forum 'Track improvement' competition. The idea is to take a stock set of Armourfast one-piece tracks and modify them so that they look a little more realistic. I have chosen to try my hand at pimping a set of T-34 tracks...
Tuesday, 10 January 2012
What's going on?
If you have found the Kit Noob blog then it will be obvious that this is a work under construction (unfortuately you can't build a Blogger blog off-line prior to launch). This blog will is an off-shoot of my Milgeek blog but will entirely focus on my model making projects in detail.
Until I get my first real posts up here you can refer back to my Milgeek blog where I do have some of my early stuff or check out the photos on my Flickr account:
> Milgeek.co.uk - military related hobbies blog
> Milgeek's modelling Flickr galleries
Until I get my first real posts up here you can refer back to my Milgeek blog where I do have some of my early stuff or check out the photos on my Flickr account:
> Milgeek.co.uk - military related hobbies blog
> Milgeek's modelling Flickr galleries
Subscribe to:
Posts (Atom)