Showing posts with label X-Ref: AF/T3485/0112. Show all posts

Thursday, 25 April 2013

Erm what next?

Having been a bit too embroiled in my man cave refurbishment I have sort of lost the thread of what I had planned. Plus I have now 'tidied' away a lot of the work I had on my makeshift work tray and it will take me a while to remind myself exactly where things are and what I was going to do with them!

I suppose this is one of the unavoidable side-effects of a big rearrangement of ones work space.

Anyway, until such time as I have everything back where I want it I am going to do a couple of wee filler projects. The first of these will be a long shelved Soviet project I was working on before I became interested in all things Finnish - my Armourfast T-34/85 'accurization' project.


Here I take a bog standard Armourfast 'quick build' kit and add bits and pieces to make it look - hopefully - more like a more expensive kit. Why? Er, because I like the challenge. :)

You can see how this project had progressed (until it was parked) here: Armourfast T-34/85 build

Sunday, 11 March 2012

Armourfast T-34/85 build - Part 5

Well, I guess the tank crew are finished...


The tank commander is holding a flag pole, so I had to modify his arm and make a new hand for him. The flag is still in production and I will probably finish them off with a touch of satin varnish.

I started by undercoating the figures in black (as that is the main colour of the uniform), then dry brushed in mid-grey so I could see the detail again. Then painted the flesh, and finally did some washes on the uniforms and oil painted the highlights. The commander's jacket was given a wash of black ink to try and simulate leather.

Next: The flag!

Friday, 9 March 2012

Armourfast T-34/85 build Part 4 - Figure painting

And now for something completely different (sort of)!

I've got a little weary of tanks this week - I have a little Soviet tank factory going on at the moment - so I thought a change of subject would be good. I turned to a little job I've been putting off for a while, my Armourfast T-34/85 crew.

This is my very first attempt at painting model figures and I'm very much feeling my way by trial and error with this. Having undercoated in black - as the main uniform colour is black - I started with the flesh layer and then dry brushed the uniform to bring out the highlight detail.


It looks a bit odd at the moment, but the next stage is to work into the detail with oil paints and hopefully this will start to create a more realistic look.

The figures - which have been chopped down - are from Orion's WW2 Soviet Tank Crew (Summer Uniform) box set.

Sunday, 12 February 2012

Armourfast T-34/85 build - Part 5

Moving on to the basic work on the turret it's worth mentioning the problems with the Armourfast T-34/85 turret:-

1. It's slightly too wide (by a few millimetres), this is most noticeable at the rear of the turret...
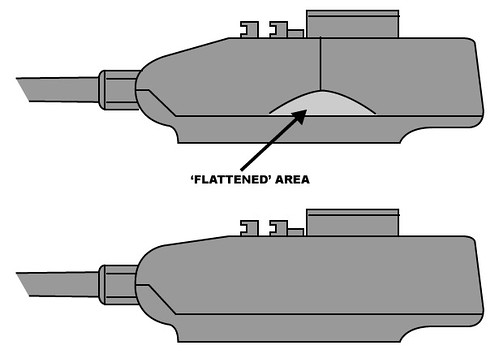
2. The flattened triangular area on each side of the turret is exaggerated...
3. The front profile is too acute, coming too sharply down from the roof to the gun mantlet...
4. The gun mantlet is the wrong shape, and the gun overly off-set.

ACCURACY?
There were several types of T-34/85 turret made by different Soviet factories during WW2, each had it's own distinctive production technique which produced a specific finished turret design. The Armourfast turret appears to be one of the 'flattened style' turret types, this refers to the triangular area on either side of the turret.

The Armourfast turret could be modeled after either the Zavod Factory Spring 1944 turret, or the Summer 1944 turret, or the final prodution 1945 production turret (which confusingly appeared in late 1944). Each of these three turrets displays the flattened triangular facet. However, the rest of the Armourfast turret's features are simplified  to a point that it makes zeroing in on exactly which of these turrets it is really supposed to be nearly impossible.


Above: Top is a drawing of the Armourfast T-34/85 turret profile showing the 'thin nose' and flattend area. Below this is what I did to the turret...

I DID IT MY WAY...
...As it happens I decided to completely ignore the above and go my own way!

As the Armourfast turret is too wide and the flattened area exaggerated I began by sanding some of the width off. This smoothed off the profile and as a result my turret was now closer in shape to one of the other variants of turrets that were made without the flattened area - specifically the Summer 1944 'Angle-Joined' version...


Aside from this rounding out of the sides I built up the nose of the turret so that the drop from the roof to the gun wasn't so acute. Using Milliput putty I rounded off the nose and added a replacement resin mantlet made by CZECH MASTER (which comes with a nice turned aluminium gun). As you can see from the above photo this means I had to make a new mantlet cover from a rectangle of brass sheet.

I also, used Milliput to create the 'Angle-Joined' weld marks around the bottom of the turret and some weld marks around the bottom of the commander's cupola.

Finally, I trimmed off the bearly discernible Armourfast turret periscopes and replaced them with some neat Czech Master resin ones.

NEXT: Finishing off the turret and adding the commander.


By the way, if you want to look a bit more into the differences between the T-34/85 turret types try out this link at Missing-lynx.com: The T-34-85 in WWII: A Closer Look by Ray Peterson

Wednesday, 8 February 2012

Armourfast T-34/85 build - Part 4


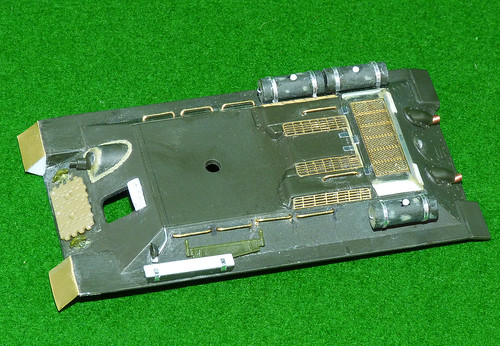
Some small progress on this build - I've just put the finishing touches to my T-34/85 hull. The principal 'improvements' (minus those already mentioned) include:

> Addition of infantry grab rails
> Extra additional external fuel tank (the T-34/85 carried 3 and not 2 as included in the stock kit)
> added detail to the external fuel tanks including new retaining straps, fuel caps and side handles
> 'Improved' head lap (drilled out) and lamp wiring
> Slightly improved tool box
> Addition of PSC spare T-34 track on front and Pegasus saw on side
> Modification of front fenders from early rounded to later angled ones

I did the angled fenders to represent a later model T-34/85, but I also wanted to include these parts as brass components so I could dent them up to show some wear and tear. I will bend the edges with some pliers later to show damage.

I could have gone further but I want to move on with this model and I think there is sufficient detail now to satisfy me. besides, some of teh remailing detailing I could have done would tax my eyesight too much!  ;)

NEXT: On to the turret!

Monday, 23 January 2012

Armourfast T-34/85 build - Part 3

OK, not a major piece of progress but I hope it's of interest to someone out there...


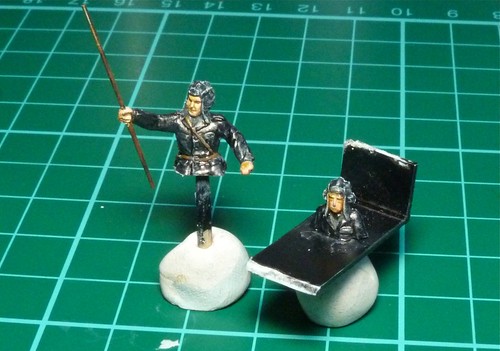
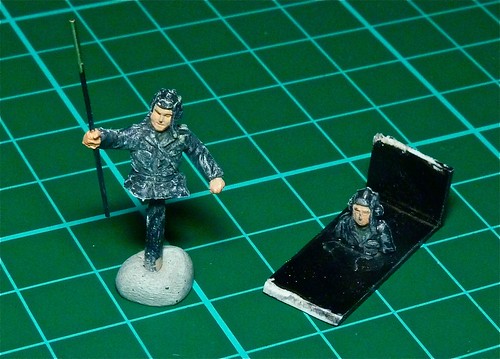
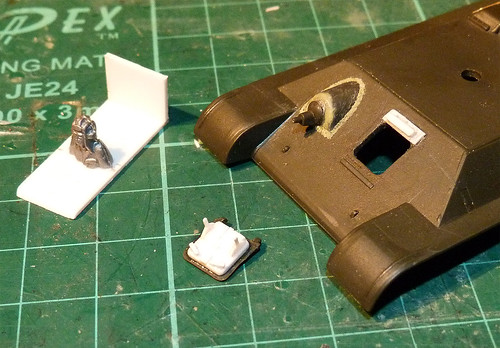
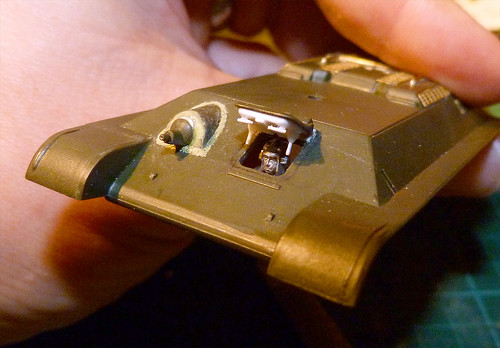
I have made a small platform for my driver - the driver itself is one of the figures from Orion's 1:72 Soviet Tank Crew in Summer Dress set. I couldn't find any clear photos of the driver's postion with the hatch open so I sort of guessed how much of his head would show - I hope it's near enough!


The hatch also needed some detailing - with stuff like the hatch levers and handles. Quite easy to make but fiddly.  :) 

I don't know about you but I find photographing bare white plasticard constructions very challenging. If I use a flash it bleaches out the detail (as in the first photo above) so I end up having to under-expose.

Anyway, you can see from the picture on the left that I have simplified the inside hatch arrangement, but it should look OK at scale. Though I must do some research on how the inside of the Soviet T-34 hatches are painted as I've seen different colours used - sometimes a light cream colours (the same as the tank interior) and sometimes the same green as the outside. Also, the hatch handles are sometimes picked out in red, and sometimes just base green.

NEXT: Finishing the hull detail.

Wednesday, 18 January 2012

Armourfast T-34/85 build - Part 2

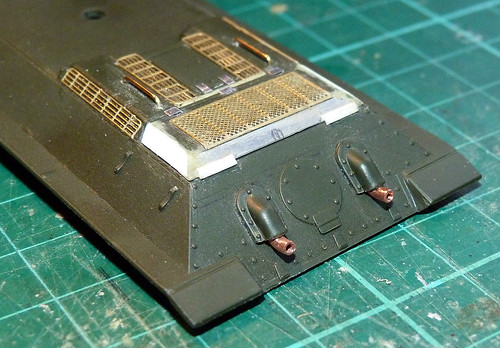
Managed to get a bit further, and although these are very small additions I'm quite pleased with both of them. I've finished off the rear hull modifications by doing an improvement to the exhaust pipes and I have cut the hatch for the driver on the front of the hull...


For the exhausts I trimmed off the Armourfast pipes and cut a grove in the back of the covers to hold the new pipes I was making. The new pipes were just pieces of copper tubing cut to length and bent to shape.

Before I got to cutting the driver's hatch I did do one other modification, this was to the front MG cupola. The stock Armourfast one was too vertical at the front compared to the reference material I was using (Kagero's 'T-34/85 Topshots #32') so I trimmed it so that it slanted back a little. I smoothed off with Milliput and while I was at it added the welding marks around the edge of it...

Cutting the hatch was a bit scary for a novice like me - I was worried that I if I made a mistake I would ruin the whole hull. But as i was I was able to cut out the 6.5x6.6mm hole and file the edges down so it looked OK. Next to the hull you can see the back of the hatch cover which I have started detailing - I've added extra thickness for the inside.

NEXT: Detailing the driver's hatch and making a 'cockpit' for the driver figure.

Sunday, 15 January 2012

Armourfast T-34/85 build - Part 1

Description: Adding extra detail and generally improving the Armourfast T-34/85 tank.


It's time for another quick-fire practise model as an antidote to my getting bogged down in a couple of protracted projects. This time the subject is the Soviet T-34/85 Medium tank, but once again it's an Armourfast quick build model of this armoured fighting vehicle.

I'm starting with the hull and the part of the Armourfast T-34 model which I dislike the most - the engine deck. Using the Hauler photoetch detailing upgrade - which was made for the HaT version of this model - I want to improve the look of the engine vents.

Next: Moving on to the front of the hull and the driver's hatch.