Thursday 23 February 2017

Bolt Action British Commandos Part 3

Warlord 28mm British Commandos
I am pretty sold on the Artizan Commando miniatures (love the sculpting), but I want to do my next painting test on a figure of the correct scale, but then don't want to ruin one of the Artizen figures. So, I bought a sprue from Warlords range of 28mm plastic Commandos, it's handy that Warlord sell their sprues individually, but don't make the mistake I did and buy the figure sprue without also buying the weapons sprue! (I've had to wait a further few days until the weapons sprue arrived before I could get on with making my next test figure.)

Anyway, the postie brought the additional sprue I needed this morning, so let's have a look...

The additional British Army weapons sprue (£4).
I can see why people like 28mm, after doing 1/72 the extra detail that can be squeezed into 1/56 is very welcome, without the models being significantly bigger (like 1/48 or 1/35). It's a very happy balance between what's good for tabletop gaming and visible interest, 1/72 (20mm) figures are a little less interesting at tabletop distance (but that's a matter of opinion).

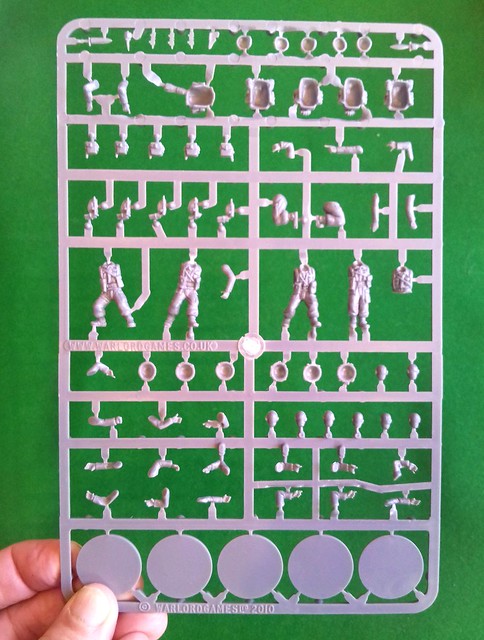
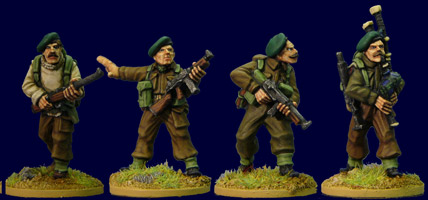
Warlord's 28mm Commandos sprue (£6). There are enough
parts to make 5 figures, 5 standing and 1 kneeling.
Close-up on the Commandos figure sprue.
Another difference between the 'serious' 1/72 models I have been doing and the gaming 28mm figures by Warlord is that these little chaps are full of fun, like little 3D caricatures or cartoons of soldiers. They have the look of characters straight out of the Commando comic or the Victor (if you are old enough to remember that). The poses are dynamic and somewhat over dramatic, but are completely in keeping with the fun nature of the Bolt Action game.

Metal or Plastic?
I suppose one of the questions that the Warlord sprues raise is, what is better, metal or plastic figures?

As I mentioned, I am smitten with Artizan's metal 28mm Commandos, but, of course, you get what poses you are given with them. Plus, there are a limited number of poses within Artizan's range. Therein is the disadvantage of metal miniatures.

Warlord's multipart plastic miniatures system allows a much greater variety of poses to be made, meaning that you need not repeat the same figure again in the same unit. You also have a greater ability to customise your figures and add specific weapon poses.

Under construction - One of the eight included choices of heads on the Warlord
Commando sprue. I haven't worked out the number of possible permutations
you can make with all the parts on the sprue...Suffice to say, it's a lot! :)
There is also the cost advantage of plastics...

Artizen's miniature work out at about £1.45 a pop, and while buying Warlord's figures by the sprue - as I did - works out more expensive than metal figures, the real saving is made when you buy a plastic starter set. Warlord's Commandos starter set is £24 and includes enough sprues to make 25 figures (which works out at 96p per figure).

So, are there any downsides to plastic miniatures over metal?

Well, it may be a bit of a personal preference, but I think the extra weight of the metal figures is something of an attractive attribute over their plastic counterparts. I worry that plastic miniatures might break when handling as they just don't feel durable.

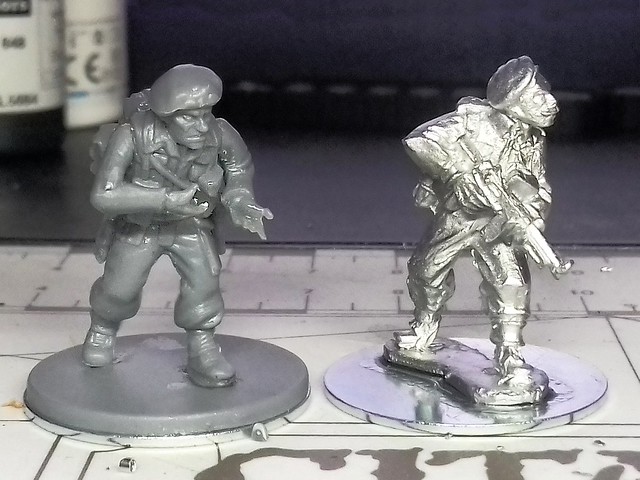
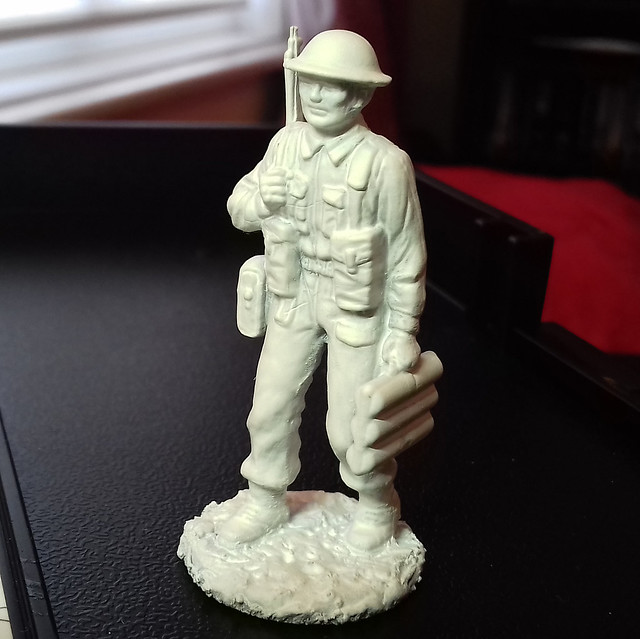
Left: A Warlord multipart plastic 28mm Commando (minus weapon, as I have
been advised to paint them separately). Right:  An Artizan one-piece metal
Commando.
Another issue with plastic miniatures - in my opinion - is that the interchangeable limbs and separate weapons and accessories are a bit fiddly to put together. And they aren't as interchangeable as they first appear. When putting together my first figure I had to try out several arms until I found a combination that seemed to look natural and that fitted the rifle I wanted. (There are no instructions or a guide to assembly with the sprues or on the Warlord website.)

Equipment comparison between Warlord plastic and Artizan metal figures.
The poor old Warlord Commando is very heavily laden!
(Incidentally, I did a straw poll on the Bolt Action Facebook Group and the consensus was almost exactly 50/50 when asked whether members prefer metal or plastics.)

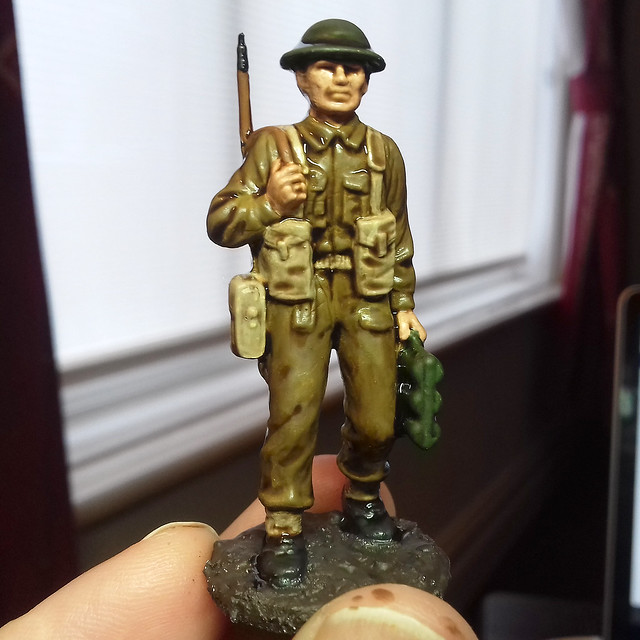
The Finished Figure...
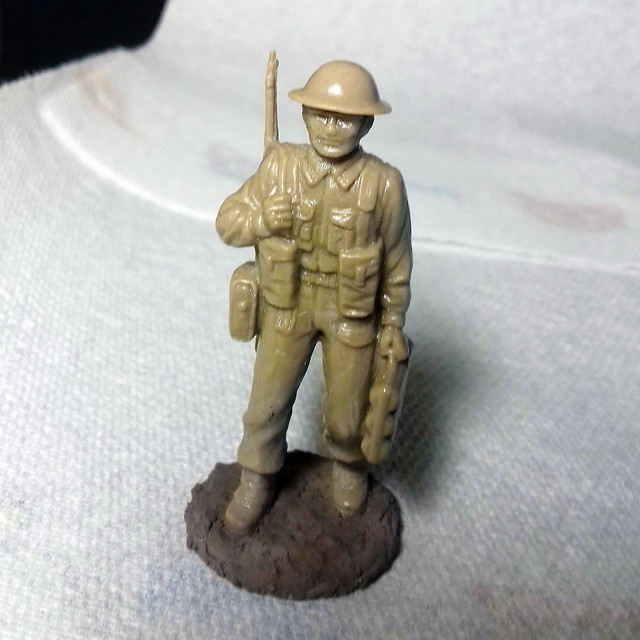
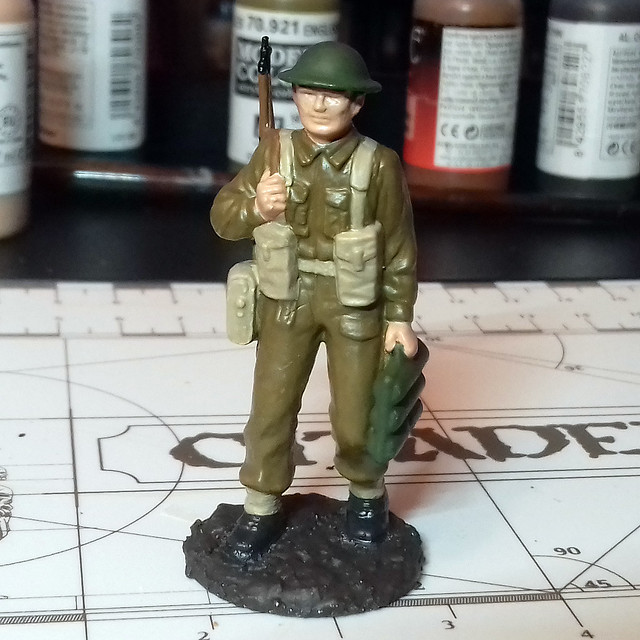
After much messing around - and referring to a couple of other modeller's blogs - I managed to piece together my test Commando. In all, there were 9 pieces in this little kit (and no pilot holes or pegs, so much of the limbs and equipment just 'hangs' where you glue it)!

I am not entirely happy with Warlord's flimsy plastic weapons and I think I prefer the chunky one-piece metal ones. Being an integral part of the figure sculpture the metal weapons look less breakable.

Basing
Just a quick note on basing. To compensate for the exceedingly light-weight plastic figure I decided to use 25mm Steel Repair Washers as bases. These not only give the figures a little bit of heft, but can also be used in combination with magnetic sheets (in case you want to 'stick' a group of figures to a magnetic strip so you can move the figures as a unit).

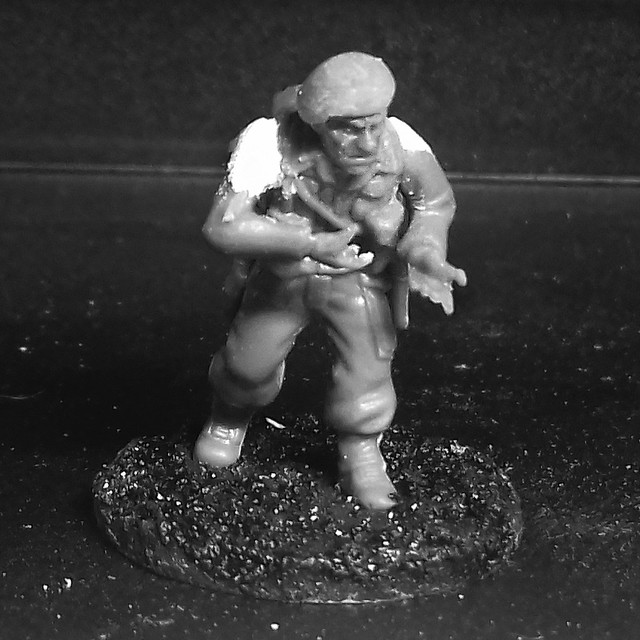
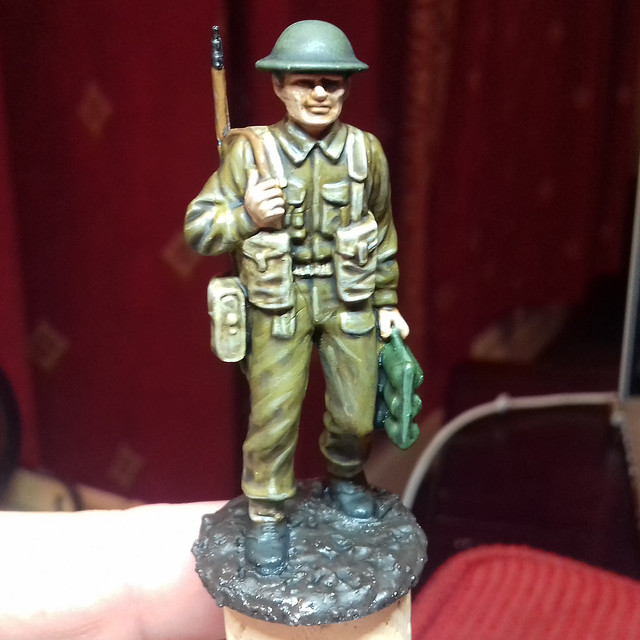
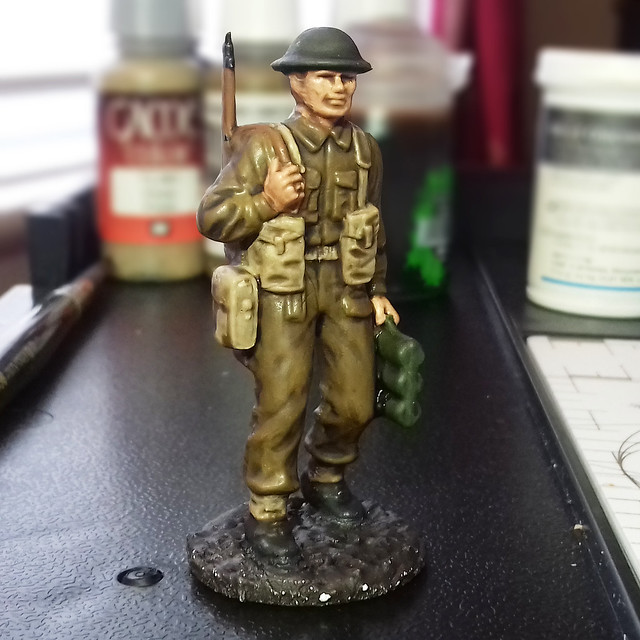
Just about there, my Warlord Commando is nearly ready for priming.
Despite the clean moulding of the plastic, it still needed some sand-
ing and filling where the arms join the body. I also sanded down
the awful beret, it looks a little better now.
Additionally, by using the washers as a base I can equalise the height of the Warlord and Artizan figures. The Warlord figures have no integral 'slab' stand, and fix directly to their disc base. While the metal figures generally come with a 'slab' stand attached. By adding the washer to both figures (with the Warlord's plastic disc base attached) the two makes of figure end up equal heights (see above photos).

Finally, I will be adding some ground effects by slapping on a thin layer of Pollyfilla (mixed with some of Vallejo's 'Black Lava', which has a nice gritty texture). This will not only give the figures an attractive terrain effect but will also disguise the different basing techniques.

Next: Priming the test models.

Wednesday 15 February 2017

Bolt Action British Commandos Part 2

The results of my first paint test for this project allowed me to work out which colours I am going to use for my 28mm British figures...


I have some tweaking to do, but I want to try any further tests on an actual 28mm figure instead of another 1/32 plastic soldier. The scale of the brushwork for this sort of painting means it doesn't exactly work on a larger model, I'll only really know if it works when I apply it to a smaller figure.

My next practice figures - a sprue of Warlord's plastic Commandos.
So, I ordered a sprue of the Warlord 28mm plastic Commandos (yes, you can order them by the sprue) to try out this paint method on 'the real thing'. Though, I've actually chosen miniatures made by a company called Artizan Designs for my final 'army'. They are wonderful little figures, superior to Warlords - in my opinion- so I don't want to make a mess of them.

Artizan Designs wonderful and characterful 28mm Lord Lovat's Commandos.
I want to be absolutely sure I know what I'm doing before I put brush to these.
 
One of the things you might notice when you compare the above two pictures of Warlord's and Artizan's 28mm figures is both the difference in painting style and colour selection.

Actually, neither set of painted figures is all-together wrong (though I would probably take issue with Warlord's very light coloured webbing) as the real Commandos and British Infantry, in general, changed the colour of their webbing - from Khaki to a pastel Olive Green - in about 1944. But, I have read that both types and colours of webbing co-existed in use until the end of the war.

The painting style is a different matter. Artizan's painted example figures are far more blended in a naturalistic style, as opposed to the higher contrast style of Warlord's example (and, indeed, the guide I worked from). And, while I do not have a tutorial for how they achieved this look I do have Artizan's Painting Guide, which tells me the colours they used, and I have found a rather informative painting tutorial which gives an alternative method of painting these miniatures...


I'll be studying this tutorial before I try out my next painting test and I will try out both methods on the smaller scale in order to compare them. Hopefully, my Warlord 28mm sprue will arrive today.

Tuesday 14 February 2017

Ooops, Diversion Ahead (Bolt Action British)

Those 2017 Resolutions didn't last long...I'm back to my old easily distracted ways already!

To be fair, my recent involvement in Bolt Action games probably made it inevitable that I would want a little army of my own to play with at the club (my 1/72 Bolt Action project is for home practising/learning the rules on the kitchen table). But which?

It may sound a bit 'boring', but I fancied good old British. Though I thought I would spice things up by doing commandos. This is probably because I still have fond memories of playing with Airfix's 1/32 plastic commandos in my garden as a kid!

Now, before I start collecting a little hoard of 28mm miniatures, I thought a painting test might be in order...

For my first attempt at painting a 'British Tommy' test figure, I'm using Warlord
Games Painting Guide...It has a good list of the Vallejo paints required.
By sheer coincidence, I happen to have a bag of Airfix's 1/32 British Infantry Support figures (think I bought them for the 1/32 Vickers), so these seem a convenient test figure for checking the British colour scheme...


As usual, with my Bolt Action figures, I mounted the figure on a metal base (a 25mm Repair Washer) and build up the ground with Polyfilla mixed with dome Vallejo German Camo Black Brown. In fact, I tried out Wilko's own 'Polyfilla' and that worked just as well as the real thing (but is cheaper).

Stage One - Priming and Base Coating
Next, I decided to go for a white primer as I want the colour to 'pop'...


I'm going to use Warlord Games British Infantry painting guide (available free on their website), as that is mainly based on the Vallejo Model Color paint system, which suits what I have. Though, I don't have all the paints they suggest I have near equivalents so I will have to do a bit of swapping colours around...


Colour recipe (British Infantry, mid-WW2):

Flesh base: Vallejo 804 - Beige Red
Uniform base: Vallejo 921 - English Uniform
Webbing base: Vallejo Game Color 72.061 Khaki
Helmet base: Vallejo 894 Camo Olive Green
Wood (rifle) base: Vallejo 72.043 Beastly Brown
Boots base: Vallejo Panzer Aces 306 Dark Rubber
Ground base: Vallejo 822 German Camo Black Brown

Stage Two - Applying a Shading Wash
These colours from the base of a triad of a colour system, going from a darker base to a mid-highlight, to a super highlight. However, the above base will be further 'dulled' down by the addition of an overall wash, which is designed to create shadow areas in the creases of clothing and between different material areas (outlining areas).

Warlord game suggests using Army Painter's Strong Tone Wash. Now, I've never used one of these 'quick shades' for figures, but I know lots of wargame figure painters swear by them for getting quick shading results. I looked it up (see above link) and it is rather pricey at £24.99 which I don't want to spend as it seems quite an invasive technique. Apparently, you can get a smaller bottle as an 'ink', for £2.25, which is more like an acrylic wash, so don't get the two confused.

Instead, I am looking at a Citadel product called Agrax Earthshade, which has been suggested to me as an alternative (particularly to the AP Strong Tone Ink, which from looking on YouTube looks almost identical)...


"Citadel Shades are specially formulated to flow over other paints and into the recesses on your miniatures, defining details and accentuating recesses. Once applied, they dry to provide very effective shading for your models."

Fingers crossed - this is why you do paint tests - here we go...(I'm a bit nervous!)

The wash has, indeed, toned down the base colours a shade or two. This is why
you must begin with base colours a shade lighter than what you want to end
up with.
As a first-time wash user, this technique seems to be something of a dark art, as you do get a bit of a fright when you first apply the liquid. The above photo shows the wash when it's still wet and as you can see there is plenty of pooling as the wash settles into any crevices in the model.

You can draw any excess wash out with your brush or a paper towel, and you can move it about a bit to more evenly distribute it across the model. I guessing that experience is needed to understand what is too much wash.

Now the awkward wait for the wash to dry completely and then we shall see how effectively it creates shadow tones in the folds of material...

Now dry, overall, it doesn't look too bad. Though, it definitely needs mid-tones
and highlights to be added as it looks very flat as it is.
It's still a bit jarring, compared to blending shadows. But, I'm determined to see this technique through to the end. Will the addition of the remaining 'triad' colours (two intensities of highlights) pull the whole thing together into a satisfying model? I hope so (but I do have a plan B, just in case).

Note: One final comment I should have added. While these sort of high contrast painting techniques are a bit unsubtle or exaggerated looking on a big 1/32nd figure, I think you have to bear in mind that they are really designed for 28mm (1/56) scale miniatures. And the effects are deliberately exaggerated so as to be seen at tabletop distance. 

Monday 13 February 2017

Armourfast Stug II - Part 3

I am my own worst enemy - this was supposed to be a 'quick' project, just to get some much-needed painting practice in. But, I just had to tinker, didn't I?

As this Stug is meant to be a later war (Normanady, 1944) model, I decided that I wanted to give it the war weary look of a veteran unit by adding some of the accoutrements of an experienced armoured vehicle crew. In other words, stowage...And lots of it...

As usual, photographing pure white Milliput is a little challenging!
I did buy the Plastic Soldier Company's 'German stowage and tank commanders' accessory set, but some of it's stowage items look a bit unconvincing so I ended up only using a couple (the dark grey items in the photo). The rest of my random collection of bits and bobs were scratch made from styrene or from white Milliput.


I didn't go as far as throwing in a kitchen sink, but there I've pretty much filled the cargo area. In reality, I believe so much stowage - especially the large oil drum I will be adding - was perhaps more relevant to vehicles serving on the Eastern Front (where they had to travel long distances from a depot). But, I think it gives my Stug a bit of the 'lived in' look!

Note: The dust particles aren't part of the weathering! :)
Priming - With Vallejo Surface Primer 'Dunkelgelb'
With regards to my Stugs priming colour, I've dodged the whole question of what exactly 'Dunkelgelb' is (the mustardy dark yellow that the Germans used as a base colour) by actually going out and buying Vallejo's Acrylic Polyurethane Primer German Dark Yellow (RAL 7028).

This is the first time I have bought a proper modelling primer rather than using a Halford's or Autocar rattle can primer. So, it will be interesting to see if there is any real difference in quality.

The Vallejo primer is designed to be applied by an airbrush in a few very light coats, so no more impatient lashing on of a thick coat of Halford's then!


Spot on for the 'Dunklegelb', but...

To be honest, as I begin to lean more and more towards wargame modeling (as opposed to display modeling) the care with which this methodical priming process takes is probably overkill. The Vallejo Surface Primer should be applied in several light coats, slowly building up the opacity. This takes time, as does the drying as the model remained tacky for several hours (apparently the process can be sped up by using a hairdryer)!

For war game models, I have to concede that a quick squirt of Humbrol acrylic spray (Desert Yellow in this case) would have been perfectly adequate. And the drying time is much faster. (I would just have to modulate the Desert Yellow to give it a more mustard tone.)

Still, that's the model primed, with the tracks and some of the stowage primed in black. Next, I have to plan which camouflage pattern I want to give this Normandy Stug. (I read that German Army vehicles came with their base colour - Dunkengelb or German Gray - from the factory. It was up to the troops in the field to apply whatever camo pattern their unit deemed suitable over the top of these base colours.)

Friday 10 February 2017

This week's Bolt Action pics


This weeks session at the Scarborough Games Society was very exciting indeed (as well as being immense fun). My host pulled out all the stops and set up a fantastic table for us to play on, based on a modular trench system.


The game involved a British Airbourne force assaulting a German entrenched position, with the objective of breaking through the lines to the German HQ at the rear. I played the Germans (boooo) and my host - Craig of the SGS - played the British Paras.

I'll write a game report in due course, but I was keen to get the pictures up as the trench system has a lot of possibilities for modellers. Here's my Flickr gallery album for the session...

Scarborough Games Society 09/02/2017

SPOILER: The Germans won!

Update: I've finished my game report - 'Milgeek: A Trench Too Far'

Monday 6 February 2017

New Armourfast Stug IV

I like Armourfast (and the other war game 'easy build' manufacturers), their kits give you (or rather 'me') a challenge - 'how good can you make these simplified models look?'

Well, it's been a while since Armourfast brought out anything new, so it was a nice surprise to get an email from them this morning announcing a brand new model. Never ones to ignore what the people (seem to) want, they decided to add some more German armour to their range...


Now, I'm developing into a bit of a Stug fan, so this Mk. IV is very tempting, even if I have absolutely no need for it in any of my current projects.

it also raises some wishful thinking on the part of Armourfast fans - will they have modified their simplified track process to include some better track detail? (I suspect not.) Also, in the past, there has been some deviation from what you get in the box and what the box artwork depicts, so will the detailed illustration match the number of parts? (Again, I doubt it, forget the headlamps and aerial for a start! But, I do hope they include the distinctive remote controlled MG.)

Update: Just had a quick gander at the pictures on the Armourfast website and, sadly, no, the remote MG is NOT part of the kit!

Very 'clean' interpretation of the Stug IV (especially given the nice detailed box artwork)!
Price is a reasonable £7.50 for two models, but, as usual, you will have to weight up whether this simplified kit is right for your needs. But, there again, none of the other 'easy build' manufacturers have a Stug IV, so Armourfast may have spotted a gap in the market.

Link to the Armourfast Stug IV page.

Friday 3 February 2017

This week's Game Report - 'Russian Front'

Here are a few snaps from last nights 'Bolt Action' game at the Scarborough Games Society. This time, in keeping with the wintery weather we are 'enjoying' here in Yorkshire, it was a WW2 Eastern Front themed game, pitting a war-weary Wehrmacht against a rampaging Red Army...

Unfortunately, winter camo couldn't hide these Germans from Soviet shell-fire!
There was plenty of bitter 'close quarter' urban action.
You can check more of the photos from the night by popping over to my Flickr album: Scarborough Games Society 2/2/2017.

Scarborough Games Society 2/2/2017

Or, if you prefer something with a bit more of my rambling narrative, you can check out my game report on my Milgeek blog: Cold Steel on the Russian Front!

As usual, there were a lot of other very exciting games going on, I managed to snap some pics of just a couple that were going on on the tables immediately adjacent to ours. It all looked amazing...

Spectacular Egyptian themed Bolt Action game in progress!
It wasn't all traditional historical war games...These little chaps caught my eye!
There were at least a dozen other games gong on, from board games to even a VR racing game. Something for everyone, young and old. Superb night!

Thursday 2 February 2017

Armourfast Stug II - Part 2

Errata: I said in my previous post on this project that Armourfast kit that I had was an earlier version of the Stug, without side-armour 'skirts' ('Schürzen'). Well, I lied!

The box instructions make no mention of the inclusion of side-armour plates, but, in actual fact, they are included on the sprue (I just over-looked them). So you can make a later war (mid-1943 onwards) Stugs with the extra armour, though be aware Armourfast supply you with early 'Schürzen', the design evolved and I suggest you pop over to this website for a detailed explanation: (Stugiii.com) Sturmgeschütze vor!

Right that out the way...
Er, I have another confession. I also suggested that I will be keeping this build simple so I could concentrate on the painting (which was the purpose of this project). I fibbed again.

Having discovered that I now had the chance to add the side-armour, it seemed fitting just to add a few other later model Stug furnishings. I mean, it would be rude not to...

My Stug with it's skirts on! I'm also in the process of adding a few bits of bling.
However, I'm not doing masses of research (which will lead me onto tinkering even further with my Armourfast 'Easy Build' kit) and everything I'm doing is suitably simplified in keeping with the kit's theme.

The Great 'MG Shield - Up or Down' Controversy
And here's where I accidently stumbled into a piece of essoteric war game modeller's controversy. :)

The Stug's roof mounted MG, operated by the Loader from atop his hatch.
The 'G' variant Stug III (onwards) was given a roof mounted machine-gun. Initially, this was simply a metal sheild with a MG34 (but sometimes a MG42)mounted in it, but later in the war it was fitted with a 'remote' fired MG34 so that the crew could safely fire the machine-gun from inside the Stug.

But, here's the problem...The early shield mounted MG was not a 'fixed' solution (like the shield protected .50 cal on Allied tanks), instead the MG34/42 was carried inside the Stug and only fitted in place on the shield when needed. This, admittedly inconvienient, arrangement was due to a badly thought through design by someone who obviously never actually had to use a roof mounted machine-gun under fire!

A terric view of the Stug's MG in action! You can clearly see how the Loader's
roof hatch is proping up the MG-shield. Without this support the shield would
just flop about and is normally stored foded forward, flat.
Now, this arangement - of shield 'up' when in use, shield 'down' when not - causes modellers who don't do thier research properly a lot of problems. Quite a few model thier Stug's with both the shield up and teh Loader's hatch closed (what would hold the shielf up, then).

But, in wargaming, it causes additional bamboozelment. Gamers may wish to have the Stug's MG on display - to indicate it has a secondary armament - but might not want to model a Loader figure poking out the roof of their Stug...So, basically, they 'cheat' and model the shield up as if it were a fixed accessory, as in this lovely example of a 28mm 'Bolt Action' Stug by Aodhan Bunny Burrows and featured on the Bolt Action Facebook Group...

Loader's hatch closed, but MG & shield up! Cool looking, but not accurate.
OK, this may be one of those modeller's 'mountain out of a molehill' issues, but things like that matter and I really can see some people being as pedantic enough to take issue with this inaccuracy during a game (tongue in cheek maybe). This is because, with the shield proped open only by the MG - as in the above example - the Loader could not open his hatch (easily) so how could he man the gun? Hmmm...

My solution to this rivet-counter's conundrum was to mount a shield on my Stug BUT to have it attached in the 'down' (folded) position. In a game, it would be my contention that the MG is available for use as - were it needed - the hypothetical Loader would hypothetically deploy the MG34 in it it's shield which could be - hypothetically - rased into place!

My Stug with it's MG shield folded forward, but ready for deployment if needed!
Welcome to the world of war gaming! :D