Monday 29 September 2014

ModellTrans Ford V3000 - Part 7

Dust and pin wash...
Others will have their process, but I have settled on giving my trucks a dusting of 'dust' (Vallejo's Model Air Sand Ivory), just on the lower surfaces. This is supposed to represent the build up of dried mud dust...


Next I apply my pin wash using - the usual - AK Interactive's Dark Brown Wash for Green Vehicles. As you can see from the above photo this picks out the panel line detail that the layer of 'dust' slightly obscured.

Chippings and scratchings!
Next stage is the application of scratches and chips. I do this with some Vallejo's German Grey (995) in tiny spots and streaks. Occasionally I join up the dots to make some larger wear and tear to the paintwork on areas which would have seen a lot of use, near the edges of doors and on vulnerable parts of the fenders and bumpers.

Tiny scratches. They never look good real close up like this, but the effect is
ok at a distance. I'm trying hard not to over-do the effect.
Well, another stage in the weathering done. Despite the fact I am trying to develop a process for weathering my vehicles I do find that I sometimes revisit effects as I go along so in the end it's not a formulaic technique where I stick rigidly to my numbered steps. As you add layers of effects you sometimes tone down or obliterate effects you did at the last stage, so you might need to touch up as you go along.

One of the things I had to do at this stage was draw back in the door frame seam as the repair I did to the cab roof supports at the beginning didn't include these thin seam lines. I did this with a thin paint brush and dark grey paint.

Next: Rust and fuel streaks and then the highlighting.

Driving me mad

Can anyone tell me why so many kits of trucks come without driver figures? What is the point of that?

Surly every truck needs a driver, and even if you decide to make a model of a truck for display with no driver you should have the option. The model company shouldn't take the decision out of your hands by not including a figure!

(There...I feel a bit better about this now!)

I was talking this annoying fact over with my brother and suggesting to him that his next resin casting project should be to mould a sprue of generic drivers in 1/72. We may follow this up...But in the meantime I did a bit of a search around the various web stores and found some sets of driver figures.

Milicast have a really nice selection of driver sets - British and German - which
not only include several figures but have multi-pose options. They come with a
selection of heads and arms. This is the German set (Ref: FIG034) and is £8.50.
Milicast, MMS and S&S models all have drivers as accessory sets. Milicast is perhaps the most detailed and offers the greatest variety in their sets but there is also a lot to be said for S&S's 'generic driver' figure - 50p a pop - as you can order it with the head of your choice to match the vehicle you have in mind (I just ordered two to try them out).

The main problem is that all the driver sets I have come across have been in 20mm (1/76) scale. However, one thing I have notice is that the driver figure being a little on the small side is not a bad thing for 1/72 trucks. I have tried to modify a full-sized 1/72 figure as a truck driver before and I found the space in the 1/72 truck cab was a little tight.

For my MT V3000 I made up a bit of a Frankenstein driver, with 1/72 Revell
head, 20mm body and weedy Milliput putty legs. All so he fitted exactly in the
small amount of space that was available in this cab. 
Having your driver's body at 1/76 gives you a bit of room for play, especially if there is a steering wheel and gear levers or a minimum amount of space between the seat and the dashboard. Even then you might have to resort to some amputation to fit the little guy in - removing the lower half of the legs is not an uncommon way to get a driver to fit in a cab.

As the head and shoulders are the parts of the driver most easily seen through the truck window I have started mounting a 1/72 head on a 1/76 body. The smaller body helps me fit the driver in the cab while the bigger head makes the driver look as if he matches my other figures. It's a bit of a bodge but it seems to work.

Two of my Frankenstein drivers - these two chaps are made up from 20mm
(HO railway) civilian bodies and 1/72 HAT Austrian heads! 
(Sorry, not the most interesting of posts but I had to get that off my chest!)

Sunday 28 September 2014

Zabrano YaG-6 - Construction begins

I am being a little over-keen and impatient to start this project. I still have several other kits on the workbench, but as they are coming to a conclusion I just couldn't resist making a start on my mighty YaG-6.

The mighty YaG! Here a YaG-6 has had an extra rear axel fitted to help it deal
with extra large loads! This 3-axel model is not to be confused with the YaG-10
which came with a third axel as standard. Kolyma area, 1943.
Source: www.armchairgeneral.com
To re-cap, this is my very first attempt at making an 'advanced' level short-run resin kit, so it's with some trepidation that I take the first few steps (nervous, as I am, of making a mess of this expensive display quality model). And right away I encountered some of the challenges of working with delicate resin parts.

The cab - a tricky start!
Step 1 in the construction of a model truck is usually the cab, this has duel challenges as - unlike tanks - you are modelling a vehicle interior that will be on display. So you have to plan a bit as you will be reaching for the paint brushes early (in this I guess trucks are a bit more like model aircraft where you paint the cockpit early on).


Aside from the painting there is the issue of the driver figure. The Zebrano YaG-6 does not come with a driver figure so you have to source a suitable model and paint that in the appropriate uniform colours (in my case although the YaG is a Soviet truck I am modelling a captured Finnish example so my driver will be in a Finnish field grey uniform).

So, while I think about that I crack on with the cab's major components and begin to remove superfluous resin casting 'flash'. Resin kit 'flash' isn't like that of a plastic injection moulded kit, resin casting 'flash' can be rather large 'blocks' of resin attached directly to components, they are an integral bi-product of the casting process and are not as easily removed - in some cases - as traditional 'flash'.

This is what I found when it came to the YaG's cab. Not only were there tow rectangular slabs of 'flash' attached to the back of the cab but also the windows were blanked off by resin too. And this stuff isn't as easy to get rid of as plastic flash either - it's thicker and the resin has a strange quality to it that make cutting it - even with the sharpest scalpel - a tricky job.

Cutting out the windows: You would not believe how long it took me to saw my
way through just this one window! Resin is horrible stuff - brittle and yet at the
same time somehow elastic. 
Note: The greatest care has to be exercised when cutting this sort of integral resin flash. The temptation is to press harder on the craft knife to cut the infuriating material but this can lead to 'skipping' where your knife jumps because of the pressure and skips across bits of the kit you don't want cutting...Or worse, finds fingers! I found the best techniques was to use a new sharp blade and cut carefully and repeatedly to 'saw' through the resin.


Gluing items is done with super-glue and not poly. The resin doesn't melt in the same way plastic does - I find - but super glue seems to make a nice strong join. I'm not attaching the windshield transparencies yet, I like to fit windows last. 

This shows what you are up against. Look how thick the 'windows' are! You can
also make out the basic dashboard detail. Otherwise the interior is quite spartan.
There is some interior detail. There's a steering wheel, a couple of gear sticks and attached to the cab's rear wall there is the bench seat. The steering wheel and gear sticks a small, fiddly and quite brittle and I'm putting off gluing these in until I source an appropriate driver figure so I can make sure everything fits in OK.

Cab interior aside it's the shape of the cab structure that presents the greatest modelling challenge. The resin cab is severely bowed which makes the fitting together of the various parts - like the roof and rear wall - a bit tricky...


It looks like I will have to make some sort of frame to straighten out the walls of the cab and make it square again. But even so there will still have to be a reasonable amount of filing to get things to fit, and maybe even some filler to get rid of any gaps. Not a promising start.

I decided to buttress the warped cab walls to straighten them out with a length of
a cut-down wooden coffee stirrer!
This seemed to have sorted out the deformed cab nicely, and now the rear wall
section - with it's integral bench seat -  fits into the cab snuggly.
I can't help being a little disappointed because of the price of the kit, but I suppose these are some of the quirks of short-run resin kits. What I have to do is bear in mind that if I persevere, take my time and make a good job of this kit I will end up with a vehicle that is pretty unique as it does not exist in any other form in 1/72.

Next: Painting the cab interior


Bottom of the page trivia: A historical note by Stanislav Kiriletz, (www.kiriletz.de) from Germany: Ya-4 truck was manufactured by Daimler's official license, they had Mercedes engines and radiators bought in Germany. A total of 182 chassis were made. The frame was used from an older Ya-3 (White chassis from WWI period). Later the "Yashka" (as the truck was nicknamed by Russians) had American-made engines (Continental and Hercules) and had very little to do with Mercedes. In 1937 Stalin has decided to stop spending hard currency on these and YaGAZ factory went back to ZIS engines. [Source: Scale43.com]

Saturday 27 September 2014

Quick '39 Chevy Truck Part 2

Now the hard part! My first Valiant resin Ford V3000 conversion was done by just cutting out the top half of the solid resin cab interior to make it look like there was an 'inside'...


My 'Quick resin V3000' was a cheat with only the top half the cab drilled out.
Could I do any better this time?
It was a quick solution to the problem - how to make  a solid resin model look more like a multipart kit - and was adequate, but I wasn't all together satisfied with the result.

One of my readers suggested that I could improve the conversion - the next time - by excavating the whole of the cab by drilling in through the bottom of the model. So this is what I decided to try out with this 'Chevy' conversion of the Valiant model.

First I drilled a few pilot holes in through the front windscreen to mark the 'top' of the cab so that when I drilled in via the bottom of the cab I didn't drill straight up and through the roof! Then I marked out a 'safe zone' on the underside of the cab, the extent of the cab interior I intended to drill out...


I had to be very, very careful when using my Dremmel, so I started drilling out a hole from the centre of the cab outwards towards where I wanted the walls of the cab interior to be. All the time keeping an eye on where the drill was coming out using the pilot holes I had drilled to mark the roof of the cab.

Once I had drilled out the interior as close to the walls of the cab that I dared I changed from a drill bit in my Dremmel to a reaming bit (a small rotating cutting tool that cuts horizontally) to slowly shave the thickness of the walls down until I was happy. I also used the reaming tool to tidy and square up the hole I had drilled out.

I then used a craft knife and files to precisely finish off the interior and make sure the cab windows were neatly shaped...


Obviously this still isn't perfect, the cab walls are still a little on the thick side but I didn't want to risk accidentally drilling right through a door or something so erred on the side of safety. But I reckon this won't look so bad once the interior is painted and I fit the windows.

To finish off the cab interior I will - of course - have to add a new cab floor, with a seat and a driver in place. But I am quite happy as this was - I hope - the worst bit of the job, everything else should be plain sailing!

Next: The cab interior.

Wednesday 24 September 2014

ModellTrans Modellbau Ford V3000 conversion kit - Part 6

Weathering - Stage 1: Oils.
I'm slowly improving I think, or at least I am feeling a little more confident about my painting. So much so that I thought I would finally get around to weathering my 'Cheap Ford V3000' conversion. This was one of my early projects which was put on hold until I felt I could do a adequate job of the weathering, which I think I can now.

Weathering with oil paints. A cheap and cheerful but effective technique. Don't
bother with expensive artists oils, I bought mine from a discount store.
So I decided to weather my first V3000 along side my latest V3000 and in doing so I think I am starting to develop a strategy for my weathering.

Having base coated my truck with the usual Humbrol Light Olive I then gave it a light varnish with a satin coat (I always feel that vehicle paint has a slight sheen to it which I think satin varnish captures nicely). The model is now ready to weather, and here's my process (for Olive vehicles):

1. Streak and stain - using oil paints.
2. Dust - with a light airbrushing of an appropriate dust colour.
(Also, mud effects on structure or hard to get places like the chassis or under mud-guards.)
3. Pin-washing - using AK Interactives Dark Brown Wash for Green Vehicles.
4. Chip & scratch - using dark grey or metallic grey.
5. Rust and oil fuel streaks - using AK Interactives washes.
6. Highlighting.
7. Graphite powder and pencil - to give metallic scratches and sheen.
8. Finishing off with surface mud streaks.

-- I tend to varnish between stages to protect the work I already done. --

I quite enjoyed adding oil weathering to my toolkit of techniques, it's quite a forgiving and can be corrected with a quick wipe with a spot of white spirit. Here's a nice video which explains the procedure if you are a beginner like me...

Tuesday 23 September 2014

An unexpected arrival - MMS Citroen Type 23


Always nice to get unexpected parcels. I ordered this so long ago I had completely forgot about it - it's a beautiful white metal MMS Citroen Type 23 (c1939ish) light truck in 1/76 scale...

The 1/76 MMS Citroen Type 23 kit (source: MMS Models). A short review of this
kit is available over at www.mondo72.com
I could have just used models of captured Soviet GAZ AAs and ZiS-5s for my light truck inventory of my Finnish collection, but as usual I wanted to illustrate the diversity of vehicles deployed by the Finns. I spotted a Citroen 23 in a photo of the Finns at war (a civilian commercial vehicle pressed into military service) and so looked for a 1/72 model version.

It was a bit of a long shot, I didn't expect to find a 1/72 plastic kit for this French WW2 truck as it's a wee bit niche, but I did come across this very nice white metal kit from MMS Models of Folkestone, UK.


It is, of course, 1/76 scale so technically should have been a wee bit smaller than I would have liked, but I decided it was still worth getting as I had a 'cunning plan' to mate the front half of this with the back half and chassis of Minairon's new 1/72 Ford AA van (which comes out at the end of September). I was thinking it would make a lovely Citroen ambulance or radio car...

The soon to be released Minairon's Ford AA ambulance.
A French Citroen Type 23 ambulance. Mating the Citroen's bonnet to the
Minairons Ford body would have made a wonderful conversion.
Anyway, when I opened the parcel I was very pleased to notice that it's actually quite a large vehicle, easily compatible with my other 1/72 light [1.5 ton] truck kits (I compared it side-by-side with the parts of my Military Wheels GAZ AA kit and they matched perfectly). So, no need to modify, it'll make a nice little model for towing my Finnish HQ 20mm AA gun!

Beautifully restored example of the Citroen Type 23 truck in French army markings.
Large numbers of these were 'acquired' by The Germans after the fall of France and
were used by the Wehrmacht
Historical note: I have been unable to find the original photo showing the Type 23 in Finnish service again so cannot absolutely validate the authenticity of using the Type 23 for this project. However, the Citroen was a very popular and successful European commercial vehicle - produced in large numbers from 1936 - and so having it as an example of civilian vehicles in use by the Finns is more apocryphal than fact.

Update: Information I have received on the Axis History Forum points towards 40 Citroen Type 23 vehicles having been imported into Finland during World War 2. So that's nice as it makes my use of the type a little less suspect!

Monday 22 September 2014

Quick model 1939 Chevrolet conversion - Part 1

My brace of Valiant resin Ford V3000s...Can I make a Chevy '39 from one of these?
I'm on a bit of a mission now to complete as many of the Finnish trucks I need for my Continuation War project. So, I decided to put together some parts I had laying on my workbench as an exercise in building a 'quick' (for me) model.

What I'm doing is taking one of the Valiant resin 'ready to roll' Ford V3000s I bought and slapping my resin Chevy 39 bonnets on it. Bang! Model 1939 Chevrolet.

I made these 1939 Chevy bonnets, can I get one to fit onto a Valiant model truck?
Technically this should be a pretty easy project - how many times have I said that though? I just saw the existing Ford bonnet off my resin Valiant model and replace it with the resin Chevy bonnet I made. So, first things first, lets get the Dremmel out and begin Frankensteining  this baby!


As well as cutting off the truck bonnet I also started removing the integral resin base. I'll be converting the truck's cab into one that has interior detail (like I did with my 'Quick Valiant Ford V3000' project).

I'm going to try and improve on the way I modified the last Valiant Ford conversion I did. I think I can make a better job of removing the integral resin base while leaving more of the chassis detail. I also want to excavate the cab interior by going in through the bottom of the model (rather than simply drilling out the upper cab like I did with the 'Quick V3000' I did).

In a way this was the easy bit. Tidying up the jagged join will be a bit harder.
Fitting the Chevy bonnet on was easy enough, I just kept chipping away until I got teh two parts to fit. But there will still have to be a fair bit of Milliput putty work to mate the two parts together so you can't see the join.

Next: Excavating the cab interior.

Sunday 21 September 2014

ModellTrans Modellbau Ford V3000 conversion kit - Part 5

Base coat time!
As usual I have given the truck a quick spray of Humbrol's Acrylic 'Light Olive' paint. I've pretty much settled on this colour for al my Finnish models as it's a good medium hue that can be darkened or lightened to suit. Finnish references mention a 'Moss Green', but picture references and even museums seem to differ on what exactly that was - it swings widely between Russian Green and a faded olive.


It's an interesting point that you can't always trust museum exhibits for colour reference as they have invariably been repainted over the years. This is particularly true of Finnish WW2 vehicles, some museum examples have decidedly inaccurate paint schemes. I just try and be consistent.

The other item that needed some work this morning was the canvas 'tilt' cover (does anyone know why they call these covers 'tilt' covers) as the Italeri donor cover was exceedingly devoid of detail. I decided to follow the technique I used while doing my German Army Truck project and add extra material folds and texture using metal foil tape...


I really like this stuff and a big thanks goes to my big brother who sent me this stuff!

Next: Base coating the tilt and flatbed and satin glossing the whole model prior to pin-washing.

Friday 19 September 2014

ModellTrans Modellbau Ford V3000 conversion kit - Part 4

Having got this resin conversion back on track after my little faux pas it's time to move this project along. It's time to add the cab details...


The extras are taken from my scrap box, mostly left overs from Opel Blitz kits I had going spare. I could have gone the extra yard and added a tool set - pick and shovel - on the side of the bonnet, but when I tried them for size it looked a bit cluttered so I left them off.

There are some really nice reference illustrations over on the Engines of the Wehrmacht web site. Each German army truck has it's own page and each page shows variants and differing equipment set-up so it's been invaluable.

With the cab 'dressed' I turned my attention to making the cargo flatbed. The German version of the V3000 truck had a slightly different flat-bed configuration to that of the usual Opel Blitz (from which I am modifying this model). It's an issue of height, the Blitz has a high-sided cargo bed - about 7 planks high - while the Ford had lower sides - of about 4 planks high.

It was a very simple operation to cut down the Italeri Blitz flat-bed to four planks height...

At the back you can see one of my Pegasus 'German Army Trucks' which have
the high-sided cargo bed typical of Wehrmacht lorries. In front you can see
my modified Italeri Opel Blitz bed.
Despite reducing the height of the cargo bed I found that the canvas tilt cover did not, then, look too low when placed on the new lower sides of the bed. I had thought that I was going to have to make a new taller canvas tilt but I really don't think that will be necessary as it looks OK to me...


One issue, however, is the very plain and undetailed look of the Italeri canvas cover - which is a good and a bad thing. Good because the real Opel Blitz canvas cover - with all it's distinctive 'window flaps' - is very different to the plain old cover of the German V3000. So I don't have to remove any detail, just add a little - some folds here and there to give it some 'character' (at the moment it is just a sort of plastic 'box').

On the right is the rather uninspiring Italeri Opel Blitz 'canvas cover' next to a
similarly plain Pegasus cover which I added extra detail to. I will add extra
material texture to the Italeri canvas just like I did with the Pegasus one.
And finally, one very small detail that cannot be left out is the actual vehicle tow 'hook'. The Germans didn't seem to use a hook as such but rather a bolted contraption. The Italeri donor kit did not have this but luckily for me I found one in my scrap box (originally from the good old Airfix Opel Blitz). It's a sort of  'U' shaped item, if the 'U' were turned so the open end were on it's side. The towing equipment's hook was slotted into this 'U' and a retaining bolt slotted through to hold the gun or trailer in place.

The funny German 'tow hook'. This example was pinched from
another kit I happen in my 'spares box'.
As my truck is intended to tow a German Pak40 anti-tank gun this is a small but very important detail.

Well, another stage done. So now I have to base coat the cab and all the new bits and pieces I have added. Next on the agenda is the detailing of the canvas tilt cover and fixing that to the flat-bed before base coating that.

Wednesday 17 September 2014

Pegasus 1/72 German Army Truck - Part 7

Onto the canvas tilt...
Now I had a bit of trouble here, although I have done a few canvas tilt covers now they have all been light 'khaki' coloured which lends itself to my 'chalk' technique. These German trucks have darker grey/olive drab canvas cover.

Now I should begin by saying that I have found that airbrushing doesn't work for me with canvas covers. Maybe I don't have a steady hand, or maybe my airbrush isn't fine enough, but for-whatever reason I cannot seem to get the same subtle effects that other modellers seem to be able to get using an airbrush...

My previous effort - ZiS-6 - at a canvas cover using Conte crayons. I found it
my easier to do a lighter coloured canvas colour than I am doing my current
darker colour one. The contrast of colours seems to suit a lighter tone.
I *think* it has something to do with scale and the amount of folds in the material. At 1/72 scale I am simply happier that I can 'paint' subtle folds in fabric using my Conté crayon technique rather than spraying on very fine lines of paint. Conté crayons are a chalky - not waxy -crayon which breaks down into a powder that's not unlike women's powder make-up in consistency (I am guessing here - I don't have a lot of experience with make-up). Therefore the greatest quality of it is that it can be blended to create subtle gradients of colour and faded like a colour tint.


So, the process I've adopted is as follows (more or less)...

1. After base coating the canvas with a mid-colour version of my target colour I begin to work into the shadow patches using a dark wash. I also outline any features - like the tilt 'window flaps'...


This looks a bit 'cartoony' at the moment as it just two colours - the mid-green and the shadow colours. I then give this a quick spray of satin varnish to protect this layer before I start the high-lighting with my Conté crayons and pencils - this is done so I can easily wipe off any crayon that I'm not happy with.

2. I begin to loosely sketch on lines of high-light on the crest of any folds in the 'canvas'. Just gently drag your crayon over the raised surfaces in the canvas in a similar way to dry-brushing - which is another way I could have done this, by the way. But the difference between my chalk technique and dry brushing is what happens next...

Note: The canvas looks darker because of my lighting - it's actually the same
mid-green as the picture above.
Having drawn on my stripes of white chalk I then start to blend the chalk into the background, creating gradients of highlight. You cannot help the crayon powder spreading, by the way, it just happens, so your whole 'mid-colour' base tends to go a shade lighter in the process.

You may find that the effect is too subtle and a lot of the chalk disappears while blending. Don't worry, just keep re-applying in layers until you achieve the effect you want (I had to go around the canvas two or three times, repeating the application of the chalk until it reached a level of high-light that I wanted).

To blend pastels or Conte crayons or chalks I use a paper based blending 'stump'.
A paper-based  'pencil' which can be sharpened to a point for fine blending and
also to clean the point between colours.
3. Now, as you will have found by this point, chalk is a very nebulous medium - easily wiped off by accident. Therefore you have to seal the medium before going further with another light coat of your chosen acrylic varnish (I find satin works best for me).

This also has the effect of 'flattening out' the rather chalky texture and graininess of the blending as well as protecting the chalk while you add more shadow wash or work into the medium tones.


I'm probably less happy with the effect so far on this one than I was with my previous khaki coloured canvas covers. Maybe it's because I overdid the wash outlining which makes the 'window flaps' look drawn on. I shall have to use a lighter wash for this in future.

It's a sort of 'Pontoon' ('Black Jack') situation really - as a lot of weathering is - and at this point I choose to 'stick'. Yes I could fiddle around a bit more gambling on a better effect, but I could also 'go bust' and spoil what I already have.

Next: Last stage - the windscreens.

Saturday 13 September 2014

And sometimes I just get it plain wrong...

History is difficult - even for model makers!
One of the reasons I like model making is that it involves - like it or not - a bit of research. I like research, maybe that means I am an inherently 'nosey' person, as I find nothing more relaxing than spending time trawling though books and websites for tidbits of useless information!

This is where I was with my MT V3000. I had started to make a new shaped fender using
Milliput putty to make the truck look more like the American version of the V3000.
However, this can be a double edged sword. Take my ModellTrans Ford Werkes V3000S conversion project - I had stated that I needed to further convert this conversion because 'it was the wrong type of V3000' truck (the German made one and not the American one as used by the Finns in WW2).

Well...I was wrong. (Or at least right and wrong.)

While researching another Finnish army vehicle I accidentally came across a photo in the fantastic SA KUVA archive that completely disproved my contention that the Finns *only* used the American production model of the V3000 truck. While initially in the war the Finns did source their V3000s from America (before they 'changed sides' and joined the Axis in 1941) they later received German-made V3000s as part of a delivery of equipment from their new best buddies, the Nazis.*

* (It's a complicated story, which I am just reading about in Henrik Lunde's history 'Finland's War of Choice: The Troubled German-Finnish Coalition in World War II'.)


From the SA KUVA archive - this photo shows a long convoy of German-made
Ford V3000s - part of a purchase - I believe - that included StuG III assault guns.
This enlargement clearly shows the features which mark this out as a later model
German Ford Werkes V3000 - note the single piece windscreen and 'flat' fenders.
Anyway, the point is 'never say never' - someone is bound to come along and make you look an ass.

So the Finn's did have German V3000s, which means I don't have to convert my HobbyTrans conversion into a shoddy take on the American production model truck...Bugger (or 'hooray')!

Luckily the Milliput just peeled off, it doesn't melt and stick to surfaces like
poly glue does. So it was a case of just chipping the hardened putty off.
Off with the Milliput - luckily I only had time to modify one of the fenders and the Milliput chipped off the resin model quite easily as it was applied to a smooth surface and so didn't 'glue' itself to the model.

Phew! Back where I started, now I can get on with finishing this model.
So there you go. Proof, were proof needed, that I ain't as clever as I thought I was. A big thank you to the chaps at the Axis History Forum who have been a big help in my research of things pertaining to  the Finnish Continuation War and put me on to the photo I found at SA KUVA.

Wednesday 10 September 2014

Final candidate for YaG-6 model - a Yag-6!


Perhaps the hardest motor unit to populate in my Finnish army project has been the heavy artillery company. Under the Rapid Fire war game rules I don't actually have to include a heavy artillery unit as - really - this would be an 'off table' asset available only as a virtual bombardment and not as physical attributes. But I am fascinated by the huge variety of assets the Finns deployed during WW2 and so couldn't resist trying to model as much of their order of battle as I could.

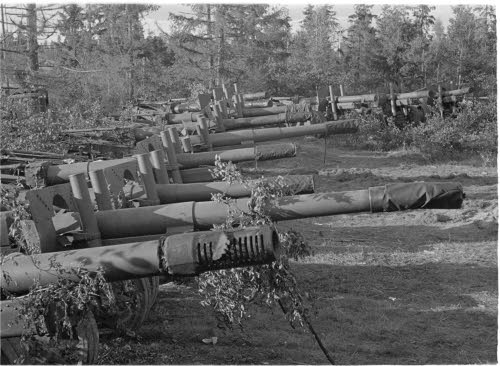
The Finns captured large quantities of Soviet equipment. Here a large number
of 152 mm howitzer model 1937 are gratefully lined up by their new Finnish owners!
Source: SA KUVA - Photo No. 43755 
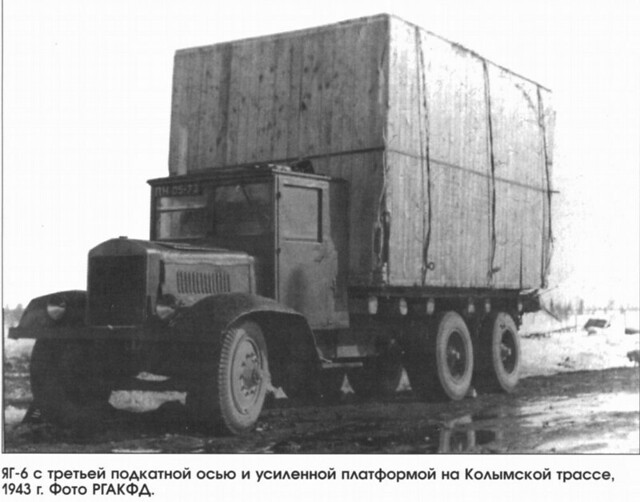
The Finns did employ a large number of very big artillery pieces - from heavy field guns to super-heavy howitzers in calibers from 150mm to 210mm [see Jaegar Platoon web site for reference] and - obviously - they needed equally large vehicles to pull them. Though there is limited data (available in English) as to quite what many of these vehicles were there are tantalising hints over on the SA KUVA Finnish WW2 photo archive - among these I found some picture of a likely towing vehicle in the form of the mighty YaG-6.

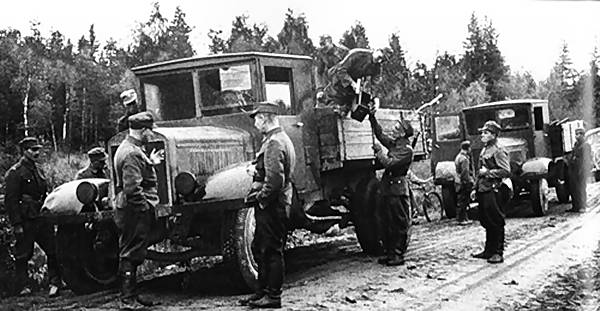
Two Soviet YaG-6, 5-ton, 4x2 trucks fell into Finnish hands. Machines of this
power must have been greatly prized. Source: SA Kuva
Now, until recently I was in something of a quandry as I knew I wanted to include an example of this vehicle in my line-up but I just couldn't find a plastic model of the Yag-6 in 1/72 scale.

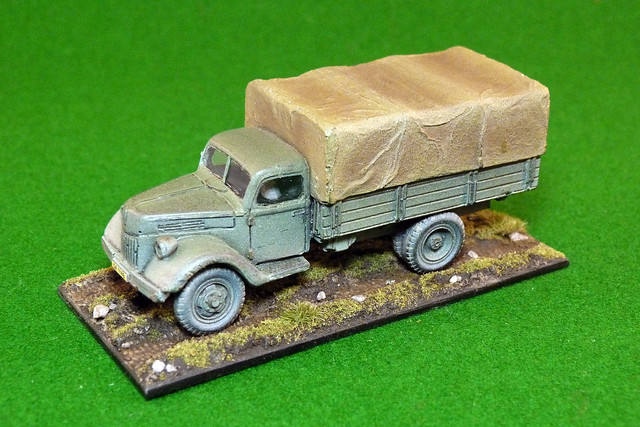
I have contemplated converting an Italeri Lancia 3RO, which is generally similar to the YaG and I did eventually find a 1/72 Zebrano YaG-10 - the bigger 6x2 version of the YaG-6 - which could be easily modified by removing one of the rear axels turning it into a 4x2. But the Zevrano YaG-10 is such a lovely looking kit that I just didn't have the heart to butcher it.

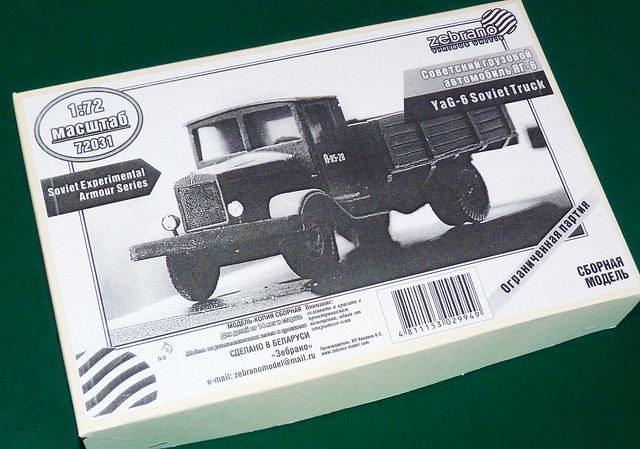
Zebrano's YaG-10 - the bigger brother to the YaG-6. For some reason they gave
this kit full-colour box artwork. And as far as I know ALL Zebrano's products
are 'very limited edition'.
In the end, as luck would have it, I managed to find a Zebrano YaG-6. I tracked it down to a model retailer in Germany and snapped it up before I had time to feel guilty about spending €26 (yikes)!

About the Zebrano YaG-6 model
Zebrano seems to be a Russian company that specialises in short-run resin models. However, they appear to be relatively advanced in the complexity of model they do and have a working relationship with the well-known company of PST for whom they seem to prototype a lot of kits for.

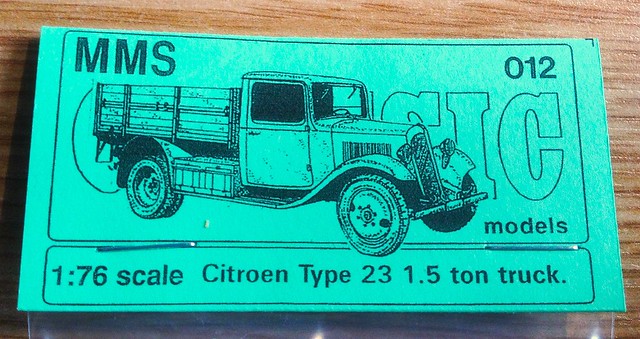
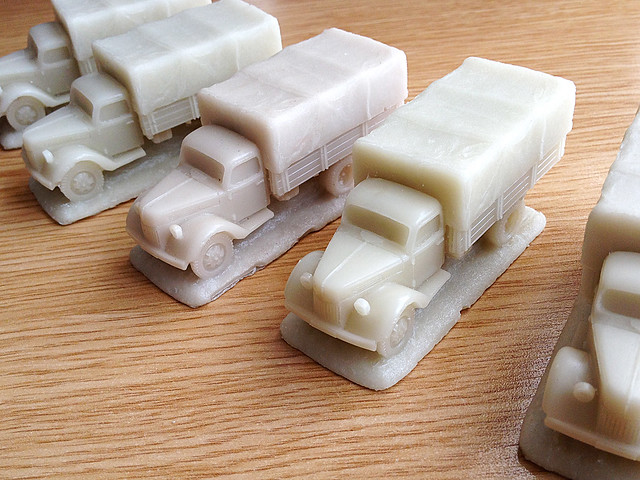
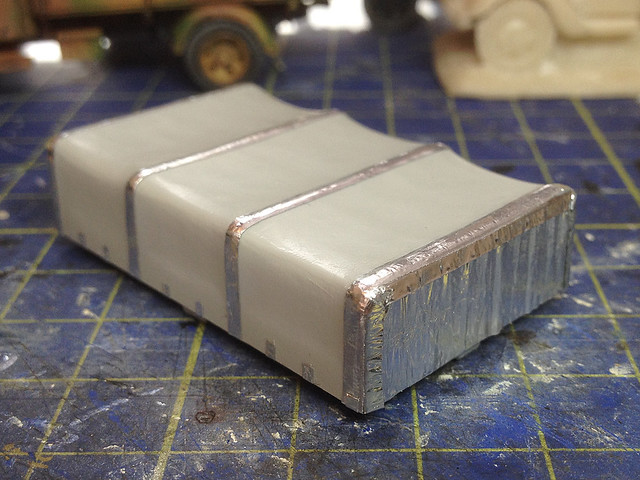
Anyway, their YaG-6 turned up in a very plain cardboard box with a simple monochrome photocopied label stuck to the lid. No frills at all with this kit, and the contents continued that frugal theme...


The instruction sheet was - again - a simple photocopy and resin parts were packing in various little plastic bags. There was a single sheet of bubble-wrap to give the parts some protection, quite important as unlike plastic injection moulded kits all these parts came loose and without sprues.


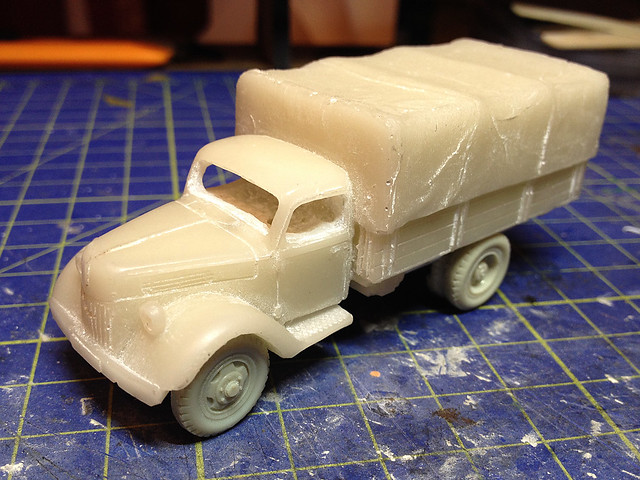
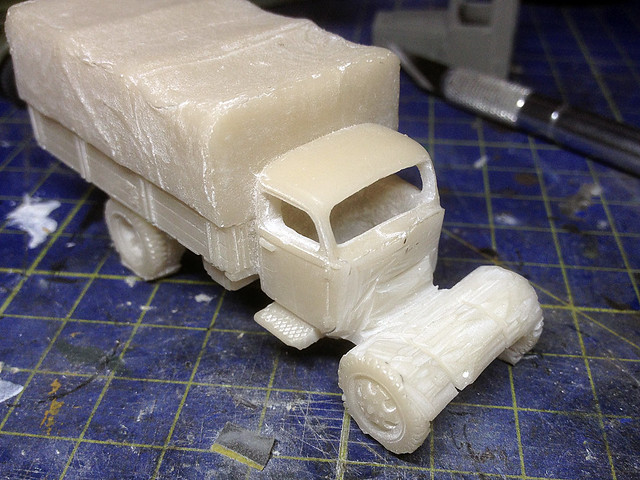
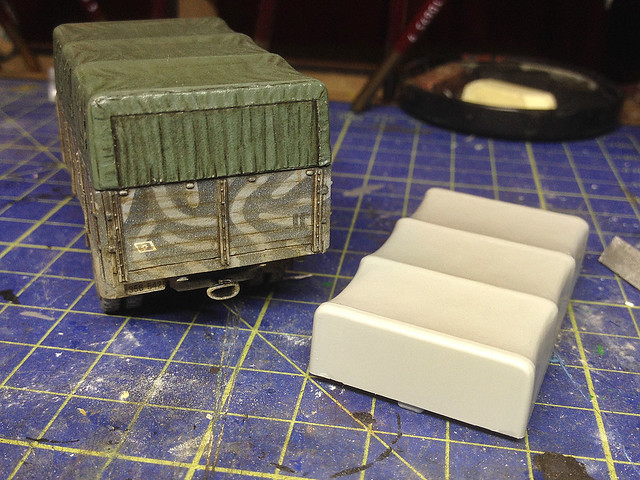
I don't have a lot of experience with these 'high quality' display resin models, but even so I was impressed with the number of parts included in the kit and amount of detail there seemed to be.


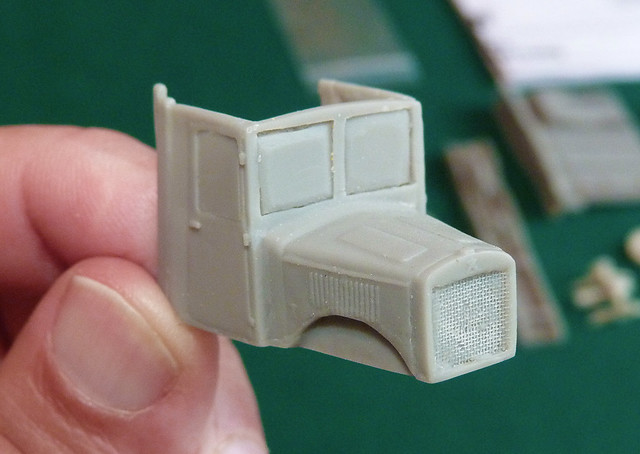
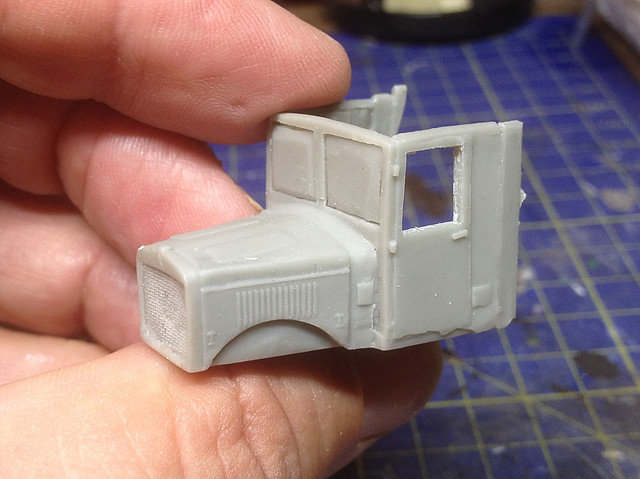
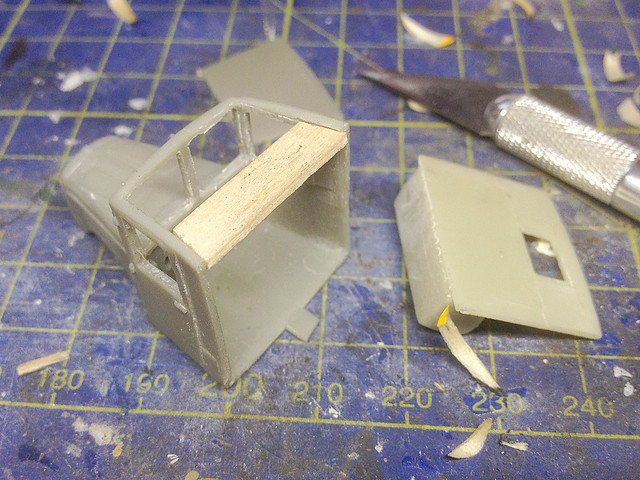
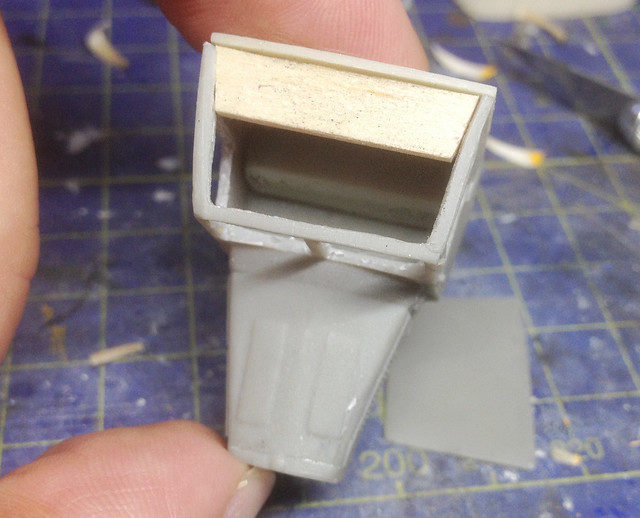
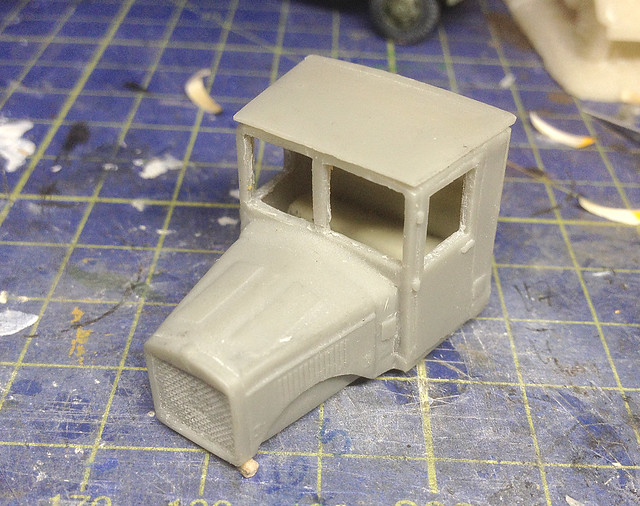
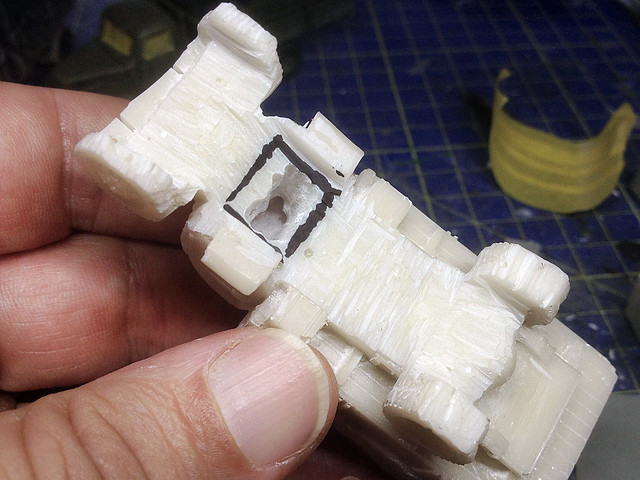
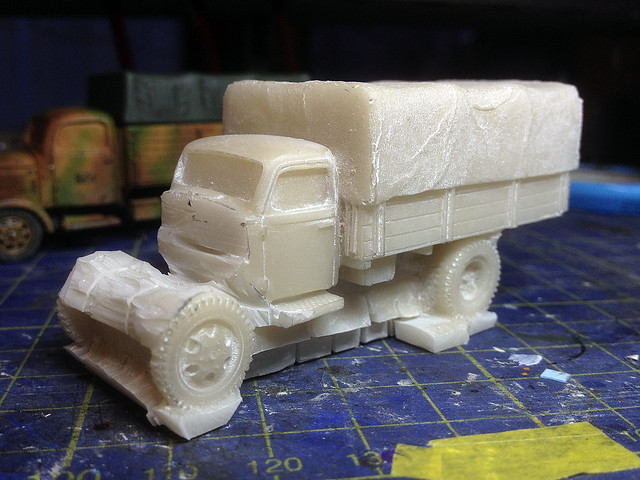
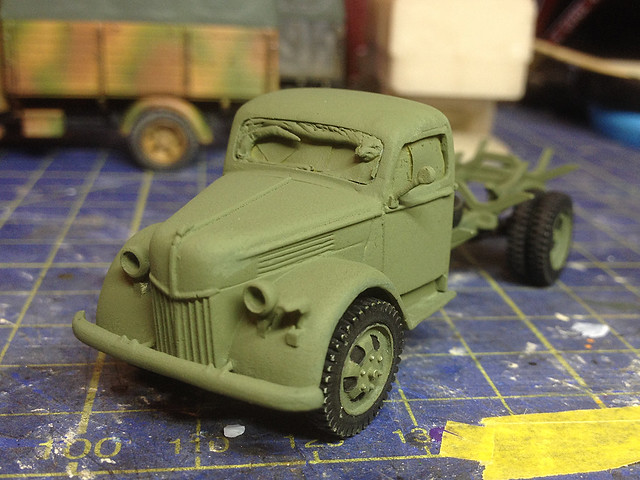
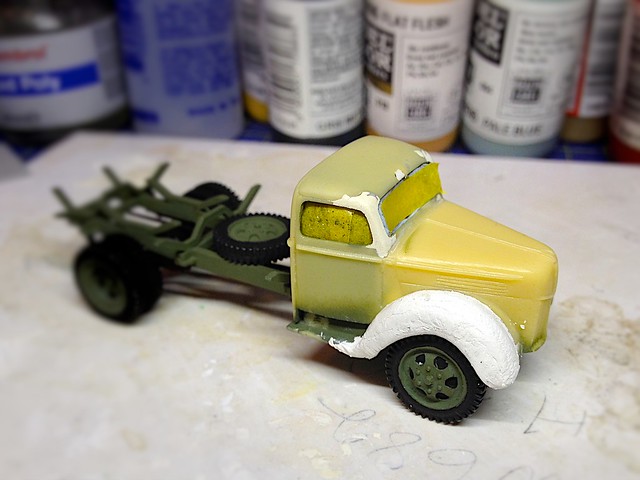
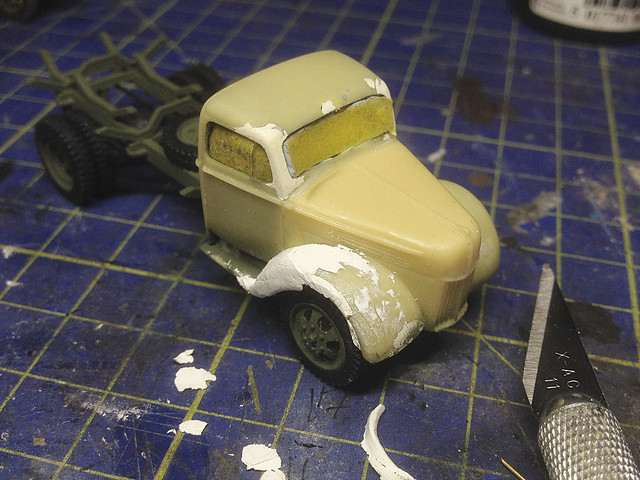
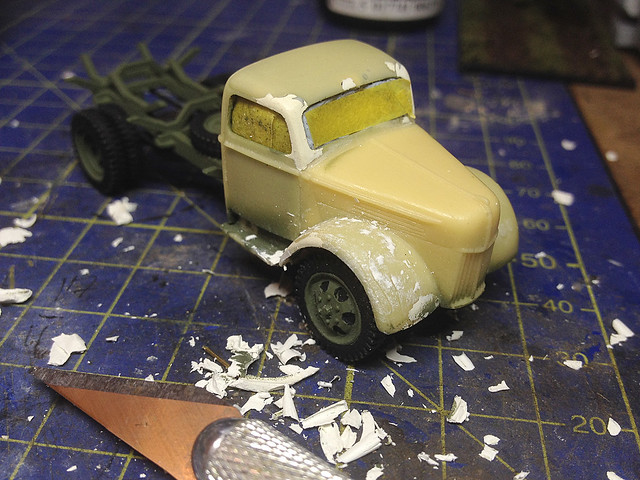
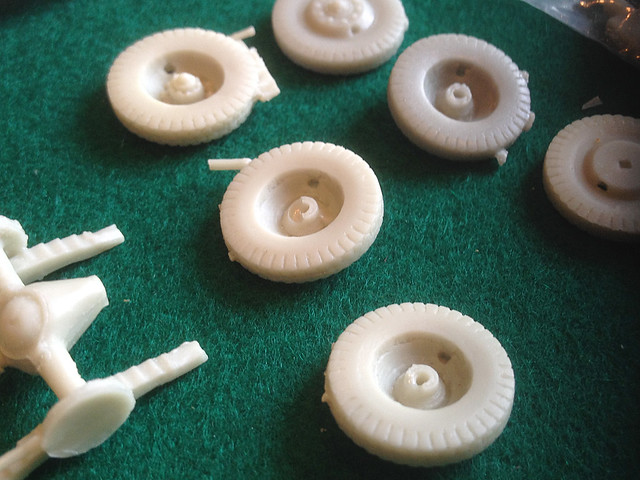
The two parts I examined first were the wheels and the cab. I was glad to see that there was adequate amounts of detail imprinted in the resin, but it wasn't quite as much or as sharp as some of the better makes of plastic kits. The tread on the tyres, for example was a bit shallow and vague for my liking and the cab has a couple of large slabs of superflous resin attached to it's rear which would have to be removed. Additionally, the cabs windows were filled in and you will have to cut those out too.


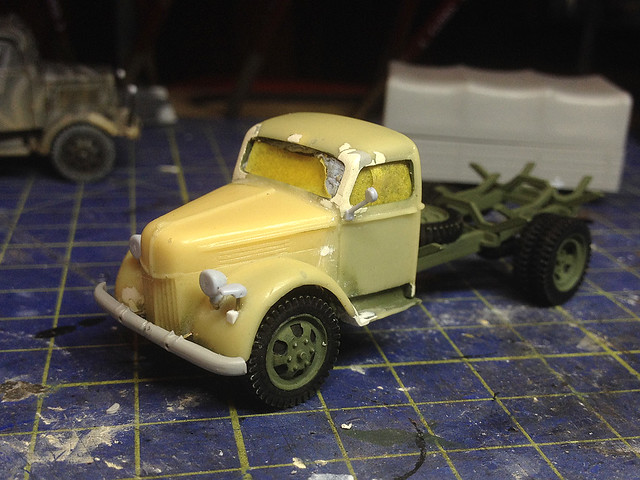
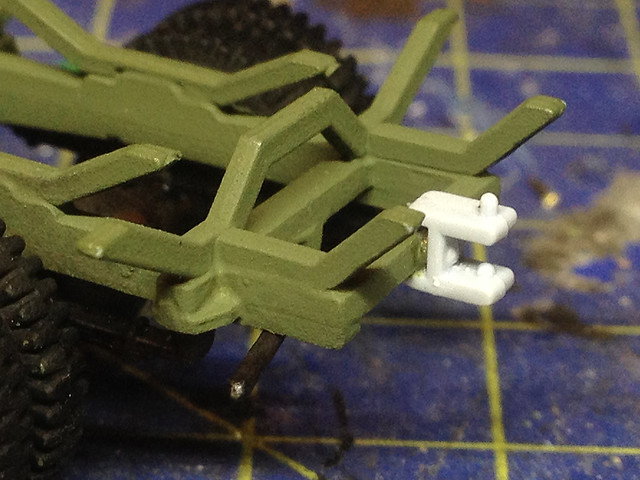
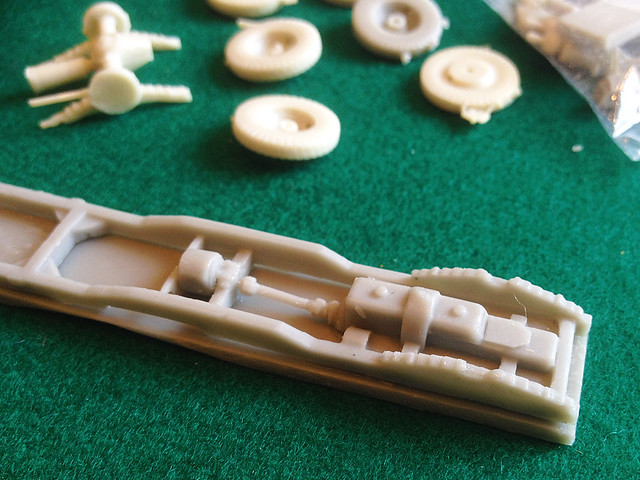
The chassis was more or less one piece, including the lower engine block and front suspension, but I can live with that as it's not really on show. One thing I was really pleased about was that Zebrano included a transparent sheet for the windshields, not only that but they printed the shape of the windows onto the sheet so you have a guide for cutting. Nice.


As I said, there are plenty of parts (I haven't counted them yet though) so I will have to take things slowly and carefully, particularly because thin resin parts have the reputation of being very brittle and easily broken. Still, I do feel - at least - that I got plenty of parts for my money (just as well really).


Good value for money? Well, that's a relative thing - I wince at the thought of how much I paid for this kit, but there again nobody else makes a YaG-6. The cheaper option - for war gaming - would have been to use an Italeri Lancia 3RO as a stand-in if you really want to include a YaG in your line-up. But...Well...I've spent the money now! :)

Next: Basic construction and the cab interior.