Sunday 30 March 2014

Last thoughts tonight - how many Finnish trucks?

I'm starting to try and get a handle on just how many trucks I want for my Finnish army - using the Rapid Fire! rules as a guide...


This is just my first attempt at calculating the number of vehicles. I'm still getting to grips with the rules as there are some 'if' and 'or' modifiers AND my basic infantry may not actually have transport at all (quite how they get from A to B is beyond me so I've thrown in some light trucks...Just because)!

Update! I ordered the Bolt Action rules this morning (it's pay day, whoo-hoo) so it will be interesting to see the differences in unit composition between the two rule systems and what I can get away with to try out a small scale battle using my Finns. The Bolt Action demo video I watched the other day had minimal unit numbers - one tank, two infantry squads, an AT team and a command team - and so I'd like to try and get that sort of small team up and running soon if I can.

Quick Ford V3000S (G198TS) - Part 4(b)

Last post of the weekend! And this gets me back on course after a bit of a disappointing couple of days of modelling...

As mentioned in my previous post about this project I was not happy. Things hadn't gone right with this model right from the start, a lot of the problems came about because this is the very first model I have done where I have relied a lot more on my Revell airbrush...No rattle cans used this time! (Except for the black primer.)

I just couldn't get the paint consistency right. Colours weren't right, coverage wasn't right and piling on further layers just didn't make me any happier. As said, a bit of this was due to lack of planning, but I was also frustrated by using new equipment and techniques that I needed more practise with.

Chief problem was the paint mixture. I didn't get this right and I guess I was spraying with overly thinned mixture, therefore everything was too pale.

Well, I finally twigged what the problem was and went out today and bought a couple of bottles of Vallejo's Model Air colours. The results were terrific as these are pre-mixed paints, designed to be used in your airbrush straight out the bottle...

I now have to re-shade and re-weather the tilt now it's the right colour.
I could now see the colour build up smoothly as I passed my airbrush over the model. This is a lot better and I also took the opportunity to adjust the colour of the tilt canvas that I wasn't happy with as well!

I'm sold on the Model Air paints as they take the guess work out of airbrushing for a novice like myself. I was able to add a fairly subtle (for me) film of dust, modulate the colour of the tilt and improve and even out the muck on my tyres.

So, it's now Sunday night and I certainly haven't made as much progress with this or my 1939 Chevy model as I had wanted to this weekend. But the discovery of these wonderful paints made up for my poor modelling efforts as I am now more confident about using my airbrush and can begin to experiment with some subtle shading effects.

Finally, A big thanks goes to my local general store - Boyes of Scarborough - which was open on Sunday and stocks the full range of Vallejo paints in it's hobby section.

Quick Ford V3000S (G198TS) - Part 4

...Not happy...

A quick project shouldn't mean a badly planned out project. That's what I've learned. Unfortunately I fell into that trap and just launched into my 'quick v3000' without thinking it through before I started and I've made several boo-boos as a result.


The above picture shows my V3000 midway through it's paint job, the biggest disappointment is the tilt canvas which I really should have base-coated with a canvas (buff) colour right at the start. This is after my second wave of weathering touches but my lack of a clear plan has me adding effects quite haphazardly.

I am trying to be more focused now and have slowed down a bit, but the next important stage - tiny as it is - is to insert a little driver! Now, remember that my cab is a cheat and only half excavated so I had to just use a spare figure cut in two and I will be using just the top half of that, from the chest upwards...


It wasn't a very good figure model, and my painting is a bit slap dash but I am hoping to hide some of these failings once I insert the transparent plastic windshields. All I wanted was to give the impression that there is a driver in the cab, as a wargame model I am banking on nobody looking that closely!

So, the next stage is the tricky one, cutting out the windows - so I will start with a  few paper templates first to get the right size and shape. I'll also be making a quick base, but as I have done a post about how I make these already I shan't go into that again.

Next: (Hopefully...) The final touches and completion.

Friday 28 March 2014

Quick Ford V3000S (G198TS) - Part 3

Right...Moving quickly on again..!

I decided to start with a black base coat to see if I could get some variation in tones if I airbrushed on the light olive I am using for my Finnish vehicles...


However, before I applied the olive green I wanted to mask out the cab interior which I want to stay black...


I managed to get some black undercoat faintly showing through which I was quite pleased about. Particularly in the crevices and panel line detail (I also didn't bother spraying the underside olive).

There isn't any military organisational or unit markings on Finnish transport (I'm not sure why that is), but I thought I would have a go at popping on a number plate (albeit a made up one)...


The general format of the plate is - I believe - authentic enough and the number starts with the obligatory Finnish military 'SA' nomenclature and the plate is yellow, it's just that I made the number up. I figured that as a wargame model I didn't have to be 100% authentic as the model is a representation of a type of vehicle rather than a specific individual truck.

Anyhoo, on to the initial weathering...More of shading really, with dustings of...Er...Dust! And then I started working into the tilt canvas. I was a bit disappointed in that really, I wish I had started with a different base colour rather than the canvas being the same colour as the rest of the truck. A khaki might have been better...


There's a bit of pin-washing in there using AK Interactive's Dark Brown Wash for Green Vehicles. I also removed the cab mask as the next stage will be to start working on the driver and the windshields. Then I will start working on some additional heavy weathering, chipping and damage...

Onwards!

[Thought I'd just add that this quick project is an experiment - as, I suppose, most of my projects are at the moment - and that if this works out I have another two of these Valiant resin trucks waiting on the workbench. These will complete my Jaeger's company transport under the Rapid Fire! rules that I'm using to guide my collection.]

War game temptations - Bolt Action

I am not a war gamer. There, I've said it - the best I can say I have done in this area was a brief obsession with Risk when I was a teenager and I enjoyed Company of Heroes on the PC. But I have never been one of the ruler and dice fraternity.

Having said all that, as you can see in all my previous Finnish Project posts, I am using the Rapid Fire! war game rules as a template with which to assemble my collection of Continuation War Finnish models. However, while I sourced a set of the RF! rules a quick flick through them was enough to convince me that actually playing a game with them was a bit beyond my meagre intellect! (I just don't seem to be mentally wired up right to easily translate the convoluted instructions into 'fun'!)

Then again, I came across a YouTube video which demonstrates a set of wargame rules that I at least seem to be able to follow - all be it with a somewhat bemused expression on my face half of the time. It is a video of a demonstration game for the Bolt Action rules by Warlord...


Don't ask me why I find these rules to be any more tempting than, say, Rapid Fire! or Flames of War as there's probably no logic to it, maybe it's because these guys actually look like they are having fun!

But in any case, I am tempted to get together a couple of tanks and a couple of squads of infantry and have a bash at this on my kitchen table one weekend. I may even give some of my Finns an outing when I have enough done.

I note that Bolt Action is primarily aimed at 28mm figures but I've Googled around and quite a few people seem to think it's 'OK' for 1/72 at a push (without changing any of the rule's ranges).

I still don't think I'll ever be a regular wargamer, but it would be nice to think that once I have a good part of my Finnish army completed I can put on a bit of a demo game myself, just to say that they have seen some action!

[Of course, this will mean I shall have to make some Soviets as well to act as opponents. So it may well be a small unit action, but this seems to suit the Bolt Action rules as can be seen in the video demo.]

Wednesday 26 March 2014

1939 Chevrolet conversion - Part 6

The cargo cage
A characteristic feature of many commercial cargo trucks from the 1930s and 40s is the wooden cargo cage that gave this type of truck it's name - the 'stake truck'. I believe this is an American term and it confused me for a while, until I realised that the 'stake' in question was a wooden one!

The 1940 Chevrolet stake truck with advertising panel. Source: Flickr - Alden Jewel
The definition of a 'stake truck' is a truck or trailer with a stake body, as for hauling farm animals or feed bags. This type of truck has a planked wooden cargo cage and is generally - but not entirely - a type of truck that is commercial rather than military in nature. Such was the case with the 1939 model Chevrolet 1½ ton truck which was in civilian use in Finland prior to the start of World War 2 but was taken into military use by the Finns who were desperately short of motor transport.

The 1943 Ford '6' kit that I using as a base with which to make my faux-Chevy is not a civilian stake truck so I am having to modify it's cargo bed with some scratch built stakes...


My solution isn't strictly authentic as I decided to use the existing kit's cargo bed walls as a basis for the stake frame. I used some strips of thin brass sheet to make the plank walls for rigidity and then covered them with thin plastic sheet so I could try making a wooden texture.


With all the plastic planking done I also laid some plastic strips on the floor of the cargo bed and then it was just a case of gluing all the parts together..


Not too bad! Not brilliant, but I suppose you could say that it's seen a lot of use and so might be quite battered? I'm making the wood texture on the 'planks' by painting on some liquid cement which will melt the plastic just a little, then I will draw on some wood grain patterns with a scalpel.


Lastly I fit the cargo bed onto the chassis. Hopefully it will all look a bit more realistic with a coat of paint!

UPDATE - NOTES ON PST KIT INACCURACIES: When I fitted the cargo bed onto the chassis something seemed wrong and I couldn't figure out what. The cargo bed seemed to be too high off the chassis and there was a noticeable gap between it and the wheels (when they were fitted). I checked reference photos of the 1943 'Ford 6' truck and there was minimal space between the bottom of the cargo bed and the top of the rear tyres. Hmmmm, lots of head scratching ensued (had I put the kit together wrong?)!

As it happens no, I hadn't. But PST had!

I just happened to remember a comment on a review of the PST Ford kit over on the Henk of Holland review site - "...this is a re-working of the [PST] Studebaker US-6/GMC truck kits"!

It turns out that the cargo bed is from the Studebaker kit and sits on the chassis in a completely different way to an actual Ford cargo bed and you have to do some judicious lowering of the bed to make it the right height for the Ford (and my Chevy)! Bloody penny pinching Russian kit manufacturers!

What next?
You may wonder where the wheels and bonnet have gone? They have been sent up to my brother for duplication in resin as I hope to make two of these Chevys for my Finnish collection. So while they are being made I will carry on with converting the truck cab into a Chevy cab.

Monday 24 March 2014

Scheduled maintenance

This is another of those 'note to myself' kind of post really. I have a nice day off today, all by myself, so I thought it would be good to have a sort of 'scheduled maintenance' day to do some of those little jobs I don't seem to have time for during my normal week.

Chief among these is cleaning my airbrush. Although I have only really just started using my Revell airbrush on a more regular basis I have noticed not only just how quickly it gets dirty but also how soon normal useage and paint build up negatively affects the quality of the spray. Although I have been doing some tentative (beginners) cleaning as I have gone along and - importantly - did a small cursory clean between colour changes - my cleaning and maintenance has been largely superficial mainly because I've been a bit scared to take the airbrush apart!

So, today began by my watching several YouTube videos on cleaning and maintaining airbrushes. There are - as you can imagine - a lot of videos out there on this subject and as usual I filtered them out by means of watching the first few seconds and judging whether I could actually bear listening to whoever was doing the video! Maybe not the best way to watch 'how to videos' (some boring guys can be very knowledgable) but I do find is a guy is boring it doesn't matter if what he has to say i s very good I simply turn off halfway through, so better to find videos I can actually stomach! :)


I didn't just watch this video, I watched about three before I felt I had a handle on what I was doing. Certainly I felt confident enough to start unscrewing bits of my airbrush feeling I now had a good chance of being able to put them back together again and still have my airbrush work. :D

It was amazing how dirty my brush was! I thought I had at least done some preventative cleaning - but I found out what was just causing some of the splatter I was experiencing when I last used it...

During my first inept - but well meaning - novice cleaning attempts I had used an old paint brush to clean inside the paint bowl. Several brush strands had detached from the old brush and worked their way down into the nozzle, causing the splattering.

So, note to myself, DO NOT use old paint brushes to clean inside your airbrush - use proper stiff airbrush cleaning brushes instead!

Left: These are the proper airbrush cleaning brushes I bought, great for pushing into the nozzles and channels inside the brush where all the old particles of paint build up.

It didn't actually take long to do a proper clean and in following the instructions in the videos I was able to disassemble and reassemble my airbrush properly (and understand what all the components did). I now feel more confident about doing things like removing the needle to wipe it clean after every spray to keep it smooth and free of what we Scots call 'clart' (tiny bits of dirt).

Sorry this is a bit of a wordy post - but it's just one of those jobs you have to do.

Friday 21 March 2014

1/72 'Finnish infantry' - second attempt

I have received a batch of 1/72 soldiers which I hope to use to make the soldiers for my Finnish army project. My first attempt at making suitable figures for this project was a bit of a flop, so I am hoping these new figures will be more suitable this time.

As said elsewhere I have decided to compromise for practical reasons and sacrifice a bit of authenticity for speed of construction. To achieve this I have given in and decided to simply use WW2 German infantry figures for my Finns. The uniform is actually very similar, and by the late war most first line Finnish infantry seem to have been issued with the German M35 steel helmet.

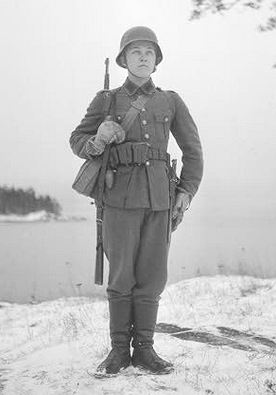
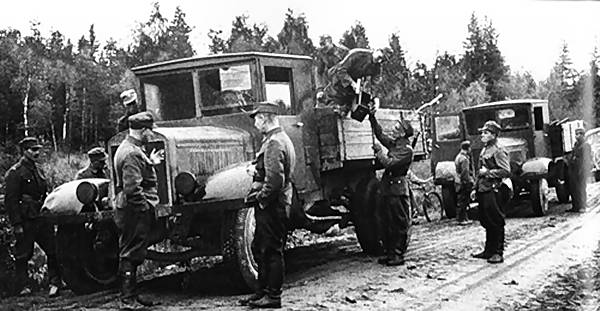
Left: An example of mid-war Finnish infantry dress. Source: SA-kuva.

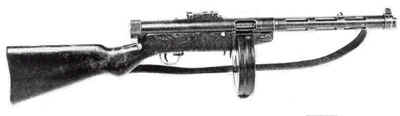
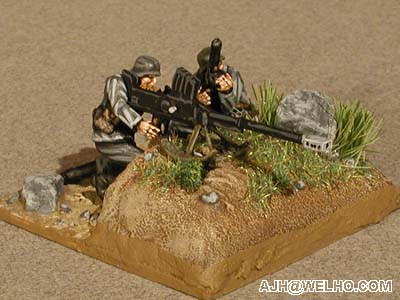
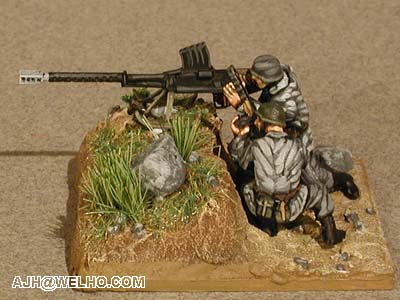
Obviously equipment and weapons is a different matter. The Finns primary weapons were a version of the Russian Mosin-Nagant rifle and the famous Soumi KP/31 submachinegun, which happens to look a little like the Russian PPsh, hence my original attempt to merge - or convert - Soviet and German infantry to make more authentic looking Finns. Anyway, it didn't work.

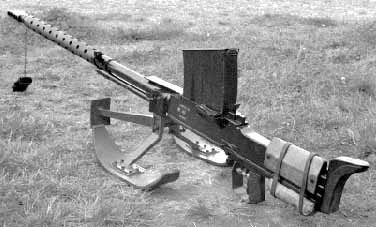
The famous Finnish Soumi SMG.
So, my second attempt - as said - will be far more simpler. I will be using some nice Zvezda and Ceasar hard plastic figures (I prefer hard plastic figures). I chose these ones after examining some of the figures on the market and comparing their relative sizes. I wanted figures that were on the smaller-mid end of the 1/72 figure spectrum to fit in with the vehicles I am using (some are 1/76 scale).


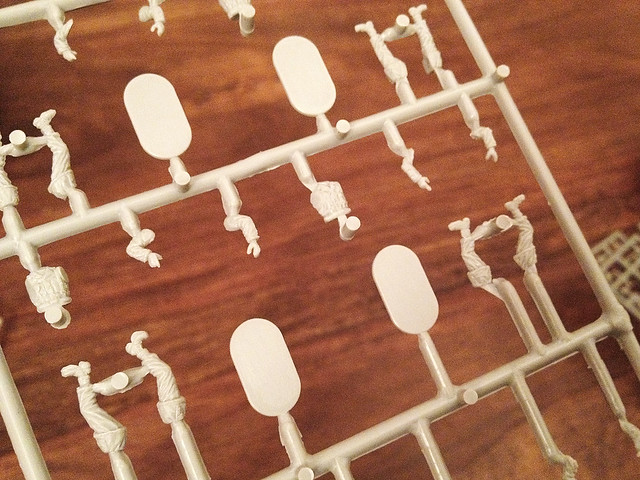
The Zvezda sets were chosen because of the specialist poses included in these little sets. The sets only contain a hand full (4 or 5) of hard plastic figures, but I like the sculpting and detail. The Caesar set was chosen because it is one of their 'Assembly Series' multi-pose hard plastic figure sets.

I *think* the scale of these figures is a better choice than my first attempt...


Above: On the back row we have Strelet's 1939-42 Finns, Zvezda's German Infantry and Valiant's German infantry (all in 1/72)! At the front is the good old 1/76 Airfix Germans.

Originally I tried Valiant's hard plastic figures (Soviet and German) but found that they were very large for 1/72 (I likewise found Plastic Soldier Company figures a little big for the scale). Zvezda and Caesar seem to be middle of the road when it comes to the height of their figures and so should fit in with my vehicles better.

By the way, the Strelet's figures are the only 1/72 Finish infantry available, but unfortunately they are from the wrong period, are in winter uniforms, are soft plastic and are - frankly - a bit naff!

The Zvezda sets, though only containing a few figures, have some quite exciting and dynamic poses that should liven up my collection of figures...

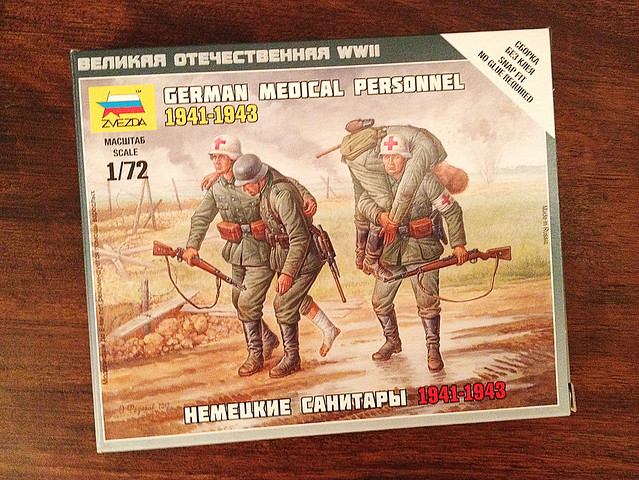
One of the 'specialist' sets that Zvezda produce to accompany their own
'Art of Tactic' war game. A nice as these are I may find it hard to incorporate
these chaps into my Rapid Fire! inspired army!
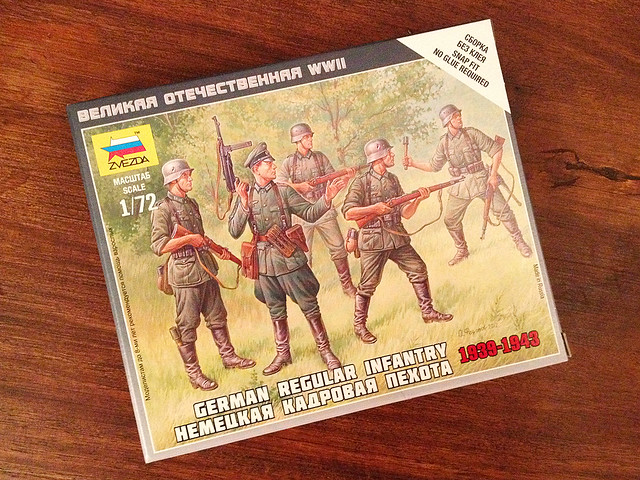
Their regular infantry set, on the other hand, is very useful and the officer is
a terrific figure who is crying out for a Finnish officer's cap and a Soumi SMG!
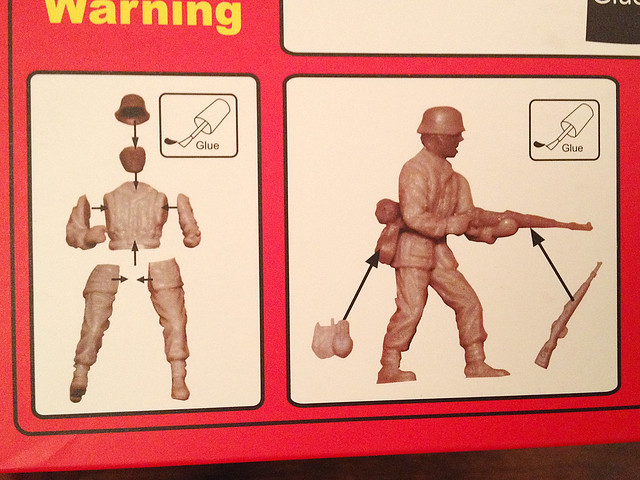
The Caesar figure set will be very useful because of it's multi-pose configuration. All additional equipment, gear and weapons come as separate items making it far easier to do simple conversions to Finnish troops...


In particular, I like the separate heads and hats. There are a variety of German headgear including M35 helmet, field caps and even a forage cap! All great for mimicking Finnish troops.


The fact that the weapons are separate items too is a very welcome bonus as I can slip in a few 1/72 PPsh SMGs to make my troops look even more like Finns (carrying Soumis).

All it remains for me to do now is to make up a few of these soldiers into a 'test' platoon and we shall see. Hopefully they will look far better than my first attempt and suit the scale better...And be quicker and easier to make and modify (where I have to or want to)!

Thursday 20 March 2014

1/72 Die-cast T-28 tank arrive!

Bit of a nice surprise waiting for me on my desk at work this morning. I ordered a couple of die-cast models of the Soviet T-28 multi-turreted tank a good while back and they have finally winged their way from Russia!

Sorry about the rather naff quality of the photos, but I was excited!
I wanted these two tanks for my Continuation War Finnish army project - the Finns captured a number of these obsolete monsters - but as far as I can see there aren't any plastic kits for this novel machine. There was a model made by Solfig available on the Millicast website for a while but this seems to be unavailable now. So I have resorted to these die-cast models instead.

These models, as I said, are from Russia (found them on eBay) and seem to be from a collection of models similar to the De Agostini magazine collection we have here. They are a bit simplified but are no worse that a lot of the war game quality models.


In theory this means that all I have to do is decide on a appropriate colour scheme and paint them. Please let it be that simple!

T-28 tank R-48 (later Ps. 241-4) photographed with some of the crew. Photo taken
in Lappee July of 1941. (SA-kuva photo archive, photo number 24415). 
Historical notes: Two tanks captured during Winter War and five more tanks captured in 1941 - 1942. Even if considered obsolete they remained in combat use until 1944 and the last of them were not removed from Finnish inventory until year 1951. (Source: Jaeger Platoon web site.)

In use these two models will make up the core of my two heavy armoured companies (under the Rapid Fire! rules). Each company can consist of one T34/76, one T-28 and either one T-34/85 or one KV-1 tank. This nicely illustrates the rather eclectic nature of Finnish armoured formations, reliant as they were on captured tanks.

As far as I can see these tanks were painted in the normal Finnish three-colour camouflage of moss green, chestnut brown and a 'blue grey' that inexplicably appears to be a sandy beige in some reference material!

Picture source: Armchairgeneral.com

Wednesday 19 March 2014

Featured work - Dave Reasoner's Finnish Lahti L-39 rifle

With the vehicles side for my Finnish project starting to gain some momentum it is time that I started to put some more thought to the infantry element of my army. Key to this will be incorporating some of the unique weapons that the Finns deployed and there can be few as 'unique' as the Lahti L-39!

Picture source: Wikipeadia
I've been having some discussions on several model and wargame forums about how I might construct my little troops - given there are no 1/72 Finns in late war summer uniforms on the market. And while having these conversations David Reasoner - of Moonlite Modelwerkes fame no less - posted up some lovely images of his Finnish force and an excellent scratch build Lahti L-39!


Picture source: David Reasoner - more examples >here<

This 20mm elephant gun was used in counter-sniping as well as a light anti-armour weapon. The Finns were noted snipers and used this beast against bunkers, Soviet snipers and even against tank crews - sniping them through hatches and viewing ports.

I have to have a couple of these in my army - though I do not think that the Rapid Fire! rules on which I am basing my army incorporates any special guidelines for it's deployment or use.

Luckily there are plenty of reference photos and diagrams of this gun as well as several videos (very useful for gauging scale). Making a couple shouldn't be too much of a problem, I just hope I can make as good a job of mine as Dave has made of his!

Tuesday 18 March 2014

1939 Chevrolet conversion - Part 5

Grill and bonnet completed!


Just a small update, but a significant one, as this marks the completion of the main part of the conversion for this vehicle. As the grill and bonnet modifications are the most important features which characterise the difference between the 1941 Chevy and the earlier model I want it's probably an apt moment to pause and take stock...


Well, I'm quite satisfied - anyway, it looks OK (hopefully)! But there are now a whole new list of jobs to do as I must start to think about modifications to the 1943 Ford cab to make it look more 'Chevy' now! Not least of these is to match the bonnet line, as the panel line on the cab is higher up the door. And then there is the small matter of the windshield.

However, there is another reason I am stopping at this point. What I would like to do is have my bonnet work duplicated in resin if possible as I want a couple of these trucks in my collection and I really don't fancy having to do all that scratch work again!

I'm sending the bonnet up to my brother and asking him if it can be copied as a one-piece in resin and if so I will get him to knock off a couple of duplicates. I will keep the conversion as a sort of 'master' should I need any 1939 Chevys again in the future.

In the meantime I shall turn my attention to the chassis and the remainder of the work that needs to be done with the PST part of this model to make the 'stake truck' cargo bed.

Cheap Ford-Werke V3000 (Pt.13) - Revisited


It been a long, long time since I updated this project but as I am in the midst of a flurry of truck projects at the moment I thought it was time I revisit this conversion.

In short, this model has been on ice while I got some much needed experience with my painting and weathering techniques. And I'm very glad I did this as I have learned a lot over the past year and I do feel that if I had completed the painting last year then it wouldn't be quite as competent a job as I feel I can do now.

What I intend to do with this model is to wait a little longer until I have my current 1939 Chevrolet truck conversion to the same stage as this V3000 and then pin wash and weather them together.


Monday 17 March 2014

Quick Ford V3000S (G198TS) - Part 2

Moving quickly on...

I made a very rudimentary chassis for my Valiant V3000. Just some plasticard bits and pieces, but enough to add some simplified detail to support the new wheels.


The model is now 'free standing' and I can mount it on one of my own bases to match the rest of my models from my Finnish collection. Having done this I need to finish tidying up the truck's excavated cab...


A bit rough and ready but the best I can do without removing the cab's roof to excavate the bottom half of the interior. And I don't want to do that because by the time I have drilled and shaved away and interior and carefully re-attached the roof I might as well have done this all using my 'cut & shut' method - and we want to try and make this a quick project, right?

However, even at this stage it's a bit of an improvement over the original solid one-piece model...


By adding some additional detail - like a transparent windshield - and with some careful painting I should be able to create a simple model that shouldn't look too out of place next to my plastic multi-part kits. Hopefully!

Next: Basic paint coat and cab interior detailing.

Sunday 16 March 2014

Quick Ford V3000S (G198TS)

Picture source: Engines of the Wehrmacht
You know I said that I wouldn't mind trying to paint up one of my five new Valiant resin V3000s 'as is'? Well, I lied...Sort of.

To be honest I just couldn't resist tinkering about with one to make the one-piece model more like the multi-part kit that I am using for my Finnish army project. But, having said that, I still wanted to do this with as little fuss and as quickly as I could...So some sort of compromise was in order.

What I decided to do - in essence - is as little as I possibly could to complete this model. Just enough to satisfy my aesthetic sensibilities, but without the normal fiddly and time-consuming alterations that typify my normal conversions. So without further ado, let's get going...

1. Let's get rid of that one-piece integral chassis and base...


What I have in mind is to replace the one-piece wheels with  as set of wheels made from one of my kits. In the same way that Moonlite Modelwerkes makes it's resin trucks...

Moonlite Modelwerkes makes their wargaming models 'free standing' by
adding a set of resin wheels to the 'one-piece' body.
This free-standing method - as opposed to making the model integral to it's resin base - at least makes the model look a little more like normal multi-piece kits.

2. I next alter the other characteristic feature of one-piece 'ready to roll' wargaming resin trucks - the filled in cab and solid windshields...


This is a wee bit tricky and demands a steady hand. Basically I carefully drill out the solid insides of the cab using my trusty Dremmel. I will have to finish off the edges of the windows by hand to make sure I don't destroy any of the nice detail and - of course - I cannot excavate all of interior. What I will end up with is an empty area at the top half of the cab, from the dashboard to the roof.

However, if I paint the interior a dark colour and then dirty up the windows I intend to fit then you perhaps won't notice the interior isn't all there. Hopefully.

OK, moving on quickly - I next will make my new chassi and add the wheels.

Saturday 15 March 2014

1939 Chevrolet conversion - Part 4

Just a quicky as this work is still 'in progress'. I have finally begun work on the front grill, with the side panels in place and any gaps filled I am applying the strips of plasticard that will make up the grill slats...


I'm applying these little strips - the smallest styrene square rods I can get off the shelf locally - by eye, using the back of my scalpel blade to 'measure' a uniform gap between the strips. However, I have already worked out that I will fall short with the number of slats that I can fit on my grill.

The real grill has 17 slats in it, at best - using my method and materials - I'll get about 13. So if any rivet counters are reading this...Sorry! :)

Very interesting shot of a '39 Chevy in Finnish use. Unfortunately I will have
to simplify my detail and just go for 'the look' of a '39 grill instead. But I like
the use of gas masks - perhaps as makeshift 'black out' cowles.
[Picture source: SA-kuva.]
Still, I am quite happy - it certainly seems to be developing the right 'feel' and is starting to look like the right Chevy now. The big question now is whether having finished the grill and bonnet details completely I should send this piece up to my brother to be duplicated in resin? Will I want any more '39 Chevy trucks? Copies of this piece may well be worth having 'just in case'.

Hmmmm.

Friday 14 March 2014

YaG-6 conversion candidate?

Serendipity is a funny old thing. There was me searching for a completely unrelated bit of information and quite by chance I came across a vehicle that may very well fulfil my need for a YaG-6 lookalike!


The photo above shows Finnish troops examining the two YaG-6 trucks which they captured from the Soviets during World War 2. I want to include one of these powerful trucks in my Finnish army collection as a prime mover for my heavy artillery company.

However, as I mentioned in my first post on this subject, while there are a couple of 1/72 kits of this vehicle out there they are prohibitively expensive - even if you can locate them. So I started thinking about converting an existing readily available truck of similar size and shape.

My first thought was the British Scammell, but today I came across what I feel is a better match (meaning I have less to convert). I discovered a WW2 Italian truck called the Lancia 3RO 
6.5-ton, 4x2, Cargo.

Lancia 3RO. Picture source: Engines of the Wehrmacht
Obviously the similarities between the two vehicles are only slight - if you close your eyes a bit - but I feel that the Lancia is a better foundation on which I can start a conversion job.

Now, the good news is that there is a reasonably - if not exactly cheap - 1/72 kit out there of the Lancia and it's a readily available make - Italeri (naturally enough).


The kit isn't - unfortunately - the 3RO Cargo, but a SPG version called the Autocannone 3 RO with a mounted AA gun. Still, I can easily scratch build a flat-bed with drop sides to mount on the back in place of the gun. And at £14 it's a hell of a lot cheaper than the rare resin Yag-6 kits I have come across.

1939 Chevrolet conversion - Part 3

Now that the Milliput grill has dried I can start thinking about working on the details in plasticard. But first there is the small matter of the PST plastic chassis. I need to finish the kit chassis and make some minor adjustments to the front axle area for the new bonnet and wheels to fit in place...


The main work was to re-centre the front axle so that the front wheels fitted correctly under the new mud-guards. This entailed me making a very rudimentary suspension onto which I could rest the axle, but this had to be exactly the right height.

[Note on the PST kit: There were a couple of problems with this kit itself I should mention. First of all, this kit is an amalgum of two sets of sprues; a set of sprues from PST's previous Studebaker US-6/GMC truck kits and a new sprue to combine with these to make it into the 1943 Ford truck. So some of the parts aren't purpose built for this new truck. Secondly, the PST instructions are a bit vague at times and I - in particular - had a hell of a time locating the correct position for the exhaust system. In the end I just had to make a guestimate about the exhaust position.]

I also made a simple engine 'fire wall' to sit between the (imaginary) engine block and the driver's cab. This was actually to support the cab so that it was in a nicely horizontal position so that it joined the new bonnet correctly...


I could now check whether I had, indeed, done all my measurements on the axle and wheels correctly by test fitting the bonnet...Another moment of truth!


Yay! Not a snug fit, but everything looks like they are in the right place even if there are some gaps that need to be filled.

Making the grill and bonnet sides
OK, with the basic 'framework' in place here's how I intend to make the gill and bonnet sides...

What I am going to do is make a shell out of thin plasticard which I will wrap around the grill and bonnet side to level everything up and make a nice flat foundation onto which I can glue the details. This is why I sanded away a recess around the lower bonnet (you can see how the hood is slightly larger than the bonnet beneath it).

So, first of all I have to make a paper template so that I can work out the exact shape of this plasticard 'shell'. Lots of test cutting will ensue until I have the right shape...


Plenty of trial and error here using paper templates. Initially I try and get the curve of the wheel arch right, the little arrow you see is my reference marker which lines up with a line I drew on the top of the mudguard itself. Once this bit is right I will start to sketch in the outline of the bonnet sides - up to where they meet the hood at the top and the cab at the back - and cut these out too.


Here's the first completed paper template (above), I now have to repeat this template for the left side of the bonnet and then join them together at the front by a doing a template for the grill. You'll notice that my panel template has filled the gap between the resin bonnet and the cab nicely.

Once all three templates are done in paper I have to copy the shapes out onto a thin sheet of plasticard and then stick these final panels onto the resin bonnet. Then it's a case of filling any remaining gaps with Milliput and cleaning up the hood before starting on the detail.