Saturday 30 June 2012

Featured work - Erhan's RBT-5 with rockets

I just had to post this picture up as the model is so unusual (I've never heard of this tank before). The RBT-5 with rockets, despite seeming quite an advanced notion for the time, seems to originate before WW2 and was an attempt to boost the range of engagement. I can't find any references about how successful this might have been or whether it was actually used in action.


Erhan has, again, done a very nice job so far (it isn't complete yet) and I can't wait to see the finished model. Follow Erhan's progress over at the MiniAFV blog

Friday 29 June 2012

Shell Hole Scenic's M40 Nimrod - Part 1

Hungarian Nimrod AA Gun
As mentioned in my first post about the Shell Hole Scenic’s Hungarian Nimrod AA tank model I am more impressed with this product than I was with their awful T20. My main criticism of white metal models thus far has been about poor fitting and the surface pitting.

Left: A lovely shot of the Hungarian Nimrod. Source: WWII in Colour

But this model seems to fare better on both accounts. Additionally the level of detailing is quite nice, with additional smaller parts provided to make - what I assess to be - a fairly passable looking Hungarian Nimrod...

Wednesday 27 June 2012

Featured work - Dave's Italeri ISU-122/152s

I've had the Pegasus Hobbies ISU-122/152 twin pack in my stash for a while now, with the intention of making one up as a Finnish example that was captured from the Soviets during the Continuation War. So it was interesting to see a post over on the Plastic Warriors blog showing Italeri's direct equivalent of this quick build set.


It seems a little unusual that two quick build makers cover the exact same subject in the exact same way - providing a 122mm and 152mm ISU option in the same box - and it really makes me want to crack open my Pegasus set to see what, if any, differences there might be between the two.

Check out the rest of Dave's photos of the Italeri versions here: Plastic Warriors - Italeri ISU 122 & 152

--------------------
Follow up -

Came across this really cool post on the MiniAFV blog where Erhan (the author) puts together the Pegasus Hobbies version of this set...


This post is in Turkish guys, but here's the Google Translated link: Pegasus Hobbies 1/72 "ISU 122 & 152 brothers"(Erhan Atalay) Page 1

I hope my Pegasus ISU-152 turns out this good!

Sunday 24 June 2012

Featured work - Erhan's Mirage Hobby 1/72 OT-130/2 Chemical Tank

Over at MiniAFV there is a very interesting model, it's the flame thrower version of the venerable T-26 Soviet tank. I recently saw this tank in the Finnish war movie 'The Winter War' ('Talvisota') and so it was great to see this lovely little model featured in-depth on this terrific blog.

Source: MiniAFV Blog
Of course, this is very relevant to my current project - WW2 Finnish Army - as the Finns were quite dependant to the T-26 (in either it's original Vicker's 6 tonne form or captured Soviet variant). Even as late as 1944 the Finnish Armoured Division included T-26s, and despite being obviously obsolete they did see action against the Germans during the Laplap War (1944-45) where the small size of the tank was an actual advantage.>

I don't know much about the flame thrower version - or 'chemical tank' as the Soviets called it - though I know that the Finns captures some of these and used them against their former owners.

Erhan's model is very nice and his posts about the build really give you a good impression of what the Mirrage Hobby model is like (very good as it tuns out). However, one criticism I have is that the Finnish decals are incorrect, the blue Hakenkreuz (Finnish swastika) should actually be black - though the Finnish Air Force of the time did use the blue version.

Check out the excellent photos of this model at the MiniAFV post.

Saturday 23 June 2012

What the posty brought - Shellhole's Nimrod

Ohhh, look what the posty just popped through my letter box (it arrived with a very hefty thud)! It's the Shellhole Scenic's Hungarian Nimrod AA tank.

I couldn't resist posting up a quick snapshot of the parts (note that I partially assembled the turret) and while not wanting to pre-empt my in-depth review I have to say I am quite impressed...


I've still got a bit of a nagging resistance to white metal as a material for modelling though and despite this model being obviously better quality that Shellhole's earlier T20 (which I was scathing about) there is still some pitting in the surfaces. This may be my opportunity (or excuse) to buy and experiment with another product I have been curious about called 'Mr. Surfacer', which I believe can help smooth out uneven or damaged model surfaces.

But I'm not being negative, I'm actually quite happy with some of the nice detail that is already apparent on this model. (I should start getting the review together over this coming week.)

Note on scale: Basically I've no idea - this could be 20mm or 1/72, I can't find any drawings or dimension of the real tank online to make an accurate assessment. Hopefully I will know more by the time I do my review.

Featured work - Steve's Panzer WIPs

It's great to look at smart finished models, all decorated and weathered and photographed expertly, but I especially enjoy seeing works in progress. As a novice it's really useful to see how other modellers go about putting together or paint a kit, if only to confirm that I am 'doing it right' myself!

Over at the Regeln des Krieges blog Steve (the author) has posted up this terrific photo or a brace of Armourfast Panzer III/IVs going through his camo painting process. It looks like he hand paints the camo - rather than spraying which I have started to do - and I have to say he looks to have a very steady and expert brush hand!


As a graphic designer I actually like this clean flat painted stage, though as a modeller it's what he does next - during the pin washing and weathering - that's probably more exciting.

Check out his blog as there's loads of really interesting things to see - including some wonderful buildings: Regeln des Krieges - Keeping wargames simple!

Friday 22 June 2012

Planning a Finnish War Game Army - Part 3

Finnish soldiers with Panzerfausts in Tali-Ihantala. Destroyed T-34s. Source: Wikipedia
Here's my first attempt at a comprehensive army list, very loosely based on the Rapid Fire! rules. Obviously this isn't a 'legal' army - there aren't any Finnish Continuation War supplements for me to draw upon - but I tried to be logical.


FINNISH ARMY 1944

INFANTRY DIVISION

1. REGIMENTAL HQ

> 6 figures (3 on 2 bases), staff car and radio truck
> Recce & Pioneer Platoon - 10 figures (5 Pioneers), 1 Panzerfaust

----------

2. INFANTRY BATTALION (39 FIGURES)

> HQ - CO & 5 figures

> 1st Company: 8 figures, 1 with Panzerfaust
> 2nd Coy: ditto
> 3rd Coy: ditto
> 4th (Heavy) Company: 9 figures, 2 x Maxims, 1 x 81mm mortar

---------

3. SUPPORT COMPANIES (17 FIGURES)

> Gun Company:
- 3 figs, 152mm gun, 1 artillery tractor
- 3 figs, 76mm gun, 1 light truck

> Anti-Tank Company:
- 4 figs, 2 Panzerschreckes (2 figs per base)
- 6 figs, 2 x 45mm AT guns and 2 light artillery tractors

-----------

4. BATTALIONS (2) DIVISIONAL ARTILLERY REGIMENT

> HQ - 3 figs (1 base) & 1 radio truck

> 1st Battalion:
- 8 gunners (4 per gun)
- 2 x 105mm howitzers
- 2 x medium trucks
- 2 fig OP team

> 2nd Battalion: As above

----------

5. ANTI-TANK COMPANY:

> 2 x Pak40 AT guns (8 gunners & 2 medium trucks)

-------------------------------

Finnish StuG III Ausf. Gs. Source Wikipedia

ARMOURED DIVISION

1. REGIMENTAL HQ

> Command Tank (T-50)
> 20mm Flak 38 and light truck
> Sd. Kfz. 9 "FAMO" Recovery vehicle

----------

2. RECCE COMPANY ('Panssariautojoukkue')

> 2 x BAF-B (BA-6) Armoured cars

----------

3. HEAVY TANK COMPANY

> T-34/85
> T-34/76

----------

4. HEAVY TANK COMPANY

> T-34/85
> T-34/76

----------

5. ANTI-TANK COMPANY

> 2 x StuG III
> 1 x ISU-122

----------

6. SP ANTI-AIRCRAFT COMPANY

> 2 x Landsverk Anti II AA-tank

----------

...I still have a LOT of work to do on this! Particularly on the Armoured Division.

Thursday 21 June 2012

Shell Hole Scenics Hungarian Nimrod

Above: L-62 Landsverk Anti II anti-aircraft tank from Anti-aircraft
Museum, Tuusula, Finland. Source: Wikipedia


You ever done that really embarrassing storming out of a house after cross words thing only to discover you have left your car keys or jacket behind and then had to timidly creep back in to retrieve them? Well this is kinda like that...

In my post about the Shell Hole Scenics T-20 artillery tractor I was hugely critical about the quality of their white metal kit and vowed I wouldn't buy another of their models...Er, well...

I mentioned in my Finnish Army post - Planning a Finnish war game army Part 2 - that I was stumped as to where to lay my hands on a  model of the Landsverk Anti II AA-tank. Well, Steve from the excellent Society of Gentleman Gamers forum got in touch and pointed me towards - you guessed it - Shell Hole Scenics! Bum!

Shell Hole Scenics sell the Hungarian Nimrod, which was a license built copy of the Swedish Luftvärnskanonvagn L-62 Anti II tank. This Swedish 40mm AA tank was also the basis of the Finnish Landsverk, and - as much as it pains me to admit it - the photo of this model on the web site kinda looks OK (and at £8.50 it is definitely the right price).

Photo: Shell Hole Scenics
However, Steve let me have a face saving get out clause (should I really want one). He also passed me a picture of a resin and white metal Nimrod made by S&S models. I think the S&S model is under a tenner too.

Oh how I hate to eat my own words, but I am tempted to buy the Shell Hole Scenics version - the tracks look better than the S&S one...

Above: Photo of the S&S Nimrod, made and painted by Søren Juul for

Wednesday 20 June 2012

WW2 Finnish infantry figures - Part 2

Well, I got the shading done on my first artillery crew. As only my second attempt at painting 1/72 figures I found this quite hard and I clearly have a lot to learn, particularly about painting realistic looking faces.


The uniforms were quite straight forward really, over the base coats I laid down a thin wash of a slightly darker colour to bing out the folds and shaded areas. This was followed by a light pin wash to get into those deep areas and to define the layers in the clothing.

Finally, I gently dry brushed a the highlights. I did have to touch up areas I was unhappy with as I went along and I also re-did wash areas as needed because these seem to dry lighter than they were when wet. Metal areas were touched over with a graphite pencil.


As I said, I found doing the skin and faces the hardest part and I haven't developed a system for doing these areas yet. I will have to do some research to find if there are any easy to follow tutorials online for doing these bits.

Still, first figure set done and ready to matt varnish and then add to my 105mm howitzer base unit.

Edit: Oh incidentally - Finnish artillery crews had a red collar patches (infantry was green) but I'm really not quite ready to paint this sort of small detail yet so I skipped them.

Next: Taking the lessons I learned from this group forward and making my artillery observation team.

Tuesday 19 June 2012

Zvezda German Reconnaissance Team 1939-1942 review

Part of my Finnish WW2 war game army - under the Rapid Fire! rules - is a two figure OP team for each artillery howitzer. I was wondering how I would modify my PSC figures to make a realistic looking observation team when I happened across a nice little set from Zvezda that seemed to fit the bill.

Zvezda's German Reconnaissance Team 1939-1942  is a four figure set that includes two prone observers, one crouching radio operator and one crouching map reader. The figures are multipart models which allows for some very realistic and interesting poses.

They are made out of a hard plastic which is quite easy to clean up with a fine file, though there is no flash and seams are neat and light. Though I have to say that some of the joins are a little ill-fitting and will have to be filled with putty.

The detail is very nice and the faces are quite expressive, though some detail is missing where Zvezda feels that that detail would escape close examination (for example, on the chest when arms partially cover it). But, as mentioned, it is the quality of the poses that makes these figures stand out.


While you do only get four figures (for £2.99) this group is, of course, modelled in some quite specialist  poses, ones that you won't normally get in some of the larger box sets from the likes of Revell or Airfix. At least not in this level of quality.

Which brings me to the figures stature when compared to other makes. They are, of course, larger than Airfix figures but a good match for Revell. They are smaller (thinner) than the chunky PSC figures though, which is a bit of a problem for me as I want to use these along side my PSC 'Finns'.

This really is a wonderful set, despite some of the vague detail in the uniforms and the badly fitting joints, the realism of the very dynamic poses makes up for this. My particular favourite is the guy making notes on the map, though the radio operator is also excellent.


If, like me, you are on the look out for a forward artillery observation team, or a general reconnaissance set of German figures, then these are well worth the very affordable cost.

Highly recommended.


Above: A nice touch is that Zvezda includes two sets of bases. One large base so you can include all the figures on one mini-diorama and also four individual smaller bases should you wish to use them separately.


Next: Turning these Germans into PSC compatible Finns.

Monday 18 June 2012

Planning a Finnish war game army - Part 2

Finnish Army wish list

While I am still developing my complete army list - based loosely on the Rapid Fire! rule-set - it is becoming apparent that I will have to buy a plethora of new items to populate the ranks of my Finnish formations. I will be posting up my draft army list in the next post in this series, but in the meantime this post is a little 'note to myself' about some of the models I need to add to the next shopping list.

So, starting from the top...

1. Regimental HQ

- ACE GAZ-M1 'Emka' Soviet Staff Car
- PST PARM-1 (GAZ AA) field repair truck (for modification to radio truck)

2. HQ Support Company

- PST 1/72 D-1 152mm Howitzer with ZIS-42 Half-track
- Military Wheels GAZ-AA light truck (to tow 76mm gun)


3. Divisional Artillery

- PST PARM-1 (GAZ AA) field repair truck (for modification to radio truck)
- Pegasus Hobbies German Army Trucks set (to tow 105mm howitzers)*

4. Anti-Tank Company

- Pegasus Hobbies German Army Trucks set (to tow Pak40 AT guns)*


* I will be modifying these trucks to represent more common makes used by Finnish Army, such as Volvo, Ford and Citroen.

5. Armoured Division

Division HQ:
- PST 1/72 KV-1E Heavy Tank
- Pegasus Hobbies BA-6 Armored Car set

1st Coy.  Light Tank Company:
- 2 x Mirage Hobby T-26 Finland-45 Light Tank
- 2 x Mirage Hobby T-26C Model 1939 Light Tank


4th Coy. 'Panssariautojoukkue' Armoured Car Company
- Pegasus Hobbies BA-6 Armored Car set

6. Anti-Aircraft Batteries

- Military Wheels GAZ AA and Flak 38 Finnish


---
Aside from the above I realize I will probably need a second set of the PSC Russian Infantry (Summer Uniform) and the PSC Russian Heavy Weapons set. But even at this stage that's quite a big list, luckily I have already the majority of my artillery and my medium tanks and tank destroyers.

However, one thing that does worry me is that I cannot find a 1/72  Landsverk Anti II AA-tank anywhere, not even in resin! I am having to consider whether this might end up being my first major scratch-build project. (So if you know of one, please leave a message and a link in the comments.)

Sunday 17 June 2012

Shellhole Scenics T-20 review

Above: The SHQ T20 (left) and the Shellhole Scenics T20 (right).

In an earlier post - Keeping things in proportion - I discussed my purchase of a SHQ white metal T20 Komsomolets light artillery tractor. Although I felt it was slightly under sized for 1/72 it is a nice little - if simple - model, but I wanted to see if I could do better. So I took a look at another T-20 by a company called Shellhole Scenics.

Their T-20 was the right price for a war game piece - £5.50 (plus postage) - and as I wanted a few of these vehicles for my Finnish light artillery I thought I could save myself some money. But, as usual, it turns out that you get what you pay for.

Above: This view illustrates the difference in quality between the SHQ (left) and Shellhole T20 very well. Notice the very badly pitted and indistinct MG mantlet and the poor fit of the chassis to the track units. In fact the Shellhole T20 only vaguely resembles the actual T20 Komsomolets Armoured Tractor.

I've been tinkering with the Shellhole Scenics T-20 for a few days now, but I'll be honest - I don't think I can get this model to an acceptable standard without stripping back much of the detail and virtually re-building the model again. It is definitely inferior to the SHQ version, which is just 50p more.

There are a few problems with this model but the primary dissatisfaction, from my point of view, is the material itself - I just don't think I'm a fan of white metal, it just seems too volatile a medium.

Above: The Shellhole Scenics T20 has just 5 components, all of which are somewhat ill-fitting. Some details have been completely neglected, for example there is no MG included.

There are skilled experts in this medium that can produce delicate and sharply detailed models, but Shellhole Scenics are not in this category it seems. Their T20 is pitted and ragged and although I expect a little cleaning up to do the poor quality of this moulding renders it virtually unsalvageable without a large amount of work. But then why would you when SHQ has done a better job for just a bit more money?

Interestingly, if you look further up the cost scale then you find the exquisite MMS T20 - £9.95 plus postage - though you will have to consider if such a cost is acceptable when building an army where you may want a clutch of these models. For me, at this time, the SHQ model represents the right balance of cost and quality (but things may change as my modelling and painting skills improve).

Above: MMS shows how it should be done, but this level of detail comes at a price.
Photo: MMS Models - Comsomolyets Artillery Tractor Ref: 022

In any case the Shellhole Scenics T20 does not meet even my modest standards. I cannot recommend this model, even if you are on a budget.

Photos of the real thing - for comparison - can be found on these pages: http://www.andreaslarka.net/lighttanks.html

Next: My final choice of T20 for my army.

Saturday 16 June 2012

Planning a Finnish war game army - Part 1

While I've been making a few initial models - just to experiment with the idea of making an army - the need to formally settle on what that whole army might look like hasn't been a big issue. Indeed, as this is my first ever attempt to build a small army for war gaming I not only don't expect to get it right first time but I'm not even sure that I actually intend to utilize this army for an actual game. I simply look at this project as an extended model making project and as a learning tool.

Above: A quite spectacular shot of a Late-War German Army for the Rapid Fire 2 ruleset by 'Big P' from Kildare, Ireland. You can see this amazing collection in detail on the Dakka Dakka forum.

That said I do want to collect the models for it that adhere to some sort of historical and game rule parameters so that the army has some sort of cohesion and authentic relevance. This series of posts is about how I am going about planning my little army, the research I am doing whilst planning it and my choice of the game rules on which I will be basing it's elements and construction.
Da Rulz - the framework for the collection
I've been busily winding my way through the miriade of web sites that have published information about WW2 scale model war gaming, boy are there a lot of different rules out there!

Though my job is made a little easier in that I do have some simple criteria for choosing said rules. Any rules I use - as a complete ignoramus to what table top war gaming is about - have to be:
  • Simple to understand
  • Flexible enough to allow for a small army
  • Be well supported by a friendly community
  • Support 20mm - 1/72 scale models
To cut a long story short, two game rules caught my eye as I have wandered about the internet - Flames of War and Rapid Fire!

Now, Flames of War (FoW) is actually intended for 15mm figures and models and while I have read that you can 'scale' it's rules for use with 20mm> models the real reason I mention it as a desirable rule set is because of it's huge community base and support. Had I gone about this whole thing a different way and chosen the rules first and then the model scale to go with them chances are that I may have picked FoW as the ideal rules for me. (Upmost in my mind are the many videos - official and unofficial - available on YouTube which clearly explain how the game works. As a visual person rather than a book person when it comes to learning new things this feature is very attractive to me.)

However, for straight 20mm> play I have determined that Rapid Fire! (RF!) shares a lot of the same kind of support net that FoW and it also seems to broadly address the rest of my basic criteria. Plus, I have been so very lucky to make the acquaintance of a fantastic chap - Bob Peyton - who is not only an excellent modeller but is a veteran war gamer who has a lot of experience playing with the RF! ruleset.

If I have one piece of advice for others in my situation - just starting out - it is that having access to a local guru or club which plays the ruleset that you are interested in is of prime importance if you want to avoid making what could end up being costly mistakes (in money and wasted time). Plus having other mad bods like yourself to talk to is part of the fun AND - of course - you need someone to play against.

The army - what, where and when
OK, I actually chose what army I was modelling before I chose my ruleset, but as with everything I do learning things by doing them the wrong way does at least make a project challenging!

I picked a World War 2 Finnish army for several reasons. First of all it's a novel subject, not everyone has hear of Finland's struggle during WW2, and because I hate running with the pack it makes a change from the huge amount of people that seem to thing that only the big four armies of WW2 are worth doing - those being Germany, America, Britain and The Soviet Union (that's Russia for those of you who do 'history lite').

When you enter this hobby - via the modelling side door or straight through the main war gaming entrance - you soon become aware that there is a rather imbalanced interest in the Germans. But even in the wider sense of the war it still amazes me that so many people are not aware that the term 'world war' was not just an acknowledgment of the geographic span of the conflagration.

Nations such as Hungary, Romania, Bulgaria, Yugoslavia, Finland, Thailand, San Marino and Iraq just do not seem to register with the popular understanding of what the 'bad guys' were in the popular consciousness and if you tell anyone that a Brazillian army fought along side the Allies in Italy then you can see the person's brain melting! But these protagonists are just scratching the surface.

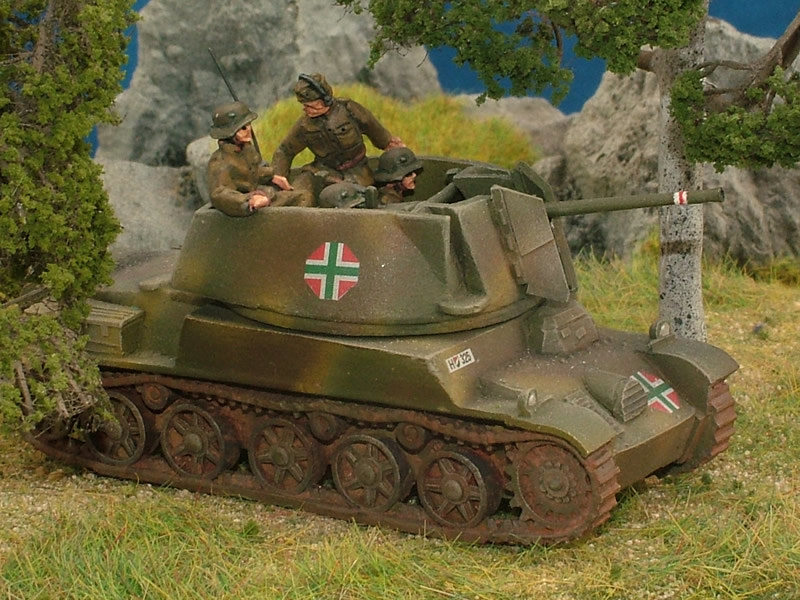
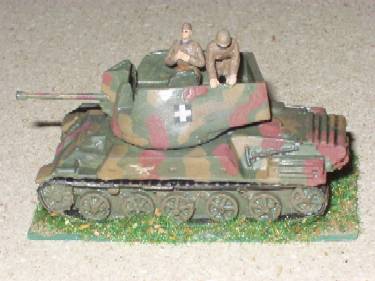
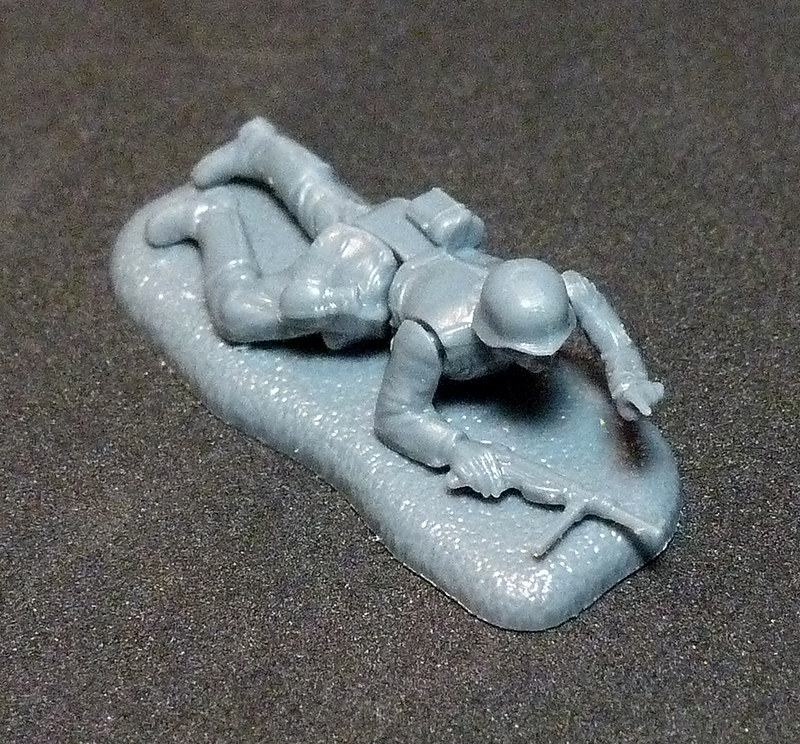
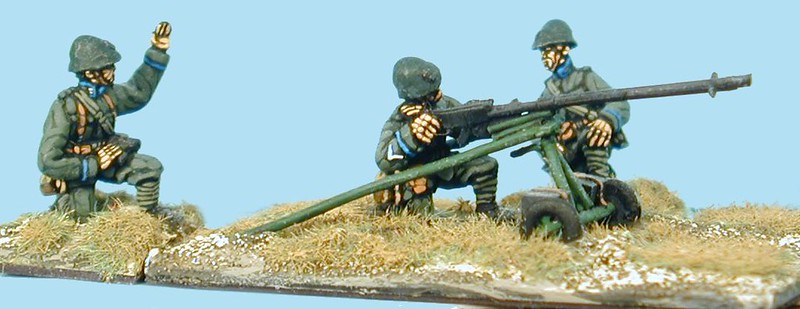
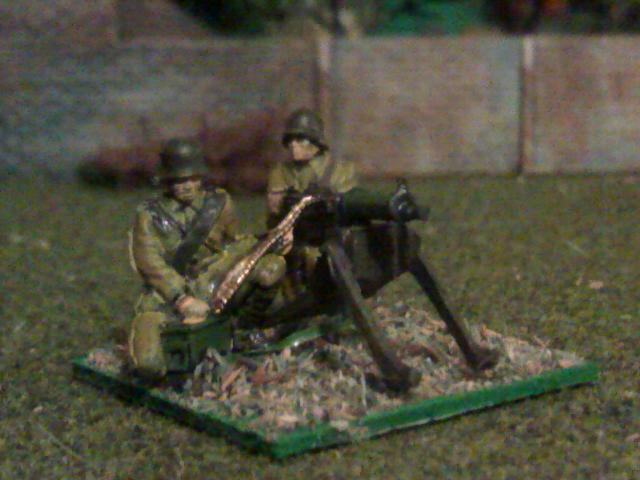
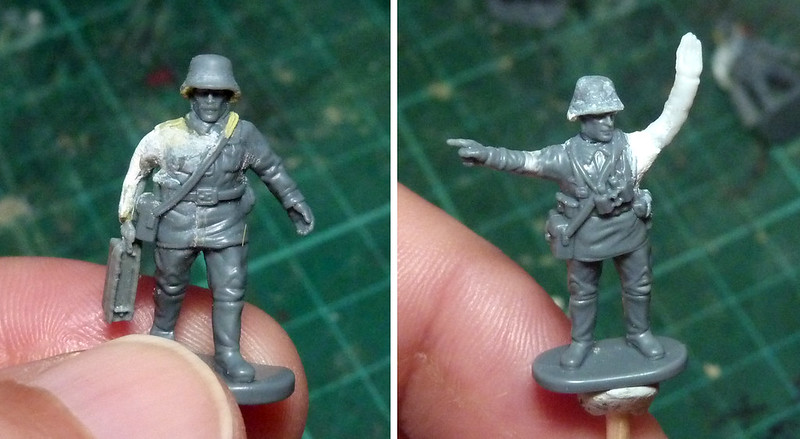
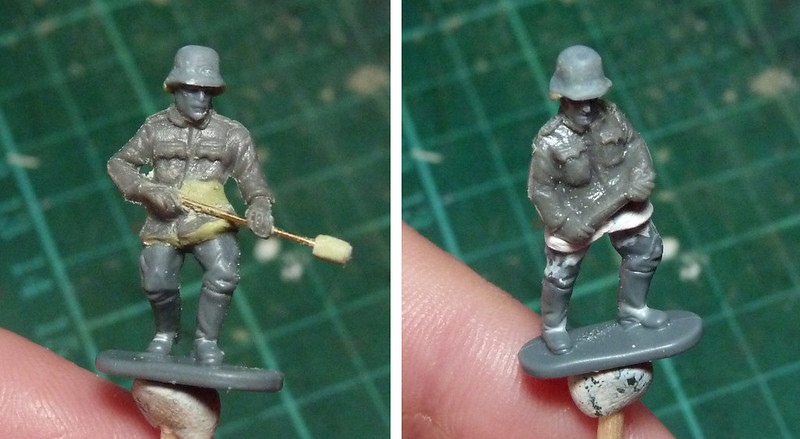
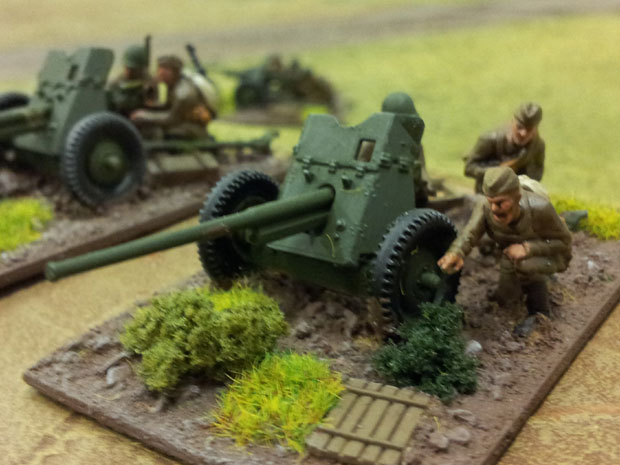
Above: Here a DUTCH infantry crew man Solothum 20mm A/T Rifle circa 1940. You are thinking 'Come on! The Dutch lasted 2 minutes'? Well,  in actual fact the Dutch took a high toll of the German invaders and (not a lot of people know this) it was probably due to the stiff Dutch resistance that the Germans were not able to commence their planned invasion of Britain! (Figures by SHQ.)

That said, when it comes to modelling or war gaming picking a nation that is obscure simply for the sake of it can lead to problems, the main of which is that model manufacturers naturally tend to produce what models and figures that will sell and the demand for, for example, a WW2 'Free Indian' army isn't huge!

And so...I based my choice of a Finnish army on the fact it was just different enough, but not so different that there is no model support out there for it. In fact, the Finnish role in WW2 seems to be something of theme which is growing in popularity, and indeed FoW has created a special set of rules for them as well a a nice series of 15mm figures and vehicles.

Next: The nitty-gritty of designing a WW2 Finnish Army (it isn't all about snow)!

Friday 15 June 2012

Featured work - Soviet offensives!

I think it's terrific that around the Internet there are lots of Soviet offensives being planned or under-way.

Here are two items which are equally wonderful examples of some of the wonderful war gamers that are out there and their ingenuity and creativeness. First up is Gunbird's fantastic Soviet decoy gun project...

Photo source: Gunbird

His series of posts - on the '20mm and then some...' blog - describes how he has gone about making these lovely items. They are really impressive and I can just imagine what spectacular props they will make for a war game table (I wonder if there are any special rules for their use?).

Next we have the amazing 'Krisis at Kharkov' game report which is being serialized over at the Megablitz and more blog. As a beginner I am awestruck by the level of detail and planning that is going into this game, not to mention just how much fun it looks!

Above: 'One of the surprises on day one was this impressive Romanian air raid.  Photo by Jim Wallman.' Source: Megablitz and more blog

I am staggered by the expertise which goes into planning and executing such projects - and these are just two of the many Soviet themed war game projects that are going at the moment.

A big thank you to either blog author for giving us such interesting posts, photo rights are - of course - theirs (so let me know guys if you mind my including them on my blog). Links to these blogs are as follows:

> '20mm and then some...' (Gunbird)
> 'Megablitz and more' ( Tom Gow)

Thursday 14 June 2012

Featured work - Paul's Hungarians

Co-incidentally Paul from the Plastic Warriors blog has posted up his WW2 Hungarian infantry. Not only is this interesting because - like my Finns - they represent another of Germany's allies but Paul has also chosen Revell's 1/72 WW1 Germans as a base for his Hungarian figures.

Left: Revell's WW1 German Maxim group - one of the very nice items in this set.

These soft plastic Revell Germans are exactly the same set that I bought with the intension of converting them into WW2 Finns. As it turned out - and despite the fact they are very nice figures - I changed my mind and went for PSC's hard plastic Russians instead. Isn't it interesting how we both considered the same solution to a slightly different problem?

Paul's Hungarians look smashing though and mix well with other makes like ESCI and Airfix and he has chosen some really nice poses. Take a look at some of the terrific photos over at Plastic Warriors.

Wednesday 13 June 2012

WW2 Finnish infantry figures - Part 1

I'd already started to work out how to model Finnish army figures while I experimented with my gun emplacement project (artillery crew). Luckily I have managed to get hold of a varied selection of reference material to help me plan out how to model these figures.

Primarily I rely on Osprey's 'Finland at War 1939-45' (Elite 141) and the web site 'The Military Tunics of Finland 1918-1945', both of which give you a good idea of the uniforms and equipment in use by the Finns throughout the war, summer and winter. In my case I was particularly interested in the summer dress of around 1944.

In my previous post on making the artillery crew (see link above) I talked about the choices I had for the figures and how I plumped primarily for the Plastic Soldier Company Russians in Summer Dress, which I mixed in with some parts from other figures for variety. I am now at the stage where I am painting my first four test figures.

Painting Finnish uniforms
I chose to prime my figures using Humbrols aerosol primer, which just happens to be the perfect light grey for the Finnish army's summer tunics. I know some people prefer to base coat figure using black, but I tried that and it played havoc with my eye-sight! My much prefer grey as an undercoat.

Then I painted the basic coats of the major items using the following Vajello acrylics:
  • Helmet (basically German) - German Grey (995)
  • Tunic - I bought Vajello's Medium Sea Grey (870) but this was exactly the same as the Humbrol primer anyway!
  • Trousers - A 50/50 mix of the two above paints - though I am told Grey Green (866) is similar
  • Boots - Flat black, but I may do some in the distinctive Finnish square-toed style which were tan/brown.
Accessories will need some browns and tans for webbing items before I start the shading. Where I substitute the German helmet for the Czech or Italian helmet I will paint these a dark olive drab and the soft M36 field cap (similar to the Germans') is the same light grey as the tunic.


Monday 11 June 2012

Plastic Soldier Company 1/72 Sherman M4A1

I haven't bought this relatively new model from PSC yet but my curiosity was piqued when I saw it in my local store. It fills a gap in the market for quick build Shermans as both Italeri and Armourfast have concentrated on the box shaped versions of this tank rather than the sleeker cast hull M4A1 version that PSC have produced.

From a British point of view this is an important tank because it was this version that was among the first to be deployed by them in North Africa in late 1942. But it's also nice that PSC has chosen to do a version that isn't already adequately done as a quick build, thus duplicating models already available from Italeri and Armourfast.


The main feature I want to highlight here is that - from the photos - you can see that PSC have chosen to follow the track system that they established with their T-34 models. This is great news as the quality of the tracks currently available to quick build Sherman models are deplorable and widely bemoaned. They use a multi-part system that has the road wheel component enclosed between two separate upper and lower track units.

This means that the PSC Sherman tracks have a passable track tread texture! In this case a T54E1 Chevron steel tread which - ironically - isn't appropriate for the earliest British versions of this tank! The early British Shermans seem to have been equipped with the T41 rectangular rubber treads. Typical!

Likewise the PSC kit comes with the later gun mantlet with extended shield (M34A1) rather than the early narrow shield (M34). Groan! But, other nice features are the commanders hatch, which can be built open or closed and a nice little .50cal and there are some useful extras like spare track and some stowage.

So - in conclusion - a mixed bag. A good attempt at a much needed quick build Sherman, but a pity about the fact that PSC seems to have chosen to standardize some of the parts between this and it's 76mm 'Wet' variant of the tank and thus spoiling some of the early North Affrican MK. II features that would have been nice to have seen on this kit (rubber track shoes and narrow gun mantlet).

Sunday 10 June 2012

Finnish AT guns - Italeri Pak 40 & PSC 45mm AT

1/72 Finnish anti-tank gun models

A crucial part of a mid-late Finnish war gaming army is the anti-tank artillery element. As Finnish armour was very much rag-tag the need for efficient anti-tank weapons was crucial in their defence against a tank heavy nation like the Soviet Union. The Soviet 45mm PstK/38 (Model 1938) and the German PstK/40 (Pak 40) were two of Finlands most important acquisitions, they captured about 700 of the 45mm guns from the Soviets and they purchased about 210 Pak 40s from their (then) German allies.

The models I have chosen to represent this important part of Finnish defences are the Italieri Set 6096 PAK 40 AT Gun with Servants and the Plastic Soldier Company Russian 45mm anti tank gun set...

Friday 8 June 2012

Making a gun emplacement - Part 7

Crew - final choice, final tinkering…

I've taken a bit longer - perhaps too long - to put together this crew, but as this is my first attempt at playing Dr. Frankenstein I guess I was bound to expend a little too much time on these modifications.

First lesson - soft plastic is a pig to work with!

It actually 'frays' if you attempt to sand it making a unholy mess, so neat and careful carving and shaving with a very sharp craft knife is critical to a clean finished figure. Smoothing of uneven bits or filling must then be done with Milliput or similar putty.

The actual mating of spare limbs and heads isn't all that hard, but you have to chose your doner limbs carefully to match the victim…Er, sorry I mean patient! In the case of my figure who is carrying the ammo crate I used a very thin Revell arm and so had to pad it out a lot - in essence rebuild the arm - with putty to match his other arm.
Tip: I add a reinforcing pin - a small piece of metal wire - to each body part in order to fix it securely to the torso.
Above: These PSC Soviets needed new arms to give them relevance within the gun crew. I quite like the crate carrying figure, it's quite a dynamic pose now. Hopefully the painting will hide his shoddy bionic appendage!

The helmets turned out not so bad and I have the technique fairly sorted now and it's quite quick to do. I just have to add the side rivets which are a distinctive feature if the German WW1 helmet. Luckily, for my infantry I will be making the far simpler Czech M1935 'pudding bowl' helmet as well and that's a doddle.

Above: These are the two 'cut & shut' composite figures made from PSC head and legs and HaT bodies. I needed these for the specialist artillery poses, but the HaT head and legs didn't match the PSC figures so had to be changed. It wasn't all that hard, though my filling leaves something to be desired.

It's been a useful experiment and I am now more confident with working with small figures and have a better idea with what can be done. Obviously I cannot lavish this level of modelling on each and every figure in my Finnish army, but the artillery crews are of sufficient specialism that they need quite unique poses - a rifleman is pretty much a rifleman and won't need much more than a change of hat or helmet!

NEXT: Honest - I will paint these next!

Thursday 7 June 2012

Featured work - Regeln des Krieges foam board buildings

Since my last visit to Bob Peyton's amazing war gaming lair I have been interested in having a go at building a foam board building (or two) of my own. But while there is no lack of inspiration, technically I am a bit lost as to how to start and progress with such a project.

Well, I came across the Regeln des Krieges blog today and the author has done a wonderful series of posts about making foam board buildings from scratch!


His village houses are ideal templates for a D-Day project and are just the sort of dwellings you might see in Normandy. I love the way the modeller has kept everything stripped down and simple - almost like a movie set.

If you follow this link you can track back through his process on the blog: Regeln des Krieges (Rules of War) foam board buildings

Wednesday 6 June 2012

Featured work - Scratch built MG bunker

Having enjoyed making my log gun emplacement so much I wondered what else I could do like it for my little Finnish army. So it was really nice to come across a tutorial on making a log MG bunker over at The Command Tent Blog.


I love the way that the roof is removable so you can place - or remove - the weapon and crew of your choice. I guess you can fit in a heavy MG, Panzerschreck team or light AT gun.

It's a really good tutorial and takes you through step by step and I will be giving it a go. Additionally, it's a nice little design which can be modified to make different bunkers - an observation post, AA position or mortar pit springs to mind. Or you could 'go large' and make a command post.

Check the tutorial out here: My Take On A Scratch Built MG Nest by Dan

Tuesday 5 June 2012

Featured work - Mark Freeth's PSC Russian 45mm ATs

Mark Freeth's photos of the Plastic Soldier Company's Soviet light AT gun set interested me as I have bought these little beauties but haven't painted them yet, so I was surfing about looking for some inspiration and tips. As he points out the PSC AT set is good value for money, especially when you consider all the nice little extras you get in the box (like spent & fresh shells, full & empty ammo boxes as well as three different types of barrels).


Mark doesn't do an in-depth review as such but it's his photos which really tell the story about this PSC set.

I'm making up two of these as part of my Finnish AT artillery contingent - for which you need the middle length barrel (47mm M1942 variant?) - as the Finns captured a great many of these and put them to use against their former owners.

Take a look at Mark's photos - you might also be impressed as I was with the gaming table textures - PLASTIC SOLDIER COMPANY AT THE W.H.C.

Monday 4 June 2012

Making a gun emplacement - Part 6

The crew - juggling figures!
OK, having worked out how to do the gun and the emplacement it's time to think about the crew. Long story short - I will have to make my own Finns.

Above: A starting point. From left to right - Revell WW1 officer, HaT Austrian officer, Starlet's Finnish officer and PSC Soviet officer. You can see just how much 1/72 figures vary in stature. The PSC figures are the most chunky but - importantly - unike the other three makes they are made of hard plastic.

After a lot of head scratching - and a couple of false starts - I have plumped for the Plastic Soldier Company's 1/72 Soviet Infantry in Summer Unifoms as the base for my mock Finns. The three most important criteria that made me chose these PSC figures as a starting point were:
  1. The Finns relied heavily of Soviet type small arms - such as their version of the Mosin-Nagant rifle as well as lots of captured arms like the Degtyarev DP LMG and the famous Finnish Soumi SMG looks reasonably similar to the Soviet PPSh41. An important consideration for the infantry contingent of my army.
  2. The Finns summer uniform is similar to the early war German Army uniform (but in grey) BUT the Finns - like the Soviet infantry - seemed to prefer a spartan webbing arrangement which is at odds with the complicated German webbing patterns (and I didn't want to do too much trimming of small items).
  3. The PSC figures are made in hard plastic. This point is quite important if you intend to be doing a lot of 'cutting and shutting' to make hybrid figures.
Some might argue that I would have been better - or it would have been easier - using early WW2 German infantry instead, but I just felt the Soviet infantry was closer to the light-weight Finnish summer dress and kit.

Above: A work in progress as my PSC Soviets slowly mutate into Finnish artillery crew. There is also a couple of hybrids here where PSC heads and legs have been mated to HaT artillery crew bodies. Figure 2 still has his Soviet M40 helmet.

Modifying - shaving and sanding!
The principal item I have to modify is the Soviet M40 helmets of the PSC figures. The Finns used quite a variety of helmets - ranging from Czech, Italian and Swedish tin lids - but perhaps the most recognisable and widely issued helmet was the WW1 vintage German M1918 'coal scuttle' Stahlhelm.

Tip: If you don't fancy trying to do the German M1918 then just round off the Soviet M40 to make a simple Czech M34 helmet - another type used by the Finns. <Link>

The hard plastic of the PSC models lended itself well to being remoulded to a different shape and I had soon sanded the rounded dome of the M40 into a more squarish shape. All I had to do then was add a tiny bit of Milliput putty to give the back of the new helmet it's distinctive protective shroud.

Above: My rather amateurish attempt at a M1918 Stahlheim helmet. At a distance it does have a 'German' look to it which I hope will be acceptable.

There was some other modifiying to do, mainly the removal of the unique Soviet back sack. The Finns seemed to like to travel light and apparently didn't have use for backpacks with their summer uniform.

There were a few figures with the distinctive Soviet blanket wrapped around the torso which would have been too difficult to remove, so I used some of these figures for spare heads, arms or legs!

Next: The painting.

Edit: I should note that another big consideration here is the main infantry section of my little army! I chose the PSC figures for my arty crew as they would then match my foot-sloggers!

Friday 1 June 2012

Making a gun emplacement - Part 5


While I didn't achieve a finished build in time for the Armourfast Group Build deadline I am still pleased with the way things are going with my LeFH18 gun position. Sorry if I sound a little self-congratulatory but it's nice - and a pleasant surprise - when something you haven't done before doesn't end in complete disaster. This project is actually going as well as I could have hoped - which as a modelling newbie is a happy place to be!


Once again I have used the Citadel scorched summer grass, a nice mixed colour flocking which has some subtle tones of reds and browns in it as well as the light summer green. I've tried to ensure that the tiny stones I carefully placed around the gun pit show though.

Painting the base Pollyfilla 'earth' was pretty straight forward - a mid-coloured base coat of Humbrols' spray buff followed by a wash of a darkened version of Tamiya's Flat Earth followed again by some dry brushing of two tones of lighter mixes of the Flat Earth colour. Really the rough Pollyfilla 'earth' does most of the work by means of it's nice texture.


The logs were a little harder as I have never painted wood before. Again, the base coat was buff to which I applied a dark wash (dark brown) to emphasis the shadow areas. Highlighting was done in two stages with increasingly lighter shades of Tamiya's indispensable Flat Earth and then I touched in some white highlights to try and bring out the grain in my wood skewer 'logs'.


Next: Well I still want to add some more new diorama accessories - like small bushes and brush scrub - and I would like to have a try at adding some moss to the logs!

After that it's back on to finishing of the gun itself with some gentle weathering and then I have the scary bit (for me) which is painting the crew!