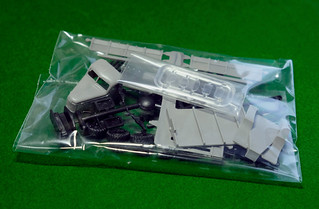
Friday 15 January 2021

1940 US K7 Truck Conversion - Part 3

The K7 Mudguards...
The original American K7 truck had pretty beefy mudguards, but the Soviets soon got rid of those for something simpler (and cheaper to make). So, to turn my current kit back into it's precursor I'll have to make a set of these rounded mudguards to turn the Zil-157 back into the good old American K7!

But, how to do it? 😐

The American IH K7 - I like big mudguards and I cannot lie...

Creating an accurate and complex 3D model is a bit beyond my software skills (for now) so I had to take a sneakier tack. I spent some time trawling through the 3D model repository THINGYVERSE to see if I could find at least something similar looking (these big rounded mudguards were pretty common in the 1940s & 50s). Maybe there was another WW2 truck model I could filtch the mudguards from?

Well, and this is a funny story, it turns out there wasn't a suitable WW2 truck model BUT - for some strange reason - they did have a model of a 1950s Romanian Steagul RoΘ™u SR-101...And you are not going to believe this (I didn't) but the SR-101 was a Romanian copy of the Soviet Zis-150 which was a copy of the US K7! πŸ˜‚

The Romanian Steagul RoΘ™u SR-101 - a copy of a copy of the K7!

Nothing I do is ever straight forward, but until I learn how to use a proper 3D modelling program - so I can create my own models - I'm going to have to settle for these half-assed shenanigans (making very simple models and 'borrowing' shapes/parts from Thingyverse). 

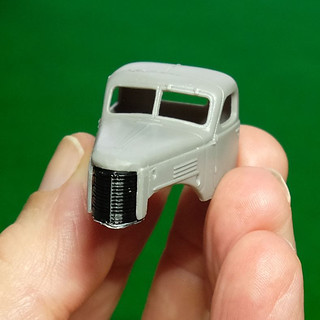
Anyway, I downloaded the 3D model files and opened the one relating to the cab component and happily there were those lovely big mudguards...

The messing around didn't end there though, after I did a quick test print I found that the model was not scaled accurately (typical). So, I had to do some measuring and some quick math and rescaled it so that the mudguards matched the size of my plastic kit's cab.

I printed the model out using the new black PLA I bought and set the quality to 'high' to make sure the rounded mudguards came out as smoothly as possible...

Not bad at all! 😊 Some of the cab was a bit messy (not my printer's fault, it was a crumby model) but fortunately the important bits were fit for purpose. It was now just a case of cutting the mudguards off the 3D model and doing a bit of a Dr. Frankenstein by transplanting them onto my Zil-157's cab.

Out comes my little multitool and a thin circular cutter...

First of all, I roughly cut out a chunk of the trucks bonnet including the mudguard. Then I carefully trim away the unwanted bits of the 3D print until I'm left with just the mudguard component itself.

Once I have a roughed piece I try a bit of preliminary fitting to get an idea how I will go about cleaning up a finished mudguard and how I will attach it to the bonnet...


Not too bad, and the size is spot on. But now I have to neaten this all up and permanently attach the grill and mudguards...Which is where I will leave things for now.

NEXT: (HOPEFULLY) A COMPLETED K7 CAB.

Monday 11 January 2021

1940 US K7 Truck Conversion - Part 2

 Right, having done the research to determine the slight differences between my target model - the US 1940 International Harvester K7 truck - and what I am going to call the 'donor' model - the 1958 Soviet 1958 Zil-157 truck - let's list them...

Above: Left - 1940 K7. Right - 1958 Zil-157.

The main cosmetic differences between the original US truck and the later Soviet copy that I am concerned with relate to the truck's cab.

1. GRILL - The US model had a horizontally orientated set of radiator grill spars, while the Zil-157 had a it's grill spars running vertically.

2. BUMPER (FENDER) - The K7 had a large bumper section integral to the bottom of the engine housing and mud-guards, the Zil-157's bumper was a simplified and separate flat rectangle.

3. ENGINE SIDE VENTS - The K7 had 4 on each side - the 157 had 3.

And my biggest concern...

4. MUD GUARDS - the K7 has nicely rounded mud guards, again the Soviet's simplified these with some easily manufacturer flat arches.

[5. WHEELBASE/CARGO BED - The Zil-75 was classified as a 6x6 truck and as such had three axels with two wheels at the front and for wheels on each of the two rear axels. The International K7 ("Inter"), 2½-ton variant I want to model was a 4x2 truck - two axles, two wheels at front, 4 wheels at the rear, front wheel drive - so I will have to build a new chassis and bed. But this is easy so it's not a major concern. I'll also have to make 1940 era US civilian wheels and tires as the Soviets stuck great big heavy duty off-road tires on the Zil-157.]

On a 1/72 scale model these are enough modifications to make a conversion pass for an original K7 (at least on a war-game quality model).

------------------------------------------------------------------

The Work Begins!
It seems really strange opening a plastic kits after so long an absence, but here we go!


The ICM Zil-157 plastic kit comes - mostly - moulded in grey and the details seems very sharp, with no flash to speak of. Here's a close up of my main project work, the 157 cab...

First of all, I'm looking at the modification of the grill - I'll have to remove the 157's and build a new grill with horizontal spars. Also, another minor difference between the trucks was that the K7 has what I shall call thin 'cheeks' on either side of the engine compartment which were absent on the 157. I'll begin by reintroducing them as this will involve cutting the sides off the compartment - I'll also remove the 157's grill... 

I may need to do some additional modifications to the engine compartment side-panels, but I will only know what I have to do once I move onto doing the new mudguards (job No. 3 on my list).

Now, though, I have to tackle the replacement radiator grill. As I mentioned, the original US K7 had horizontal grill spars - I can either try to scratch build this component myself with good old plasticard or try creating a model in 3D and print it out. 

The above picture show the grill, huge mudguards and the massive bumper unit. You can understand why the Soviets simplified a lot of this in their version, that's a lot of metal and lengthy manufacturing!

I used GOOGLE SKETCHUP to draw a 3D model of the K7 grill (scaled for the 1/72 kit)...


As a3D printing novice, I was very unsure if I could get the detail of my model to render. While it isn't the most complex model all those tiny caps between the grill (0.5mm) had me worried so - for the first time - I set the quality to 'hyper'! What this does is increase the resolution by reducing the size of the layers printed, hopefully resulting to increased detail.

Well, the overall dimensions and fit was good...

But the black PLA material makes it a bit hard to see the detail - were the grill spars printed out properly or just a unrecognisable mess? Let's give the grill a quick spray of primer to see...

Hooray! We have a passable K7 style front grill! Task No. 1 done. Though it'll look better when it's properly cleaned up and fixed in place. πŸ‘πŸ˜€

NEXT: THE MUDGUARDS & BUMPER.

Thursday 7 January 2021

3D (Physical) Modelling, Getting Started

 So much to learn! Arrrrgggg! 😲

...In the background I am slowly learning to 3D model from a software perspective BUT I am also intrigued by the modelling aspects of 3D printing in a more tangible sense. What can I do with a PLA printed model? Can I sand it? Can I paint it? Etc, etc... 

This just shows what a complete noob I am to the world of 3D printing. I don't even completely understand the properties of the print material, whether it be PLA, PLA+, PETG or ABS (to name but a few types of filament). I'm still trying to learn the pros and cons of each, but - in the meantime - I'm sticking to the basic - jack of all trades-ish - PLA!

Anyway, I needed a test project to try out modelling craft skills on a PLA model and I settled on this little chap...

Baby-Groot seemed a good test piece as he'll make a nice birthday present for my daughter (the model is actually a small plant pot for an 'air plant'). 

I was VERY pleased with this model - the first medium sized print I have done and only the third print in total - though the candy red filament that came with the printer to get you started is a little gaudy. I'd really like to get a nice neutral grey or even black PLA for future models.

Anyhoo... The quality of resolution of the print was a lot better than I expected. Yes, close-up you see that characteristic 'stepping' pattern that 3D prints inherently create when building up the layers of filament, but the models I have created so far have been a lot smoother than I expected AND these have been set to print on the 'standard' quality setting and not 'high'! 

To further smooth out the prints I wondered how priming would affect the surface of the model (I also was keep to get a better look at the general detail as the candy red filament kinda hid some of the finer detail as it was so garish)...

Using a grey primer spray certainly  showed just how well the Flashforge Adventurer 3 could render models and the layer of paint did help smooth out some of the print pattern (and it worked very well with the PLA). I did a bit of further research and I discovered that you can buy what's called a filler/primer spray, this is a slightly more gloopy primer paint that can fill in some small imperfections and gives a smoother surface (allegedly). That may be worth a try in the future - hopefully it won't fill in detail so much as to obscure it (we shall see)...

I then added my first paint 'base' layer, naturally I went for a medium 'wood' colour. For some reason this particular brand of paint came out a little glossy - which was annoying - but it does make the 3D model look rather nice.

However, I decided that this mid-colour was still a bit too light and so I ended up experimenting with some darker washes and dry brushing - just as I used to do with my plastic kit models - to darken and give the wood effect some depth...

Pretty good, eh? (If I say so myself.) One thing that concerned me about using a liquid shadow wash - was whether the thinned paint would highlight the 3D stepping pattern by seeping in between the print layers. But, the good news is that while it did the layers of filler and base paint smoothed out these layer lines just enough to not make this such a big deal - you just need to go easy with your wash and dry-brushing.

[Note: You will have noticed that my single Baby-Groot has suddenly become three Baby-Groots! 😁 This was because of a unintended effect of having a 3D printer - as I found that all of a sudden I had family members asking me if I could 'just print me a copy' of whatever it was I was printing! 😐]

I finished the model off by painting in in the eyes and that's fairly much it...

All in all, this has been a very interesting and informative first exercise. Working with a 3D printed model is very similar to how you might go about working with a plastic kit - though you have to be wary of the printing pattern and try to alleviate it - either by sanding and filling the model OR by printing it out at a higher resolution.

Next I will be looking more into creating a scale model print and how I go about creating a tiny recreation of a real world object.

Sunday 3 January 2021

I'm Back! With a New Toy...

 It's fair to say that I lost my mojo for plastic model making. Because of my own OCD I tended to get a bit too obsessive about certain detail and often lost sight of the 'big picture'. This resulted is major 'burn out' and my subsequent near abandonment of this blog... πŸ˜₯

However, a good example of this obsessiveness also happens to be the thing that is getting me to give military model making a second go! πŸ˜€

A long time ago (you know how it goes)... I got very obsessive about collecting a great many vehicles which were historically correct(-ish) for the Finnish 'Continuation War'. Most wargamers - because the game is the main thing - might compromise a bit on technical detail, I've seen a lot of Continuation War games played where the player 'makes do' with equipping the Finns with mainly German equipment with just a smattering of historically correct vehicles. A fair compromises as the Finns did actually use some German equipment.

A typical 'Flames of War' (15mm scale) compromise for a Continuation War
war-game scenarios is the heavy use of German vehicles mixed in with a
smattering of 'captured' Soviet trucks.

But me...Oh boy. No, I had to collect just about every historically correct make and manufacturer of vehicle that the Finns actually used. As usual I went over the top...

Anyway, cutting to the chase - one of my major obsessions was the International Harvester K7 which was bought from the Americans in 1941, just before Finland technically changed sides and became a nominal member of the Axis coalition with Germany.

The K7 was a big truck - at least compared to many of the trucks the Finns had at their disposal - and was used as a 'heavy mover' for their larger artillery pieces. My problem (in 2017) was that there was no 1/72 models of this truck available and I ended up concocting all sorts of convoluted strategies for making one...

My strategy (three years ago) to make a International Harvester K7 was to
convert a 1/72 kit that was available - the ICM Soviet Zil-157. The 157 was
a Soviet copy/modification of the K7 series which they had received from the US.

Above: The Soviet Zis-151. Here we can trace the development back from
the Zil-157 closer to it's American origins...

Above: The Zis-150, hardly distinguishable from the American K-7.

And finally - or rather firstly - we have the original American International
Harvester K-7. It was not actually used in large numbers in American military
use, they preferred famous Studebaker 2.5 ton truck. A few of these US K-7s
did see service with the RAF and, of course, were exported to the Finns.

In the end I discovered that the Soviet Zis-50 truck was a near exact copy of the K7s - which the Soviets received from the US as lend lease - BUT I didn't feel confident about scratch building the modifications needed to 'revert' this design to it's origins...

Now this is hugely ironic... Three years ago when I was still enthusiastically kit making
you could NOT buy a K7 or it's Zis-150 equivalent! Hence my plan to build and
convert a 'look-a-likey' Zis-157 (a later Soviet variant) into a fauz-K7! But now, as
you can see from the picture there IS a Zis-150! Du-uh!

BUT THAT HAS CHANGED...

And here's where I explain what has got me back. Good old Santa has generously supplied me with a lovely gift of a FLASHFORGE ADVENTURER 3 3D PRINTER!

Hopefully this bit of kit will allow me to make a lot of the parts which stopped me from finishing some of my conversions and will allow me to build some of the more complex models that I wanted but couldn't even conceive of scratch building (or didn't want to just make do by using a 20mm scale model and pretend it was 1/72)!

I soon got the printer up and running and have produced a few test prints (just to check it was calibrated correctly and to see what it could do)...

Flashforge Adventurer 3 - First Calibration Print


Though, aside from downloaded third-party models, I have already started learning to create my own 3D models in a piece of software called TINKERCAD. I started simple by making the missing wheels I needed for my K7 conversion...


The above simple model is just a test object where I want to test the ability of my printer to adequately produce quite small detailed objects. This ability is unknown to me as so far my 'small' printed models (see above) have not been that small!

And the results? πŸ‘‰

Printed in 'high' quality mode (only took 11 minutes)! Unfortunately, it's
in that awful candy red PLA that comes with the printer to get you started...

To get the detail in this tiny model to show up I sprayed the wheel with some grey primer. Although I am impressed with the resolution on this 'high' quality there are still tiny 'steps' where the model has been rendered in layers - typical of 3D printing. You can buy an automotive filler/primer which helps smooth out minor indentations, I'll have to try this next. But, really, I am pleased...


I was shocked to see that it had even picked out the tire tread!

This was a very instructive exercise and has given me a lot of useful information which I can now carry forward onto the next stage. I think I can further simplify this design to help it print better and then, of course, I need to print out the full set of wheels. Then I can think about the other K7 parts I need to convert my Zil-157 model kit!

So, my journey begins...Again! 😁