Tuesday 30 April 2013

1/72 Finnish Ford V3000 - quick repair

Everything is a bit of a muddle while I carry out my man cave reorganisation  and bit of the projects I was working on are scattered all over. But in any case, I keep finding little bits and pieces to work on including my Ford V3000 truck which was in need of some repair.

The 'planks' that form the 'stake bed' had deformed, this is in part because of the poor choice of material with which I made the planks - very thin plasticard strips - and also because of the glue I used melted the plastic, weakening it. The strips ended up wrinkling and warping.

Repairing the warped plastic strips by gluing on thin brass ones.
Anyway, while tidying up I came across a sheet of thin brass and I wondered if I could reinforce my plastic planks by gluing thin strips of the brass to the inside. Hopefully the metal strips would straighten out my warped plastic ones.


I couldn't use anything thicker or the planks would then look odd. The brass strips did the job and straightened up the planking again. I'll give these a quick spray and then I can continue with this project once again.

Sunday 28 April 2013

Featured work - Neil Lyall's Gaz 42 & 120mm mortor

Military Wheels Kit 7250 GAZ-42 Truck & 120mm Mortar.

Photography is a wonderful thing, with good photography you can make a mediocre model look good, or with bad photography you can make a good model look mediocre. Neither my model making or my photography is anything to shout about so I really appreciate it when I see a nicely presented diorama.

Neil Lyall - over at the Braillebuilder blog - made a wonderful Gaz 42 truck in 1/72 scale along with an accompanying 120mm mortar. He has done minimal panel lining or highlighting on his models preferring a ultra realistic look helped out by some excellent photography...


I did a double take - the natural lighting helps the realistic effect and his subtle 'dust' layer gives it that weathered look without going over the top.


Neil choses some really nice scenics to create his dioramas and his train sequence is very well put together. And again you have to look twice to realize that it is indeed a scale model.

See more over at the the BrailleBulder blog.

Saturday 27 April 2013

Progressive Engineering Paint Rack

Part of my workspace reorganisation is trying to get proper storage for all the bits and pieces of modelling paraphernalia that are currently spread allover the house. I'm fed up of things not being exactly where I thought they were, so...

Instead of storing my paints in various boxes and draws I want to gather the together and neatly sort them out by means of a rack. I came across the Progressive Engineering laser cut MDF racks and they really look just the sort of thing I want in my new and super organised work space.

The good thing about these racks are that they are specially designed to accomodate specific pots of paint made by the most popular manufacturers. Tamiya, Games Workshop, Vallejo and Foundry sized pots are catered for and racks range from 20 pot to giant 256 pot capacity!


The racks come 'flat pack' but they go together very easily and are quite sturdy once constructed. The MDF itself is heat sealed which happens to produce a very attractive finish. I guess you could spray the racks any colour you want if you happen to want to match the racks with your decor!


The components are held together with steel nuts and screws and they come with rubber 'feet' and everything appears very well thought out and good quality. The particular rack I purchased can also be linked together in modular fashion using a magnet system - which can be purchased separately - so you can join together racks made for different brands of paint pots.

Down side? Well, I guess that might be the price - my 20 pot Vallejo rack set me back £15 (plus postage)! But what you are really paying for is the satisfaction of having your collection of paints stored and presented in a very attractive and uniform system, you have to decide whether that is worth shelling out for. I happen to like the 'everything in it's place' sense of satisfaction that is gotten from such tidy purpose built storage.


You can see the full range of Progressive Engineering racks by visiting their web store: http://www.progeng.co.uk/paint-racks#!__paint-racks

Thursday 25 April 2013

Erm what next?

Having been a bit too embroiled in my man cave refurbishment I have sort of lost the thread of what I had planned. Plus I have now 'tidied' away a lot of the work I had on my makeshift work tray and it will take me a while to remind myself exactly where things are and what I was going to do with them!

I suppose this is one of the unavoidable side-effects of a big rearrangement of ones work space.

Anyway, until such time as I have everything back where I want it I am going to do a couple of wee filler projects. The first of these will be a long shelved Soviet project I was working on before I became interested in all things Finnish - my Armourfast T-34/85 'accurization' project.


Here I take a bog standard Armourfast 'quick build' kit and add bits and pieces to make it look - hopefully - more like a more expensive kit. Why? Er, because I like the challenge. :)

You can see how this project had progressed (until it was parked) here: Armourfast T-34/85 build

Tuesday 23 April 2013

Man cave progress - station 2, spray paint corner!

Having finished my computer workstation section of my 'L' shaped desks I am now moving onto the first of my modelling areas - or rather the last bit in the modelling process, if you see what I mean. This is my spray paint corner...


There's still things to do. I want to raise the spray booth up a bit but I have discovered that I have a lot of spare space. So this may end up being my painting area, which is logical when you consider that the window is just above this section.

Hmmmm, think...

Sunday 21 April 2013

Making a war game (small) base

A basic skill (forgive the pun), I have dabbled with making bases before but these have been one-offs and I have never had to consider creating a constant format which I could replicate again and again. Why is this important? Because I am building a war game army and I want all the bases to look like they are part of a specific landscape.

As I am looking at bases for war game vehicles I want to keep the dimensions
pretty tight. Here I cut a base which only extends 5mm larger than my
example vehicle.
What sparked my interest in a pre-made product for making mud was an article over at the MiniAFV blog which looked at Tamiya's Soil Effect diorama texture. Getting your mud from a bottle seems to me to be a great way of ensuring the sort of consistency that I am after.

I am using a similar product to that of Tamiya's, it's Vallejo's Brown Earth texture material and it produces a gritty and red-brown earthy base-layer to which you can add further diorama effects.

Yes, it does look like the contents of a nappy! And it seems to be a bit sloppier
than the Tamiya product that you can see in the MiniAFV article.
Working with the Vallejo product is a messy process as it is quite sloppy. I think I would prefer something a little firmer as I had to wait for it to dry a bit before I could start to create the patterns in the 'mud' that I wanted. Still, the colour is good - if you are after a red clay type mud - and will save time.


While still tacky I sprinkled in some small stones (grit) and also impressed some tyre tracked into the mud. Once dry I will do a spot of dry brushing with a highlight tone to create some depth (I could work into the shadow areas first with a thin wash, we shall see).

Dry brushed with Yellow Ochre oil paint. Er, not that you can tell, but
it does make a nice contrast and picks out the detail.
So...Now to the static grass. I have been using Citadels Glade Grass, which I prefer to the ordinary sprinkle grass. I paint an area with PVA glue and then pour the static grass on, then shake off the excess. I leave gaps for the mud to show through and for decoration I glue some more small stones on randomly.


I finished off the base with some brush grass. I could have done this by buying some hobby brush grass but I decided to do do this more cheaply. I bought a natural hair brush from the local pound store, trimmed off small bunches of this and glued it to the base.


And there you go. I think my technique could be improved but the basic principal is sound. The main thing is that this a fairly quick and easily repeatable for a whole army of bases.

Here is a link to the original MiniAFV article which gave me the idea: How to make a simple base with Tamiya Texture Paint (by Erhan)

Thursday 18 April 2013

Man cave update - Man, he build shelves, ug!

Never mind cave painting, in my mind prehistoric man became 'man' when he first thought that he needed some sort of thing on the cave wall to place his mammoth tusks or conch shells. This was the first shelf, and since then it has been a mark of a man that he takes pride in his installation of such a thing...

OMG! There IS carpet under the muck!
Well, I got my shelf system up OK and now I am starting to re-organize the junk. I need some more shelving of course - when did white Melamine get so expensive by the way? - so I can start clearing down the desks. At the moment I am just re-assembling my spray booth in the corner.

...It's amazing how uneven the wall - and floor - is! Honestly I used a spirit level - that shelf IS level!

So, nearly there. I need to get a Velux blind for the window, the sun shines right in my eyes at this time of year, in the meantime I've pinned a piece of cloth up as a make-shift curtain. Otherwise it's all very comfortable and pleasant.

Next, organising the modelling desk and adding all my tools and paints.

Tuesday 16 April 2013

Kit stash - Moonlite Modelwerkes resin trucks

Yes I said I wasn't spending any more money this month, but this was actually ordered a couple of months back (so there)! I recieved my order for a couple of pre/early WW2 American trucks this week and they are a couple of beauties.

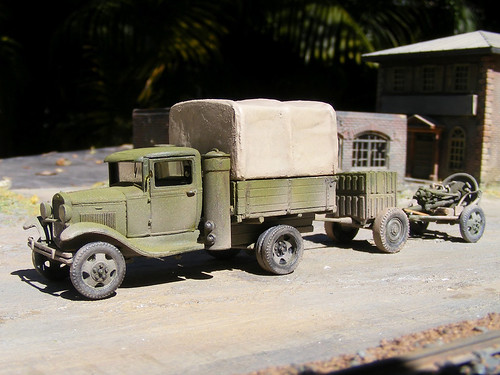
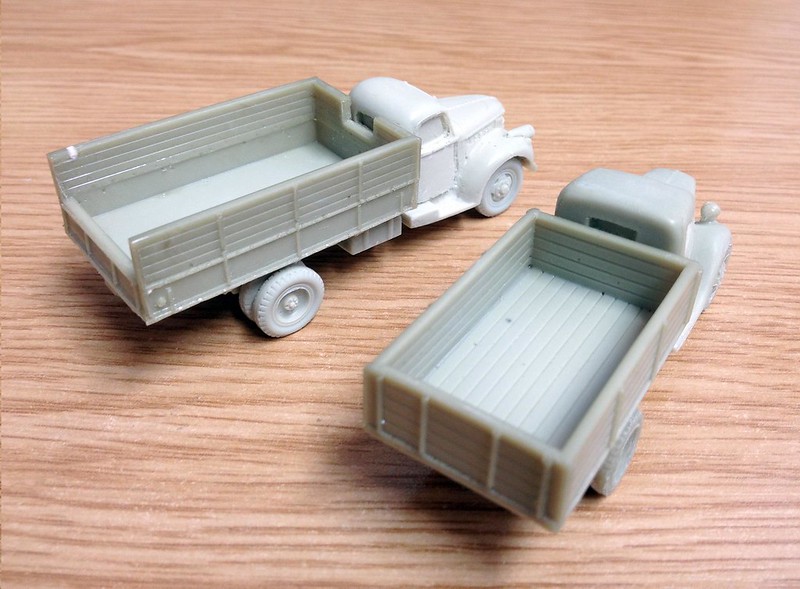
My new Moonlite 1936 Ford and 1941 Chevrolet trucks in 20mm.

This is my very first order from Moonlite Modelwerkes of USA and it really was worth the wait. When you consider that these models are more or less made to order and there is some hand assembly done to them (they aren't the usual war game quality one-piece lumps of resin) then you understand why there is a bit of a delay between order and delivery. Besides that they do seem to be up to their eyeballs in orders, and I can see why.

I opted for a test order of just two truck (and now I wish I had ordered more!), a 1936 Ford V8-51 2½-ton truck and a 1941 Chevrolet MS4403 4x2 1½-ton truck. This was initially for my Finnish WW2 Rapid Fire! army project, but I have changed my mind now.


These models seem to be true 20mm (1/76) and won't fit in with my 1/72 kits - even if I kit bash them like my V3000 conversion. But they are just so nice that I may have to start a brand new project just to utilise them (in the meantime they will go into storage).

As I said these are war game quality ready-made models, with solid filled-in windows, so I would feel obliged to only use them with other similar 'ready to rolls'. Despite this the level of detail on these trucks is excellent, I particularly like the way Moonlite makes a proper chassis and wheel base for it's trucks - unlike the one-piece filled in and supported bases like those of Valiant and other resin war game model makers.


Another excellent feature of Moonlite's models is the rather unusual subjects of some of it's vehicles. Along side the usual military types they include quite a few less well know commercial types - like my 1936 Ford - that were common in early WW2 armies (like The Netherlands, Finland, France, etc).

Well, as you can tell I am very happy with my purchase and will think long and hard about how I can utilise these excellent resin models.

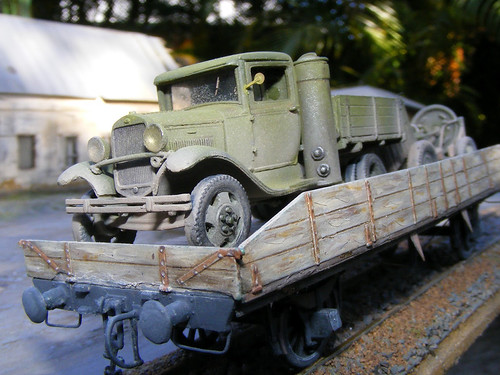
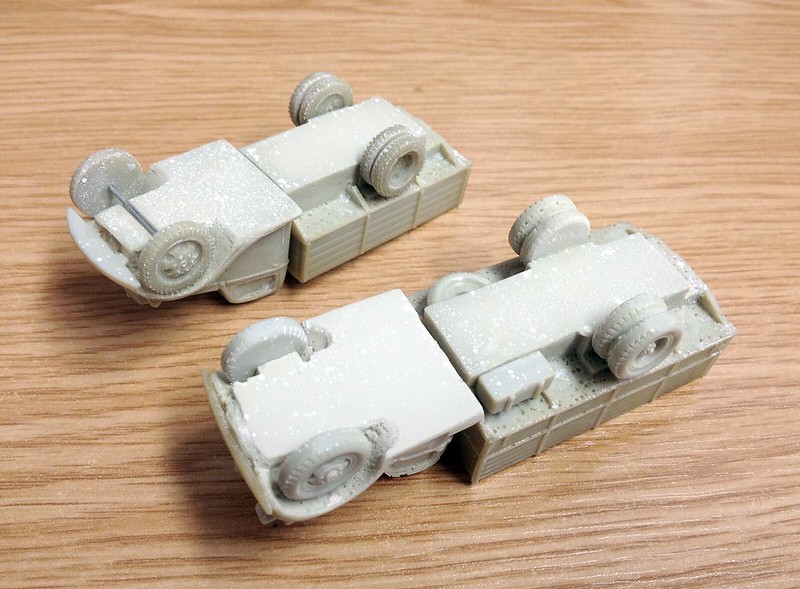
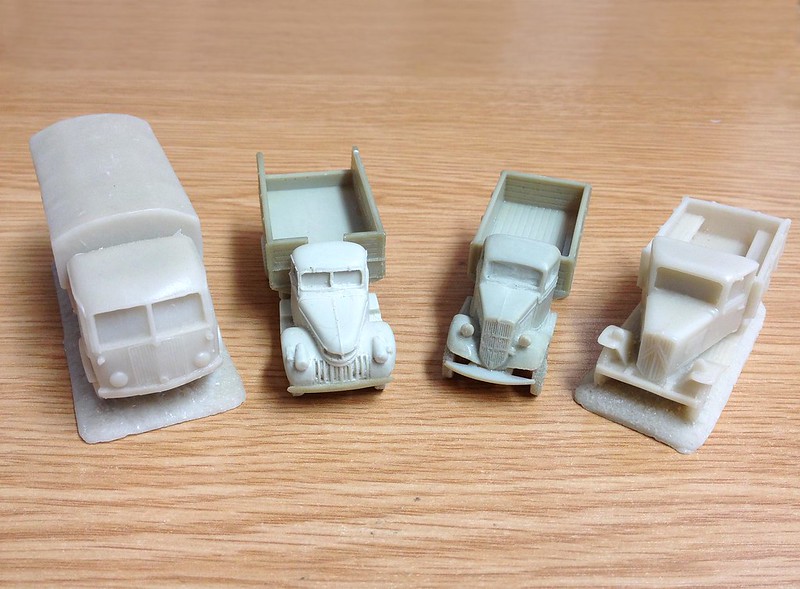
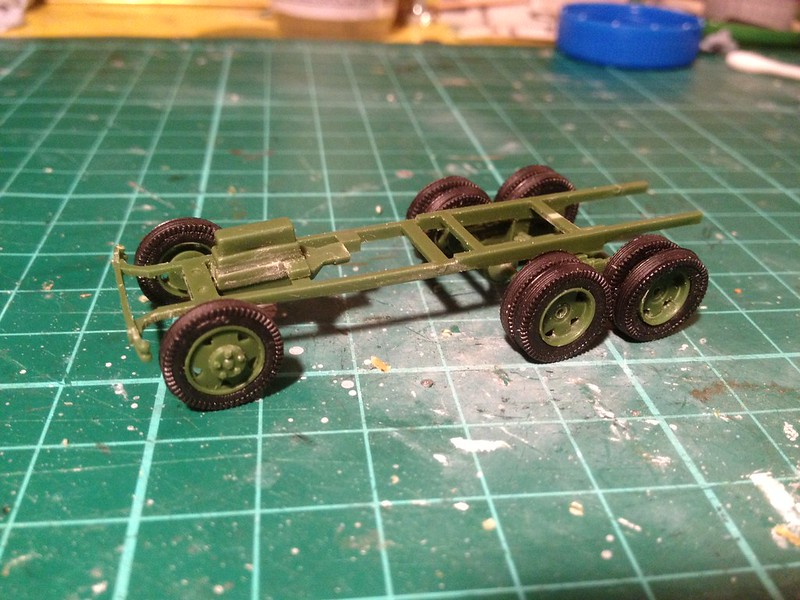
Here I compare my Moonlite models with a couple of resin one-piece models
I purchased from Valliant. Aside from the solid one-piece casting you will
notice a lot more fine detailing on the Moonlite vehicles. The Valliant
trucks are also closer to 1/72 scale.
To order from Moonlite you must email David Reasoner in the States and ask for a catalogue, all sales are conducted by email and you pay by PayPal. Postage was reasonable and David himself was exceptionally helpful:  hmsdiomede@aol.com

As an example, my Chevvy was $12 and my Ford was $10, which once you take the hand assembly and short run nature of these nice little models into consideration is well worth it.

Tuesday 9 April 2013

1/72 Unimodel BA-10 Armoured Car Pt. 4 - Construction complete

Got the last little twiddly bits stuck on (I think that's the technical term for it)! Looks OK I think...


The next phase would be the base coat - Humbrol Light Olive - for this and it's BA-20 partner but I am going to pause here while I finish off my 'man cave'. Once done my new hobby space will have my airbrush booth set-up and I will be able to spray these properly.

So, a short break from armoured cars, let's see what else I have in the unfinished project box.

BA-10 & BA-20 together, this represents my Rapid Fire! rule set Finnish
armoured car company.

Sunday 7 April 2013

1/72 Unimodel BA-10 Armoured Car Pt. 3 - Cab

A nice way to finish off the weekend - some BA-10 relaxation. Once again the UM kit's complexity has turned a small job into a bit of a intense session. I did have to wonder if they really had to have separate parts for some of the features of the cab.


Take the engine hatches, I am pretty sure if I bought the Pegasus BA-6 kit that these hatches would be perfectly well represented by being moulded onto the hull's body itself. But would they be as sharply and delicately as defined as they are in the UM kit?

It is a nice kit - I shall have to get some more UM models.


My only criticism of this stage would be the delicacy of the guns. I would prefer to find a brass turned barrel to replace the 45mm main gun. The machine guns are a little fragile too.

Next: Mating the chassis to the cab and adding the additional hull features. Let's see if I can get the construction phase finished!

Friday 5 April 2013

FLW Friday - for the last time!

OK, it hasn't really been FLW Friday for a while - there has just been a lot of FLW posts! So I have decided to shunt all my FLW stuff over to a separate blog so I can get Kitnoob back on track with Braille Scale models.


There is now a 'FLW Molatero' link on my navigation bar where you can go to catch up on His Royal Highness Prince Vallzack III and his adventures in the world of Funny Little Wars. I will also start transferring all my FLW posts from this blog and populate 'Molatero'.

Tuesday 2 April 2013

Minicraft 1/144 JU-88 Pt. 6 – Decals

Catching up on some parked projects, I popped on the Finnish decals on my JU-88. These are fairly generic and aren't all-together authentic, but they look smart enough.


The canopies are masked out at the moment while I protect the decals with a light spray of varnish. My splinter pattern colours are a bit light, but I am going for a pretty weathered finish for this model anyway.


Next I will start my shading using the same charcoal powder technique I used on my 1/144 Me-109 G-6 as I work through the weathering stage.

Monday 1 April 2013

1/72 Unimodel BA-10 Armoured Car Pt. 2 - Wheels

The UM model is a complex one, amazingly the construction of the wheels, suspension and lower chassis includes about 42 parts! So while it seems I haven't made a lot of progress here it actually feels like I have done a lot.


The rubber tyres are interesting to work with. There was a little flash around the inside which needs to be trimmed off with a sharp knife and then you slip them onto the wheels themselves. The fit is OK but some went on better specific ways round, and these pop off easily and look strange, so these ones were fitted onto the inside of the rear double sets.

There is also the issue of painting the tyres. I decided to not glue the double wheel sets together at this point so I could remove the tyres again and spray the wheels before the final construction. Otherwise getting at the inner wheels to paint them would be tricky.


Everything goes together easily enough though and unlike the ACE BA-20 kit I just constructed the UM model has very helpful pilot holes or makes it obvious where things are supposed to go.

So there we go, aside from being a little skeptical about the merits of real rubber tyres - precisely because of their flexibility - I am enjoying this construction so far. You could say that there is a little too much complexity, but that would depend of whether you are a war-gamer or a display modeller. You are certainly aren't going to be able to bang this one together in a hurry (try the Pegasus BA-6 which only has 23 parts in total if speed of build is your goal)!

Next: The upper chassis and hull.