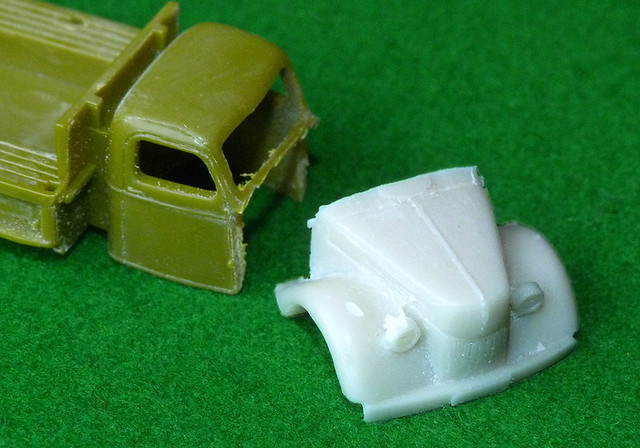
(The whole 'Quick' thing is taking on a rather ironic twist now!)
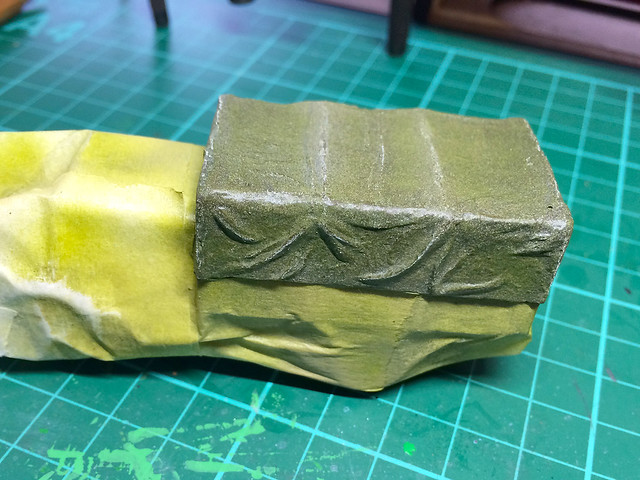
Onto the tilt canvas. It's not one of my favourite parts of the original Valiant resin model as it's a bit shabby and rough, but I did't fancy remaking it.
After masking off the rest of the truck, I started with a couple of light airbrushed base layers light olives...
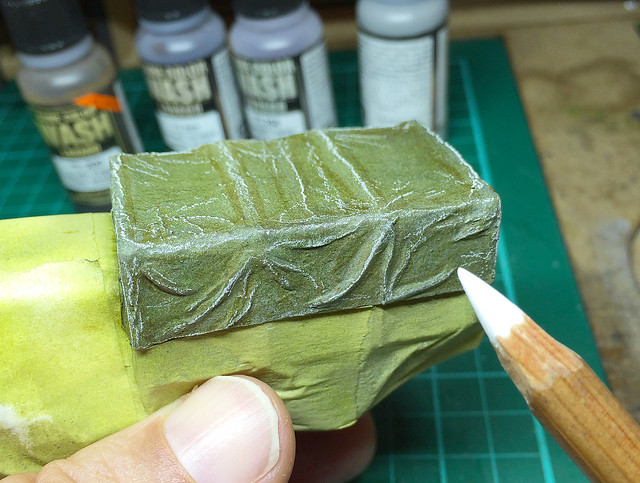
It's been my habit to work into my model canvas tilts using conte crayons and powders for tarpaulin type effect, but this time I thought I'd try something different. I got out my Vallejo Game Color Washes and started laying down thin washes of greens and sepias to emphasise the folds in the canvas...
Once I got the shadow areas done I then started picking out the highlights with conte pencil...
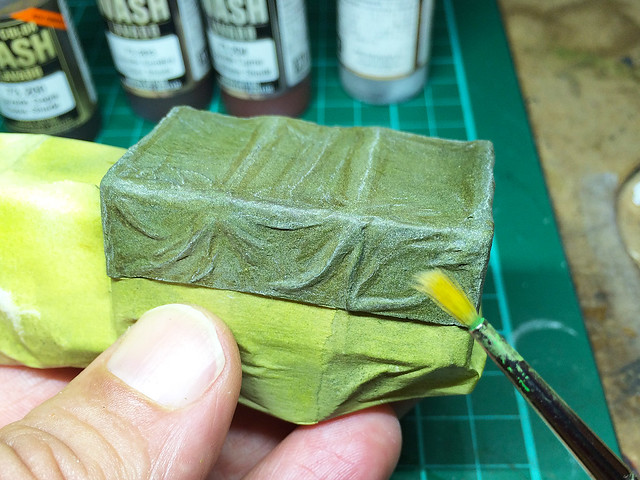
And then I used a soft brush (or a eye makeup foam stick) to blend back the highlight into the shadow areas...
And finally I picked out some of the deeper folds in the material with a darker wash and some inks...
Finally I gave the cover a coat of Humbrol Matt Varnish. Job done and I think the washes turned out not too bad, especially at a distance.
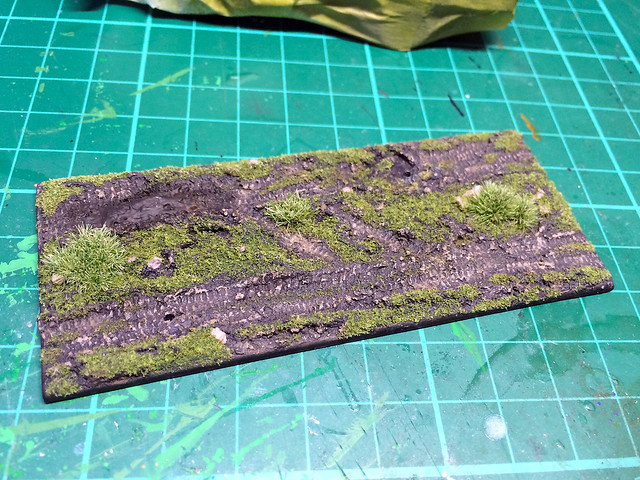
That sorted it's onto the model's base. I've shown my technique for doing this a few times now so I won't go through this again...
Well, that's nearly it. I just have to do some touching up here and there and I want to add a bit more mud to the truck itself before I give the model a final coat of matt varnish.
Diary of a novice scale model maker and his adventures in the wacky world of Braille Scale.
Showing posts with label X-Ref: CON/39Chevy/0314. Show all posts
Tuesday, 6 October 2015
Wednesday, 30 April 2014
Whoo-hoo! Excited about 1939 Chevy bonnet!
Excellent news from my brother today - he's duplicated my '39 Chevrolet bonnet in resin! And it looks very nice too...
I can now finish off my truck conversion. It will be nice to have this particular make of truck for my Finnish army as it appears on so many photos from the period. :)
Wednesday, 26 March 2014
1939 Chevrolet conversion - Part 6
The cargo cage
A characteristic feature of many commercial cargo trucks from the 1930s and 40s is the wooden cargo cage that gave this type of truck it's name - the 'stake truck'. I believe this is an American term and it confused me for a while, until I realised that the 'stake' in question was a wooden one!
The definition of a 'stake truck' is a truck or trailer with a stake body, as for hauling farm animals or feed bags. This type of truck has a planked wooden cargo cage and is generally - but not entirely - a type of truck that is commercial rather than military in nature. Such was the case with the 1939 model Chevrolet 1½ ton truck which was in civilian use in Finland prior to the start of World War 2 but was taken into military use by the Finns who were desperately short of motor transport.
The 1943 Ford '6' kit that I using as a base with which to make my faux-Chevy is not a civilian stake truck so I am having to modify it's cargo bed with some scratch built stakes...
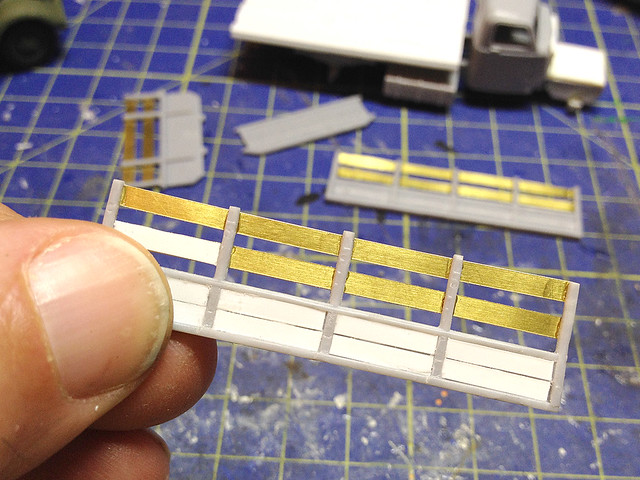
My solution isn't strictly authentic as I decided to use the existing kit's cargo bed walls as a basis for the stake frame. I used some strips of thin brass sheet to make the plank walls for rigidity and then covered them with thin plastic sheet so I could try making a wooden texture.
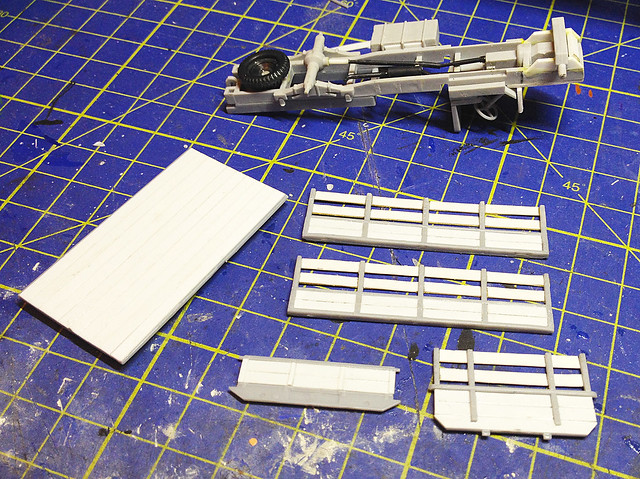
With all the plastic planking done I also laid some plastic strips on the floor of the cargo bed and then it was just a case of gluing all the parts together..
Not too bad! Not brilliant, but I suppose you could say that it's seen a lot of use and so might be quite battered? I'm making the wood texture on the 'planks' by painting on some liquid cement which will melt the plastic just a little, then I will draw on some wood grain patterns with a scalpel.
Lastly I fit the cargo bed onto the chassis. Hopefully it will all look a bit more realistic with a coat of paint!
UPDATE - NOTES ON PST KIT INACCURACIES: When I fitted the cargo bed onto the chassis something seemed wrong and I couldn't figure out what. The cargo bed seemed to be too high off the chassis and there was a noticeable gap between it and the wheels (when they were fitted). I checked reference photos of the 1943 'Ford 6' truck and there was minimal space between the bottom of the cargo bed and the top of the rear tyres. Hmmmm, lots of head scratching ensued (had I put the kit together wrong?)!
As it happens no, I hadn't. But PST had!
I just happened to remember a comment on a review of the PST Ford kit over on the Henk of Holland review site - "...this is a re-working of the [PST] Studebaker US-6/GMC truck kits"!
It turns out that the cargo bed is from the Studebaker kit and sits on the chassis in a completely different way to an actual Ford cargo bed and you have to do some judicious lowering of the bed to make it the right height for the Ford (and my Chevy)! Bloody penny pinching Russian kit manufacturers!
What next?
You may wonder where the wheels and bonnet have gone? They have been sent up to my brother for duplication in resin as I hope to make two of these Chevys for my Finnish collection. So while they are being made I will carry on with converting the truck cab into a Chevy cab.
A characteristic feature of many commercial cargo trucks from the 1930s and 40s is the wooden cargo cage that gave this type of truck it's name - the 'stake truck'. I believe this is an American term and it confused me for a while, until I realised that the 'stake' in question was a wooden one!
![]() |
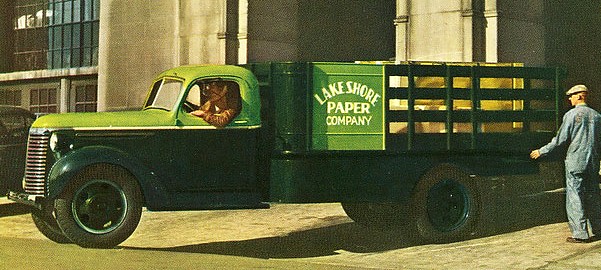
| The 1940 Chevrolet stake truck with advertising panel. Source: Flickr - Alden Jewel |
The 1943 Ford '6' kit that I using as a base with which to make my faux-Chevy is not a civilian stake truck so I am having to modify it's cargo bed with some scratch built stakes...
My solution isn't strictly authentic as I decided to use the existing kit's cargo bed walls as a basis for the stake frame. I used some strips of thin brass sheet to make the plank walls for rigidity and then covered them with thin plastic sheet so I could try making a wooden texture.
With all the plastic planking done I also laid some plastic strips on the floor of the cargo bed and then it was just a case of gluing all the parts together..
Not too bad! Not brilliant, but I suppose you could say that it's seen a lot of use and so might be quite battered? I'm making the wood texture on the 'planks' by painting on some liquid cement which will melt the plastic just a little, then I will draw on some wood grain patterns with a scalpel.
Lastly I fit the cargo bed onto the chassis. Hopefully it will all look a bit more realistic with a coat of paint!
UPDATE - NOTES ON PST KIT INACCURACIES: When I fitted the cargo bed onto the chassis something seemed wrong and I couldn't figure out what. The cargo bed seemed to be too high off the chassis and there was a noticeable gap between it and the wheels (when they were fitted). I checked reference photos of the 1943 'Ford 6' truck and there was minimal space between the bottom of the cargo bed and the top of the rear tyres. Hmmmm, lots of head scratching ensued (had I put the kit together wrong?)!
As it happens no, I hadn't. But PST had!
I just happened to remember a comment on a review of the PST Ford kit over on the Henk of Holland review site - "...this is a re-working of the [PST] Studebaker US-6/GMC truck kits"!
It turns out that the cargo bed is from the Studebaker kit and sits on the chassis in a completely different way to an actual Ford cargo bed and you have to do some judicious lowering of the bed to make it the right height for the Ford (and my Chevy)! Bloody penny pinching Russian kit manufacturers!
What next?
You may wonder where the wheels and bonnet have gone? They have been sent up to my brother for duplication in resin as I hope to make two of these Chevys for my Finnish collection. So while they are being made I will carry on with converting the truck cab into a Chevy cab.
Tuesday, 18 March 2014
1939 Chevrolet conversion - Part 5
Grill and bonnet completed!
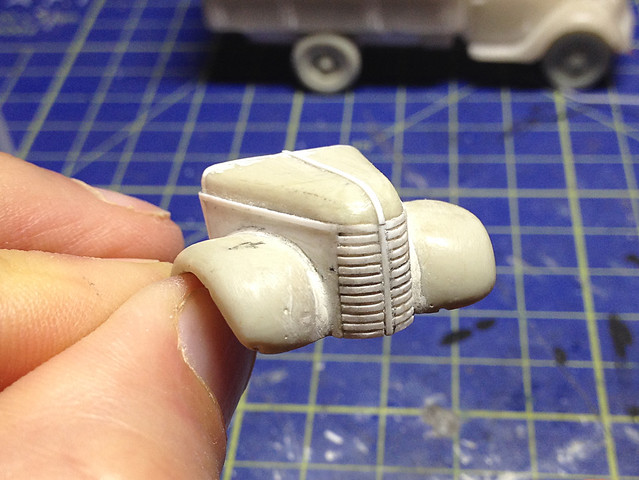
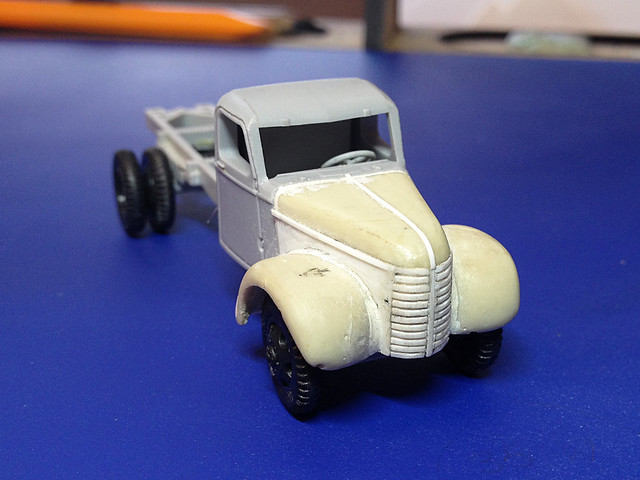
Just a small update, but a significant one, as this marks the completion of the main part of the conversion for this vehicle. As the grill and bonnet modifications are the most important features which characterise the difference between the 1941 Chevy and the earlier model I want it's probably an apt moment to pause and take stock...
Well, I'm quite satisfied - anyway, it looks OK (hopefully)! But there are now a whole new list of jobs to do as I must start to think about modifications to the 1943 Ford cab to make it look more 'Chevy' now! Not least of these is to match the bonnet line, as the panel line on the cab is higher up the door. And then there is the small matter of the windshield.
However, there is another reason I am stopping at this point. What I would like to do is have my bonnet work duplicated in resin if possible as I want a couple of these trucks in my collection and I really don't fancy having to do all that scratch work again!
I'm sending the bonnet up to my brother and asking him if it can be copied as a one-piece in resin and if so I will get him to knock off a couple of duplicates. I will keep the conversion as a sort of 'master' should I need any 1939 Chevys again in the future.
In the meantime I shall turn my attention to the chassis and the remainder of the work that needs to be done with the PST part of this model to make the 'stake truck' cargo bed.
Just a small update, but a significant one, as this marks the completion of the main part of the conversion for this vehicle. As the grill and bonnet modifications are the most important features which characterise the difference between the 1941 Chevy and the earlier model I want it's probably an apt moment to pause and take stock...
Well, I'm quite satisfied - anyway, it looks OK (hopefully)! But there are now a whole new list of jobs to do as I must start to think about modifications to the 1943 Ford cab to make it look more 'Chevy' now! Not least of these is to match the bonnet line, as the panel line on the cab is higher up the door. And then there is the small matter of the windshield.
However, there is another reason I am stopping at this point. What I would like to do is have my bonnet work duplicated in resin if possible as I want a couple of these trucks in my collection and I really don't fancy having to do all that scratch work again!
I'm sending the bonnet up to my brother and asking him if it can be copied as a one-piece in resin and if so I will get him to knock off a couple of duplicates. I will keep the conversion as a sort of 'master' should I need any 1939 Chevys again in the future.
In the meantime I shall turn my attention to the chassis and the remainder of the work that needs to be done with the PST part of this model to make the 'stake truck' cargo bed.
Saturday, 15 March 2014
1939 Chevrolet conversion - Part 4
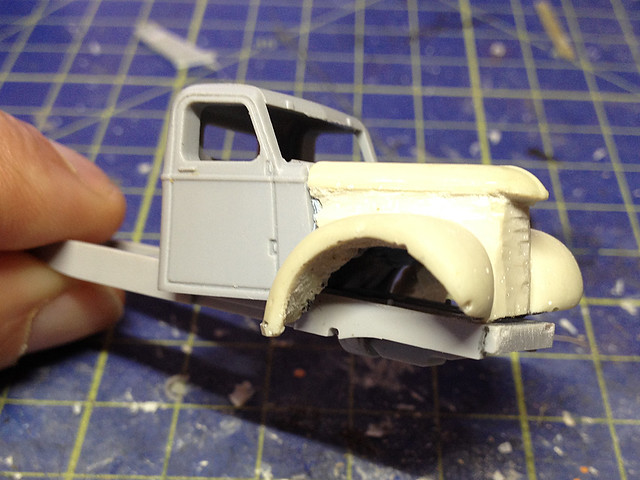
Just a quicky as this work is still 'in progress'. I have finally begun work on the front grill, with the side panels in place and any gaps filled I am applying the strips of plasticard that will make up the grill slats...
I'm applying these little strips - the smallest styrene square rods I can get off the shelf locally - by eye, using the back of my scalpel blade to 'measure' a uniform gap between the strips. However, I have already worked out that I will fall short with the number of slats that I can fit on my grill.
The real grill has 17 slats in it, at best - using my method and materials - I'll get about 13. So if any rivet counters are reading this...Sorry! :)
Still, I am quite happy - it certainly seems to be developing the right 'feel' and is starting to look like the right Chevy now. The big question now is whether having finished the grill and bonnet details completely I should send this piece up to my brother to be duplicated in resin? Will I want any more '39 Chevy trucks? Copies of this piece may well be worth having 'just in case'.
Hmmmm.
I'm applying these little strips - the smallest styrene square rods I can get off the shelf locally - by eye, using the back of my scalpel blade to 'measure' a uniform gap between the strips. However, I have already worked out that I will fall short with the number of slats that I can fit on my grill.
The real grill has 17 slats in it, at best - using my method and materials - I'll get about 13. So if any rivet counters are reading this...Sorry! :)
| Very interesting shot of a '39 Chevy in Finnish use. Unfortunately I will have to simplify my detail and just go for 'the look' of a '39 grill instead. But I like the use of gas masks - perhaps as makeshift 'black out' cowles. [Picture source: SA-kuva.] |
Hmmmm.
Friday, 14 March 2014
1939 Chevrolet conversion - Part 3
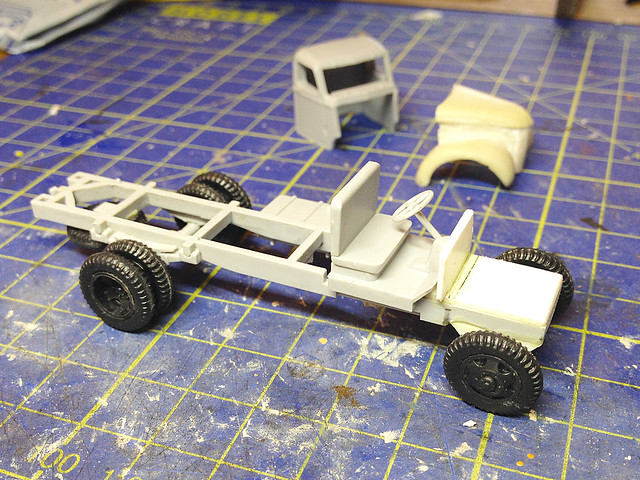
Now that the Milliput grill has dried I can start thinking about working on the details in plasticard. But first there is the small matter of the PST plastic chassis. I need to finish the kit chassis and make some minor adjustments to the front axle area for the new bonnet and wheels to fit in place...
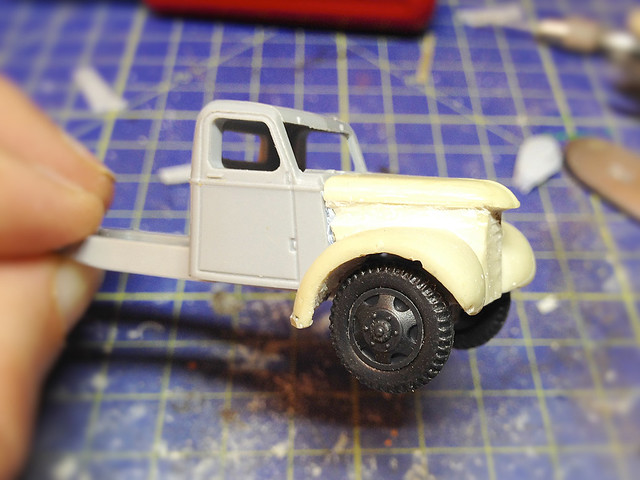
The main work was to re-centre the front axle so that the front wheels fitted correctly under the new mud-guards. This entailed me making a very rudimentary suspension onto which I could rest the axle, but this had to be exactly the right height.
[Note on the PST kit: There were a couple of problems with this kit itself I should mention. First of all, this kit is an amalgum of two sets of sprues; a set of sprues from PST's previous Studebaker US-6/GMC truck kits and a new sprue to combine with these to make it into the 1943 Ford truck. So some of the parts aren't purpose built for this new truck. Secondly, the PST instructions are a bit vague at times and I - in particular - had a hell of a time locating the correct position for the exhaust system. In the end I just had to make a guestimate about the exhaust position.]
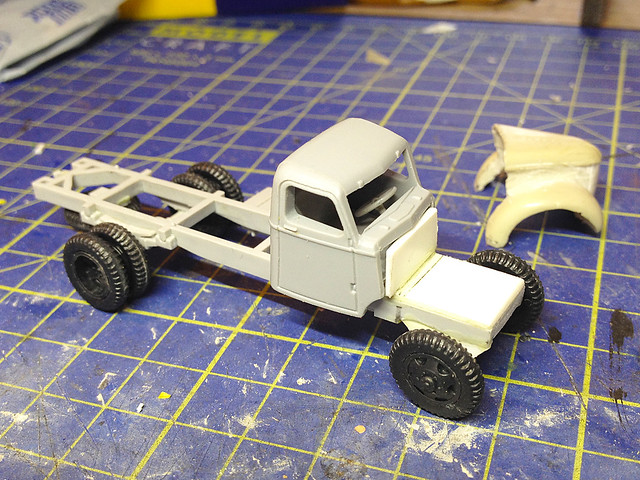
I also made a simple engine 'fire wall' to sit between the (imaginary) engine block and the driver's cab. This was actually to support the cab so that it was in a nicely horizontal position so that it joined the new bonnet correctly...
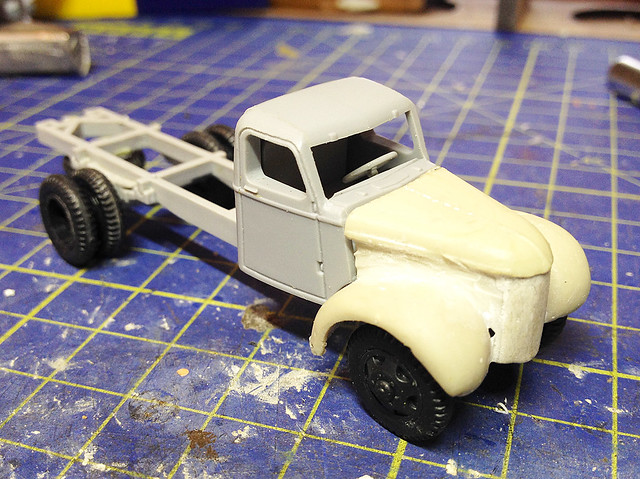
I could now check whether I had, indeed, done all my measurements on the axle and wheels correctly by test fitting the bonnet...Another moment of truth!
Yay! Not a snug fit, but everything looks like they are in the right place even if there are some gaps that need to be filled.
Making the grill and bonnet sides
OK, with the basic 'framework' in place here's how I intend to make the gill and bonnet sides...
What I am going to do is make a shell out of thin plasticard which I will wrap around the grill and bonnet side to level everything up and make a nice flat foundation onto which I can glue the details. This is why I sanded away a recess around the lower bonnet (you can see how the hood is slightly larger than the bonnet beneath it).
So, first of all I have to make a paper template so that I can work out the exact shape of this plasticard 'shell'. Lots of test cutting will ensue until I have the right shape...
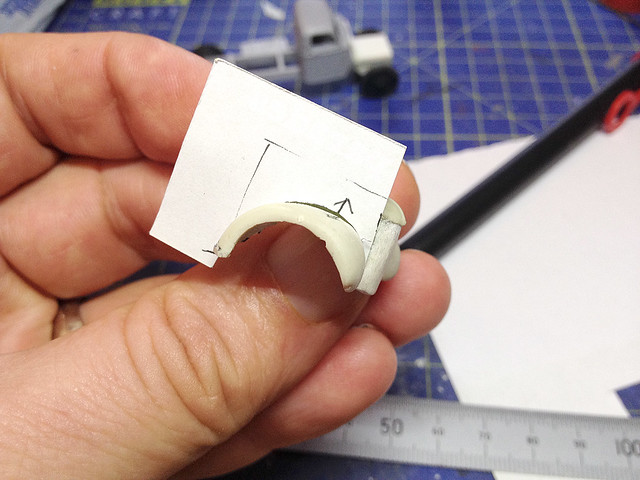
Plenty of trial and error here using paper templates. Initially I try and get the curve of the wheel arch right, the little arrow you see is my reference marker which lines up with a line I drew on the top of the mudguard itself. Once this bit is right I will start to sketch in the outline of the bonnet sides - up to where they meet the hood at the top and the cab at the back - and cut these out too.
Here's the first completed paper template (above), I now have to repeat this template for the left side of the bonnet and then join them together at the front by a doing a template for the grill. You'll notice that my panel template has filled the gap between the resin bonnet and the cab nicely.
Once all three templates are done in paper I have to copy the shapes out onto a thin sheet of plasticard and then stick these final panels onto the resin bonnet. Then it's a case of filling any remaining gaps with Milliput and cleaning up the hood before starting on the detail.
The main work was to re-centre the front axle so that the front wheels fitted correctly under the new mud-guards. This entailed me making a very rudimentary suspension onto which I could rest the axle, but this had to be exactly the right height.
[Note on the PST kit: There were a couple of problems with this kit itself I should mention. First of all, this kit is an amalgum of two sets of sprues; a set of sprues from PST's previous Studebaker US-6/GMC truck kits and a new sprue to combine with these to make it into the 1943 Ford truck. So some of the parts aren't purpose built for this new truck. Secondly, the PST instructions are a bit vague at times and I - in particular - had a hell of a time locating the correct position for the exhaust system. In the end I just had to make a guestimate about the exhaust position.]
I also made a simple engine 'fire wall' to sit between the (imaginary) engine block and the driver's cab. This was actually to support the cab so that it was in a nicely horizontal position so that it joined the new bonnet correctly...
I could now check whether I had, indeed, done all my measurements on the axle and wheels correctly by test fitting the bonnet...Another moment of truth!
Yay! Not a snug fit, but everything looks like they are in the right place even if there are some gaps that need to be filled.
Making the grill and bonnet sides
OK, with the basic 'framework' in place here's how I intend to make the gill and bonnet sides...
What I am going to do is make a shell out of thin plasticard which I will wrap around the grill and bonnet side to level everything up and make a nice flat foundation onto which I can glue the details. This is why I sanded away a recess around the lower bonnet (you can see how the hood is slightly larger than the bonnet beneath it).
So, first of all I have to make a paper template so that I can work out the exact shape of this plasticard 'shell'. Lots of test cutting will ensue until I have the right shape...
Plenty of trial and error here using paper templates. Initially I try and get the curve of the wheel arch right, the little arrow you see is my reference marker which lines up with a line I drew on the top of the mudguard itself. Once this bit is right I will start to sketch in the outline of the bonnet sides - up to where they meet the hood at the top and the cab at the back - and cut these out too.
Here's the first completed paper template (above), I now have to repeat this template for the left side of the bonnet and then join them together at the front by a doing a template for the grill. You'll notice that my panel template has filled the gap between the resin bonnet and the cab nicely.
Once all three templates are done in paper I have to copy the shapes out onto a thin sheet of plasticard and then stick these final panels onto the resin bonnet. Then it's a case of filling any remaining gaps with Milliput and cleaning up the hood before starting on the detail.
Thursday, 13 March 2014
1939 Chevrolet conversion - Part 2
Right...Just before I get onto the main event - making the new grill - I have to backtrack a little as I need to check that the new cab will fit on the PST Ford chassis...
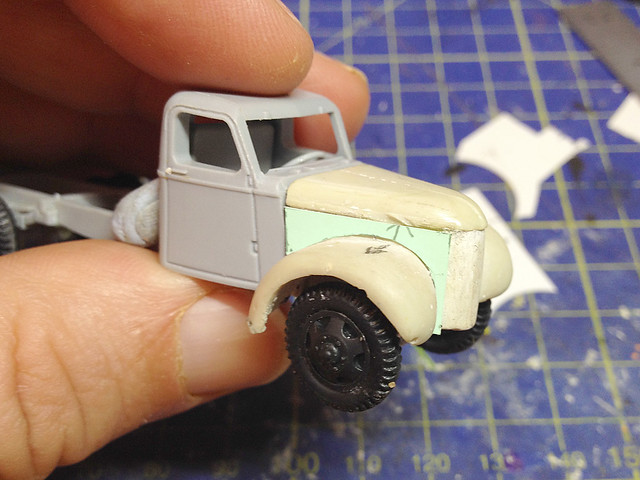
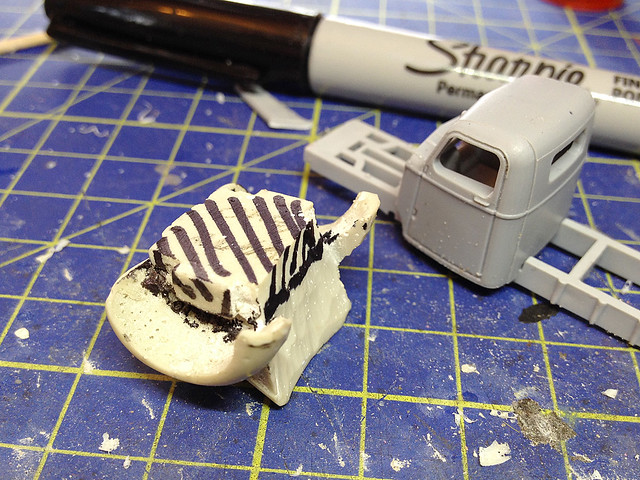
On trying to fit it I found that there was still too much resin under the wheel arches, so this will have to be removed. I marked out what would have to come off with a Sharpie, then it was back to the workbench for some more Dremmeling...
Now, let's try again...
Drat, drat and double drat! OK, so the chassis needs shortening, but this means that the front axle will have to be moved back so that the wheels are still centered within the mud guards. I don't think this will have any knock on effects, so let's try sticking the suspension, axle and front wheels and check that this all works...
Good enough for me! But there's plenty of finishing off and tidying up to do, that can wait until later though. Now I need to start working on the grill. I'll start by building up the basic shape with Milliput...
Now, I am *not* trying to build the actual grill itself out of modelling putty, just create a supporting shape onto which I can make the grill from plasticard strips. You'll notice that I've sanded back the lower bonnet about a millimeter - you can see that the hood itself looks bigger. This is because I need to recess these parts so I can glue a thin sheet of plasticard over them to create the final shape of the 1939 bonnet. (If that makes sense?)
Anyroads, that's all I can do for tonight as I will have to let the Milliput dry now and then I can do any final shaping by sanding it smooth.
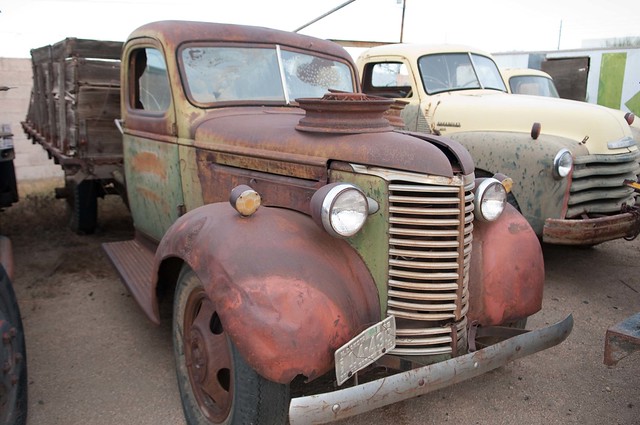
I'll end with a lovely photo of an old '39 Chevy, just to remind myself what I am trying to achieve!
On trying to fit it I found that there was still too much resin under the wheel arches, so this will have to be removed. I marked out what would have to come off with a Sharpie, then it was back to the workbench for some more Dremmeling...
Now, let's try again...
Drat, drat and double drat! OK, so the chassis needs shortening, but this means that the front axle will have to be moved back so that the wheels are still centered within the mud guards. I don't think this will have any knock on effects, so let's try sticking the suspension, axle and front wheels and check that this all works...
Good enough for me! But there's plenty of finishing off and tidying up to do, that can wait until later though. Now I need to start working on the grill. I'll start by building up the basic shape with Milliput...
Now, I am *not* trying to build the actual grill itself out of modelling putty, just create a supporting shape onto which I can make the grill from plasticard strips. You'll notice that I've sanded back the lower bonnet about a millimeter - you can see that the hood itself looks bigger. This is because I need to recess these parts so I can glue a thin sheet of plasticard over them to create the final shape of the 1939 bonnet. (If that makes sense?)
Anyroads, that's all I can do for tonight as I will have to let the Milliput dry now and then I can do any final shaping by sanding it smooth.
I'll end with a lovely photo of an old '39 Chevy, just to remind myself what I am trying to achieve!
Wednesday, 12 March 2014
1939 Chevrolet conversion - Part 2
Before I begin this installment of my truck conversion I have an apology to make. I would like to give my profound apologies to David Reasoner of Moonlite Modelwerkes who created the lovely resin 1941 Chevrolet I am about deflower!
That said...Let's operate!
First thing is to decide where best to make the first incisions...
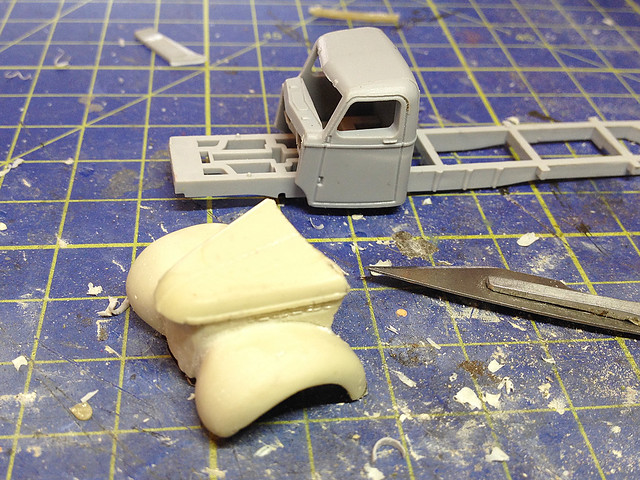
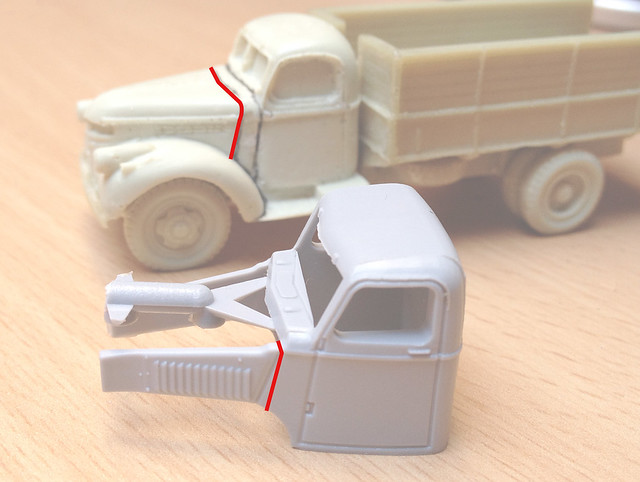
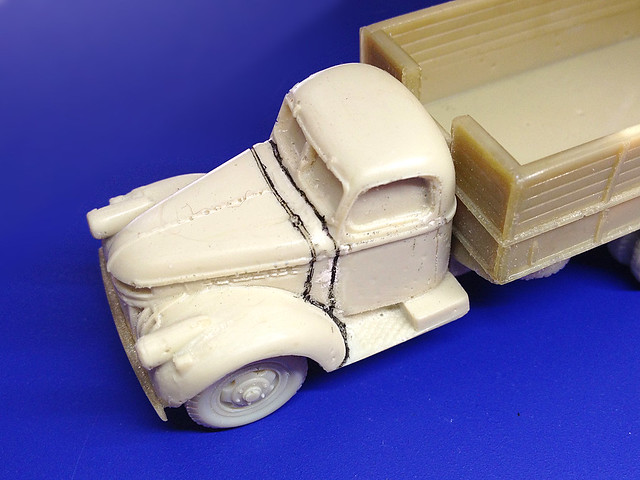
Looking at the two pieces there seems to be an obvious seam where I can re-join the two disparate halves. There is a panel line which runs at the rear of the bonnet (the hood, if you are one of my American friends) and diagonally down the side of to the mud guards (fenders). Like so...
...Nurse, hand me my Dremmel!
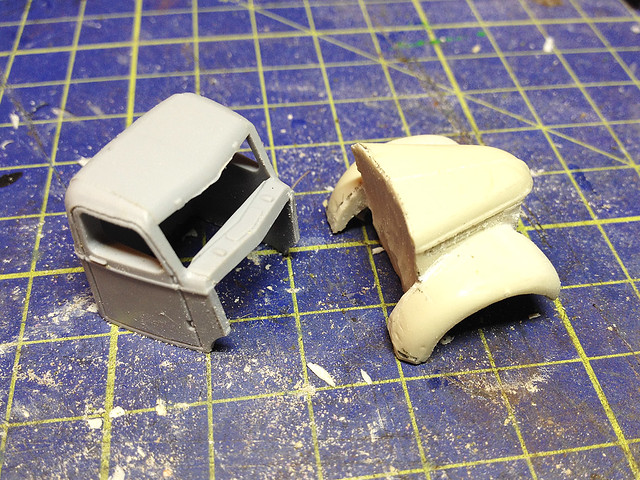
While I try my best to make a cut that will mate the two halves neatly together I know I will have to do a bit of cosmetic work using Milliput, so the join doesn't have to be absolutely exact...
This is the moment of truth...Will the PST cab and the Moonlite Modelwerkes bonnet fit together?
Phew! 'IT LIVES!' - Luckily the two models were almost exactly the same width where the bonnet seams join! Oh joy, that makes things easier...
But really, that was the easy part, especially if - like me - you own a Dremmel...But at this point I should add a few words of caution.
* The resin of the Moonlite model creates a very fine dust when sanded or cut, using a Dremmel or similar - while making the job easier - does generate quite a cloud and I shouldn't imagine that it is good for you. I strongly suggest wearing a dust mask while doing this sort of work. *
That said, now we get to the trickier part...The front grill modification.
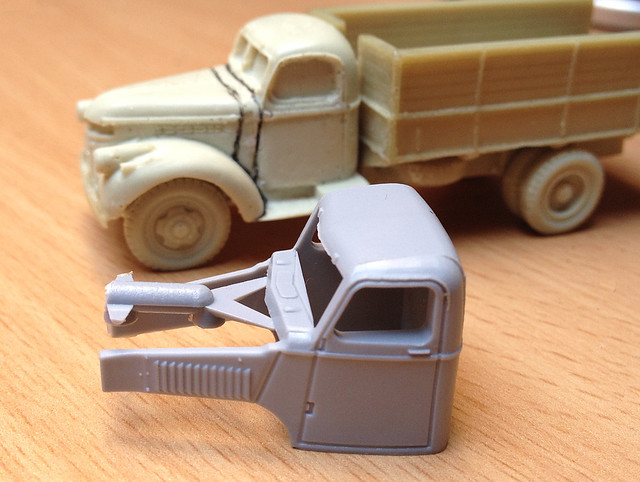
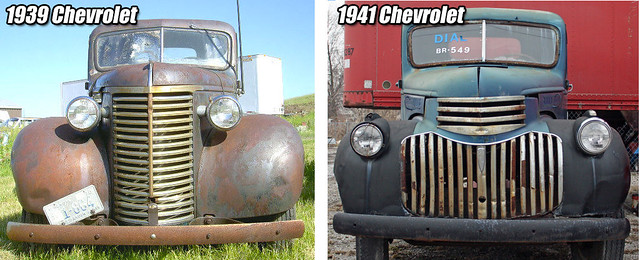
It's worth looking at what I want to achieve compared to what I had. Here's a photo showing the front of the 1939 commercial Chevrolet next to the 1941 model, the latter being what the Moonlite resin model was based on...
Obviously the main difference is the size and shape of the grill, but luckily the hood and the shape of the fenders are similar on both models. So, in theory, all I have to do is shave back the grill on the '41 and replace it with a new scratch-built '39 grill...
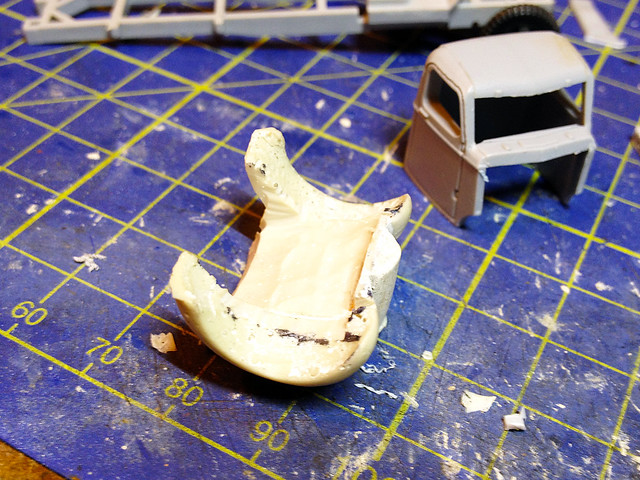
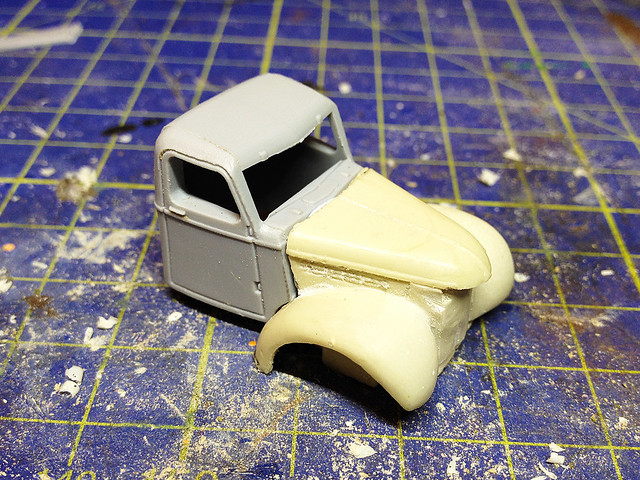
As you can see, I have excavated away the front grill - again, using the Dremmel - and carefully re-shaped the fenders (mud guards) so that they curl back and in towards the back of where the new grill will be mounted. I've also shaved off the old 1943 style headlights so that I can fit some scratch-built 1939 shaped lamps once the new grill is on.
...So...There we have it. The first stage of the operation over. Next I will start to build up the new shaped grill with some Milliput.
I'm off for a lay down now!
That said...Let's operate!
First thing is to decide where best to make the first incisions...
Looking at the two pieces there seems to be an obvious seam where I can re-join the two disparate halves. There is a panel line which runs at the rear of the bonnet (the hood, if you are one of my American friends) and diagonally down the side of to the mud guards (fenders). Like so...
...Nurse, hand me my Dremmel!
While I try my best to make a cut that will mate the two halves neatly together I know I will have to do a bit of cosmetic work using Milliput, so the join doesn't have to be absolutely exact...
This is the moment of truth...Will the PST cab and the Moonlite Modelwerkes bonnet fit together?
Phew! 'IT LIVES!' - Luckily the two models were almost exactly the same width where the bonnet seams join! Oh joy, that makes things easier...
But really, that was the easy part, especially if - like me - you own a Dremmel...But at this point I should add a few words of caution.
* The resin of the Moonlite model creates a very fine dust when sanded or cut, using a Dremmel or similar - while making the job easier - does generate quite a cloud and I shouldn't imagine that it is good for you. I strongly suggest wearing a dust mask while doing this sort of work. *
That said, now we get to the trickier part...The front grill modification.
It's worth looking at what I want to achieve compared to what I had. Here's a photo showing the front of the 1939 commercial Chevrolet next to the 1941 model, the latter being what the Moonlite resin model was based on...
Obviously the main difference is the size and shape of the grill, but luckily the hood and the shape of the fenders are similar on both models. So, in theory, all I have to do is shave back the grill on the '41 and replace it with a new scratch-built '39 grill...
As you can see, I have excavated away the front grill - again, using the Dremmel - and carefully re-shaped the fenders (mud guards) so that they curl back and in towards the back of where the new grill will be mounted. I've also shaved off the old 1943 style headlights so that I can fit some scratch-built 1939 shaped lamps once the new grill is on.
...So...There we have it. The first stage of the operation over. Next I will start to build up the new shaped grill with some Milliput.
I'm off for a lay down now!
Monday, 10 March 2014
Next Project - another truck conversion
As the current project nears completion I am starting to think about what's going to be my next victim...Er, I mean subject!
The fact is that I need trucks for my Finnish Army project, a lot of trucks! I want all shapes and sizes of vehicles in order to portray the rather eclectic nature of the Finn's military transport inventory. To this end I am having to think about converting available models to represent some of commercial trucks that were pressed into service at the time.
Trucks like pre-war Fords and Chevrolets were quite common in Finland but are not so easy to acquire from mainstream scale kit manufacturers. Rather like my V3000 project I am having to think about kit-bashing a couple of donor models to make a make and model that I desire.
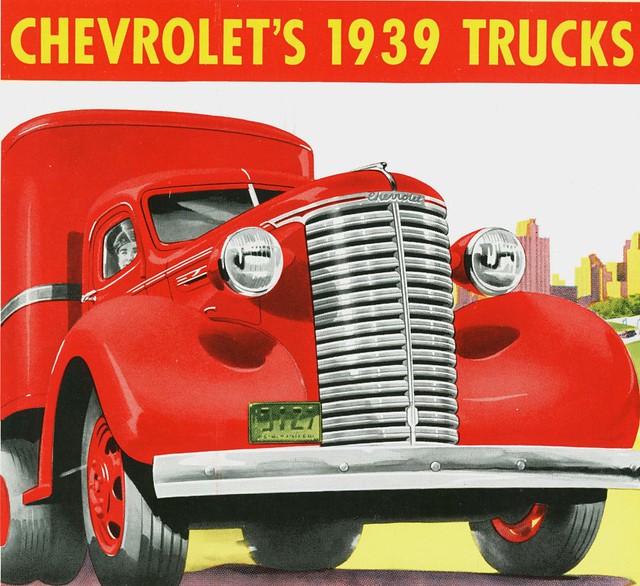
What I am after in this case is a 1939 Chevrolet. It's quite distinctive and differs obviously from the wartime Chevy designs built and used by either the Allies or the Germans!
As said, while the wartime (1941) Chevrolets are relatively easy to get hold of in 1/72 kit form - they are the truck on which the famous British LRDG patrol truck is based - the earlier commercial version is not.
Left: The more familiar 1941 CC60L 3 ton model Chevrolet, here in the hands of the Germans. It's a rather unpleasant truth that both Ford and Chevrolet made vehicles for both sides during the war by means of their local subsidiaries. Fordwerkes Germany, for example, continued producing Ford designs for the German army throughout the war.
Anyway, I made the mistake of buying the wrong Chevrolet - before I had fully researched the subject - when I ordered a nice resin 'ready to roll' wargame model from Moonlite Modelwerkes...
This left me in a bit of a quandary as it's a nice little model, but it's no good for my intended use. Quite aside from it being the wrong year it's a solid one-piece resin mould with the cab interior filled in. So, just as with my resin V3000, I decided - somewhat reluctantly - to do a 'cut and shut' job with it and try and mate it to the back end of a spare plastic truck kit.
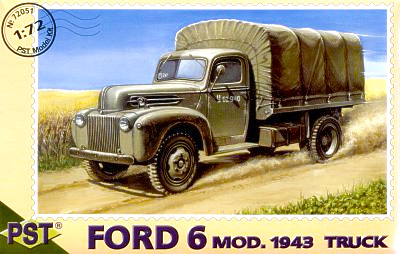
As it happens I have a plastic truck kit which I also bought for my Finnish truck collection but was likewise - as it turned out - the wrong model! This time I bought a 1/72 PST 1943 Ford instead of an earlier version. I got it on a whim as I thought it looked like a pretty cool truck and it was in wide use as a lend-lease vehicle by the Soviets (so I imagined that it could have been captured by the Finns, but in the end there is no evidence of this premise)...
Bummer! (This all taught me to do a bit of research first before buying kits for projects!) Still, I now have a donor for the back end of my 1939 Chevy project (by 'backend' I mean from the rear of the bonnet back including the cab shell).
Now I know this might all sound a bit of a waste of two perfectly good models just to make one half-baked conversion, but I really want to have a 1939 Chevy in my collection and this does seem to be the only way I will get one.
There are problems, the most obvious being that the grill on my Moonlite Chevy is all wrong. I will have to scratch build the 1939 grill onto the 1941 cab and then mate the 1941 cab onto the 1943 back end! ...Following this?
So let's start with the initial planning of my next Frankenstein truck shall we?
First of all I decide where it would be best to cut my resin model's bonnet. I look for details like panel lines that would hide my surgery and highlight them with a thin marker pen...
Next I will check these shapes against the 1943 Ford truck kit to see where I can most obviously join them together (the seam just in front of the cab window and down the door seems likely). Here's a reminder of how I achieved this when making my V3000 conversion...
The idea, of course, is to find a mutual seam in either component that will make it easy to hide my butchery.
To end this first project post, here's a photo of the 1939 model Chevrolet and some of the Finns who relied on it's hardiness and reliability...
...Now, where's my Dremmel!
Photo credits: All black and white wartime Finnish photos are courtesy of the SA-kuva web archive: http://sa-kuva.fi/neo
The fact is that I need trucks for my Finnish Army project, a lot of trucks! I want all shapes and sizes of vehicles in order to portray the rather eclectic nature of the Finn's military transport inventory. To this end I am having to think about converting available models to represent some of commercial trucks that were pressed into service at the time.
Trucks like pre-war Fords and Chevrolets were quite common in Finland but are not so easy to acquire from mainstream scale kit manufacturers. Rather like my V3000 project I am having to think about kit-bashing a couple of donor models to make a make and model that I desire.
What I am after in this case is a 1939 Chevrolet. It's quite distinctive and differs obviously from the wartime Chevy designs built and used by either the Allies or the Germans!
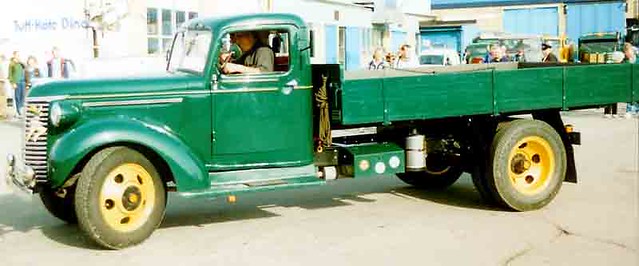
| A beautifully restored 1939 Chevrolet HS Commercial truck. A common civilian type in Finland in the 1940s. |
Left: The more familiar 1941 CC60L 3 ton model Chevrolet, here in the hands of the Germans. It's a rather unpleasant truth that both Ford and Chevrolet made vehicles for both sides during the war by means of their local subsidiaries. Fordwerkes Germany, for example, continued producing Ford designs for the German army throughout the war.
Anyway, I made the mistake of buying the wrong Chevrolet - before I had fully researched the subject - when I ordered a nice resin 'ready to roll' wargame model from Moonlite Modelwerkes...
| The 1941 Chevrolet - front - and a 1936 Ford by Moodlite Modelwerks. |
As it happens I have a plastic truck kit which I also bought for my Finnish truck collection but was likewise - as it turned out - the wrong model! This time I bought a 1/72 PST 1943 Ford instead of an earlier version. I got it on a whim as I thought it looked like a pretty cool truck and it was in wide use as a lend-lease vehicle by the Soviets (so I imagined that it could have been captured by the Finns, but in the end there is no evidence of this premise)...
Bummer! (This all taught me to do a bit of research first before buying kits for projects!) Still, I now have a donor for the back end of my 1939 Chevy project (by 'backend' I mean from the rear of the bonnet back including the cab shell).
Now I know this might all sound a bit of a waste of two perfectly good models just to make one half-baked conversion, but I really want to have a 1939 Chevy in my collection and this does seem to be the only way I will get one.
There are problems, the most obvious being that the grill on my Moonlite Chevy is all wrong. I will have to scratch build the 1939 grill onto the 1941 cab and then mate the 1941 cab onto the 1943 back end! ...Following this?
| A Finnish wartime model 1939 Chevrolet Commercial front end with some rather spooky headlight accessories! |
First of all I decide where it would be best to cut my resin model's bonnet. I look for details like panel lines that would hide my surgery and highlight them with a thin marker pen...
Next I will check these shapes against the 1943 Ford truck kit to see where I can most obviously join them together (the seam just in front of the cab window and down the door seems likely). Here's a reminder of how I achieved this when making my V3000 conversion...
| My previous Ford V3000 conversion - the same 'cut & shut' process will be used to create a 1939 Chevrolet in my new project. |
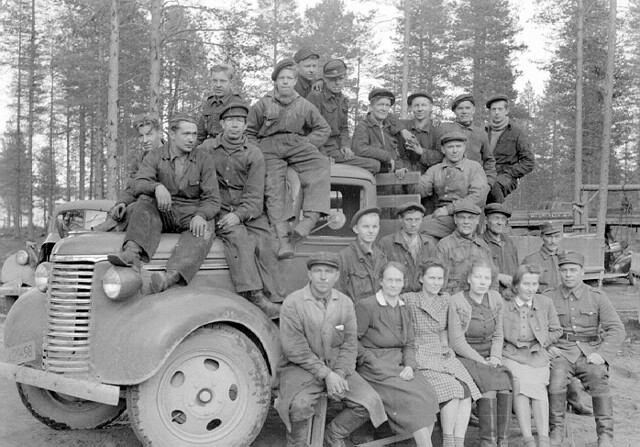
To end this first project post, here's a photo of the 1939 model Chevrolet and some of the Finns who relied on it's hardiness and reliability...
...Now, where's my Dremmel!
Photo credits: All black and white wartime Finnish photos are courtesy of the SA-kuva web archive: http://sa-kuva.fi/neo
Subscribe to:
Posts (Atom)