I think I mentioned my surprise that so many model trucks come without driver figures? I know I have done a few resin conversions but even so I am getting a bit fed up scrambling about for figures I can use as drivers.
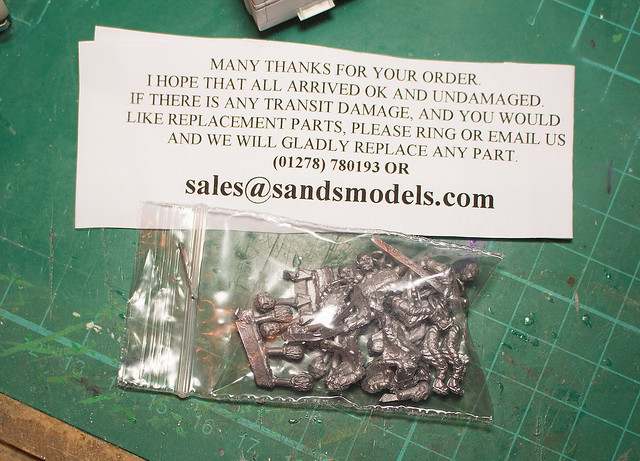
And so...I had a look around the tin'ternet and I was surprised there weren't more generic driver figure sets in 1/72. And what I did find were quite pricey. But I eventually scored a 'hit' with Google and found some reasonably priced white metal figures at Sands Models...
As I am in the wife's good books at the moment I went ahead and ordered them (despite being slightly over budget this month already). They are priced individually at 50p each, and for that you get a body with a choice of head. I went for 10 male figures with bare heads (there are a variety of heads with different hats and helmets available).
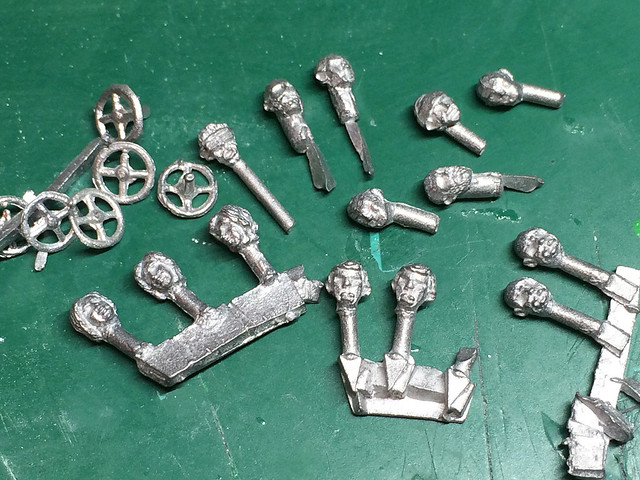
A nice touch is the inclusion of a number of steering wheels, very handy. Some of the models need a hair cut, unless I got some of the female heads that Sands Models also do by accident!
The bodies are a nice mix. These include torsos with integral steering wheel and some without. Again this is a very nice option as sometimes the cabs are a very tight fit, or the model might come with it's own steering wheel fitted.
Obviously, it's very hard to get a fair idea of the quality of these figures as white metal does not photograph well. But you get what you pay for, these aren't highly detailed, finely sculpted resin display quality scults - they are, however very useful scale figures at a very reasonable price. Ideal for me as I have a lot of vehicles without drivers.
It will be interesting to see one of these painted up, and I will be doing that soon as I have another truck kit in the cue for my workbench whish doesn't come with one included.
Link to Sands Models Generic Driver Figure.
Diary of a novice scale model maker and his adventures in the wacky world of Braille Scale.
Tuesday, 24 November 2015
Monday, 23 November 2015
Chevrolet Radio Van conversion - Part 6
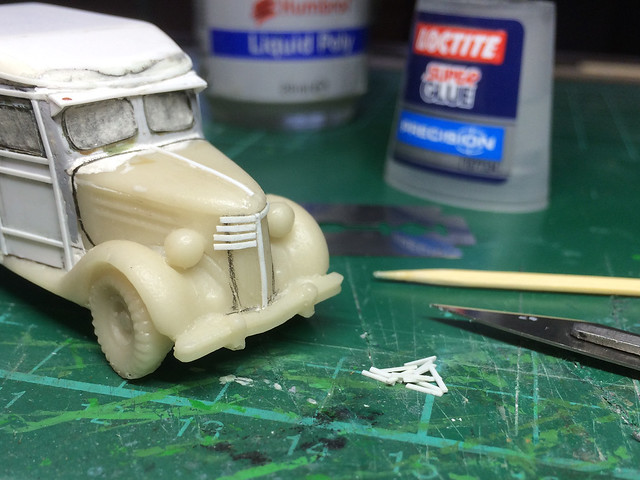
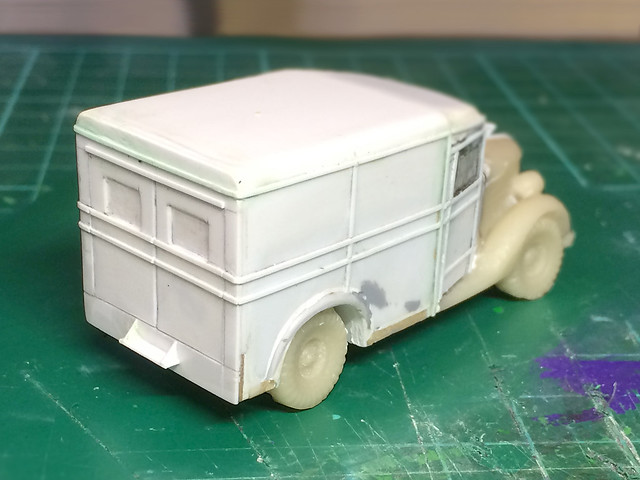
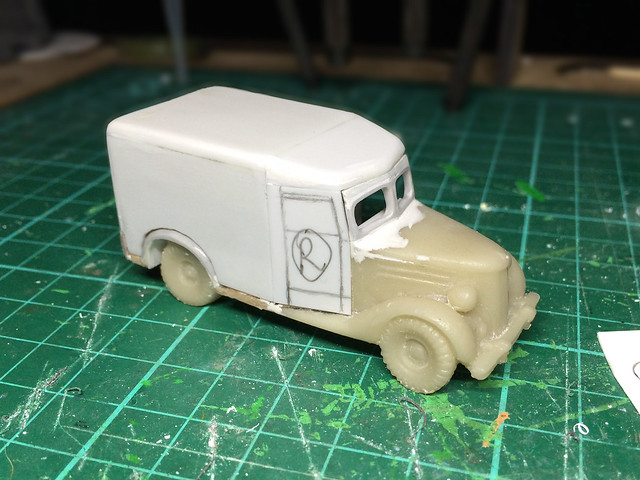
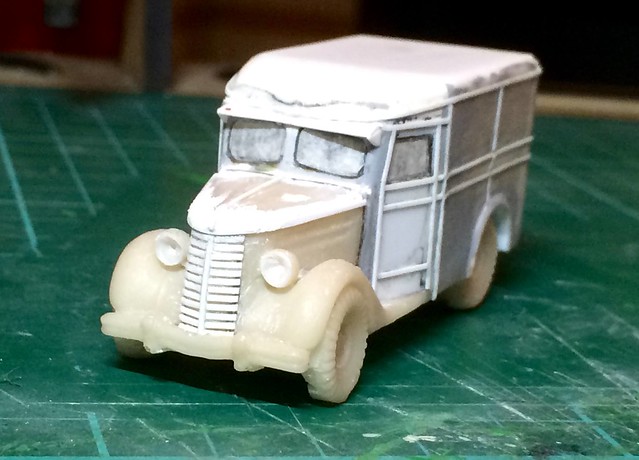
The bonnet and grill of my radio van is finished. It's a bit of a cosmetic job and not high-quality modelling, but it gives the appearance of a '39 Chevy (if you half close your eyes).
I'd have preferred narrower styrene rods for the job but these were the closest my local store had. And cutting thin plastic strips would be a nightmare.
I relied on superglue as my adhesive and this too can be a problem with small parts (which then stick to everything but the place you want them to). Plus superglue isn't as nice to work with as liquid poly, which allows some wiggle room for repositioning.
Anyway, it's done now. The final effect wasn't too bad and is about as good as one of these 'make do' resin conversions might be expected to be I suppose. (Looking forward to getting back to a straight plastic kit though.)
I did some minor putty work on the bonnet, as this had a slight chip in it. And I drilled out the solid resin headlamps too.
All that's left is to decide how I am tackling the number plates. A very thin rectangle of plastic strip seems the obvious way to go. But, because my Finnish number plates themselves are printed out (so already quite thick) I am tempted to cut these out and just glue them straight on AFTER painting. Hmmmm?
Well, I enjoyed this. But I wouldn't like to have to do all my models this way.
Next: Primer and base coat.
I'd have preferred narrower styrene rods for the job but these were the closest my local store had. And cutting thin plastic strips would be a nightmare.
I relied on superglue as my adhesive and this too can be a problem with small parts (which then stick to everything but the place you want them to). Plus superglue isn't as nice to work with as liquid poly, which allows some wiggle room for repositioning.
Anyway, it's done now. The final effect wasn't too bad and is about as good as one of these 'make do' resin conversions might be expected to be I suppose. (Looking forward to getting back to a straight plastic kit though.)
I did some minor putty work on the bonnet, as this had a slight chip in it. And I drilled out the solid resin headlamps too.
 |
| Excuse the naff photography - it was late when I took this. |
Well, I enjoyed this. But I wouldn't like to have to do all my models this way.
Next: Primer and base coat.
Saturday, 21 November 2015
Chevrolet Radio Van conversion - Part 5
Got up early this morning and did some work on my Chevy radio van. I have finished off the work on the van bodywork at the rear of the vehicle...
I originally had grand designs for things like external radio antennas and roof rack storage and what not, but what reference I have found indicates a far simpler configuration for what was - after all - just a converted commercial delivery van. (The extending antennae being stored inside until needed, then erected outside.)
Here are some reference photos from the excellent SA-Kuva history archive...
The above photo illustrated the sort of ad hoc van conversion that I'm trying to model. As you can see its a bit of a primitive expedient, but despite this the Finns were excellent radio technicians. Part of their success against the Soviets was due to their skill at radio interception, decoding and 'radio warfare' - they were known to fool the Russians into dropping resupplies onto Finnish units by usurping the Red Army's radio frequencies!
Here's another shot (left) showing the external deployment of radio equipment - this time in the summer of 1942. A pole cut from readily available trees serves as a mast.
So I decided to ditch my plans for a lot of additional external detailing on the van as the Finns were clearly not ones of over-complicating things.
Next I will turn my attention to the front of my van. The original resin model was a Ford light truck so I will have to modify it slightly to look like a Chevrolet instead. This isn't a big deal, it just means I will have to tweak the grill on the front of the bonnet to give it a Chevy grill.
But it's all coming on nicely (I think).
I originally had grand designs for things like external radio antennas and roof rack storage and what not, but what reference I have found indicates a far simpler configuration for what was - after all - just a converted commercial delivery van. (The extending antennae being stored inside until needed, then erected outside.)
Here are some reference photos from the excellent SA-Kuva history archive...
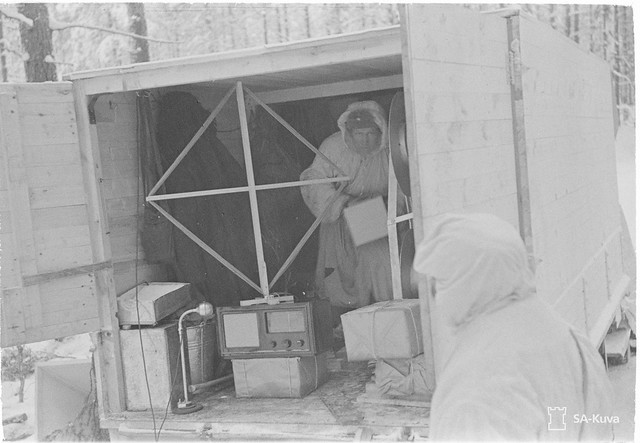 |
| Source: SA Kuva [Pic 4483] |
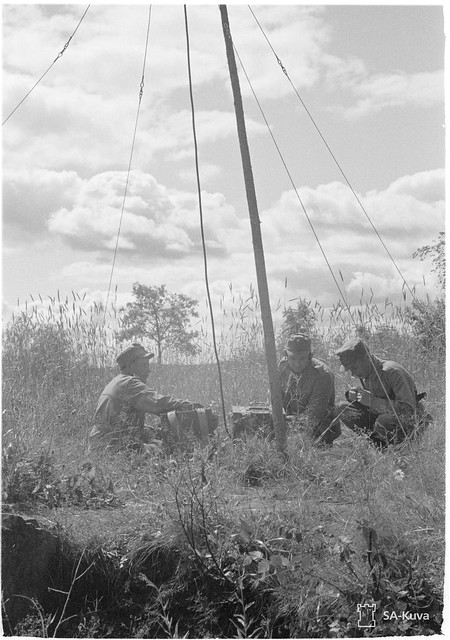 |
| Source: SA Kuva [Pic 99641] |
Here's another shot (left) showing the external deployment of radio equipment - this time in the summer of 1942. A pole cut from readily available trees serves as a mast.
So I decided to ditch my plans for a lot of additional external detailing on the van as the Finns were clearly not ones of over-complicating things.
Next I will turn my attention to the front of my van. The original resin model was a Ford light truck so I will have to modify it slightly to look like a Chevrolet instead. This isn't a big deal, it just means I will have to tweak the grill on the front of the bonnet to give it a Chevy grill.
But it's all coming on nicely (I think).
Friday, 20 November 2015
Minairons 1937 Chevrolet 1.5ton truck - part 6
When I finished the last post on this model it was as finish as Minairons intended it. Me being me, I couldn't resist tinkering...Just a little!
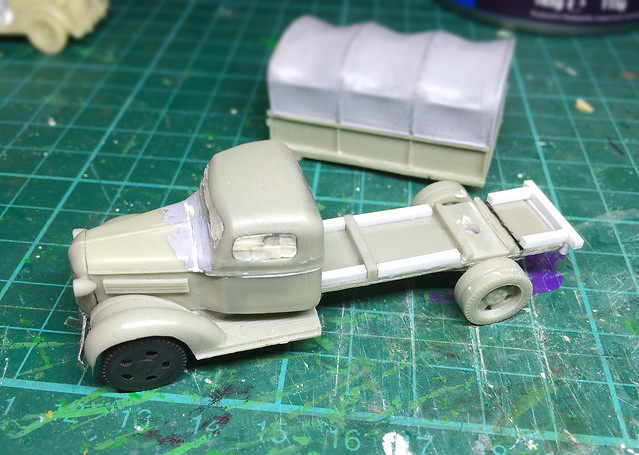
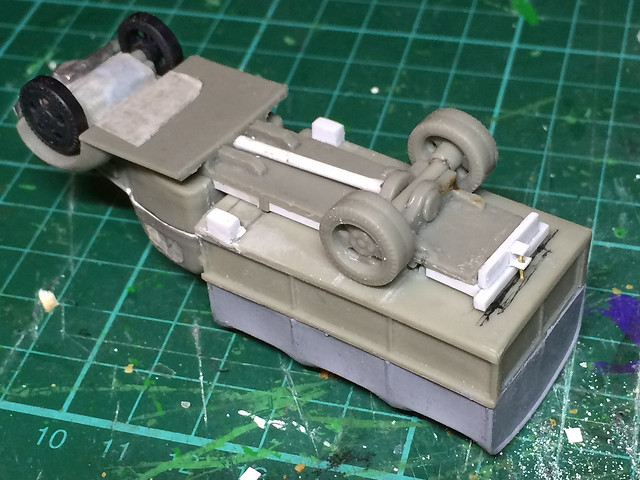
The main thing that I noticed about the Minarions Chevy was that the chassis was a little flimsy. I mean there was no cross bracing under the cargo bed and you could see straight through. I did a bit of digging around and found this reference of a '37 Chevy - 'Stake Truck' variant - and it clearly shows that there was a pretty solid chassis framework under the flatbed...
So I added some styrene rods to the basic chassis to beef it up a bit...
This extra structure will allow me to add a tow-hook at the rear - quite important as this truck is one of three I will be assigning to my anti-tank company (towing 7.5 cm Pak 40s).
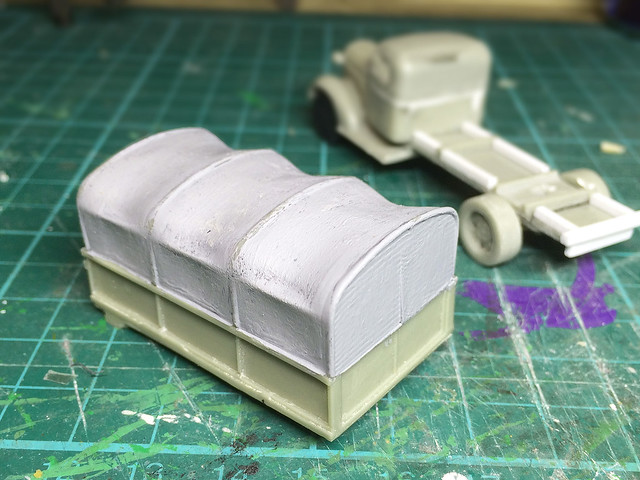
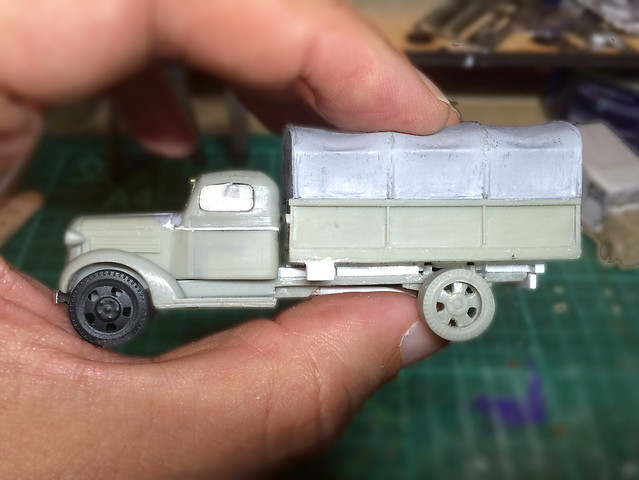
It's not a big mod but I feel a bit better about it as the chassis now looks a little more substantial. Now, the other thing I wanted to 'improve' was the tilt canvas. It was a little bland so I painted on some Mr. Surfacer 1000, waited for it to go tacky and then brushed it to produce some rough texture...
And that's about it really, not earth-shaking but issues that were niggling me a bit. There are a couple of other small 'improvement' I'll be adding as I go along as well - I want a windsheild wiper over the drivers window and I want numberplates. Again, not big jobs.
The main thing is the work I have done on the chassis.
And with that, the model is now ready to prime and base coat.
Thursday, 19 November 2015
Good intensions didn't last long!
I've been a bad boy! Despite the fact that I have been trying very hard to restrict my kit buying - having realised that I am a slow kit builder - to just two kits a month, today I fell off the waggon (or the tank, to be specific)...
In my defence, it was unplanned and unintentional as it began because of an unscheduled stop in Bridlington while making my way home on the train. I mistakenly caught the Bridlington train instead of my usual Scarborough train, so ended up having to pass and hour or so until the next train home arrived.
What to do?
I knew there was a model store in Bridlington, which I hadn't had a chance to visit yet, so I decided the least I could do was to try and find it so I knew where to go when I had time for a proper visit. Oh, how we fool ourselves!
I have to say, if you get a chance and are in Bridlington make the effort to go to Cropper Models, on Lansdowne Rd, as it is truly a veritable Alladin's Cave (their website - www.croppersmodels.co.uk - doesn't do their amount of stock justice).
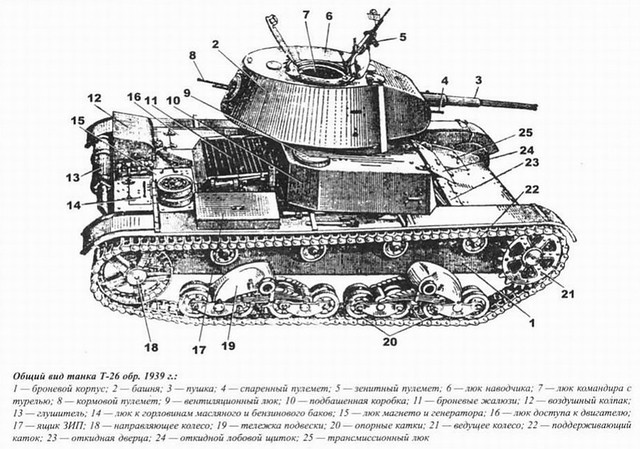
No sooner was I inside ("just a quick look") than I spotted this on the top of a pile of Mirage kits...
Bugger!
I mean, it's so rare that you actually come across a proper kit of a WW2 Finnish vehicle that it's just too good to pass on. Even though I am a little luke-warm about the T-26 light tank the fact that was an accurate model of a specific Finnish version, with nice box art showing the Finn's three-colour camo meant I caved in like a chocolate teapot!
The Finnish T-26
Now this is an interesting tank, even though by 1944, it was horrendously out-matched. Having said that, the Soviets themselves were not above throwing obsolete armour against the Finns (reserving their best stuff for use against the Germans). In fact, the last T-26 captured from the Soviets by the Finns actually took place in August 1944! Unbelievable.
That said, I have been more interested in the more 'useful' tanks that the Finns captured - like the KV-1s, T-34s and T-34/85s. But the fact is, the T-26 (in it's many variants) was still the most numerous tank in the Finnish inventory - and it continued in the Finish inventory many years after the war.
Interesting note: The Finns were not the only ones to field obsolete tanks at this late stage in the war. In the Lapland War, where the Finns (to put it bluntly) turned on their former allies, Germany, their old T-26s found themselves up against German Somua and Hotchkiss tanks (which the Germans had captured during the fall of France)!
The one major attraction of this model, however, is that for once it is a good one. This Mirage kit is highly regarded for both its accuracy and quality, so for the very first time I will actually be making a premium quality kit. (No fettling, no tinkering, no DIY 'improvements' - just a straight build.)
You can find lots more about the Finn's use of the T-26 by following these links:
• Andreaslarka.net - Dedicated to Finnish WW2 Armour (lovely colour reference)
• Jaegerplatoon.net - Finnish Vickers 6 ton and T-26E tanks
• Jaegerplatoon.net - Soviet T-26 variants captured (and used) by the Finns
Monday, 16 November 2015
Minairons 1937 Chevrolet 1.5ton truck - part 5
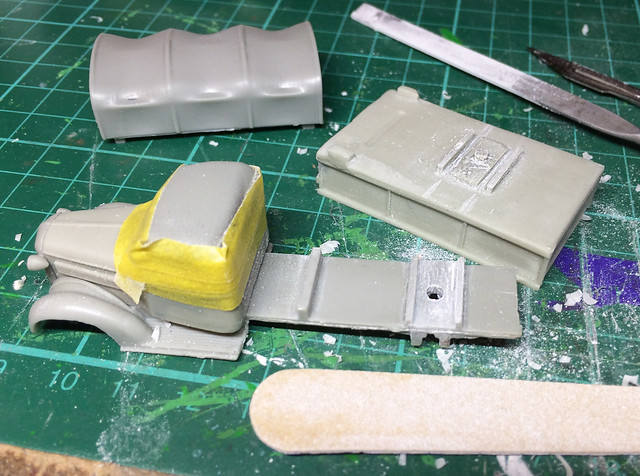
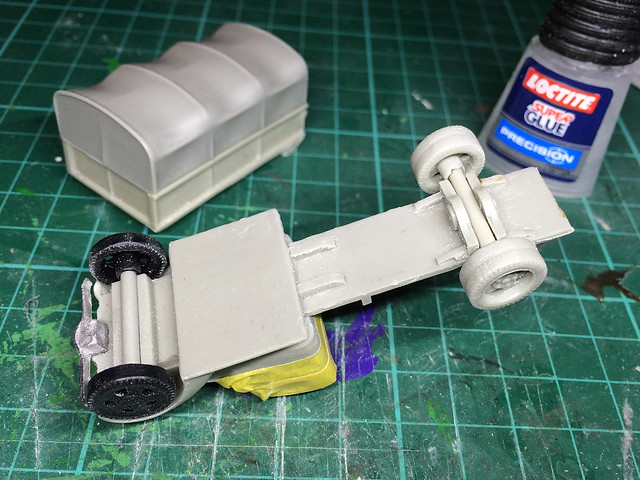
Moving from the cab to the rear of the truck, there is some tidying up work to do to ensure a good fit and a level assembly. As I showed in an earlier post, the Minairons truck chassis was quite distorted and had to be straightened out by immersing the resin part in hot water. This softened the resin and I was able to straighten the flatbed base out again.
Additionally, I have had to do a fair bit of sanding to get the cargo flatbed to fit on the base...
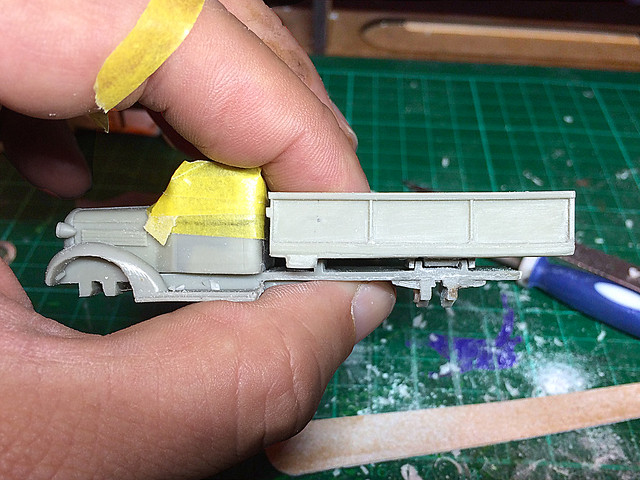
I personally thought that the cargo flatbed and its tilt cover sat a little too high, making the vehicle quite tall. So I have sanded down the plinth on which the flatbed sits on the chassis to lower the profile of the truck and level up the bed at the same time.
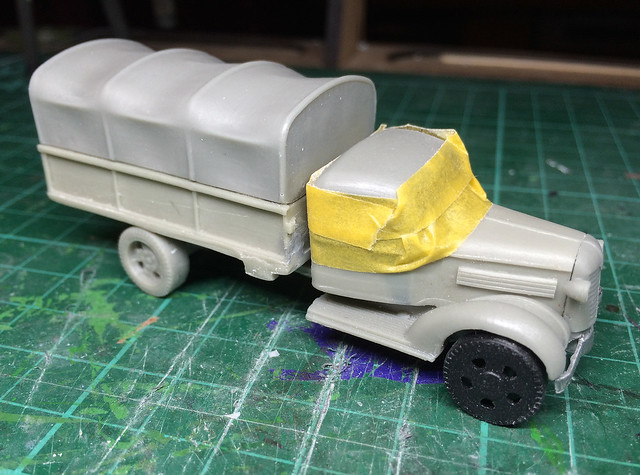
By the way, the masking tape is there to ensure that none of the fine resin powder that is coming off as I sand gets inside the completed cab and settles on the inside of the windscreens I have installed!
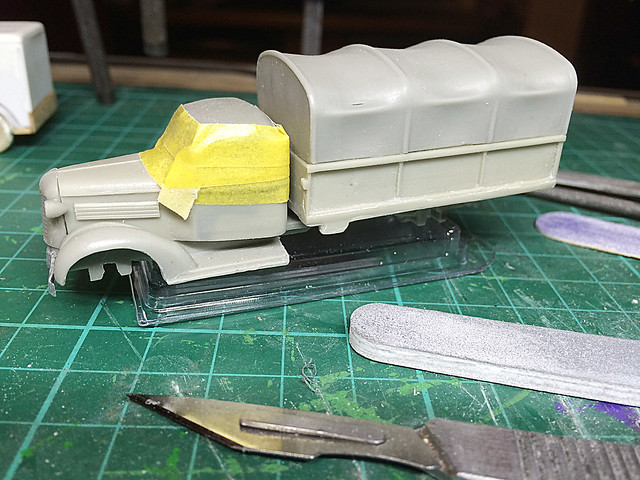
With the flatbed low and level, it's time to look at the tilt canvas. I won't glue the flatbed in place yet as I want to apply the primer and base paint coats before I attach everything together.
The two-part flatbed and tilt cover went together with some minor sanding. It's not the greatest model of a canvas cover, with few fold or wrinkles, but the hint of the 3D printing texture does inadvertently add a little character to it.
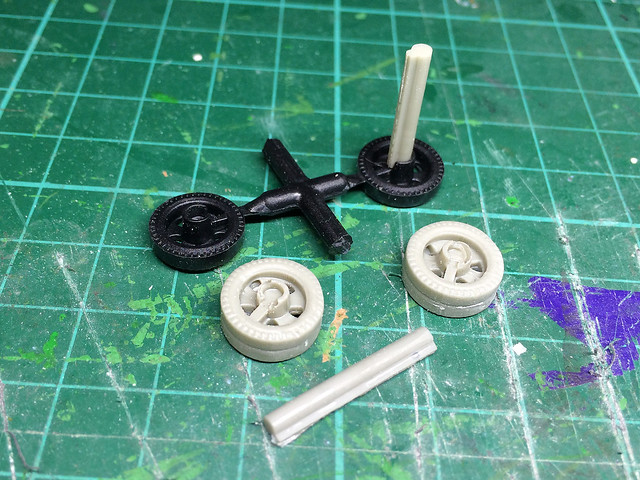
The wheels are acceptable but don't have any tread on the tyres. The axels are just two strips of resin and there is hardly any detail on the underneath of the truck - no suspension or drive shaft, etc.
And that's all there is to it! You can see why it's a handy kit for war gamers - no fiddling about with intricate detail that won't be seen or of interest to a game player.
But yet the model has its own charm and I reckon could be upgraded to something a little more detailed without too much effort. I've opted to build it as is (for once)!
Next: Onto the painting.
Saturday, 14 November 2015
Making windscreens
The two projects I am currently working on are at the same stage of construction. As neither have purpose-built windscreens (for different reasons) I will have to make some.
It's not a difficult job, and indeed it's surprising how many kits these days still require you to make your own windscreens (the next two kits I will be making are from PST and Hunor and both require me to do so). So here's my procedure for doing this (I do not claim it's the best way, just the way that works for me)...
1. Create templates for your windows.
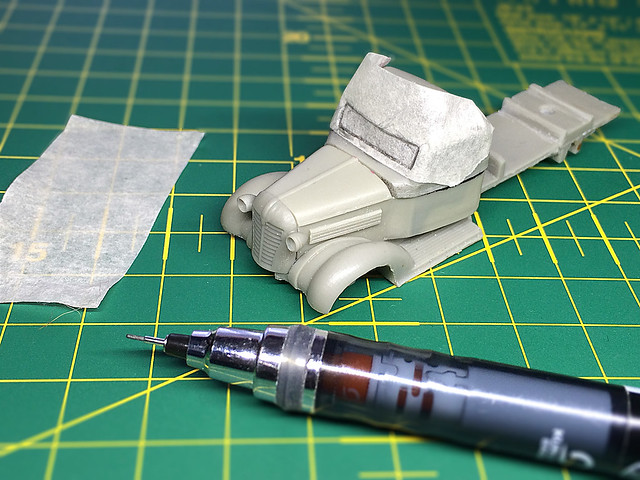
I begin by masking over the vehicle's empty window spaces. Then I take a sharp pencil or technical pencil and carefully draw around the window...
I press very gently and get the point of the pencil lead just inside the lip of the window. I use the shape of the window itself to guide my pencil around the edge so I end up with a drawing of the exact contour of the inside of the window.
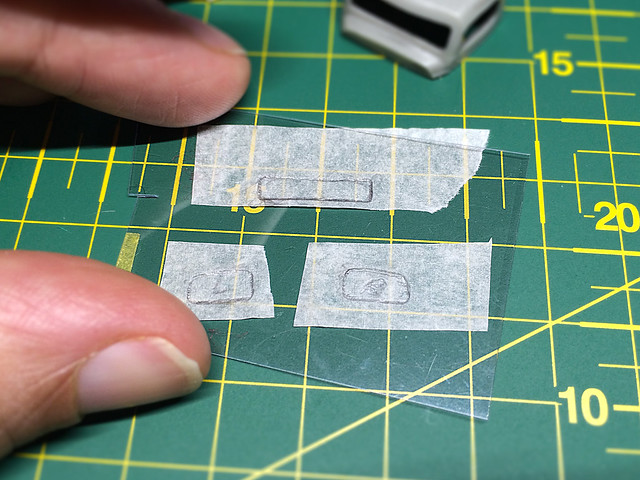
2. I transfer the contour template onto transparent plastic.
Then I just stick the masking tape with the template on it to a flat surface, lay some transparent plastic over it and trace the outline using an indelible pen...
Not the best photos I've ever taken, but then transparent plastic isn't the easiest thing to photograph. My drawings are a bit shaky, but I will cutting generously and sanding the window edges to fit. It's a bit time-consuming, but the best way to ensure and exact and snug fit, especially with resin models where straight lines ain't so straight sometimes.
3. Fitting...Carefully now!
I'll be honest, it took a couple of goes to cut the correct shapes - or nearest thing to them - and then some very careful filing using my trusty Squadron Premium Sanding Stick. These sanding sticks are excellent and come in a variety of 'grits' right down to a very fine. They do make the difference.
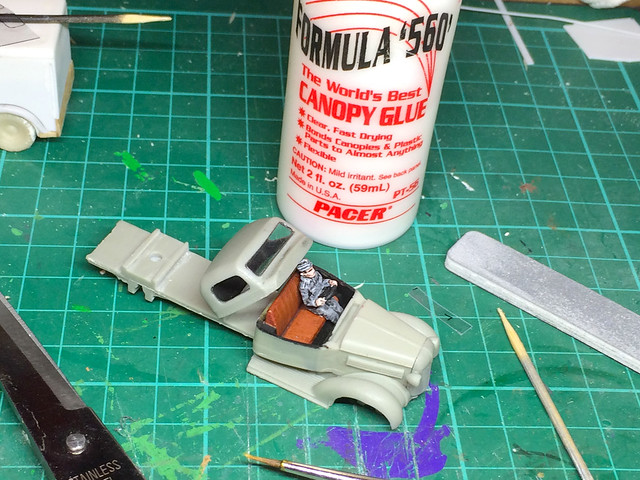
Pacer's Formula '560' is my go to glue for canopies and windscreens, it dries a crystal clear...
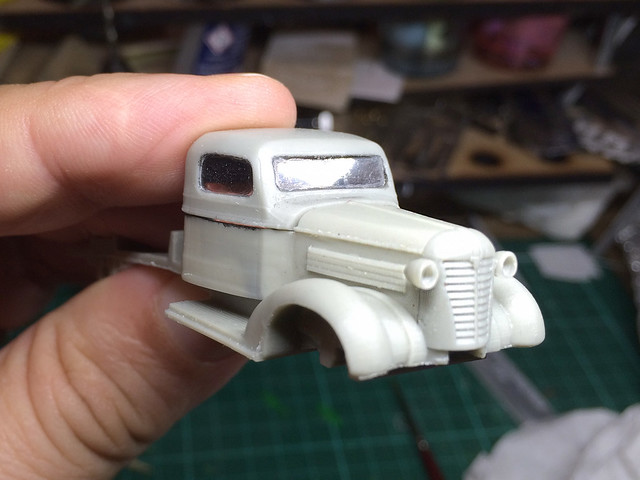
Hard to tell but the windscreens have been fitted! I finished them off by painting on a layer of Johnson's Klear (now Pledge Multi-Surface Wax) which not only makes the 'windows' shine but clears up any light scratches and helps to stick the windshield in place securely.
Conclusion
Making your own windscreens is a bit of a black art. Sometimes you get a perfect fit first time, but then sometimes one windscreen can be an absolute bitch and needs recutting a couple of times. You just keep going until you are happy.
Things like a good canopy glue and using Klear are a big help, but no matter how experienced you are things can go wrong. Even when I thought I had made a good job I have looked at my work the next day and found a fingerprint or spec of dust or scratch on the inside of the glass. Boy, is that frustrating.
One thing is that I no longer buy expensive sheets of transparent 'modelling' plastic. Two reasons for this, aside from it being costly I found - no matter how I tried - keeping the sheet pristine and unscratched is neigh on impossible. Far better to use clear plastic from blister packaging or food packs - it's cheaper and you can always guarantee it's unscratched when you begin.
Well - that's my thinking anyway.
Friday, 13 November 2015
Minairons 1937 Chevrolet 1.5ton truck - part 3
This is the first time I have been blogging about two projects simultaneously, haven't decided whether alternating the posts like this is a wee bit confusing or not?
Anyway, progress on the '37 Chevy truck...
I've gone for the civilian type red leather bench seat colour. I can still remember this colour so well from cars when I was a lad in the 1960s (and I remember the beautiful smell too). They knew how to make car seats in those days, my father's Rover P5 had seating that would have done a gentleman's club justice! Sorry, I digress...
The small unpainted splodge you can see is a bare patch of plastic I have left so that I can glue the driver onto the seat properly. As a matter of fact, I have also left the driver with an unpainted bum.
I've really simplified the painting and gone a bit minimalistic with the painting. Just a plain black painted interior for this one. (Which I guess it's in keeping with this war game format of model.)
Before I close the cab by glueing the two halves together, I have the windscreens to make and fit. It's an easier job if I have access to the windows from inside and out. This actually brings my two current models to the same state of construction and I will be concentrating on a little windscreen production line when I have some time to myself today!
Anyway, progress on the '37 Chevy truck...
I've gone for the civilian type red leather bench seat colour. I can still remember this colour so well from cars when I was a lad in the 1960s (and I remember the beautiful smell too). They knew how to make car seats in those days, my father's Rover P5 had seating that would have done a gentleman's club justice! Sorry, I digress...
 |
| A tip for painting drivers - I glue them to cocktail sticks for easier handling. |
 |
| A bit 'Gothy' perhaps? :) |
I've really simplified the painting and gone a bit minimalistic with the painting. Just a plain black painted interior for this one. (Which I guess it's in keeping with this war game format of model.)
Before I close the cab by glueing the two halves together, I have the windscreens to make and fit. It's an easier job if I have access to the windows from inside and out. This actually brings my two current models to the same state of construction and I will be concentrating on a little windscreen production line when I have some time to myself today!
Tuesday, 10 November 2015
Chevrolet Radio Van conversion - Part 4
Apologies for the creeping progress reports on this one, but I'm just doing half an hour or so on this at a time (get the feeling I could have probably got this one knocked off in a long day session - if only I could get a whole day to myself)!
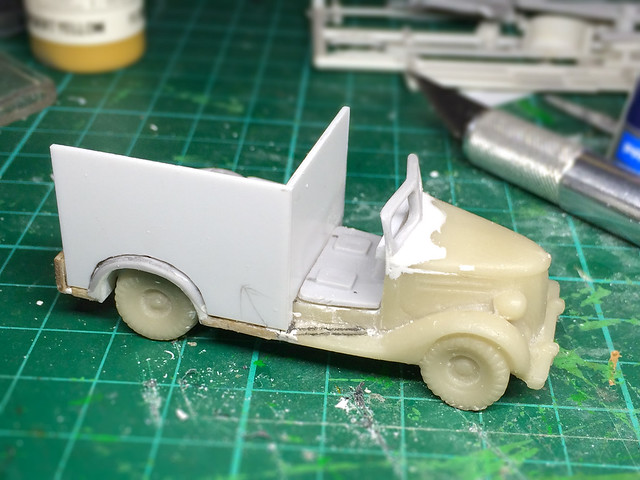
Still, nice bit of progress on the van bodywork...
Now, onto the slightly tricky part - making the cab roof. This joins the van 'box' to the top of the windshield in a curving wedge. I won't fix any of the cab parts permanently though as I will need to finish off and paint the cab interior before I do that.
Yay! Finally starting to look like a van. I've started marking the doors ready for cutting out the windows. Once this is done I can get on with finishing the cab interior.
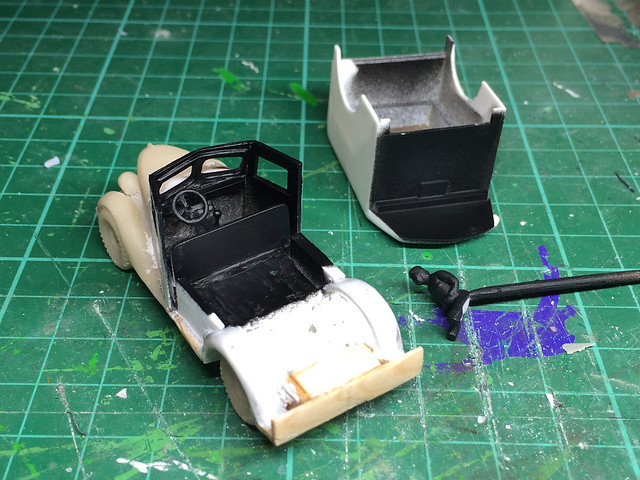
Being able to see through the windows means I have to give my model a basic interior. It's not very accurate or detailed, but it will do...
One thing I have realised after doing about a dozen truck now is that when it comes to adding a driver figure a 1/72 scale vehicle rarely has interior space enough to add a 1/72 scale figure. I'm not sure if this is something to do with the thickness of the plastic used to create the cabs but I inevitably have to use a 1/76 scale driver figure to fit into the space provided. (The better quality kits seem to get this right, the cheaper model seem to use thicker plastic.)
In any case, this 'cheat' isn't too noticeable through the windscreen.
Right, I can actually paint the interior now, before I close the cab up. Again I won't spend too much time on this as it will not be altogether distinct through the plastic windscreens. All I need is a rudimentary impression (obviously were I doing a display quality model I would be absolutely conscientious about all aspects of the painting, whether fully visible or otherwise)...
First note on Colour scheme: The basic scheme for most Finnish transport vehicles was a plain 'moss green' or faded version of said (which I have been interpreting by the use of Humrol's Light Olive Green). Finnish armour did use a three-colour camo pattern, but all other of their military vehicles seemed to use either an easy to apply green or in some cases an ad-hoc and hastily applied two-tone camo pattern.
There was apparently no guidelines for unit level application of camo on transport vehicles. Units (and even individuals in some cases) seemed to add their own 'camo' as they saw fit...
This (above) anti-aircraft artillery repair van - it has a small workshop in the back - was photographed in 1944, which indicates that the practice of ad-hoc camo application persisted throughout the war.
I'd like to add this aspect of Finnish army transport into my collection so I'm going to have a go with my radio van. The only question is - what colours do I use?
Black civilian and commercial vehicles *seem* (this is my guess) to have gotten a quick pattern of moss green paint* over the top to create a two-tone scheme. This may be the case in the above photo. Those with more colourful liveries seem to have been given an all-over moss green coat (or were whitewashed in winter).
Sadly, I have not been able to find one decent colour photo to back this theory up. While 'interesting' vehicles like tanks survive in museums trucks were most likely scrapped or returned to private ownership at the end of the war so few examples still exist.
*Note: Some enquiries over at the Axis History Forum have resulted in a suggestion that the light colour may have actually been a field grey!
In short, I may have to 'guess'!
First paintwork - Cab interior
OK, I realise I meander on, but I am thinking out loud so I can reassure myself of how to proceed. I'm going for the black with green camo scheme though this infers that the cab interior was probably its original black. Black seems a good shade to start with for an interior whatever the eventual top colour anyway...
Next I painted my wee driver figures (I happened to be working on a driver for another vehicle as well). I'm really fudging these figures, they will be partially hidden inside the cab and only visible - eventually - through a dirty plastic 'windscreen', so I'm taking some liberties...
I know, not brilliant! The figure on the right is the one I will be using - he is part of a batch of cheap seated figures my brother sent me (I believe they were intended for use with model railways as passengers for the inside of coaches). It's not a great figure by any means, but it is a good size for fitting inside 1/72 trucks I have found.
(I wish someone would bring out a cheap set of generic 1/72 driver figures. The sets I have found are quite expensive and tend to be specifically for particular nations, with the appropriate hats/helmets.)
With the driver painted it was time to paint the cab interior. Again, I've kept it simple with just a basic coat followed by a wash for shading. I also painted the cab's rear wall which is a part of box body of the van...
Neary there. But there's one final element of making the cab that's a bit of a tricky so-and-so - making the windscreens.
This is not my favourite job as so much can go wrong. Each window has to be custom made to fit its equivalent window space and during the fitting it's easy to scratch the plastic if you aren't careful. Therefore, I will allot this process it's very own post.
(Note: I won't glue the driver figure in place until I have installed the windows.)
Still, nice bit of progress on the van bodywork...
 |
| At this point, I could turn this van into a variety of auxiliary vehicles. It could be an ambulance, or a light cargo vehicle or how about an ice-cream van? ;) |
Yay! Finally starting to look like a van. I've started marking the doors ready for cutting out the windows. Once this is done I can get on with finishing the cab interior.
Being able to see through the windows means I have to give my model a basic interior. It's not very accurate or detailed, but it will do...
One thing I have realised after doing about a dozen truck now is that when it comes to adding a driver figure a 1/72 scale vehicle rarely has interior space enough to add a 1/72 scale figure. I'm not sure if this is something to do with the thickness of the plastic used to create the cabs but I inevitably have to use a 1/76 scale driver figure to fit into the space provided. (The better quality kits seem to get this right, the cheaper model seem to use thicker plastic.)
In any case, this 'cheat' isn't too noticeable through the windscreen.
Right, I can actually paint the interior now, before I close the cab up. Again I won't spend too much time on this as it will not be altogether distinct through the plastic windscreens. All I need is a rudimentary impression (obviously were I doing a display quality model I would be absolutely conscientious about all aspects of the painting, whether fully visible or otherwise)...
First note on Colour scheme: The basic scheme for most Finnish transport vehicles was a plain 'moss green' or faded version of said (which I have been interpreting by the use of Humrol's Light Olive Green). Finnish armour did use a three-colour camo pattern, but all other of their military vehicles seemed to use either an easy to apply green or in some cases an ad-hoc and hastily applied two-tone camo pattern.
There was apparently no guidelines for unit level application of camo on transport vehicles. Units (and even individuals in some cases) seemed to add their own 'camo' as they saw fit...
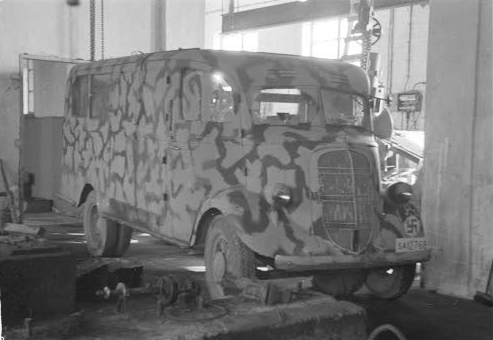 |
| Source: SA-Kuva [Picture 167155] |
I'd like to add this aspect of Finnish army transport into my collection so I'm going to have a go with my radio van. The only question is - what colours do I use?
Black civilian and commercial vehicles *seem* (this is my guess) to have gotten a quick pattern of moss green paint* over the top to create a two-tone scheme. This may be the case in the above photo. Those with more colourful liveries seem to have been given an all-over moss green coat (or were whitewashed in winter).
 |
| Finnish Ford V8-51 - the earlier in the war the more slap-dash was the 'camo' application (green over black possibly). Source: SA-Kuva 42567 |
*Note: Some enquiries over at the Axis History Forum have resulted in a suggestion that the light colour may have actually been a field grey!
In short, I may have to 'guess'!
First paintwork - Cab interior
OK, I realise I meander on, but I am thinking out loud so I can reassure myself of how to proceed. I'm going for the black with green camo scheme though this infers that the cab interior was probably its original black. Black seems a good shade to start with for an interior whatever the eventual top colour anyway...
Next I painted my wee driver figures (I happened to be working on a driver for another vehicle as well). I'm really fudging these figures, they will be partially hidden inside the cab and only visible - eventually - through a dirty plastic 'windscreen', so I'm taking some liberties...
 |
| Well...They will be only barely visible! |
(I wish someone would bring out a cheap set of generic 1/72 driver figures. The sets I have found are quite expensive and tend to be specifically for particular nations, with the appropriate hats/helmets.)
With the driver painted it was time to paint the cab interior. Again, I've kept it simple with just a basic coat followed by a wash for shading. I also painted the cab's rear wall which is a part of box body of the van...
Neary there. But there's one final element of making the cab that's a bit of a tricky so-and-so - making the windscreens.
This is not my favourite job as so much can go wrong. Each window has to be custom made to fit its equivalent window space and during the fitting it's easy to scratch the plastic if you aren't careful. Therefore, I will allot this process it's very own post.
(Note: I won't glue the driver figure in place until I have installed the windows.)
Sunday, 8 November 2015
Minairons 1937 Chevrolet 1.5ton truck - part 2
Actually I am right in the middle of another model build at the moment but could not resist peeking into the Minairons Chevy kit box. A glance at the number of parts plus mulling over the exceedingly simple instructions led me to wonder just how long it would take to put this kit together?
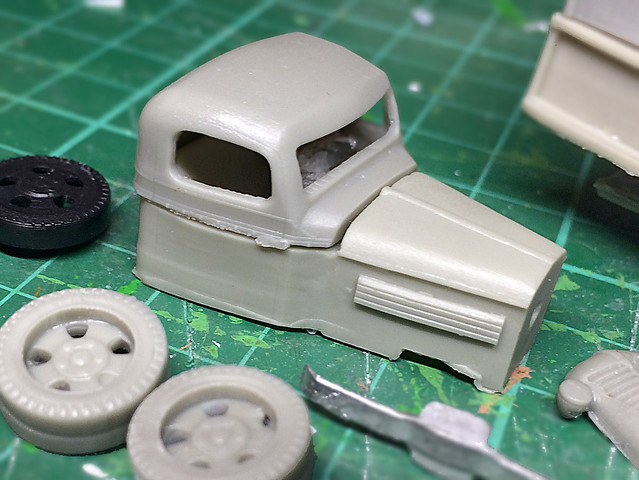
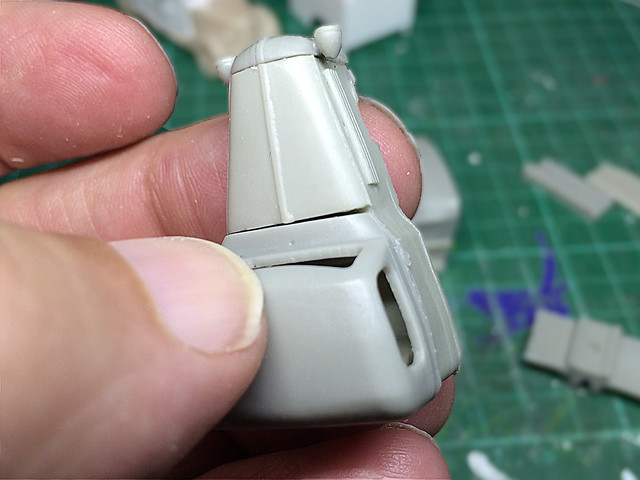
It may look simple but looks can be deceptive. On closer inspection - and a test fitting of all the parts - I quickly realised that this job might be a tiny bit more involved than it first appeared...
The fit is somewhat 'vague' - not that I could be too critical as Minairons specialise in niche models in resin and puter, they are not a large-scale plastic-injection manufacturer. You have to be aware that what you are getting is meant for a select community of enthusasts who are willing to overlook certain deficiencies in the model construction. So it's a case of caveat emptor! ('Let the buyer beware!')
The kit will go together quickly but in order to get the most ot of your purchase you have to be ready to put the extra time in...
Some components will need a little more than a quick sanding to get them to fit properly. Take the above photo of the profile of the model's chassis - I had to immerse this in hot water to get it straight.
Another more trivial characteristic of the Minairons models are the surface textures that appear on some of the components. I believe this may be because they use 3D printing to generate some of the master parts (which is how they can resize their model designs for vaious different scales)...
There's noting a bit of sanding or filling can't repair but it kinda negates the whole 'quick build' aspect of the kits!
But hey! I'm not dispondent. This is such a cool little vehicle that I'm still happy to have it...Now, where's my modelling putty? :)
Next: I begin at the beginning...The cab. Let's see how that goes together!
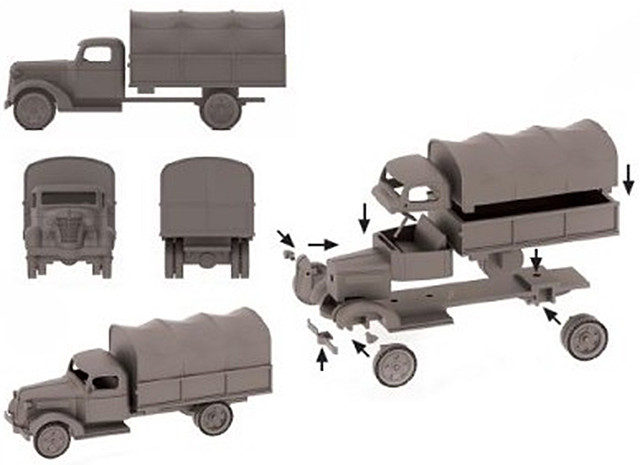 |
| Source: Minairons |
The fit is somewhat 'vague' - not that I could be too critical as Minairons specialise in niche models in resin and puter, they are not a large-scale plastic-injection manufacturer. You have to be aware that what you are getting is meant for a select community of enthusasts who are willing to overlook certain deficiencies in the model construction. So it's a case of caveat emptor! ('Let the buyer beware!')
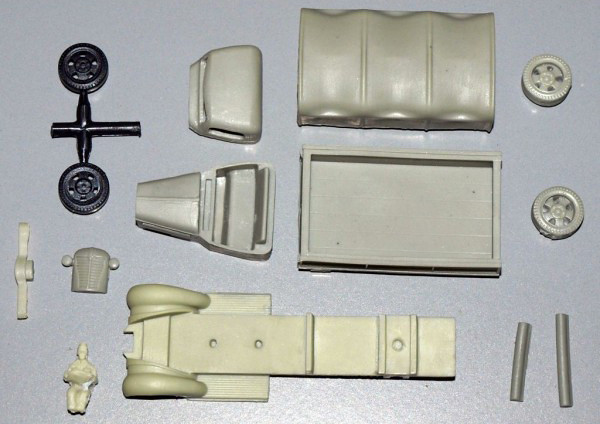 |
| Source: Minairons |
Some components will need a little more than a quick sanding to get them to fit properly. Take the above photo of the profile of the model's chassis - I had to immerse this in hot water to get it straight.
Another more trivial characteristic of the Minairons models are the surface textures that appear on some of the components. I believe this may be because they use 3D printing to generate some of the master parts (which is how they can resize their model designs for vaious different scales)...
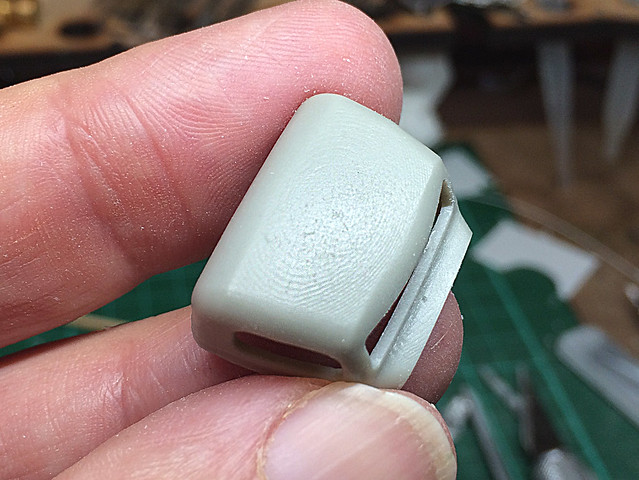 |
| No, not a finger print! This pattern - I believe - is the tell tale sight of 3D printing. |
But hey! I'm not dispondent. This is such a cool little vehicle that I'm still happy to have it...Now, where's my modelling putty? :)
Next: I begin at the beginning...The cab. Let's see how that goes together!
Saturday, 7 November 2015
November's stash additions - Part 2
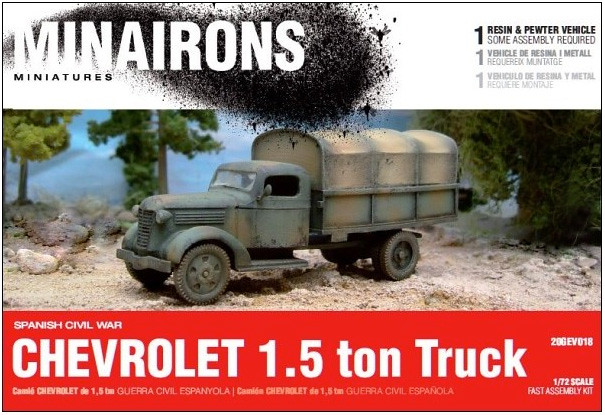
Well, that was quicker than I thought! All the way from Spain comes this wonderful 1/72 Minairons 1937 Chevrolet 1.5 ton truck...
I really quite like Minairons, they are producing a lot of interesting 'inter-war' models that no-one else is doing (in a variety of scales). The downside of this is they are a little pricey for what they are - they are simplified 'war game quality' kits, easy to put together and minimal parts yet this lovely '37 Chevy cost me £10.67 and then I took a big hit on postage as well.
Still, it gives me a unique little vehicle for my Finnish collection...
In the above photo (take in 1941) a Finnish Army '37 Chevy makes it way over a temporary bridge. What's particularly interesting about this photo is that the vehicle has been given a camouflage paint job and it has night driving indicators (the white panels on the fenders and bumper). This is a bit more organised than earlier examples of Finnish commandeered vehicles, as earlier in the war they generally kept their civilian/commercial liveries.
I hate trying to work out what colours were from black and white photos. I'd love to do this camo on my truck but have no idea what colours it might be. (And as these patterns seem to have been an ad hoc unit embellishment there is no record of what they might have been.)
And that's it for this month.
I really quite like Minairons, they are producing a lot of interesting 'inter-war' models that no-one else is doing (in a variety of scales). The downside of this is they are a little pricey for what they are - they are simplified 'war game quality' kits, easy to put together and minimal parts yet this lovely '37 Chevy cost me £10.67 and then I took a big hit on postage as well.
Still, it gives me a unique little vehicle for my Finnish collection...
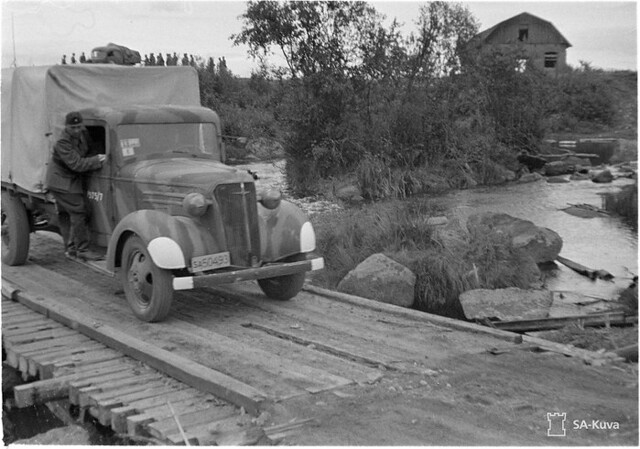 |
| Source: SA-Kuva |
I hate trying to work out what colours were from black and white photos. I'd love to do this camo on my truck but have no idea what colours it might be. (And as these patterns seem to have been an ad hoc unit embellishment there is no record of what they might have been.)
And that's it for this month.
Thursday, 5 November 2015
November's stash additions - Part 1
A couple of additions to the stash this month, the first of which has just been delivered. The other is still in transit from sunny Spain!
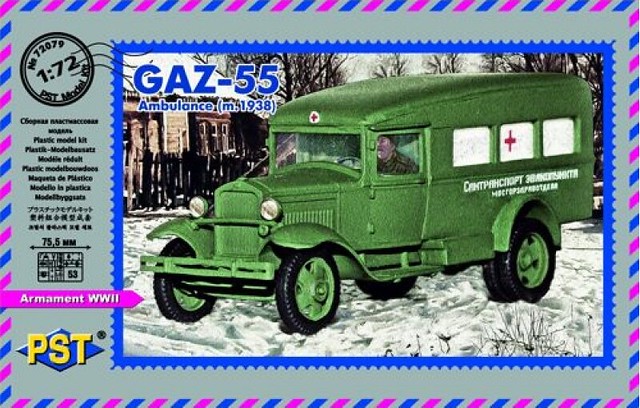
This morning I am rather pleased to be the recipient of one of PST's more recent models - a lovely GAZ-55 Ambulance (m.1938). Though, there are some mixed feelings attached to this model as I had already bought a similar one from Minirions a couple of months ago. Let me explain...
It all started when I spotted this photo while trawling through the indispensable SA-Kuva photo archive. The picture shows a captured Soviet GAZ ambulance being used by the Finnish Army.
Quite by chance the model maker Minirions had just released their 1/72 Spanish Civil War Ford AA 'Bookmobile' model, a wonderfully charming little kit...
It so happens that the Soviet GAZ-AA truck series - of which the GAZ-55 is a member - is a licensed copy of the Ford-AA Model1929 (hence the similarities). So, I immediately ordered the Minarion's kit with the intention of converting the Ford AA kit into its Soviet relative.
All fine and dandy - in fact, I was going start this project next - but then, a few weeks ago, I saw this on the eModels (UK) web site...
A bit of a quandary. What to do - proceed with my conversion plan or buy the proper kit?
What clinched my decision was that - by sheer coincidence - I happened to come up with yet another 'cunning plan' for the Minairion's kit (based on yet another piece of photographic reference I happened to come across). This meant I could go ahead and buy the PST GAZ-55 after all.
This is quite a nice outcome as I remember having fun making my PST ZIS-6 truck, it was a nice kit and went together very nicely. Therefore, I am looking forward to making this GAZ.
This morning I am rather pleased to be the recipient of one of PST's more recent models - a lovely GAZ-55 Ambulance (m.1938). Though, there are some mixed feelings attached to this model as I had already bought a similar one from Minirions a couple of months ago. Let me explain...
It all started when I spotted this photo while trawling through the indispensable SA-Kuva photo archive. The picture shows a captured Soviet GAZ ambulance being used by the Finnish Army.
 |
| Source: SA-Kuva [44306 - Gaz 55 Ambulance] |
It so happens that the Soviet GAZ-AA truck series - of which the GAZ-55 is a member - is a licensed copy of the Ford-AA Model1929 (hence the similarities). So, I immediately ordered the Minarion's kit with the intention of converting the Ford AA kit into its Soviet relative.
All fine and dandy - in fact, I was going start this project next - but then, a few weeks ago, I saw this on the eModels (UK) web site...
A bit of a quandary. What to do - proceed with my conversion plan or buy the proper kit?
What clinched my decision was that - by sheer coincidence - I happened to come up with yet another 'cunning plan' for the Minairion's kit (based on yet another piece of photographic reference I happened to come across). This meant I could go ahead and buy the PST GAZ-55 after all.
This is quite a nice outcome as I remember having fun making my PST ZIS-6 truck, it was a nice kit and went together very nicely. Therefore, I am looking forward to making this GAZ.
Wednesday, 4 November 2015
Chevrolet Radio Van conversion - Part 3
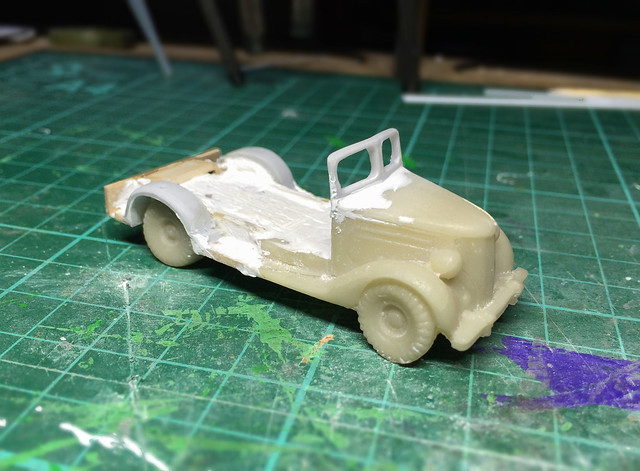
Having stripped the Valiant model (a LRDG Ford 15cwt truck) down to just the bonnet and chassis, I am now ready to build the bodywork back up again...
Rebuilding the windscreen worried me the most as I thought this might be tricky. Luckily I found a spare windscreen in my scraps box (one of the good things about getting time under your belt modelling is that the longer you do it the larger and more useful your scraps box becomes). I also found a nice set of wheel arches for the rear wheels.
The cab interior
Why go to the bother of making an interior? Well, I had the spare parts on hand and it didn't take five minutes to cobble together a simple bit of detail...
Now, because this interior will need painting (and a driver figure installed) I will leave off boxing it in and instead get on with the van framework instead (everything to the rear of the cab).
Van bodywork - forget the curves, let's have angles!
You might remember that it was my original intention to built a model of the 1937/39 Chevrolet
'Panel Van' - a lovely looking delivery van. This would have required a lot of delicate modelling to achieve the elegantly designed streamlined van bodywork inherent of this type, and I have to admit I don't think I'm up to doing the design the justice it deserves.
However, I found a lovely photo of a 1939 Chevrolet with what looked like 'tacked on' and rather boxy van bodywork. Even though I cannot be sure of it's historic authenticity regarding Finnish use I just knew I had to have something like this in my collection. The ad hoc nature of its construction seemed perfectly in the spirit of the Finn's make do and mend philosophy.
(And being 'boxy' makes it so much more easy for me to make!)
Well, you get the idea. It's a pretty simple conversion - stripping down the resin parts aside (thank you Dremmel) - and although the initial phase seems a lot of work I find this sort of project very enjoyable as the end product is somewhat unique. Or rather I should say the product is very satisfying as I would never say that it's as good quality as an equivalent plastic kit.
(I mention this - the satisfaction derived - as a couple of people have pointed out on forums that this seemed a lot of work and that there wasn't much left of the donor vehicle. Yes, I guess I could have searched around to find a donor model closer to my finished idea thus negating all the tedious and messy Dremmeling, but I don't think the project would have been so interesting and enjoyable for me. That's just me!)
Next: The finished van bodywork and the cab fitting.
Rebuilding the windscreen worried me the most as I thought this might be tricky. Luckily I found a spare windscreen in my scraps box (one of the good things about getting time under your belt modelling is that the longer you do it the larger and more useful your scraps box becomes). I also found a nice set of wheel arches for the rear wheels.
The cab interior
Why go to the bother of making an interior? Well, I had the spare parts on hand and it didn't take five minutes to cobble together a simple bit of detail...
Now, because this interior will need painting (and a driver figure installed) I will leave off boxing it in and instead get on with the van framework instead (everything to the rear of the cab).
You might remember that it was my original intention to built a model of the 1937/39 Chevrolet
 |
| How can you not love this van? |
(And being 'boxy' makes it so much more easy for me to make!)
Well, you get the idea. It's a pretty simple conversion - stripping down the resin parts aside (thank you Dremmel) - and although the initial phase seems a lot of work I find this sort of project very enjoyable as the end product is somewhat unique. Or rather I should say the product is very satisfying as I would never say that it's as good quality as an equivalent plastic kit.
(I mention this - the satisfaction derived - as a couple of people have pointed out on forums that this seemed a lot of work and that there wasn't much left of the donor vehicle. Yes, I guess I could have searched around to find a donor model closer to my finished idea thus negating all the tedious and messy Dremmeling, but I don't think the project would have been so interesting and enjoyable for me. That's just me!)
Next: The finished van bodywork and the cab fitting.
Subscribe to:
Comments (Atom)
