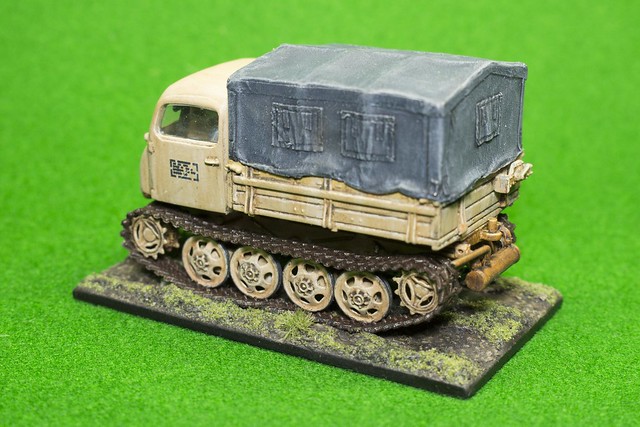
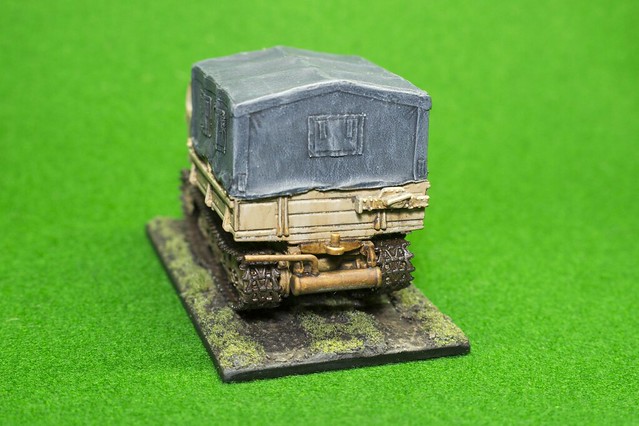
Altaya 1/72 Raupenschlepper (RSO) Prime Mover
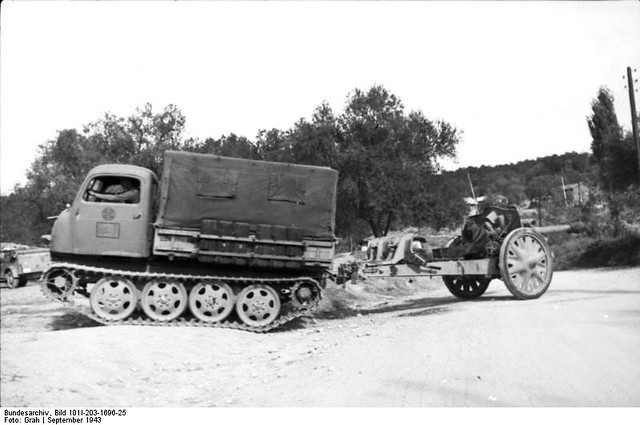
The Finnish Army purchased 53 vehicles from the Germans which were delivered in 1944. They were procured as artillery prime movers, being capable of towing both 7.5cm Pak 40 and the 10.5cm leFH 18 Light Field Howitzer which they also bought from the Germans (though there is photo reference of a Finnish RSO towing a captured Soviet 122mm gun).
Diary of a novice scale model maker and his adventures in the wacky world of Braille Scale.
Showing posts with label X-Ref: ALT/RSOCON/1114. Show all posts
Friday, 30 October 2015
Wednesday, 28 October 2015
1/72 Steyr RSO - The last leg
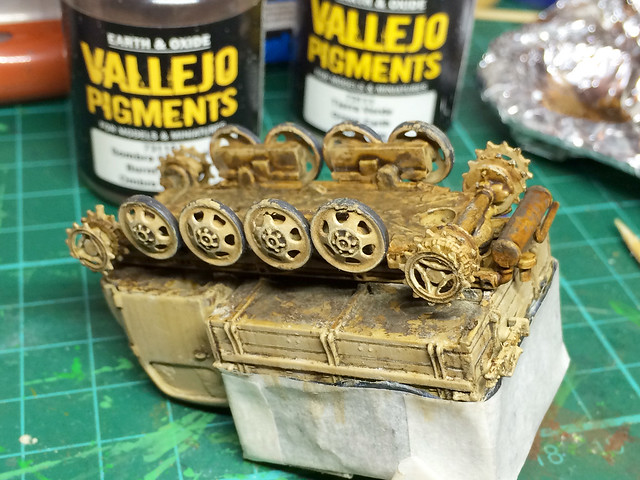
The last touches to the vehicle body are just some 'cosmetics' - the addition of some dirty and mud to the underside...
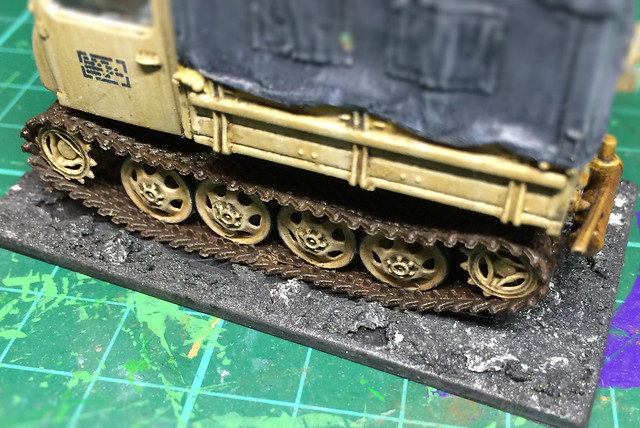
Having finished the underside I can now add the tracks. in doing this I have to use some strategically placed spots of superglue in order to give the impression of realistic track droop...
This all worked out OK, I suppose, but the vinyl tracks deform very easily and I hate the obvious join. Still, I guess this is one of the downsides of die-cast models compared to quality plastic kits.
And lastly...
Making the model base
Well, you know the routine by now, although this base will be slightly different because of the tracks (rather than the usual wheels). So it will be interesting to see how this will work out.
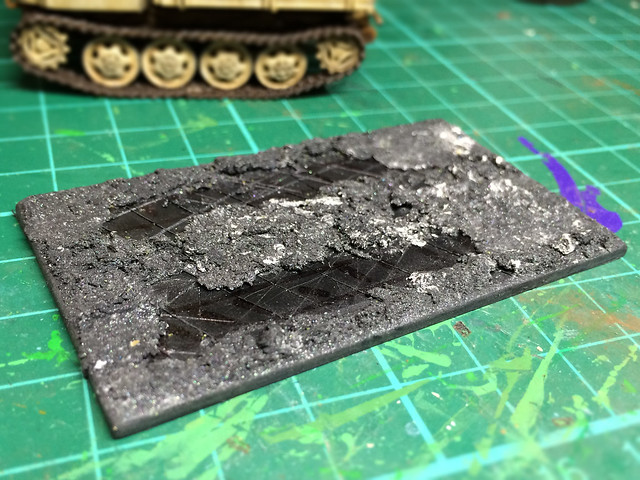
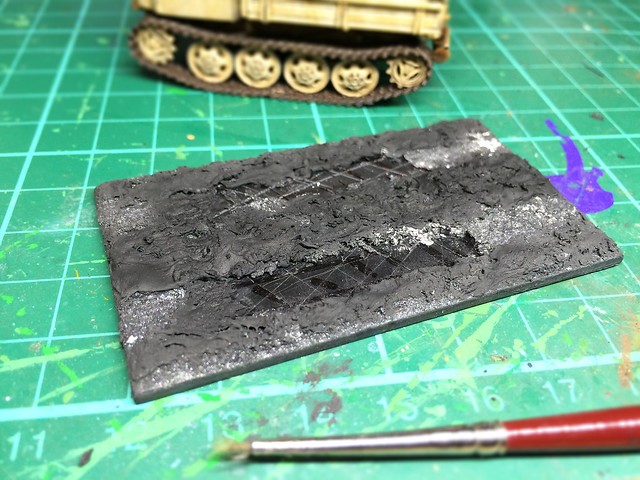
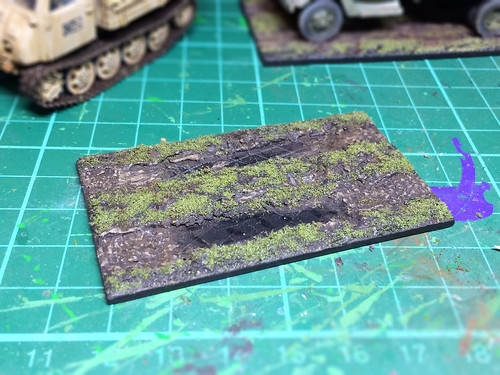
I begin with the usual rectangle of black plastic sheet, cut down to give a 5mm border all round the circumference of the vehicle to be mounted. I then start daubing on some Polyfilla, which has been coloured black by adding some acrylic paint, to represent a muddy road or country track...
I try to leave a flat area without any 'mud' for the tracks (or wheels when doing trucks) to sit on. The reason for this is so I can build up some mud around them so they appear to be depressed into the ground. It also gives me a good piece of the bare base with which I can glue my vehicle securely.
A quick check with the vehicle in place gives me an idea of how much more 'mud' I need to add and where to add it. I want to make sure the vehicle tracks look like they are pressing into the ground (Polyfilla is excellent stuff, I particularly like the quick drying version that comes in a tube)...
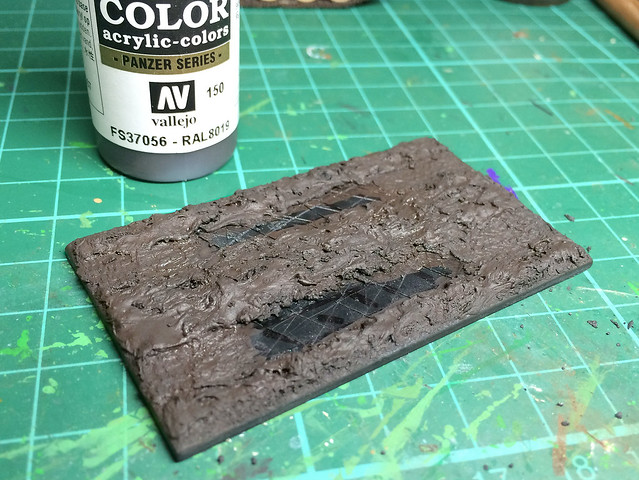
With the 'mud' added right up to the tracks now I can get onto painting the base and adding grass. My basic earth coloured coat is Vallejo's [822] German Camo Black Brown...
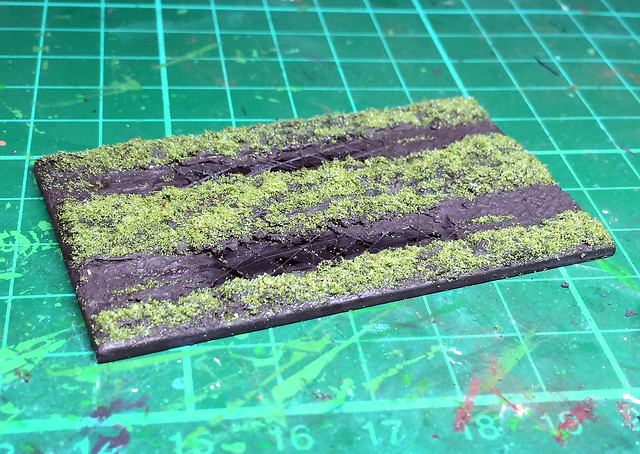
After a light wash of very dark brown to pick out the detail and texture in ground I add the grass. This is a simple sprinkle of static mid-coloured grass on top of a thin mix of watery PVA glue...
Grass sown, it's onto creating the mud tones. For this I have been using Tamiya's Weathering Sticks (as I got them cheap) - I lay down some of Tamiya's 'Mud' and then highlight it with Tamiya's 'Light Earth'...
And that's that really. I'm ready to mount the RSO and then all that's left to do is take the completion photos.
Improving die-cast models to fit in with plastic models has it's own challenge, but I enjoyed this project. Which is probably just as well as I have a small collection of other 1/72 die-cast vehicles I will be converting for my Finnish Continuation War project.
But, it will be nice to have a break and get back to a bit of kit making..
Having finished the underside I can now add the tracks. in doing this I have to use some strategically placed spots of superglue in order to give the impression of realistic track droop...
This all worked out OK, I suppose, but the vinyl tracks deform very easily and I hate the obvious join. Still, I guess this is one of the downsides of die-cast models compared to quality plastic kits.
And lastly...
Making the model base
Well, you know the routine by now, although this base will be slightly different because of the tracks (rather than the usual wheels). So it will be interesting to see how this will work out.
I begin with the usual rectangle of black plastic sheet, cut down to give a 5mm border all round the circumference of the vehicle to be mounted. I then start daubing on some Polyfilla, which has been coloured black by adding some acrylic paint, to represent a muddy road or country track...
I try to leave a flat area without any 'mud' for the tracks (or wheels when doing trucks) to sit on. The reason for this is so I can build up some mud around them so they appear to be depressed into the ground. It also gives me a good piece of the bare base with which I can glue my vehicle securely.
A quick check with the vehicle in place gives me an idea of how much more 'mud' I need to add and where to add it. I want to make sure the vehicle tracks look like they are pressing into the ground (Polyfilla is excellent stuff, I particularly like the quick drying version that comes in a tube)...
With the 'mud' added right up to the tracks now I can get onto painting the base and adding grass. My basic earth coloured coat is Vallejo's [822] German Camo Black Brown...
After a light wash of very dark brown to pick out the detail and texture in ground I add the grass. This is a simple sprinkle of static mid-coloured grass on top of a thin mix of watery PVA glue...
Grass sown, it's onto creating the mud tones. For this I have been using Tamiya's Weathering Sticks (as I got them cheap) - I lay down some of Tamiya's 'Mud' and then highlight it with Tamiya's 'Light Earth'...
And that's that really. I'm ready to mount the RSO and then all that's left to do is take the completion photos.
Improving die-cast models to fit in with plastic models has it's own challenge, but I enjoyed this project. Which is probably just as well as I have a small collection of other 1/72 die-cast vehicles I will be converting for my Finnish Continuation War project.
But, it will be nice to have a break and get back to a bit of kit making..
Monday, 26 October 2015
1/72 Steyr RSO - Part 7
Having finished the weathering on the vehicle - I've applied the pin-wash and chipping now - it's onto the the bit I've been dreading...Painting the vinyl tracks.
Before get onto that, though, just a quick word on the state on the weathering and chipping. I haven't gone mad with the wear and tear effects on this RSO, it's mainly dirt. This is because the RSO was a fairly recent addition to the Finnish inventory in 1944, so unlike some of my other trucks for this project they wouldn't have seen heavy wear.
As usual, really grateful to Engines of the Wehrmacht web site for excellent reference.
How to paint vinyl tracks?
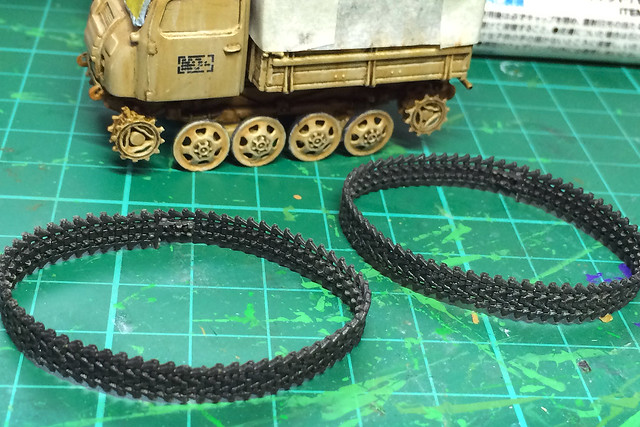
Oh, now the tricky bit - painting 'elastic band' tracks. The problem, of course, is the flexibility and elasticity of the material. Painting them with acrylics and then stretching them for fitting may be liable to flake the paint right off.
Now, it's been suggested that the easiest way to paint these is when they are fitted in place - so there is no need to stretch the tracks again. But after putting so much effort into painting the track wheels I don't fancy doing this. (The other approach would be to cut the track bands and paint them flat, gluing them back to get
So, I'm going to begin with a test to see what effect spraying the tracks and then stretching them has...This could end badly!
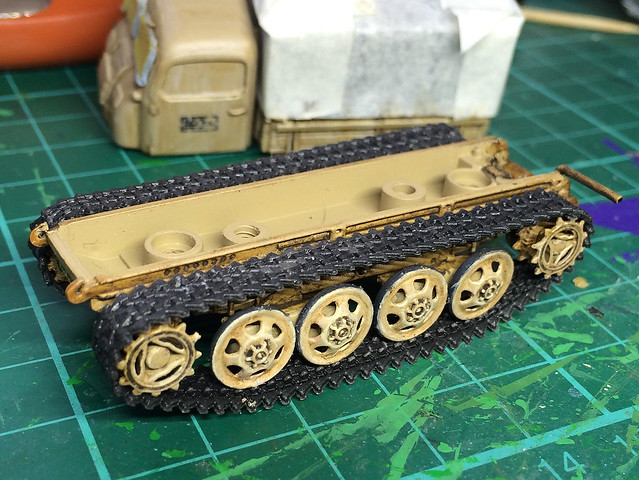
![]() |
| I've put the tracks back in place to see how much I have to stretch them. They actually don't need to be stretched that much, but will it flake the paint? |
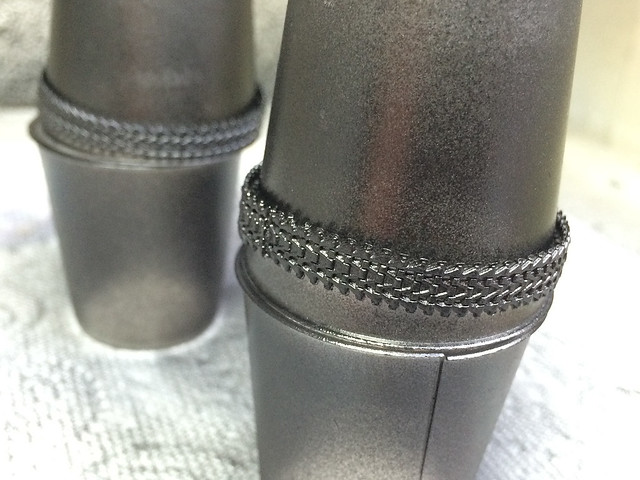
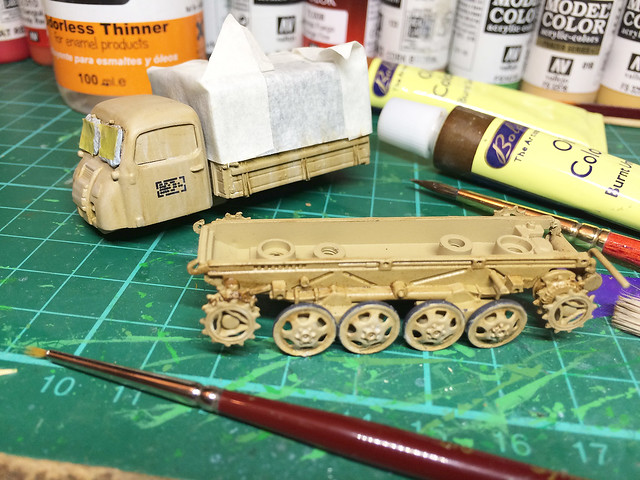
So, I began by spraying my 'elastic band' tracks with my usual black primer - cheap Hicote auto primer. I mounted the tracks on some make-shift supports and first sprayed the inside of the tracks and then the outsides...
I have to say that when I turned the flexible tracks inside-out between sprays I didn't experience any flaking of paint at this stage. So far so good, but what about when I spray on some normal acrylic paint?
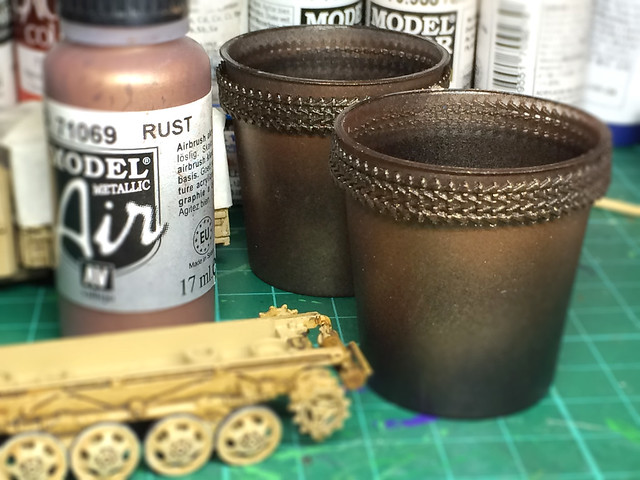
For the next stage of the track painting I am using Vallejo's Model Air Metallic [71069] Rust...
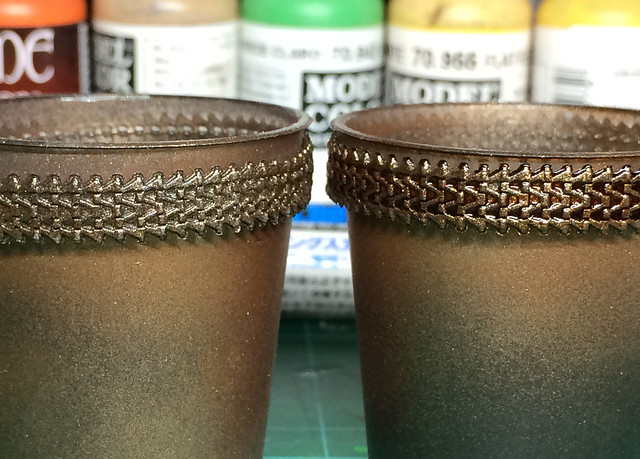
And then, to give the track some depth, I tried out a light wash with some Sienna Ink (below, right). I'm probably going to play about a bit with different colours and shades of washes to see what effect they have and which brings out the detail best...
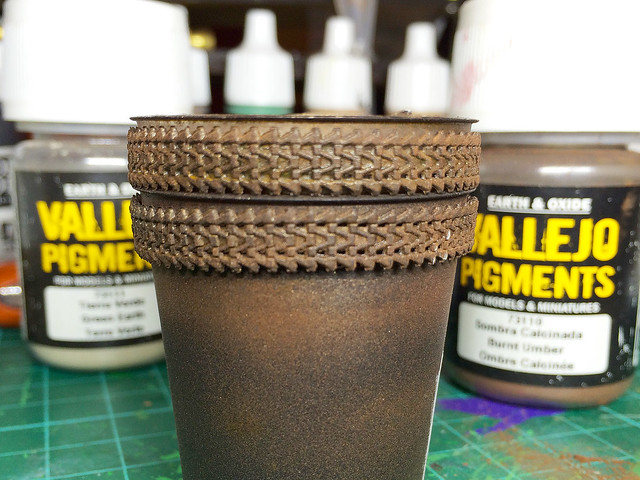
Having got the metallic, rusty base that I wanted it's now time to tone it down! I will be doing this with Vallejo's [powder] Pigments, notably 'Burnt Umber' and 'Green Earth', which give a dried mud and dust colour (the Burnt Umber also adding to the rust effect)...
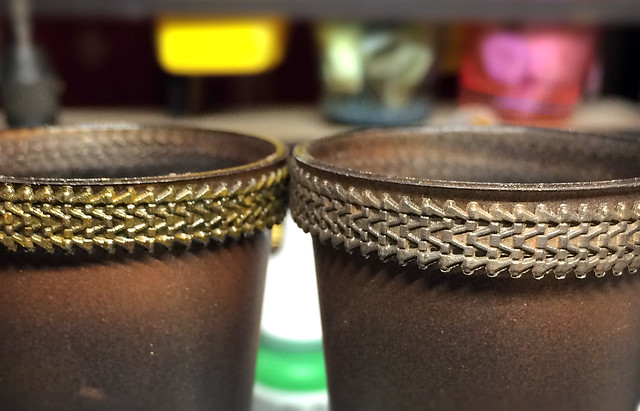
![]() |
| On the left is the 'rusty' un-weathered track, on the right the pigment treated track. |
There are ways you can get around this, by adding a fixer medium to the pigments to begin with. But I wanted to experiment with a more dusty looking effect (so this may go wrong)...
Hooray! A couple of very light passes - at medium distance - with Humbrol Matt Varnish did no harm. The tracks have retained the dusty effect created with the pigments, but the pigment is now 'fixed'. There's still an underlaying metallic sheen which gives the impression that the rust is surface rust which is good. But there's not glint or 'sparkle' of bare metal, so that's next...
Graphite pencil - steel highlights
The final stage in this process is adding the steel 'glints' or accent to the tracks. Of course you don't have to add this IF you decide you want heavily rusted or muddy tracks I suppose.
My 'go to' tool for metallic highlighting is my 4B graphite pencil. It's a terrifically easy and effective technique, in this case I just gently run the pencil over the raised bits of the track and the edges...
I'd probably be tempted to finish this effect off with some small touches of silver acrylic here and there for those scratches which show the bare steel and for extra extra shinny highlights.
But that's it for tonight. I'm quite satisfied with that and the good news is that the paint doesn't appear to be flaking.
Next: Fitting the tracks and making the base.
Thursday, 22 October 2015
1/72 Steyr RSO - Part 6
Weathering with oils
I'm starting to get a process with my vehicles, a series things that seem to work for me. Bleaching and staining with cheap oil paints is part of my weathering regime...
The bleached streaks are done by smudging spots of white oil paint and the greasy brown streaks are smudges of brown oil. Between oil colours I spray on a light coat of satin varnish to help protect the previous oil layers.
I've also started using the brown oil paint as a sort of wash - I did this on the chassis and underneath, it's a quick way to distress and shade areas that aren't 'on show'...
Pinwashing
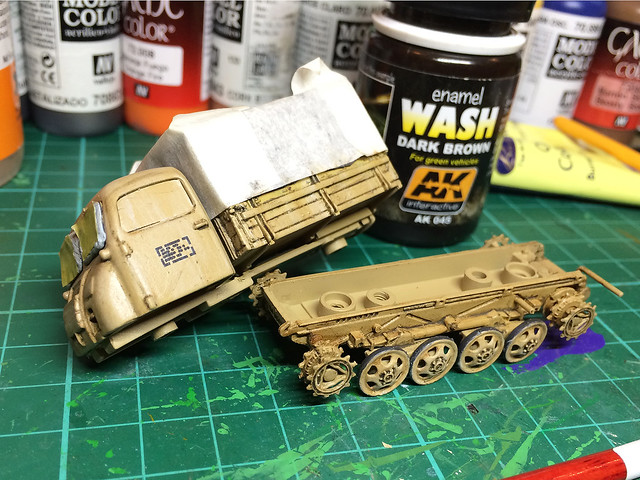
While the use of cheap oil paints has made many of my (more expensive) AK Interactive Washes obsolete there is one item in AK's line that I don't think I could do without. That's their Dark Brown for Green Vehicles.
This is an enamel wash so it has pros and cons. Obviously it's a bit smelly, I suppose I've gotten a bit spoilt because of the availability of good quality acrylic paints these days (can't believe it was enamels or nothing when I was a kid). On the positive side it's because it's a oil-based paint that it works so well - in combination with a varnished surface - for pin-washing.
Next up - a spot of highlighting before the chipping and mud.
I'm starting to get a process with my vehicles, a series things that seem to work for me. Bleaching and staining with cheap oil paints is part of my weathering regime...
The bleached streaks are done by smudging spots of white oil paint and the greasy brown streaks are smudges of brown oil. Between oil colours I spray on a light coat of satin varnish to help protect the previous oil layers.
I've also started using the brown oil paint as a sort of wash - I did this on the chassis and underneath, it's a quick way to distress and shade areas that aren't 'on show'...
Pinwashing
While the use of cheap oil paints has made many of my (more expensive) AK Interactive Washes obsolete there is one item in AK's line that I don't think I could do without. That's their Dark Brown for Green Vehicles.
This is an enamel wash so it has pros and cons. Obviously it's a bit smelly, I suppose I've gotten a bit spoilt because of the availability of good quality acrylic paints these days (can't believe it was enamels or nothing when I was a kid). On the positive side it's because it's a oil-based paint that it works so well - in combination with a varnished surface - for pin-washing.
Next up - a spot of highlighting before the chipping and mud.
Monday, 12 October 2015
What next? Steyr RSO
Now I'm fully back into the swing of my hobbies (and blogging about them) and the missus admits that it will be 'a while' before we can afford to do any more home improvement jobs I find I have a backlog of part built models to get through.
So, next up on the workbench is a nifty little conversion of the die-cast Altaya Steyr RSO tracked prime mover for my Finnish project. Here's where I left the model...
It looks like I've actually done the majority of the hardest work. I think it's onto the weather and chipping stage, so - in theory - this should be a nice short job.
...Yes, it's all coming back to me now - I wasn't looking forward to painting the 'elastic band' style vinyl tracks!
Link to all posts in the project series Altaya Steyr RSO Die-cast Conversion
So, next up on the workbench is a nifty little conversion of the die-cast Altaya Steyr RSO tracked prime mover for my Finnish project. Here's where I left the model...
It looks like I've actually done the majority of the hardest work. I think it's onto the weather and chipping stage, so - in theory - this should be a nice short job.
...Yes, it's all coming back to me now - I wasn't looking forward to painting the 'elastic band' style vinyl tracks!
Link to all posts in the project series Altaya Steyr RSO Die-cast Conversion
Sunday, 14 December 2014
1/72 Steyr RSO - Part 5
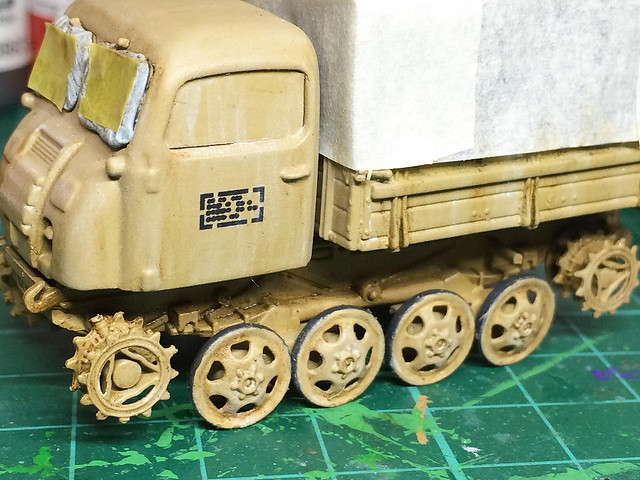
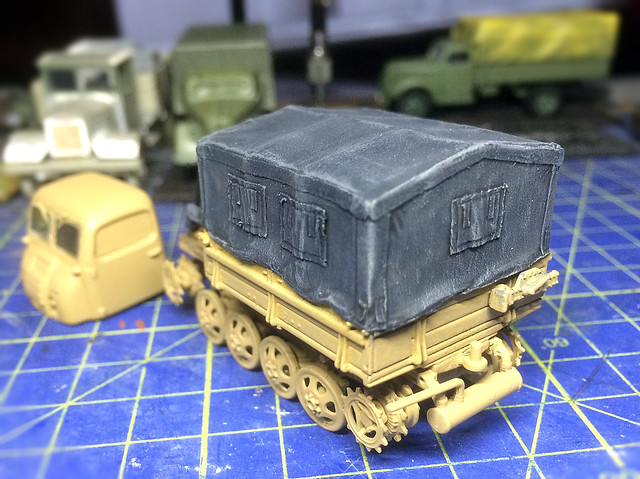
OK, a real post this time! I've been fooling around with some dry-brushing of the canvas tilt.
Now, I'm not a huge fan of dry-brushing - probably because I haven't mastered the technique - but it seemed such a logical effect to apply the my RSO's dark grey tilt cover.
I'm using this LIFE cover photo as reference, I really like the tatty nature of the canvas tilt on this RSO. It's also nice and muddy, which I will use as the contrast in colours will lift the plain grey canvas and add some character...
In the meantime, onto the cab interior. Now, I'm not spending a lot of time on this, just the bear minimum as it will only be partially visible through the cab windscreen. I gave the interior a mid-brown wash and did a passable job of the figure - just a bit of dry-brushing for highlights and then some black wash for shadows...
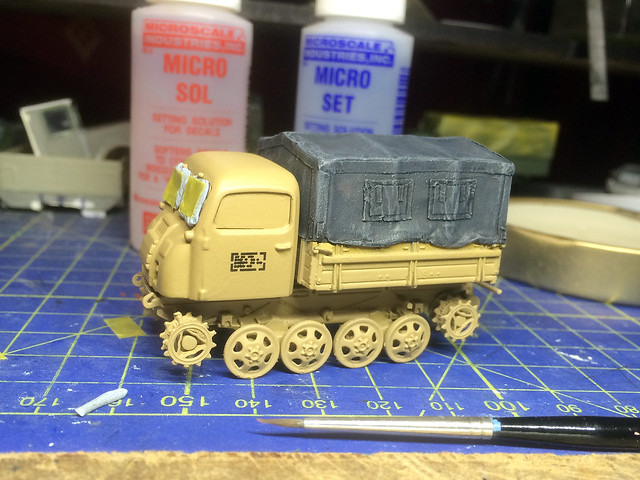
The Finnish vehicle didn't have unit or divisional emblems, the Finn's didn't seem to use them. All it seems to have had were Finnish military ('SA') number-plates and the factory applied vehicle ID patches on the driver's door. The ID patches contained weight data [shipping] for the vehicle and seem to have been applied to both doors, or sometimes just to the drivers side...
As usual I gave the base paint coat on the cab a light spray of Humbrol's acrylic Satin Varnish before applying the decal. I used Microscale's Micro Set as a preparation and placed the water-slide decal (from a Academy Opel Blitz kit) onto that then dabbed it dry. Once satisfied with the positioning I then gently moistened the edges of the decal with Micro Sol, just to ensure an seamless look between decal and the model surface.
And that's it for tonight. Next it will be back into the spray booth for another light dusting of satin varnish to seal the decal and prepare the model for a dusting of dust and pin-washing.
Now, I'm not a huge fan of dry-brushing - probably because I haven't mastered the technique - but it seemed such a logical effect to apply the my RSO's dark grey tilt cover.
I'm using this LIFE cover photo as reference, I really like the tatty nature of the canvas tilt on this RSO. It's also nice and muddy, which I will use as the contrast in colours will lift the plain grey canvas and add some character...
In the meantime, onto the cab interior. Now, I'm not spending a lot of time on this, just the bear minimum as it will only be partially visible through the cab windscreen. I gave the interior a mid-brown wash and did a passable job of the figure - just a bit of dry-brushing for highlights and then some black wash for shadows...
The Finnish vehicle didn't have unit or divisional emblems, the Finn's didn't seem to use them. All it seems to have had were Finnish military ('SA') number-plates and the factory applied vehicle ID patches on the driver's door. The ID patches contained weight data [shipping] for the vehicle and seem to have been applied to both doors, or sometimes just to the drivers side...
As usual I gave the base paint coat on the cab a light spray of Humbrol's acrylic Satin Varnish before applying the decal. I used Microscale's Micro Set as a preparation and placed the water-slide decal (from a Academy Opel Blitz kit) onto that then dabbed it dry. Once satisfied with the positioning I then gently moistened the edges of the decal with Micro Sol, just to ensure an seamless look between decal and the model surface.
And that's it for tonight. Next it will be back into the spray booth for another light dusting of satin varnish to seal the decal and prepare the model for a dusting of dust and pin-washing.
1/72 Steyr RSO - Part 4
[This is a 'note to myself' post.]
Part of the RSO job will be dealing with those rubber/vinyl tracks. I haven't painted rubber model tank tracks before, I've only done hard plastic tracks. So I've had to go out and do a bit of research and find some useful tutorials for dealing with these sort of tank tracks.
Here's the best I have found so far - it's on the www.militarymodelling.com site and although it's a 1/35 scale tutorial it seems to be just as suitable for Braille Scale models...
You can find the detailed tutorial here:
Part of the RSO job will be dealing with those rubber/vinyl tracks. I haven't painted rubber model tank tracks before, I've only done hard plastic tracks. So I've had to go out and do a bit of research and find some useful tutorials for dealing with these sort of tank tracks.
Here's the best I have found so far - it's on the www.militarymodelling.com site and although it's a 1/35 scale tutorial it seems to be just as suitable for Braille Scale models...
![]() |
| Picture source: Per-Erik Kristiansen via Militarymodelling.com |
Militarymodelling.com
Thursday, 27 November 2014
1/72 Steyr RSO - Part 3
Basic painting
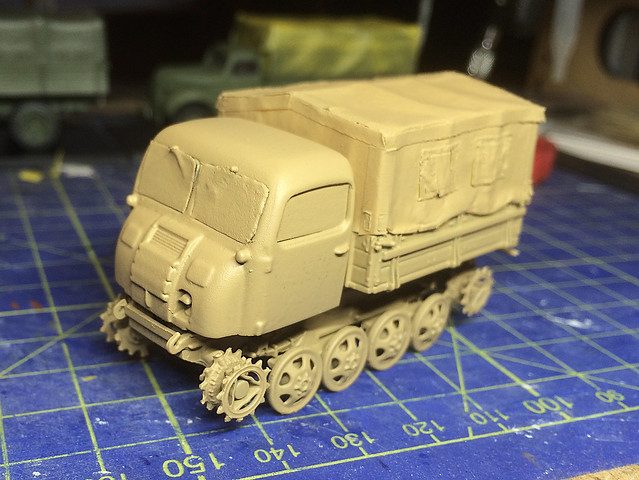
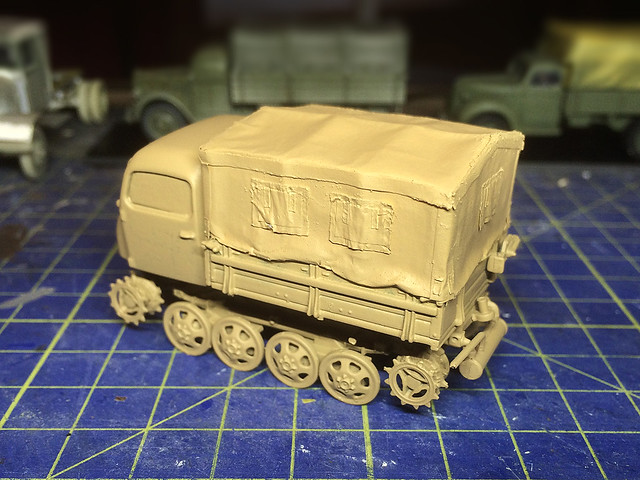
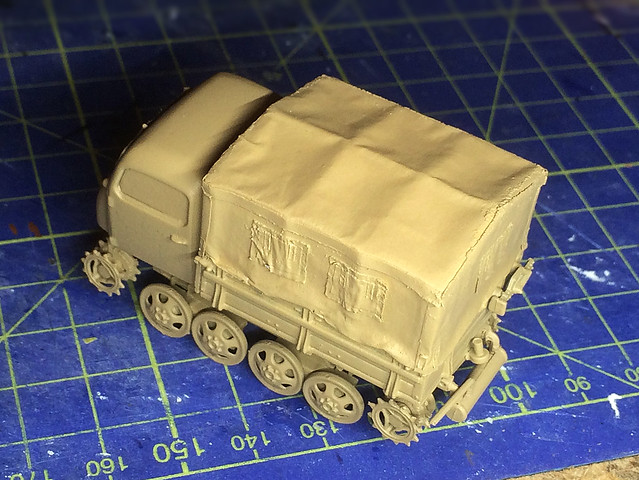
I have now sprayed the RSO with a coat of Humbrol's 'Matt Desert Yellow' (#93) acrylic spray. I could have gone with a black base coat - I know many modellers like that method - but I like to start with a mid-shade base coats so I can go darker or lighter with my subsequent shading.
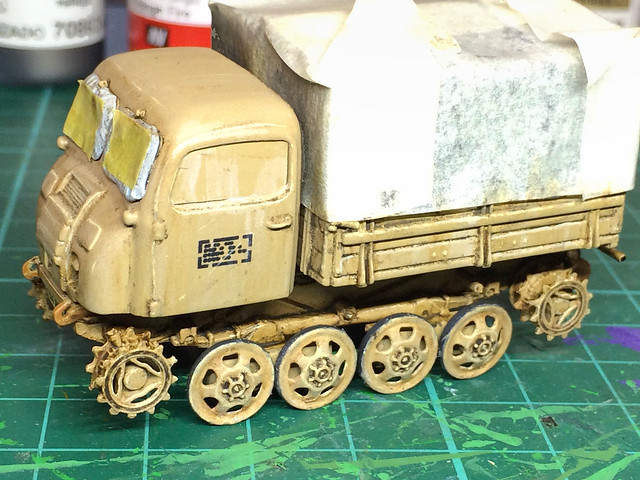
I was pleased that this light coat covered up the model's original camo colours nicely and I did manage to get some of the wrinkle effect in my canvas tilt...
Obviously if I had gone for a thinner masking tape when making the tilt cover more of the wrinkles from the foil base layer would have been evident. But, still, the effect isn't bad. The roof of the tilt came out especially well, with just the right amount of 'droop' between the supports...
The base painting has highlighted some ragged seams and areas that need some extra work. A quick bit of sanding here or there, nothing major.
Next I add the modulation colour with a airbrush misting of Vallejo's 'Middle Stone' (#031). This will create a slightly darker tone to the 'Dunkelgelb' areas and make the overall effect a little less yellow. Hopefully I can create some nice tonal effects by letting more or less of the base coat show through.
Note: Just looked at this again and I'm not sure I am at all happy with the 'yellow' colour of the Vellejo Middle Stone paint. I think I was happier with the Humbrol Desert Yellow that I primed the model with! Oh dear, this vehicle might look different the next time you see it!
NEXT: Painting the cab interior.
I have now sprayed the RSO with a coat of Humbrol's 'Matt Desert Yellow' (#93) acrylic spray. I could have gone with a black base coat - I know many modellers like that method - but I like to start with a mid-shade base coats so I can go darker or lighter with my subsequent shading.
I was pleased that this light coat covered up the model's original camo colours nicely and I did manage to get some of the wrinkle effect in my canvas tilt...
Obviously if I had gone for a thinner masking tape when making the tilt cover more of the wrinkles from the foil base layer would have been evident. But, still, the effect isn't bad. The roof of the tilt came out especially well, with just the right amount of 'droop' between the supports...
The base painting has highlighted some ragged seams and areas that need some extra work. A quick bit of sanding here or there, nothing major.
Next I add the modulation colour with a airbrush misting of Vallejo's 'Middle Stone' (#031). This will create a slightly darker tone to the 'Dunkelgelb' areas and make the overall effect a little less yellow. Hopefully I can create some nice tonal effects by letting more or less of the base coat show through.
Note: Just looked at this again and I'm not sure I am at all happy with the 'yellow' colour of the Vellejo Middle Stone paint. I think I was happier with the Humbrol Desert Yellow that I primed the model with! Oh dear, this vehicle might look different the next time you see it!
NEXT: Painting the cab interior.
Tuesday, 25 November 2014
1/72 Steyr RSO - Part 2
As I mentioned in the first part of this project thread I have two main modelling jobs to do on this diecast RSO. The first is to make a driver figure and the second is to make a canvas tilt cover.
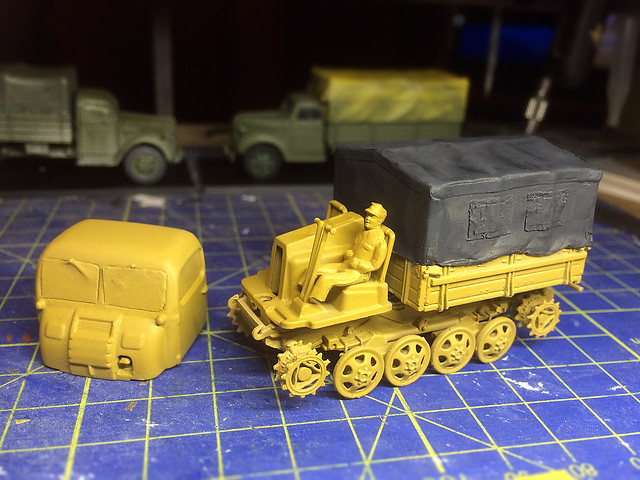
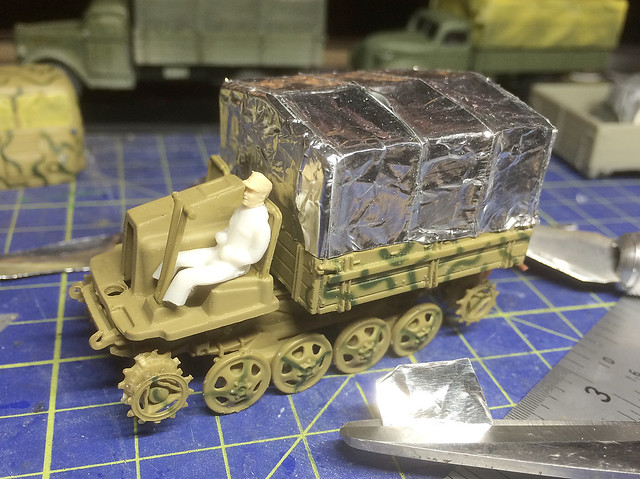
The figure is very straight forward, I've done this three or four times now. I use a 1/76 seated model railway model figure's body - as full-sized 1/72 figures look too big inside 1/72 model vehicle cabs for some reason - and cut off it's head, replacing it with a 1/72 military figure's head.
Even with the 'smaller' body I still had to cut off the feet to squeeze him into the very cramped cab! Still, you won't see this when the cab body is re-attached.
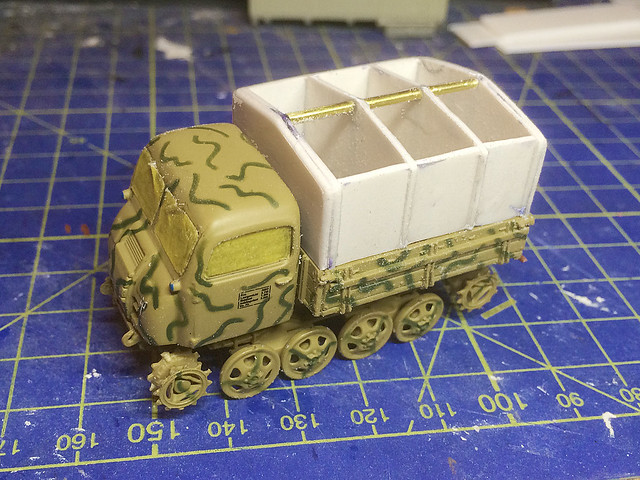
I then made a start on the canvas tilt cover. I began by making a set of 'ribs' to denote where the canvas support rods would be - the idea being that I drape my tarp material over this to give the impression of the supports with some 'droop' in between them.
Next I created some walls for support, recessing them just a tiny bit so I can create the slackness in the canvas that I am after.
I left the top of this support open but added a longitudinal support rod down the middle so the canvas material could drape over it, giving a natural droop in-between the 'spines' of the tilt. If that makes sense? (I'm making this up as I go along!)
For the material itself I am experimenting with a sandwich of two materials. I'm starting with the foil tape that I have used before on other canvas tilts - because it's foil it wrinkles and keeps it shape, making nice little folds. But foil is a bitch to paint (paint is apt to chip and flake off it I have found) so...
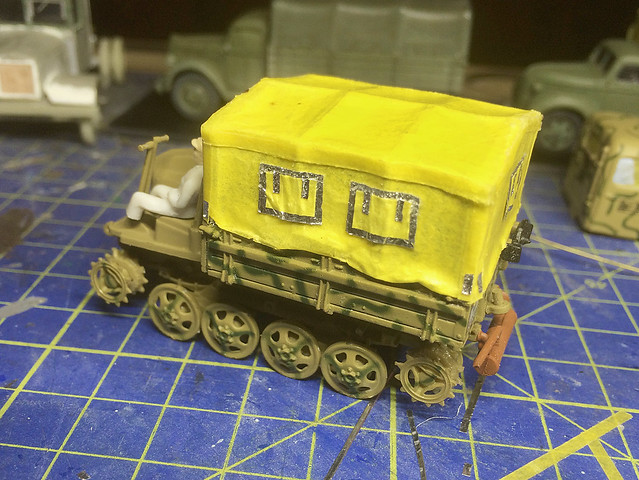
On top of my foil tape base I will stick some masking tape. This not only takes paint better - being a little absorbent - but creates a nice textured surface giving the impression of a fabric based material. (In theory!)
Note: You could just use the foil on it's own, depending if you want a lot of wrinkles. I wanted a subtler effect. Whether it has worked will depend on how it looks after the paint has been applied.
Using more pieces of masking tape I add some of the tarp details, like extra seams and the window flaps, etc. Working with tape for modelling fabric is nice as you can create natural looking folds and wrinkles - but for extra hold you can coat the masking tape with a thin coating of super-glue.
Note: The masking tape I used was a bit too thick, to really get the benefit of the foil wrinkles below you ned to use very thin modellers masking tape instead of the decorators tape I used. The next time I try something like this I might try gluing PVA soaked tissue paper over the foil instead.
And finally...
There is one more modelling job that I *could* do but haven't decided whether I should or shouldn't as it is an optional item.
The Steyr RSO came with a set of winter/soft ground track shoes (or grousers). They are clearly seen in many reference photos and were included because the RSO was originally designed with the 'Russian Front' in mind (RSO stood for Raupenschlepper Ost, which is literally "Caterpillar Tractor East"). So all RSOs came from the factory with a set of wooden 'slats' which could be fitted to the narrow tracks should the ground be boggy or snow very deep.
My Finnish photo of an RSO has them fitted, and I suppose when you bear in mind teh geography and climate of the Finnish theatre - with boggy forests and harsh winters - it kinda makes sense for them to be a 'non-optional' item really.
...I'll think about it!
Sunday, 23 November 2014
Next up - Finnish Raupenschlepper Ost RSO
OK, you've probably had enough of trucks by now, eh? So I'm moving on - a little.
Thinking ahead to the heavy armour company I will be making I wanted a project that would bridge the gap between wheeled vehicles and tanks and the German RSO/01 - 'Caterpillar Tractor East' - seems the idea transition vehicle. The Finns purchased 30-50 of these 1.5 ton prime movers from 1943, presumably to replace the mish-mash of under-powered captured Soviet tractors and commercial vehicles that they had been using since the Winter War (1939-40).
I found Altaya's 1/72 diecast model on eBay at a reasonable price so I snapped it up as I am going for the option that the Rapid Fire rules give you for the late war Finns to upgrade their anti-tank guns to 75mm Pak40s. Alternatively - and more accurately - I could use these tractors to tow Finnish 105mm (German FH18 10.5cm Howitzer) as I have found a nice contemporary photo of this configuration being used by the Finns...
This project will also be quite interesting as I now have quite a few of these type of diecast models and I want to see how well they turn out when converted and re-painted. With regards to the RSO I will have to do some dismantling in order to add a driver figure to match the rest of my truck models.
The Altaya model is held together with three tiny triangular head screws, luckily I have a precision screw driver set with these shaped screw-heads in it. But bear this in mind before undertaking a similar conversion...
Aside from the driver another addition to the basic diecast model will be a tilt canvas cover. The model does come with a set of very flimsy wire supports for a canvas cover, but no cover itself. I want a tilt cover so as to circumvent that annoying 'crew aboard or not' that war-gaming rules produce - while stationary your crew will be stand-alone figures on the table, when moving the crew are technically supposed to be aboard the vehicle.
You could make some 'removable crew' to fulfil the needs of the game, but the easiest way to get around this is to make a tilt cover so you can't tell whether the crew is aboard or not.
I'll have to put some thought into how I will make the tilt, but it shouldn't be too hard. A simple plasticard 'box' with some textured paper over it should suffice.
Painting: The Finnish RSOs seem to have come from the factory in Germany and straight into service. Unfortunately as only monochrome photographs exist we can only make a guess as to the basic colour, but generally the factory colour for German military transport was either 'Dunkelgelb' (a dirty yellow) or 'Dunkelgrau' (a mid-grey).
After comparing several black & white photos I have chosen to plump for the 'Dunkelgelb'. The Altaya model is basically this colour but has green camo added, hence the respray. Vallejo do a passable 'Dunkelgelb' in their Model Air range, my local store didn't have this but did have Vallejo's Model Air 031 'Middle Stone' which is within the spectrum that can be considered 'Dunkelgelb' (which can vary shades from a ocre-yellow to a khaki/mustard).
Next: A driver and a tilt cover.
![]() |
| Altaya's Steyr RSO Diecast Model (Panzer Collection PZ08) |
I found Altaya's 1/72 diecast model on eBay at a reasonable price so I snapped it up as I am going for the option that the Rapid Fire rules give you for the late war Finns to upgrade their anti-tank guns to 75mm Pak40s. Alternatively - and more accurately - I could use these tractors to tow Finnish 105mm (German FH18 10.5cm Howitzer) as I have found a nice contemporary photo of this configuration being used by the Finns...
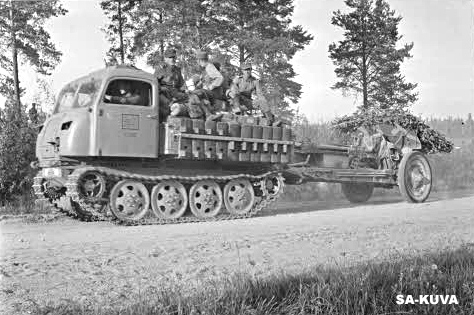
![]() |
| Here we see one of the Finnish RSO/01s towing a 105mm howitzer in 1944. Source: SA-KUVA Finnish WW2 photo archive |
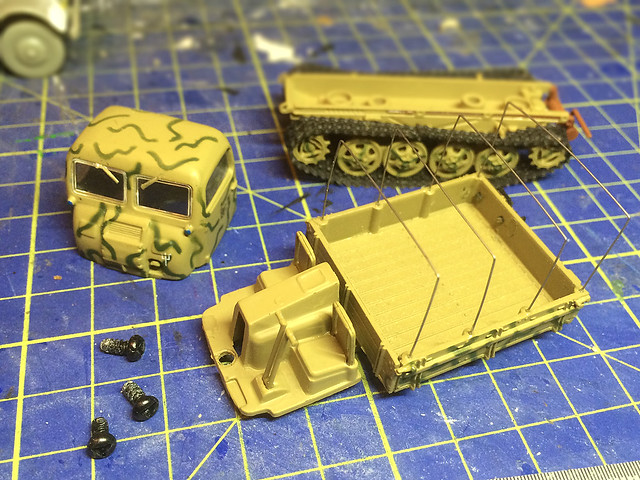
The Altaya model is held together with three tiny triangular head screws, luckily I have a precision screw driver set with these shaped screw-heads in it. But bear this in mind before undertaking a similar conversion...
![]() |
| Once the screws are removed the model breaks down into three pieces. But the windows are - unfortunately - glued in place. Pity, but I can mask them prior to re-spraying the base 'Dunkelgelb' yellow. |
You could make some 'removable crew' to fulfil the needs of the game, but the easiest way to get around this is to make a tilt cover so you can't tell whether the crew is aboard or not.
![]() |
| An German RSO/01 with canvas tilt towing a 10.5 cm leFH 18 light howitzer. Picture Source: Wikipedia |
Painting: The Finnish RSOs seem to have come from the factory in Germany and straight into service. Unfortunately as only monochrome photographs exist we can only make a guess as to the basic colour, but generally the factory colour for German military transport was either 'Dunkelgelb' (a dirty yellow) or 'Dunkelgrau' (a mid-grey).
After comparing several black & white photos I have chosen to plump for the 'Dunkelgelb'. The Altaya model is basically this colour but has green camo added, hence the respray. Vallejo do a passable 'Dunkelgelb' in their Model Air range, my local store didn't have this but did have Vallejo's Model Air 031 'Middle Stone' which is within the spectrum that can be considered 'Dunkelgelb' (which can vary shades from a ocre-yellow to a khaki/mustard).
Next: A driver and a tilt cover.
Subscribe to:
Posts (Atom)