Diary of a novice scale model maker and his adventures in the wacky world of Braille Scale.
Monday, 27 February 2012
Pegasus KV box set - Part 2
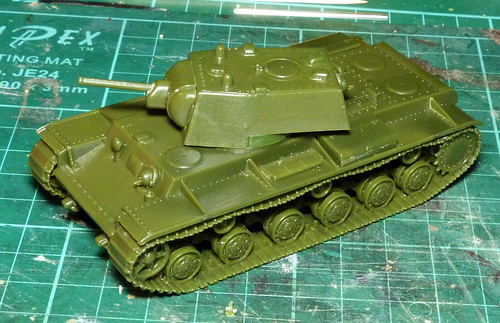
Popped the KV-1 together. Decided to go with the earlier version without the applique armour. Nice looking tank, although the track running gear was maybe a little complicated for a quick build.
I have chosen this model for my next painting experiment - camouflage.
Sunday, 26 February 2012
SU-122M conversion - Part 2
DETAILING AND BASE COATS
So far so good...
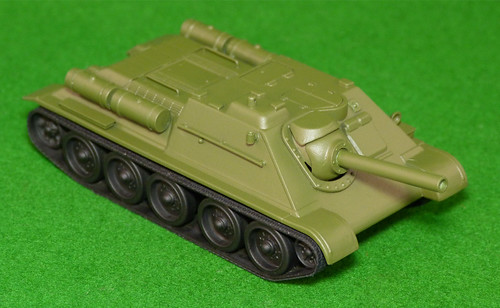
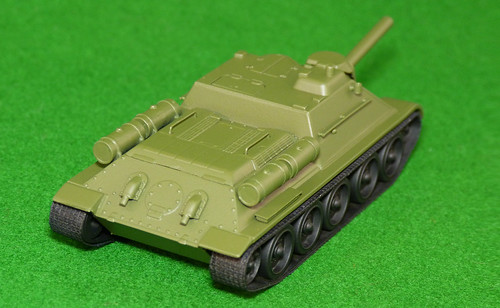
I haven't gone crazy with the amount of detailing on this one - I'd still regard this as a quick build. I've just added the side rails, radio mast plug, pistol ports and improved straps around the external tanks. And, of course, there is my Mk. II tracks...
One of the other new things about this model is that I tried out the Flames of War 'War Paint' spray in Soviet Green. I was a bit worried about it at first as the actual spray is very weak (I thought there was something wrong with the nozzle at first). But the instructions do say that it is best to give a couple of thin coats - even so I ended up giving the model three passes. Still, this didn't bother me in the end as the 'Russian Green' you get is gorgeous.
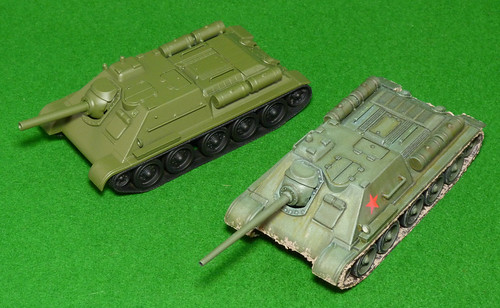
Here I comare my pristine Flames of War coated SU-122(3) with my weathered SU-85 which was base coated in Humbrol's Dark Green (No. 30) acrylic spray paint...
It's all a matter of taste (and do bear in mind I have yet to weather the SU-122M, which will tone it down) but this is the very green 'Russian Green' I have been after - which is very distinct to either the American Olive Drab or the deep British Bronze Green.
Well, that's it for now on to the pin-washing (no decals on this one) and the weathering of the tracks. On this, you will notice I have base coated the tracks black - this is a tip I got from some tutorial site or other.
NEXT: PIN-WASHING
So far so good...
I haven't gone crazy with the amount of detailing on this one - I'd still regard this as a quick build. I've just added the side rails, radio mast plug, pistol ports and improved straps around the external tanks. And, of course, there is my Mk. II tracks...
One of the other new things about this model is that I tried out the Flames of War 'War Paint' spray in Soviet Green. I was a bit worried about it at first as the actual spray is very weak (I thought there was something wrong with the nozzle at first). But the instructions do say that it is best to give a couple of thin coats - even so I ended up giving the model three passes. Still, this didn't bother me in the end as the 'Russian Green' you get is gorgeous.
Here I comare my pristine Flames of War coated SU-122(3) with my weathered SU-85 which was base coated in Humbrol's Dark Green (No. 30) acrylic spray paint...
It's all a matter of taste (and do bear in mind I have yet to weather the SU-122M, which will tone it down) but this is the very green 'Russian Green' I have been after - which is very distinct to either the American Olive Drab or the deep British Bronze Green.
Well, that's it for now on to the pin-washing (no decals on this one) and the weathering of the tracks. On this, you will notice I have base coated the tracks black - this is a tip I got from some tutorial site or other.
NEXT: PIN-WASHING
Saturday, 25 February 2012
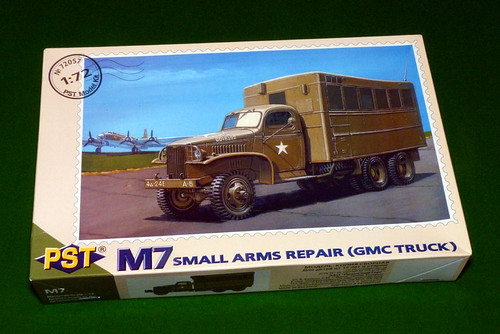
Stash addition - GMC M7 Small Arms Repair Truck
Thinking about what vehicles would support any WW2 Soviet armoured formation I started looking into repair and recovery vehicles. It's pretty easy to knock up a tank recovery vehicle as the Red Army simply used turretless versions of their T-34, but I did by chance come across a specialist vehicle at my local model store - GMC's M7 repair shop truck.
The Red Army deployed several different field repair shop trucks - notably converted Zis trucks - but they also made use of lend-lease American 2.5 ton GMC 6x6 vehicles. These appear to be used during the late war period, indeed the decals included in the kit are for two 1945 era examples (one US ARmy and the other Red Army).
The PST model is described as a 'small arms repair truck', but I *believe* this variant was a general field workshop which supplied a repair shop for all types of units. According to the PST instruction sheet 95 examples of this mobile workshop were supplied to the Soviets during the war.
To be honest this would be a really easy conversion job for something like Pegasus Hobbies GMC cargo truck set. But it seemed too much of a good thing finding it in my local store, so I snapped it up.
The Red Army deployed several different field repair shop trucks - notably converted Zis trucks - but they also made use of lend-lease American 2.5 ton GMC 6x6 vehicles. These appear to be used during the late war period, indeed the decals included in the kit are for two 1945 era examples (one US ARmy and the other Red Army).
The PST model is described as a 'small arms repair truck', but I *believe* this variant was a general field workshop which supplied a repair shop for all types of units. According to the PST instruction sheet 95 examples of this mobile workshop were supplied to the Soviets during the war.
To be honest this would be a really easy conversion job for something like Pegasus Hobbies GMC cargo truck set. But it seemed too much of a good thing finding it in my local store, so I snapped it up.
Friday, 24 February 2012
Simple SU-85 to SU-122M conversion
As I didn’t want to build my two Armourfast SU-85s exactly the same I started looking for some options for a variation. I considered building the later SU-85M version, which would entail some scratch building including making a whole new commander’s cupola based on the T-34/85 commander’s hatch. But really, I wanted something simpler to make.
Luckily I did find a really nice looking variant called the SU-122, an assault gun (which some term a self-propelled gun) that was armed with a 122mm artillery howitzer and was used for infantry support. Interestingly, despite it’s numerical designation, the SU-122 actually came before both the SU-85 and the SU-100 – in around December 1942.
However, as attractive as this idea was, once again it would provided a bit of a challenge for my novice building skills as the 122mm gun was housed in a large gun mantlet that looked quite complicated to scratch build at this point in my modeling career. It is based on the Soviet 122mm field howitzer, which happens to be available – very cheaply – in 1/72 scale from Zvezda (in case you are interested).
Anyroads, it was while I was researching the SU-122 that I came across a prototype variant that caught my interest. The SU-122 proved both popular and very useful in service so it was decided that a modernized version should be created to replace it – this was to be the SU-122M.
There were two prototype designs and I was interested in the second - the SU-122-3. What's special about the second SU-122M version was that it was the prototype that first incorporated the distinctive ‘ball mount’ mantlet that was later used in the SU-85 tank destroyer!
In fact the SU-122M was basically the SU-85 with a larger caliber gun stuck on the front. A REALLY simple conversion job that even I could manage.
There is one small problem though. The SU-122M was only ever a prototype – in the end the Red Army decided to skip this assault gun, due to it’s production costs, keep using the original version and move on to the SU-85 (keeping the specially developed ball mount).
So, although important and interesting, the SU-122M could only be modeled as either a prototype or as a ‘what if?’ element for a war game.
Still, it is an attractive proposition for the war gamer that wants – as I did – something a little different. You can justify it’s use in a game as you could use the technical characteristics of the SU-122 in play, and if your game rules allow ‘what if?’ prototypes in your scenario.
As for me, I am building it for the fun and because I need a quick platform on which to try out a new painting technique for me – the ‘hairspray technique’.
Hope you find this potted outline of interest. Certainly it’s a quick and dirty way to get a Soviet 122mm SPG onto your gaming table for mid-war scenarios.
(Note: Although the 122mm SU-122 was primarily developed as an assault gun there was a hollow charge developed for it to be used – in an emergency I guess – in the anti-tank role. While the effectiveness of this might be debatable, when compared to specialist AT rounds, I for one wouldn’t have wanted to be in a Panzer IV with one of those foot wide projectiles coming at me! However, you should be aware of this ability if you do decide to put this machine on your game table.)
NEXT: Finished details and basic coat.
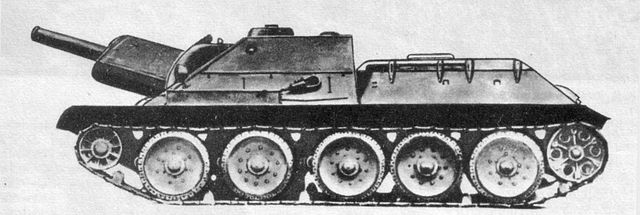
Luckily I did find a really nice looking variant called the SU-122, an assault gun (which some term a self-propelled gun) that was armed with a 122mm artillery howitzer and was used for infantry support. Interestingly, despite it’s numerical designation, the SU-122 actually came before both the SU-85 and the SU-100 – in around December 1942.
Above: The production SU-122 version. The most distinctive feature - which differentiates it
from the later SU-85 - was the large gun-howitzer mount.
However, as attractive as this idea was, once again it would provided a bit of a challenge for my novice building skills as the 122mm gun was housed in a large gun mantlet that looked quite complicated to scratch build at this point in my modeling career. It is based on the Soviet 122mm field howitzer, which happens to be available – very cheaply – in 1/72 scale from Zvezda (in case you are interested).
Anyroads, it was while I was researching the SU-122 that I came across a prototype variant that caught my interest. The SU-122 proved both popular and very useful in service so it was decided that a modernized version should be created to replace it – this was to be the SU-122M.
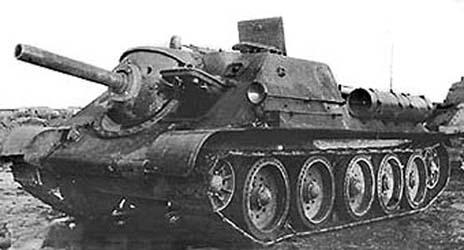
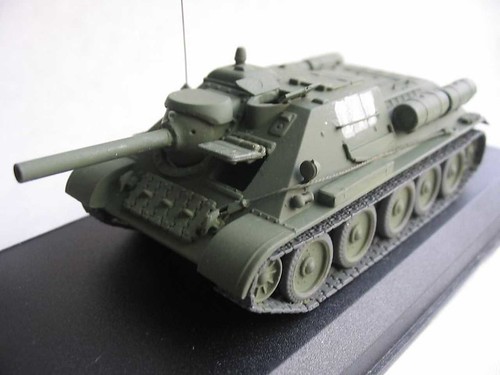
There were two prototype designs and I was interested in the second - the SU-122-3. What's special about the second SU-122M version was that it was the prototype that first incorporated the distinctive ‘ball mount’ mantlet that was later used in the SU-85 tank destroyer!
Above: The second prototype version of the modernised SU-122 - designated the SU-122-3.
In fact the SU-122M was basically the SU-85 with a larger caliber gun stuck on the front. A REALLY simple conversion job that even I could manage.
There is one small problem though. The SU-122M was only ever a prototype – in the end the Red Army decided to skip this assault gun, due to it’s production costs, keep using the original version and move on to the SU-85 (keeping the specially developed ball mount).
So, although important and interesting, the SU-122M could only be modeled as either a prototype or as a ‘what if?’ element for a war game.
Still, it is an attractive proposition for the war gamer that wants – as I did – something a little different. You can justify it’s use in a game as you could use the technical characteristics of the SU-122 in play, and if your game rules allow ‘what if?’ prototypes in your scenario.
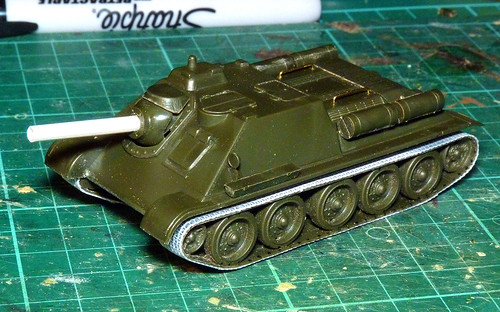
Above: Initial stages of a very simple conversion. I still have some small details to add - but I think this picture shows you just how easy a job this is! Note that I am including my Mk. II track mod.
As for me, I am building it for the fun and because I need a quick platform on which to try out a new painting technique for me – the ‘hairspray technique’.
Hope you find this potted outline of interest. Certainly it’s a quick and dirty way to get a Soviet 122mm SPG onto your gaming table for mid-war scenarios.
(Note: Although the 122mm SU-122 was primarily developed as an assault gun there was a hollow charge developed for it to be used – in an emergency I guess – in the anti-tank role. While the effectiveness of this might be debatable, when compared to specialist AT rounds, I for one wouldn’t have wanted to be in a Panzer IV with one of those foot wide projectiles coming at me! However, you should be aware of this ability if you do decide to put this machine on your game table.)
NEXT: Finished details and basic coat.
Thursday, 23 February 2012
Featured work - 20mm and then some
Today's featured work isn't so much one piece but rather a whole site full! I literally went through every post on this site, gob smacked by everything this guy does.
It is specifically 20mm war gaming subjects, but I love his style as there is some very subtle and elegant touches not to mention his amazing attention to detail...
Just sometimes I find that small scale war gaming models can have a bit of a cartoony and gaudy look to them, but not these! The colours are toned down and the shading not exaggerated.
As well as some terrific examples of painting there are also some very useful 'how to' posts, so if you want a bit of a treat pop along to the 20mm and then some site.
It is specifically 20mm war gaming subjects, but I love his style as there is some very subtle and elegant touches not to mention his amazing attention to detail...
Just sometimes I find that small scale war gaming models can have a bit of a cartoony and gaudy look to them, but not these! The colours are toned down and the shading not exaggerated.
As well as some terrific examples of painting there are also some very useful 'how to' posts, so if you want a bit of a treat pop along to the 20mm and then some site.
Wednesday, 22 February 2012
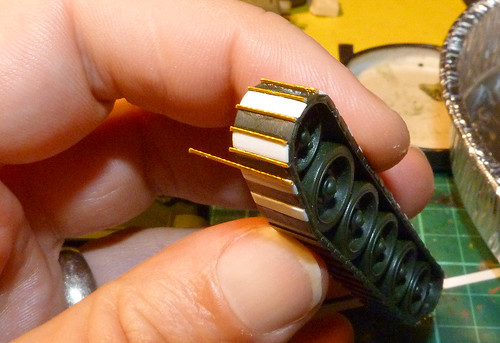
Armourfast T-34 track mod Mk. II (simplified version)
While I was quite pleased with my ‘Mk. I’ track modification technique I received some very useful feedback from different sources about how this mod might be further improved. There were two main issues that were raised by folk, the first was the thickness of the finished tracks and the second was the fiddeliness of the individual track separators that I added.
The track thickness issue raised the point that I had – in fact – approached my mod in completely the wrong way. I had built up the Armourfast track by inserting rectangles of plasticard in between the raised groves so that I had a level surface onto which to add my net curtain segments. In fact, what I should have done was to trim down the raised grove so that they lay level with the recessed groves in the track.
So, in my Mk. II version it was a simple process to sand down the raised runners in the tracks until the track was quite thin and relatively even.
I did this using my Dremel and a sanding wheel, but if you have access to a fixed orbital sander you could do this part of the mod far quicker and more accurately and the result could be even thinner and even. As it was I had to go over my Dremelled track surface with a fine sanding block to smooth out the uneven job I did with the hand held sanding tool.
Next I rethought my use of the track separators in my first attempt. I had glued short pieces of wire at regular intervals onto the level track to represent the raised track links. In between these separators I then placed my small rectangle of net curtain fabric, representing the T-34 waffle tread.
Thinking about it, it would be a lot simpler if I just left out the separators and cut one long length of net curtain – the same length and width of the track – and glued it right round the flat track surface.
In this way I cut out a couple of intricate operations, and despite the time it took to sand the tracks down in the end it was a lot quicker and simpler modification. I could see how this simplified technique would perhaps be preferable to the war gamer and could be utilized to produce a small run of tracks in order to create an armoured squadron of T-34s.
NEXT: Painting the tracks
Above: My T-34 track mod version 1 - a little too thick and complicated?
The track thickness issue raised the point that I had – in fact – approached my mod in completely the wrong way. I had built up the Armourfast track by inserting rectangles of plasticard in between the raised groves so that I had a level surface onto which to add my net curtain segments. In fact, what I should have done was to trim down the raised grove so that they lay level with the recessed groves in the track.
Above: Here you can see me attaching the wire track seperators to my Mk. I tracks, you can also clearly see how I built up the tracks with white plasticard.
So, in my Mk. II version it was a simple process to sand down the raised runners in the tracks until the track was quite thin and relatively even.
I did this using my Dremel and a sanding wheel, but if you have access to a fixed orbital sander you could do this part of the mod far quicker and more accurately and the result could be even thinner and even. As it was I had to go over my Dremelled track surface with a fine sanding block to smooth out the uneven job I did with the hand held sanding tool.
Above: Using a hand-held sanding tool it can be a bit tricky to get a uniformly level surface, you also have to watch your speed as the plastic tends to melt rather than sand if your Dremel's setting is too high. Lastly, do wear a mask as the plastic dust gets everywhere.
Next I rethought my use of the track separators in my first attempt. I had glued short pieces of wire at regular intervals onto the level track to represent the raised track links. In between these separators I then placed my small rectangle of net curtain fabric, representing the T-34 waffle tread.
Thinking about it, it would be a lot simpler if I just left out the separators and cut one long length of net curtain – the same length and width of the track – and glued it right round the flat track surface.
In this way I cut out a couple of intricate operations, and despite the time it took to sand the tracks down in the end it was a lot quicker and simpler modification. I could see how this simplified technique would perhaps be preferable to the war gamer and could be utilized to produce a small run of tracks in order to create an armoured squadron of T-34s.
NEXT: Painting the tracks
Friday, 17 February 2012
Featured work - Snow hunter
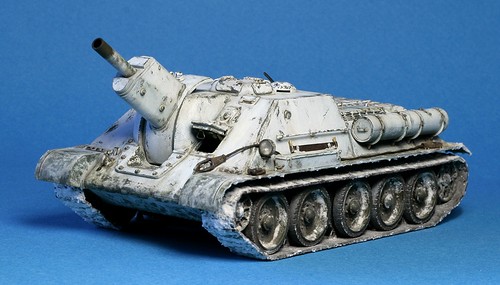
Florin David is a modeler who has become something of an inspiration to me. I like weathered tanks, it suits my grungy graphic artist aesthetic so his wonderfully winter weathered SU-122 really impressed me...
What particularly intrigues me about this model is that I am just about to try an experiment with the 'hairspray technique' on my remaining Armourfast SU-85 to give it a similar snow camo white washed effect. Additionally, Florin has chosen an interesting variant of the SU series that mounts a 122mm howitzer, but otherwise it's the same hull and superstructure as the SU-85.
This provides a good opportunity for me to try out a conversion of my SU-85. Though what makes the job easier is that the second variant of the SU-122 used a more conventional 122mm gun that didn't have the distinctive and enlarged gun mount that you see on the picture above.
What particularly intrigues me about this model is that I am just about to try an experiment with the 'hairspray technique' on my remaining Armourfast SU-85 to give it a similar snow camo white washed effect. Additionally, Florin has chosen an interesting variant of the SU series that mounts a 122mm howitzer, but otherwise it's the same hull and superstructure as the SU-85.
This provides a good opportunity for me to try out a conversion of my SU-85. Though what makes the job easier is that the second variant of the SU-122 used a more conventional 122mm gun that didn't have the distinctive and enlarged gun mount that you see on the picture above.
Above: The 122mm howitzer U-11 or D-6 in ball mounting on the SU85 chassis. Photo from Henk of Holland web site. As you can see, apart from the barrel, there is no difference between this and the basic SU-85 - so a very easy conversion job!
Subscribe to:
Posts (Atom)