Diary of a novice scale model maker and his adventures in the wacky world of Braille Scale.
Showing posts with label X-Ref: Fin/144/me109G2. Show all posts
Thursday, 7 March 2013
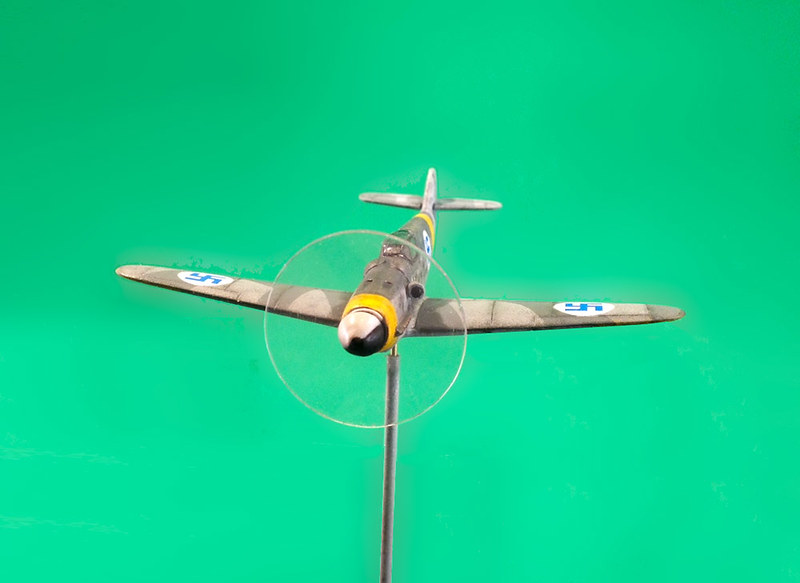
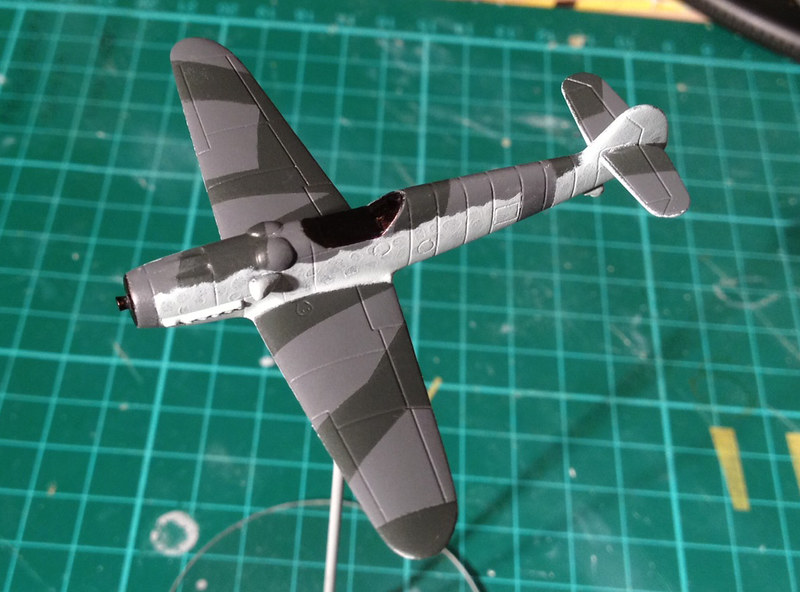
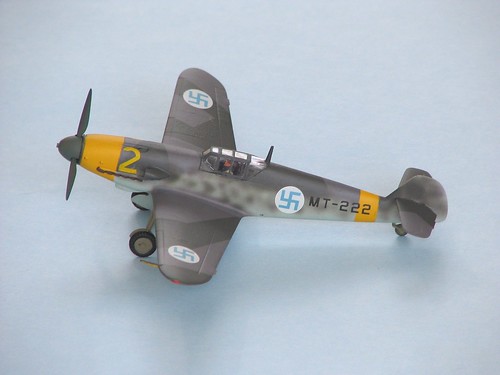
Eduard 1/144 Me 109 G-6 - Complete
Conclusion
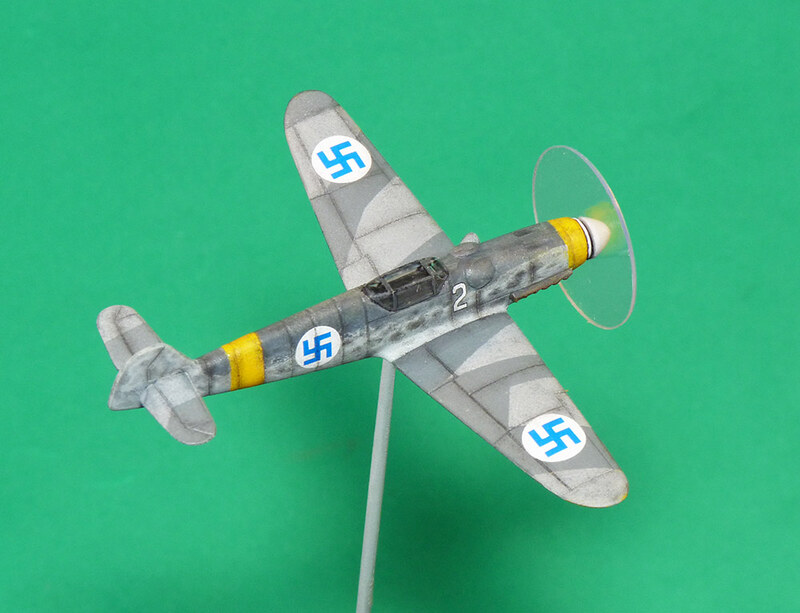
Phew! I finished a model guys...Yay!
1/144 is a challenge, I found trying to directly scale down painting techniques I have been learning in 1/72 didn't always work. I also had to fudge the decals as I couldn't find suitable small numerals or the correct emblems in this size. Still, I kept reminding myself that I was building a war game model and not a historically exact display replica.
Wednesday, 27 February 2013
Eduard 1/144 Me 109 G-6 Pt. 9 - Bugger!
I've put my Me 109 on the back burner as I get the other aircraft in my Finnish air group to a similarly near completed state (I hope to finish all three at the same time). But putting this model to one side had an unfortunate result - I lost the propeller!
Don't ask me how, I do use a project box for each model but it still went astray. So I had to make a replacement prop spinner, luckily I had couple of spare props in my Minicraft JU-88, though I had to sand the bomber's larger spinner down quite a bit...
I hope my new spinner looks OK. But this is another issue that illustrates the point that I need to get myself set-up with a special place for making my models, and not just a wobbly tray sat on my knee!
Don't ask me how, I do use a project box for each model but it still went astray. So I had to make a replacement prop spinner, luckily I had couple of spare props in my Minicraft JU-88, though I had to sand the bomber's larger spinner down quite a bit...
I hope my new spinner looks OK. But this is another issue that illustrates the point that I need to get myself set-up with a special place for making my models, and not just a wobbly tray sat on my knee!
Wednesday, 20 February 2013
Eduard 1/144 Me 109 G-6 - Part 8
Panel line detailing with charcoal
One of the advantages of being off work for a couple of days with a stomach bug (to put it mildly) is that I have had time to do a wee bit of model stuff between trips to the bathroom!
The Eduard Me 109 has quite deep panel line details - in fact some online reviews note that these 'features' are a little too deep - and I wanted to use these for trying out a technique I read about. I am using some charcoal filings to dust into the grooves and seam lines of my aircraft.
Now a couple of things. First of all this technique is normally done using artists Conte crayons and not charcoal. These two art mediums a distant relative but charcoal is a lot more messy and tends to spread around a lot more - Conte granules being a little more stable. But unfortunately in my hometown the last proper art store closed last year and proper Conte crayons were not available to me - this time.
Charcoal tends to go everywhere - and you end up with your fingers covered in the dust, so you have to be careful that you do not end up with unwanted finger prints on your model. luckily, however, if you do this work on top of a thin gloss varnish layer as I have the dust is easy to erase with an artists putty rubber or BluTac.
I know this is just a small stage on from my last report about this project but I thought the technique was interesting enough to warrant it's own post. Judge for yourself how effective it was - though, as usual, as a newbie I have probably exaggerated the effect...
One of the advantages of being off work for a couple of days with a stomach bug (to put it mildly) is that I have had time to do a wee bit of model stuff between trips to the bathroom!
The Eduard Me 109 has quite deep panel line details - in fact some online reviews note that these 'features' are a little too deep - and I wanted to use these for trying out a technique I read about. I am using some charcoal filings to dust into the grooves and seam lines of my aircraft.
Above: I use a cheap nail file to sand off the charcoal stick's granules, then apply
them to the model's seam lines sing a nice pointy brush.
Now a couple of things. First of all this technique is normally done using artists Conte crayons and not charcoal. These two art mediums a distant relative but charcoal is a lot more messy and tends to spread around a lot more - Conte granules being a little more stable. But unfortunately in my hometown the last proper art store closed last year and proper Conte crayons were not available to me - this time.
Charcoal tends to go everywhere - and you end up with your fingers covered in the dust, so you have to be careful that you do not end up with unwanted finger prints on your model. luckily, however, if you do this work on top of a thin gloss varnish layer as I have the dust is easy to erase with an artists putty rubber or BluTac.
I know this is just a small stage on from my last report about this project but I thought the technique was interesting enough to warrant it's own post. Judge for yourself how effective it was - though, as usual, as a newbie I have probably exaggerated the effect...
Sunday, 17 February 2013
Eduard 1/144 Me 109 G-6 - Part 7
Sunday is, naturally a good day for relaxing and getting some model making done. Tim may be glad to see that I've wacked on the decals on my Finnish Me 109...
Now, unfortunately, the only 1/144 scale World War 2 Finnish Air Force decals that I was able to find were the more common hakenkreuz with the white background circle. By 1944 the Finn's Me 109s were sporting their swastikas with a grey-blue background. So, I've had to make do.
Also, I'm afraid I am not going to send myself cross-eyed by trying to do the teeny-weeny aircraft numbering. :)
Anyway, it's getting there. As Tim Gow was hinting - I think - models look loads better once you get the decals on. So, it's onto the prop and the canopy.
Now, unfortunately, the only 1/144 scale World War 2 Finnish Air Force decals that I was able to find were the more common hakenkreuz with the white background circle. By 1944 the Finn's Me 109s were sporting their swastikas with a grey-blue background. So, I've had to make do.
Also, I'm afraid I am not going to send myself cross-eyed by trying to do the teeny-weeny aircraft numbering. :)
Anyway, it's getting there. As Tim Gow was hinting - I think - models look loads better once you get the decals on. So, it's onto the prop and the canopy.
Wednesday, 13 February 2013
Eduard 1/144 Me 109 G-2 - Part 6
More painting (mis)adventures...
So you won't be surprised that my progress with this little project is crawling along at a snails pace. Looking at other model blogs you see projects that are done and dusted in a couple of posts...Well, not here. Today I present a change of tone on my Finnish Me 109...
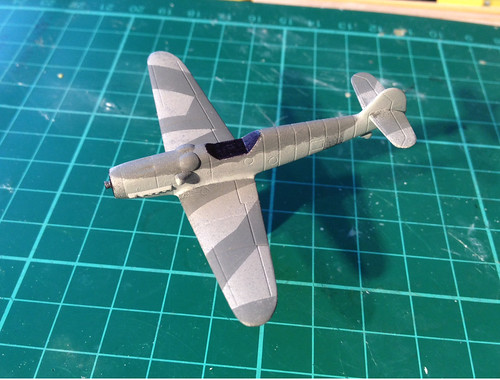
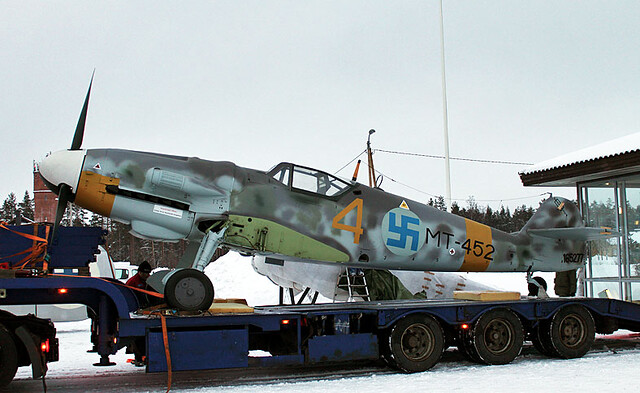
I've gone gray. Not as pretty as the Luftwaffe RML 74/75/76 but closer to the Finnish subdued camo that I'm seeing in the available reference material...
Source: Antti Lappalainen
1/144 is a really funny scale to work with, it's like painting a bird house with a paint roller. I've learned a lot about how not to do things with this model and I want to do more. When I started I got some advice from Tim Gow of Megablitz to go with brushes rather than a spray - I now see why (as usual I like to understand why by experimentation).
This small scale requires no less planning than a larger model, and maybe even more as you have to understand what techniques do and do not transfer down from larger scales (again, something Tim pointed out to me).
I'm finishing this up with some more experimentation and just putting this one down to experience. Just too many new things going on in one project for my liking and I'm not satisfied with the quality of the job I've done. I've ordered a cheaper Zvesda 1/144 Me 109 F and have planned this one using what I have learned so far.
UPDATE: Egged on by Tim Gow...
So you won't be surprised that my progress with this little project is crawling along at a snails pace. Looking at other model blogs you see projects that are done and dusted in a couple of posts...Well, not here. Today I present a change of tone on my Finnish Me 109...
I've gone gray. Not as pretty as the Luftwaffe RML 74/75/76 but closer to the Finnish subdued camo that I'm seeing in the available reference material...
Source: Antti Lappalainen
1/144 is a really funny scale to work with, it's like painting a bird house with a paint roller. I've learned a lot about how not to do things with this model and I want to do more. When I started I got some advice from Tim Gow of Megablitz to go with brushes rather than a spray - I now see why (as usual I like to understand why by experimentation).
This small scale requires no less planning than a larger model, and maybe even more as you have to understand what techniques do and do not transfer down from larger scales (again, something Tim pointed out to me).
I'm finishing this up with some more experimentation and just putting this one down to experience. Just too many new things going on in one project for my liking and I'm not satisfied with the quality of the job I've done. I've ordered a cheaper Zvesda 1/144 Me 109 F and have planned this one using what I have learned so far.
UPDATE: Egged on by Tim Gow...
Monday, 11 February 2013
Eduard 1/144 Me 109 G-2 - Part 5
Painting (mis)adventures
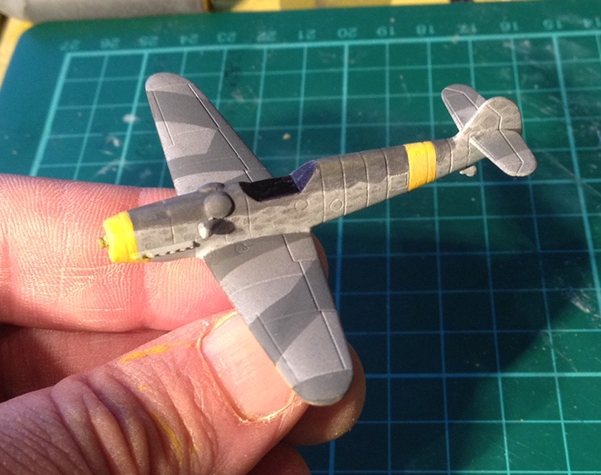
Hmmm, I'm not really sure how this is going. I've had a few disasters with this one along the way.
First lesson - trying to get nice blended effects at 1/144 is NOT for a novice and certainly not for a first model at this scale (I cocked that up). On the other hand I'm pleased with the splinter camo pattern.
Anyway, I have a lot of tidying up to do.
The scary bit is the next stage where I am supposed to tone down the whole scheme with a subtle coating of grey, so everything looks weathered and more subdued. Like this...
Ah well, onwards and upwards!
Hmmm, I'm not really sure how this is going. I've had a few disasters with this one along the way.
First lesson - trying to get nice blended effects at 1/144 is NOT for a novice and certainly not for a first model at this scale (I cocked that up). On the other hand I'm pleased with the splinter camo pattern.
Anyway, I have a lot of tidying up to do.
The scary bit is the next stage where I am supposed to tone down the whole scheme with a subtle coating of grey, so everything looks weathered and more subdued. Like this...
Friday, 8 February 2013
Eduard 1/144 Me 109 G-2 - Part 4
Making a stand
For once I've tried - very hard - to do something as simple as I can. Not easy as when I looked around to see how war gamers made thier flight stands I saw some pretty nifty - and relatively complicated - stands made from telescopic radio ariels and little magnets and such like fancy stuff...
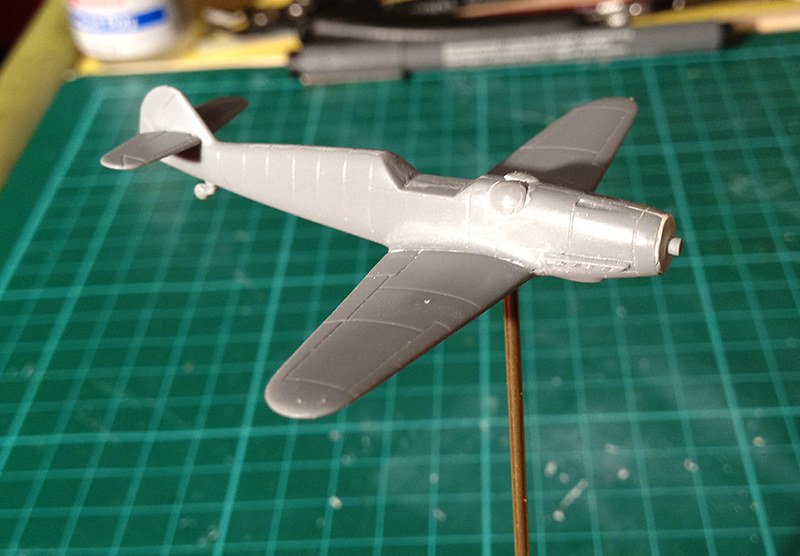
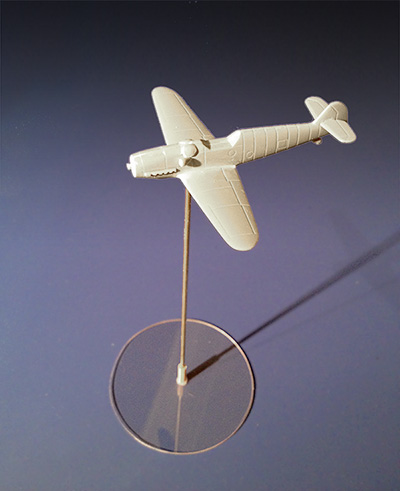
Well, I've stuck me little Me 109 on a pole! :)
My one concession to my tinkering side was that I wanted to be able to remove my plane from it's stand so I could put it on a different height of stand, and so...
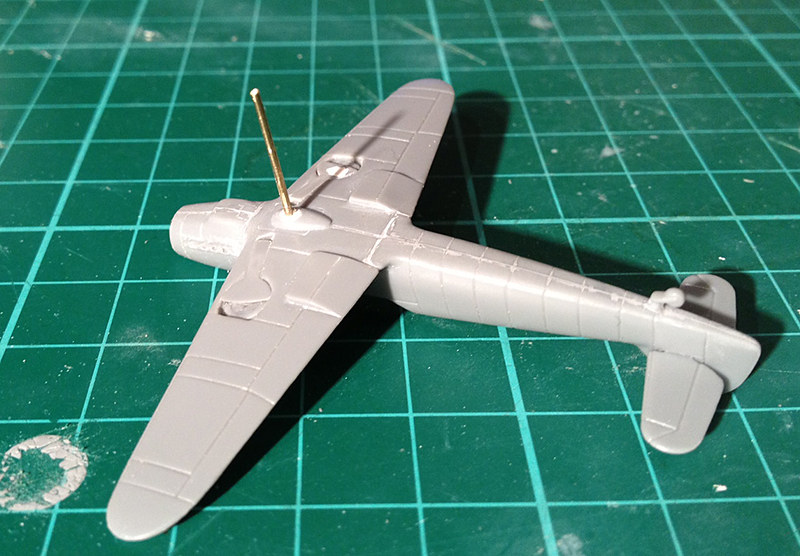
First of all I installed a thin rod into the bottom of my 109...
This would slip inside a hollow rod...
I made the base out of some transparent plastic (stupidly I decided to try and cut a circle - idiot that I am)...
I'll paint the rod sky blue I suppose.
Er, well...That's it really. I can change out the stand for something higher or lower, or if I bend the main rod I could have the plane in a dive.
<-- Previous post in this project
For once I've tried - very hard - to do something as simple as I can. Not easy as when I looked around to see how war gamers made thier flight stands I saw some pretty nifty - and relatively complicated - stands made from telescopic radio ariels and little magnets and such like fancy stuff...
Well, I've stuck me little Me 109 on a pole! :)
My one concession to my tinkering side was that I wanted to be able to remove my plane from it's stand so I could put it on a different height of stand, and so...
First of all I installed a thin rod into the bottom of my 109...
This would slip inside a hollow rod...
I made the base out of some transparent plastic (stupidly I decided to try and cut a circle - idiot that I am)...
I'll paint the rod sky blue I suppose.
Er, well...That's it really. I can change out the stand for something higher or lower, or if I bend the main rod I could have the plane in a dive.
<-- Previous post in this project
Friday, 1 February 2013
Eduard 1/144 Me 109 G-2 - Part 3
Painting thoughts for a Finnish Me 109
I've had a look at quite a few pictures of 'Finnish Me 109s' - well, at least people's impressions of what they looked like. There seems to be quite varied and diverse opinion on the matter, especially when it comes to the colours.
I *think* the basic colour of Finnish Me 109s - as they were delivered from the Germans in standard camo patterns - was the RLM 74/75/76 (grey green, green violet and light blue).
Here's a drawing I did to illustrate 'a' (generic) Finnish Me 109 pattern from 1944...
Where the discrepancies - and my confusion - seem to come about is where the Finns may have over-sprayed the original Luftwaffe crosses and where these new, vivid, colours became faded. So some modellers depict these colours as far more subtle greys and less hard edged than my first drawing. Like this...
Anyway, if like me you like acrylic spray paints, the good news is that the Tamiya AS range of sprays makes this scheme easy to paint as they have:
> AS-3 Gray Green (Luftwaffe) Acrylic Spray Paint (RLM-74 Graugrun)
> AS-4 Gray Violet (Luftwaffe) Acrylic Spray Paint (RLM-75 Grauviolett)
> AS-5 Light Blue (Luftwaffe) Acrylic Spray Paint (RLM-76 Lichtblau)
...So, this is my starting point.
But here is how one modeller - S. Bathy - has toned these vivid pristine colours down to give a more war weary look to his Finnish Me 109...
Whether the Finns actually toned down the German colours themselves I am not sure - but in the reference book I have - Osprey's 'Finnish Aces of WW2' - many of the Finn's 1944 Messerschmitts are depicted in this more faded grey scheme (like my second drawing).
Anyone any opinions?
<-- Previous post in this project
I've had a look at quite a few pictures of 'Finnish Me 109s' - well, at least people's impressions of what they looked like. There seems to be quite varied and diverse opinion on the matter, especially when it comes to the colours.
I *think* the basic colour of Finnish Me 109s - as they were delivered from the Germans in standard camo patterns - was the RLM 74/75/76 (grey green, green violet and light blue).
Here's a drawing I did to illustrate 'a' (generic) Finnish Me 109 pattern from 1944...
Anyway, if like me you like acrylic spray paints, the good news is that the Tamiya AS range of sprays makes this scheme easy to paint as they have:
> AS-3 Gray Green (Luftwaffe) Acrylic Spray Paint (RLM-74 Graugrun)
> AS-4 Gray Violet (Luftwaffe) Acrylic Spray Paint (RLM-75 Grauviolett)
> AS-5 Light Blue (Luftwaffe) Acrylic Spray Paint (RLM-76 Lichtblau)
...So, this is my starting point.
But here is how one modeller - S. Bathy - has toned these vivid pristine colours down to give a more war weary look to his Finnish Me 109...
Whether the Finns actually toned down the German colours themselves I am not sure - but in the reference book I have - Osprey's 'Finnish Aces of WW2' - many of the Finn's 1944 Messerschmitts are depicted in this more faded grey scheme (like my second drawing).
Anyone any opinions?
<-- Previous post in this project
Wednesday, 30 January 2013
Eduard 1/144 Me 109 G-2 - Part 2
Undercarriage up!
I mentioned that I was going to do some work to the undercarriage in order to model it in a realistic up position. Well I finished this off last night...
I also did some filling while I was at it. But you can see how the struts and wheels now look like they are in the correct flight position with the wheels laying under the struts. To do this I had to excavate out nice little alcoves inside the wheel wells so that the wheels looked as if they were under the struts. This involved scrapping away with the point of my scalpel until I had two suitably shaped indentations.
Of course this is just one way to do it, and it sort of belies my display modeler's ambitions rather than a war game modeler's practicality.
Wg Cdr Luddite, in a comment on part 1 of this project, pointed out the war gamer's approach quite succinctly...
"Don't worry too much about the undercart. The simplest way for a wargame model in 'flight mode' is to throw away the kit parts and just fill the recess with putty. (no one is ever going to look at the underside of aircraft during a game)."
...Er, oops, I suppose I could have done that really! Du-oh! Well I am a Kit Noob. LOL!
I mentioned that I was going to do some work to the undercarriage in order to model it in a realistic up position. Well I finished this off last night...
I also did some filling while I was at it. But you can see how the struts and wheels now look like they are in the correct flight position with the wheels laying under the struts. To do this I had to excavate out nice little alcoves inside the wheel wells so that the wheels looked as if they were under the struts. This involved scrapping away with the point of my scalpel until I had two suitably shaped indentations.
Of course this is just one way to do it, and it sort of belies my display modeler's ambitions rather than a war game modeler's practicality.
Wg Cdr Luddite, in a comment on part 1 of this project, pointed out the war gamer's approach quite succinctly...
"Don't worry too much about the undercart. The simplest way for a wargame model in 'flight mode' is to throw away the kit parts and just fill the recess with putty. (no one is ever going to look at the underside of aircraft during a game)."
...Er, oops, I suppose I could have done that really! Du-oh! Well I am a Kit Noob. LOL!
<-- Read Part 1 / Read Part 3 -->
Tuesday, 29 January 2013
Eduard 1/144 Me 109 G-2 - Part 1
Construction phase
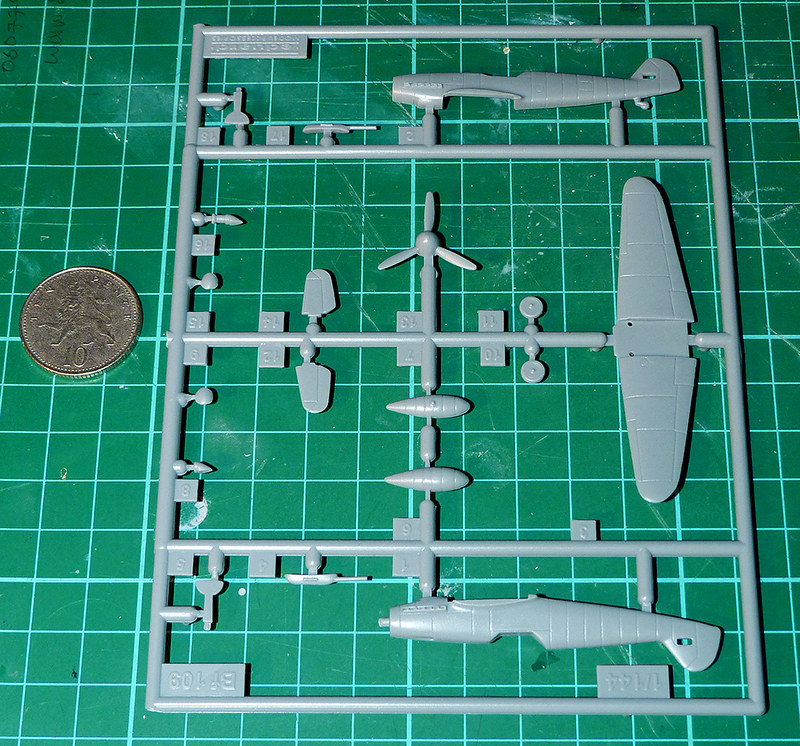
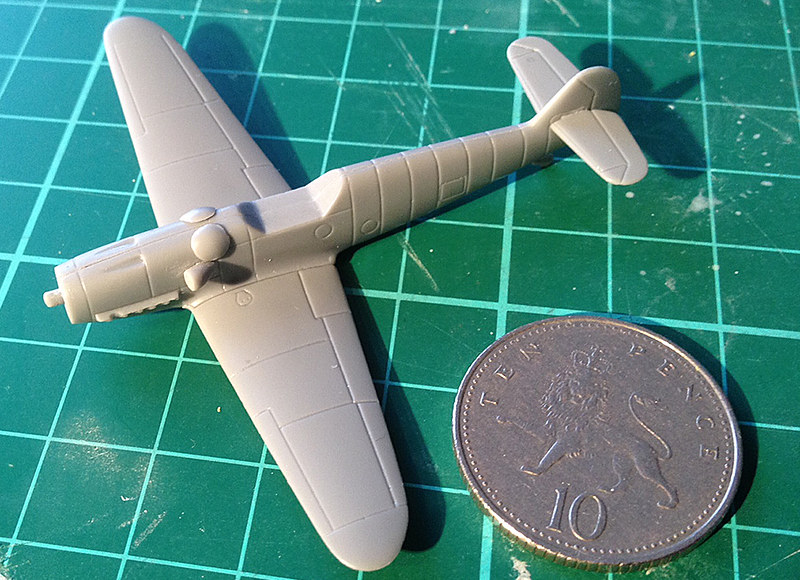
Well, there are only 18 parts plus two canopies (why two I don't know, as they appear to be the same type), with some of the parts being optional - like the wing mounted cannons and the fuel drop tank.
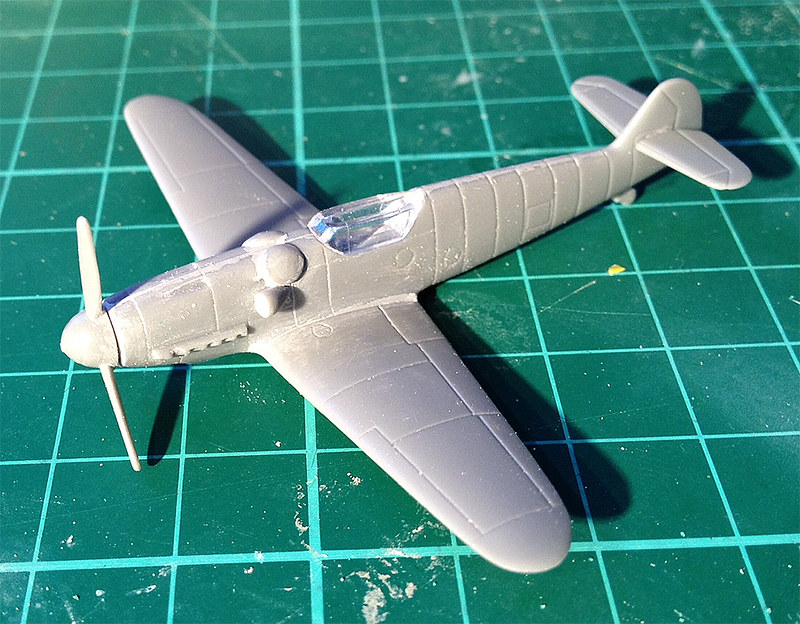
Initial construction was very straight forward, particularly as there are no cockpit details to worry about, just a blank cover hiding the interior.
I did find the nose accessories (sorry not sure what they are) a little over-sized and not a terrific fit. In particular, the 'bumps' will need some filler to make them seamlessly blend into the fuselage. There are no wireless ariels, which is probably a good thing at this scale.
There is a noticeable seam join down the middle of the fuselage which I will have to fill.
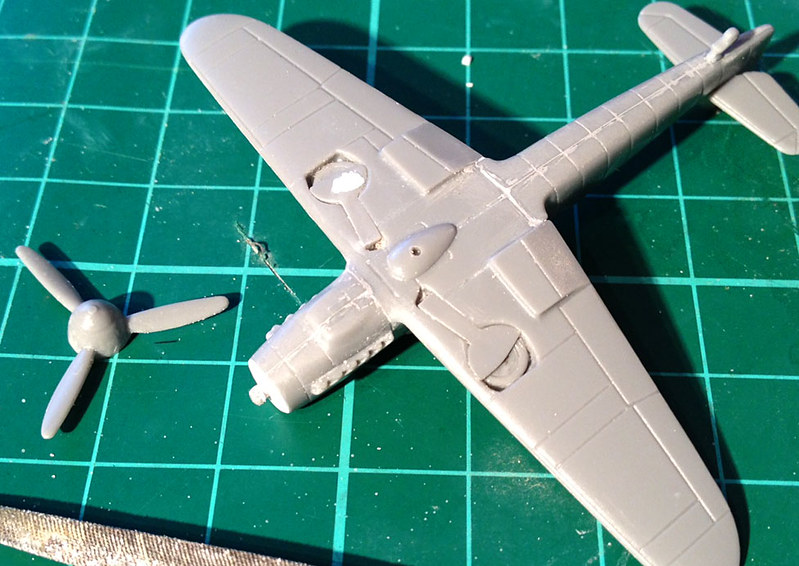
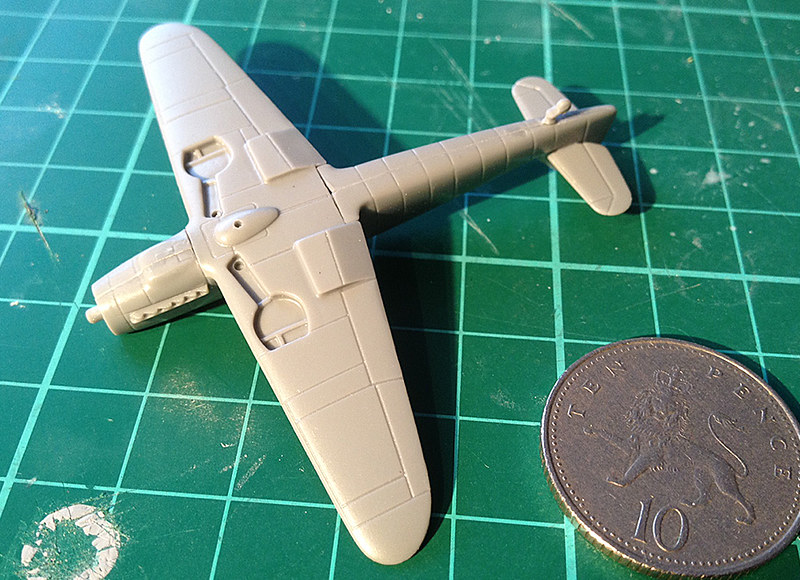
A bit more filling will have to be done underneath where the wing joins the fuselage. But the major problem with this kit - from my point of view - becomes apparent when you start to put together the underside. Eduard only supply an undercarriage which is designed to be fitted in the down position.
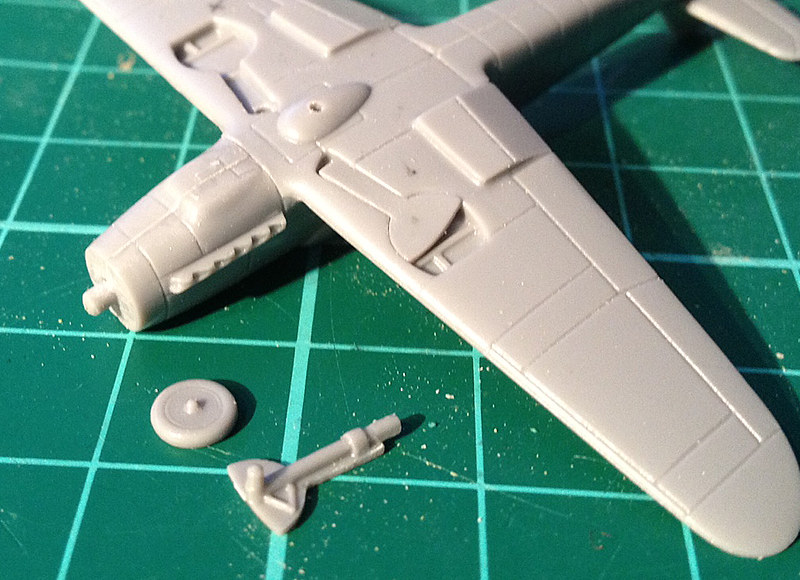
Now this is a problem because I want to mount my model in a flying pose, undercarriage up. However, the parts provided do not fit into the undercarriage 'wells' as they are - some modifications have to be done if you want your Me 109 in the flying state.
In the above photo you can see an unmodified undercarriage group of components next to a wing where I have inserted one of the wheel struts which I already modified by trimming off the landing gear.
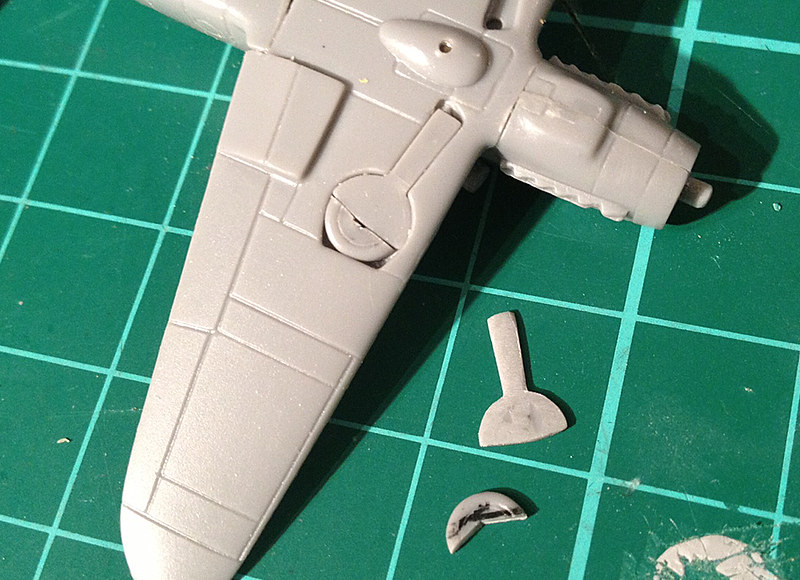
Having removed the gear from the struts, so they lay flush in the gear wells, I will have to slim down and cut my wheels so they fit in the wells next to the struts. In the above picture you can see how I am most of the way through doing this to the right undercarriage. I will have to take some more off the thickness off the wheel though, so it appears to be under the strut rather than flush with it.
As I mentioned, I will not be fitting the optional 20mm wing mounted cannon or the drop tank. Instead I will be fitting some sort of flight stand, and I will also be making a piece of circular transparent plastic to represent the rotating propeller. That's what I'll be doing next.
Well, there are only 18 parts plus two canopies (why two I don't know, as they appear to be the same type), with some of the parts being optional - like the wing mounted cannons and the fuel drop tank.
Initial construction was very straight forward, particularly as there are no cockpit details to worry about, just a blank cover hiding the interior.
I did find the nose accessories (sorry not sure what they are) a little over-sized and not a terrific fit. In particular, the 'bumps' will need some filler to make them seamlessly blend into the fuselage. There are no wireless ariels, which is probably a good thing at this scale.
There is a noticeable seam join down the middle of the fuselage which I will have to fill.
A bit more filling will have to be done underneath where the wing joins the fuselage. But the major problem with this kit - from my point of view - becomes apparent when you start to put together the underside. Eduard only supply an undercarriage which is designed to be fitted in the down position.
Now this is a problem because I want to mount my model in a flying pose, undercarriage up. However, the parts provided do not fit into the undercarriage 'wells' as they are - some modifications have to be done if you want your Me 109 in the flying state.
In the above photo you can see an unmodified undercarriage group of components next to a wing where I have inserted one of the wheel struts which I already modified by trimming off the landing gear.
Having removed the gear from the struts, so they lay flush in the gear wells, I will have to slim down and cut my wheels so they fit in the wells next to the struts. In the above picture you can see how I am most of the way through doing this to the right undercarriage. I will have to take some more off the thickness off the wheel though, so it appears to be under the strut rather than flush with it.
As I mentioned, I will not be fitting the optional 20mm wing mounted cannon or the drop tank. Instead I will be fitting some sort of flight stand, and I will also be making a piece of circular transparent plastic to represent the rotating propeller. That's what I'll be doing next.
Read Part 2 -->
Subscribe to:
Posts (Atom)