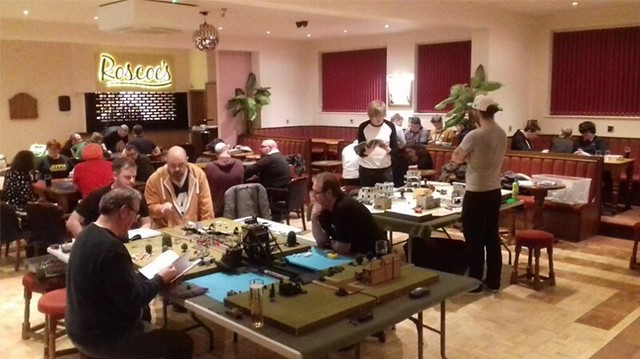
I thought it might be interesting for some of you who read this blog to tell you about a game of Bolt Action that I played last night, at the Scarborough Games Society. I managed to get a few snaps of the game - I played as part of the British team - and they include some very nice shots of some of the models fielded in the game.
I won't recount the whole game report here, as I have already done so over on my gaming blog, but if your would like to read about it (and it was a very exciting game) you can jump over to that post by clicking on this link: Milgeek - Tabletop game report - 'Pegasus Bridge'.
Or, alternatively, if you don't want to listen to me drone on about my gaming adventures but would like to see the pictures, then you can follow this link to my Flickr album of the game: Flickr - Bolt Action Game - Pegasus Bridge.
A big thank you goes to the members of the Scarborough Games Society for putting up with a novice like myself. And I should note that they play all sorts of board and tabletop games, not just war games (next week they are hosting a big Zombiecide game, so I'm looking forward to that)!
You can find out more about the SGS by popping over to their Facebook page: The SGS Facebook page.
Diary of a novice scale model maker and his adventures in the wacky world of Braille Scale.
Friday, 13 January 2017
Tuesday, 10 January 2017
Hunor Model 1939 Ford V8 Truck - Part 3
Oh, dear! This is gonna be a long haul...
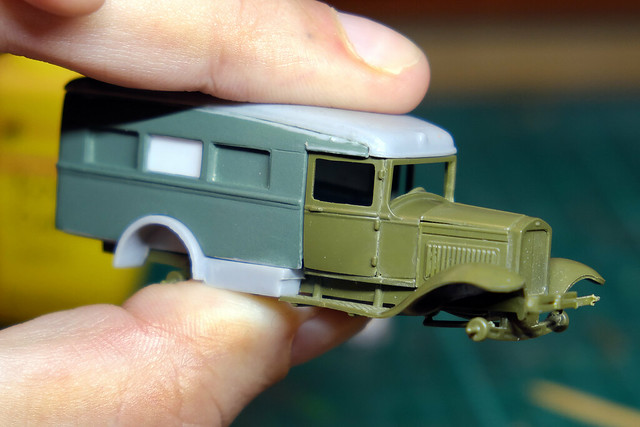
Just a tiny update on this project, so you can see what I'm up against and why this is going to crawl along with some very insignificant progress updates.
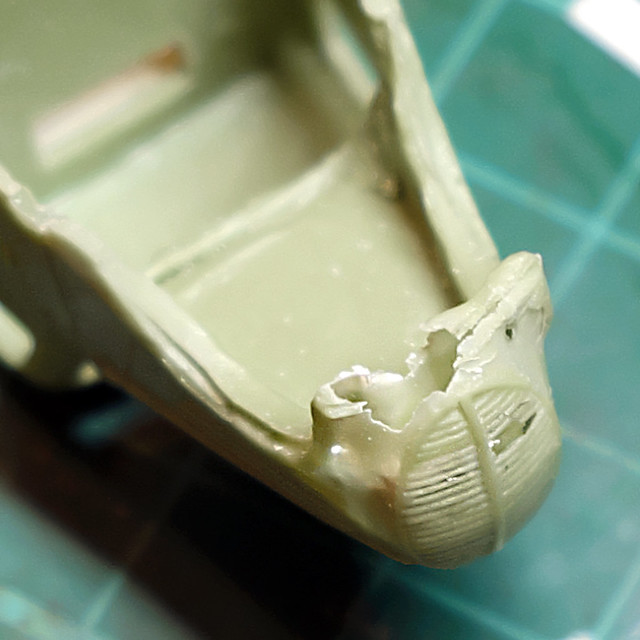
One of my two Hunor Ford M39's arrived with a damaged 'nose'...
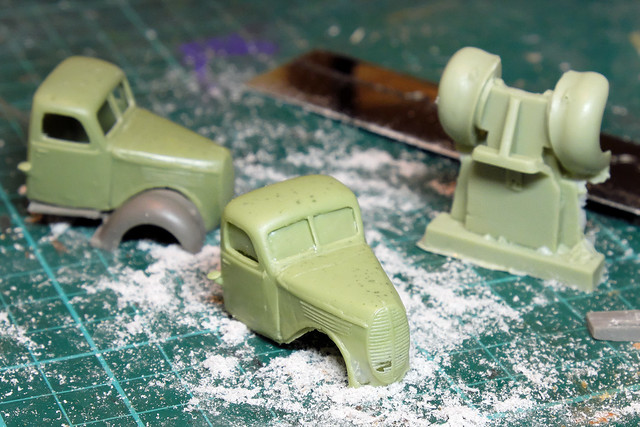
It seems there might have been an air bubble in the mould, the truck's grill and lower edge were paper thin and disintegrated when touched. So I am having to rebuild the damaged area with some Milliput putty.
While this may be an extreme example of some of the problems that exist with this model, there will undoubtedly be a lot more work for the Milliput on these models.
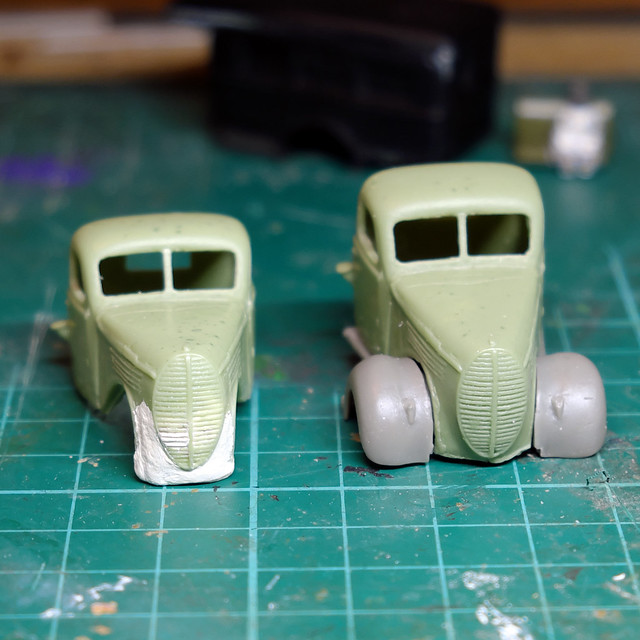
Once the Milliput has dried I will sand it into shape properly. I'm quite pleased with the job I made of repairing the grill, I think it will suffice. From here I will move onto fitting the cab and bonnet to the cab floor and fenders (which you can see temporarily fitted to the cab on the right).
You perhaps won't be surprised to hear that the cab and its floor and fenders aren't a great fit. You'll notice the gaps between the fenders and the bonnet in the picture, but this is the least of the problems
But, that - as they say - is a story for another time!
Just a tiny update on this project, so you can see what I'm up against and why this is going to crawl along with some very insignificant progress updates.
One of my two Hunor Ford M39's arrived with a damaged 'nose'...
It seems there might have been an air bubble in the mould, the truck's grill and lower edge were paper thin and disintegrated when touched. So I am having to rebuild the damaged area with some Milliput putty.
While this may be an extreme example of some of the problems that exist with this model, there will undoubtedly be a lot more work for the Milliput on these models.
Once the Milliput has dried I will sand it into shape properly. I'm quite pleased with the job I made of repairing the grill, I think it will suffice. From here I will move onto fitting the cab and bonnet to the cab floor and fenders (which you can see temporarily fitted to the cab on the right).
You perhaps won't be surprised to hear that the cab and its floor and fenders aren't a great fit. You'll notice the gaps between the fenders and the bonnet in the picture, but this is the least of the problems
But, that - as they say - is a story for another time!
Monday, 9 January 2017
What next? Future projects.
As this is a start of a new year I suppose it's a good time to look forward to what projects I will undertake this year. Now that I've got a proper plan and am better organised with my current Finnish project, I can actually see the light at the end of the tunnel and am starting to actually think about what I might do next!
There are two ideas that immediately come to mind; a World of Tanks themed project and a small Middle East Wars project.
World of Tanks
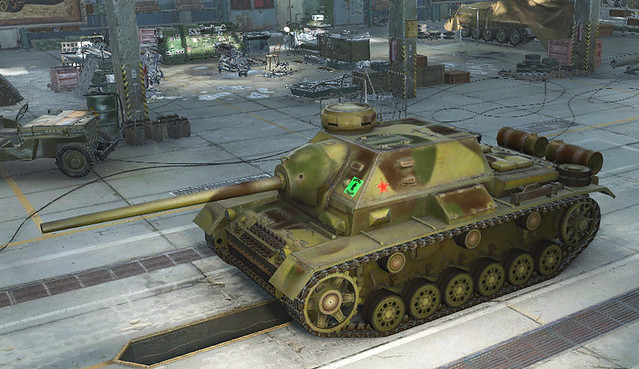
The World of Tanks computer game is a continuing obsession with me, and I particularly enjoy playing the Soviet tank destroyers. So I thought that I'd love to have a little set of my favourite tanks in the game.
There are some amazing steel beasts in the game and some are quite obscure (some of the tanks are actually 'paper tanks' or tanks which were never more than prototypes). So, it would be nice to have a little display for my desk.
Middle East Wars
I noticed that a lot of modellers got the 'Cold War' bug last year and while it is a very interesting subject, for me, it was the Middle East Wars that have influential memories for me. I still remember black and white TV news images from when I was a kid of Israeli tanks during the Yom Kippur War (1973).
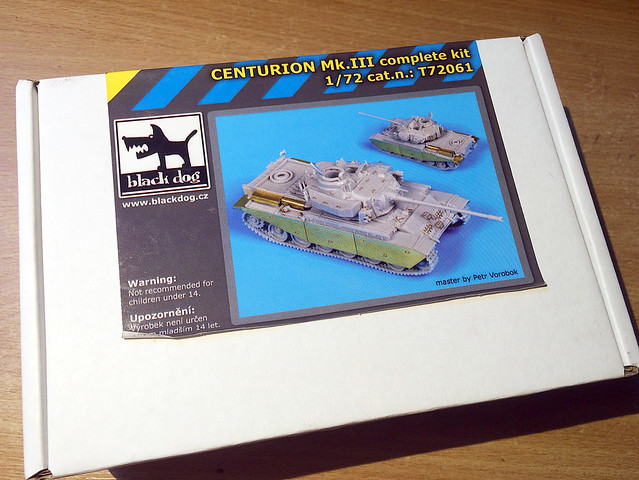
Of all the tanks involved during the Arab-Israeli conflicts, one tank stand out in my mind as being iconic of these desperate struggles and that is the - apply named - Israeli Sho't tank (105 mm L7 armed British Centurion tank). I was lucky enough to receive a 1/72 scale Black Dog made Centurian Mk. III lit from my brother last year...
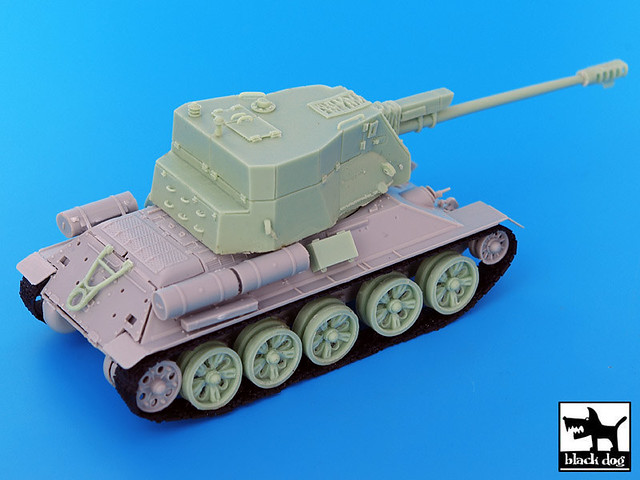
And, quite by chance, this seemed to compliment a Black Dog Egyptian SPG 122mm conversion kit that I had already acquired for one of my Soviet T-34/85 kits...
So, together, I thought these models might make the embryo of a nice little Middle East collection or maybe just an interesting little diorama.
Which of these two ideas I will go with this year remains to be seen, I could actually build the two Middle East tanks I have between projects I suppose and leave the World of Tanks project until I finish my Finnish collection, I suppose. But, I do have something special in mind with which I will conclude my Finnish project...
There are two ideas that immediately come to mind; a World of Tanks themed project and a small Middle East Wars project.
World of Tanks
The World of Tanks computer game is a continuing obsession with me, and I particularly enjoy playing the Soviet tank destroyers. So I thought that I'd love to have a little set of my favourite tanks in the game.
![]() |
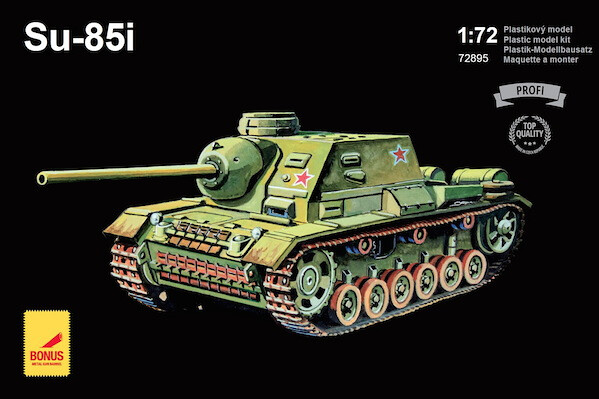
| My favourite 'small' tank from World of Tanks is my Soviet SU-85i, or, as I like to call it, 'the poor man's StuG'. |
![]() |
| Action Hobbies do a nice 1/72 scale Su-85i, which would look great painted in my World of Tanks camo scheme. |
![]() |
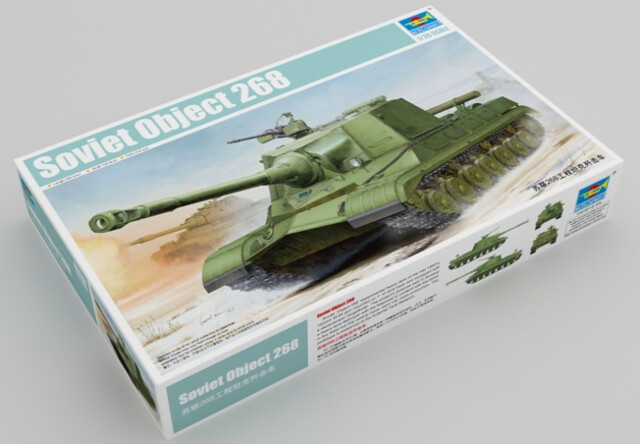
| At the other end of the scale, my monstrous Object 268. Top of the Soviet Tank Destroyer line and my favourite German E-100 killer! |
![]() |
| Trumpeter make an Object 268 kit, but I think I would have to source my 152mm gun option from a third-party by the looks of it. |
I noticed that a lot of modellers got the 'Cold War' bug last year and while it is a very interesting subject, for me, it was the Middle East Wars that have influential memories for me. I still remember black and white TV news images from when I was a kid of Israeli tanks during the Yom Kippur War (1973).
Of all the tanks involved during the Arab-Israeli conflicts, one tank stand out in my mind as being iconic of these desperate struggles and that is the - apply named - Israeli Sho't tank (105 mm L7 armed British Centurion tank). I was lucky enough to receive a 1/72 scale Black Dog made Centurian Mk. III lit from my brother last year...
And, quite by chance, this seemed to compliment a Black Dog Egyptian SPG 122mm conversion kit that I had already acquired for one of my Soviet T-34/85 kits...
So, together, I thought these models might make the embryo of a nice little Middle East collection or maybe just an interesting little diorama.
Which of these two ideas I will go with this year remains to be seen, I could actually build the two Middle East tanks I have between projects I suppose and leave the World of Tanks project until I finish my Finnish collection, I suppose. But, I do have something special in mind with which I will conclude my Finnish project...
Sunday, 8 January 2017
Meanwhile...One step back - Gaz 55 Ambulance
While I spend an inordinate amount of time cleaning up the resin parts of my Hunor Ford, for a bit of relaxation (!), I thought I'd dust off the PST 1/72 Gaz-55 Ambulance I started last year (just before I went into hospital).
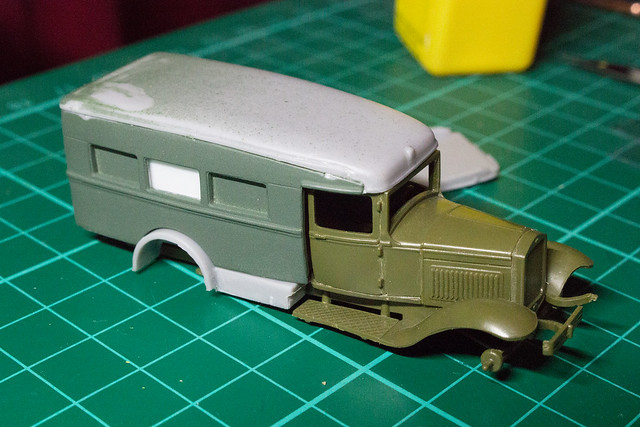
To recap, I hit a bit of a brick wall with the PST kit as it wasn't long into the assembly that I discovered that some things didn't fit like they were supposed to. Namely, the ambulance body didn't mate seamlessly with the Gaz truck cab.
If, as I did, you assemble the chassis and truck cab and the ambulance body as two separate major components and then try, then, to fit the two together then you are in for a nasty surprise...
You'll notice that the cab's doors do not meet the ambulance body flush, instead, there is a recess of about a half a millimetre between the two assemblies. I guess it was my fault for trusting PST and not doing a dry fit first, I stupidly thought that this would be a straight forward build. When will I learn that there's no such thing as a straight forward build!
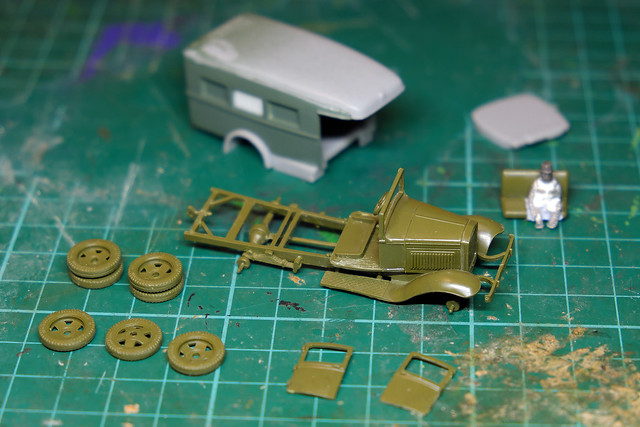
Anyway, I now feel ready to return to this project, but in order to get it to completion, I first had to take a step backwards and disassemble the cab by removing the doors again...
Now, the tricky part begins - working out the best way to align the doors and fit the major components together. To begin with, I tried refitting the doors first just to see if they could fit seamlessly with the ambulance body...
Well, that looks OK, but it isn't an easy fit. It may be easier if I get the ambulance body and chassis correctly mated together and then fit the doors last.
There are a couple of other issues that means I may have to do some more filling and trimming and jigging about to get everything to align properly. At the moment, with the body and chassis together the wheelbase is slightly too short (by a fraction of a millimetre) and so the rear axel is not central to the rear wheel arch.
One of the other issues is that the cab's running boards are warped. I may try softening them with hot water and then I'll attempt to straighten them out again...
I've also created a driver figure. He's a bit of a Frankenstein, the body is a 20mm (1/76) driver figure by S&S Models while the Head is a 1/72 Hat Austrian infantryman. As I have mentioned before, in order to fit a figure inside a 1/72 scale truck cab I have found that you have to go for a slightly smaller sized figure, even then I have had to amputate his feet!
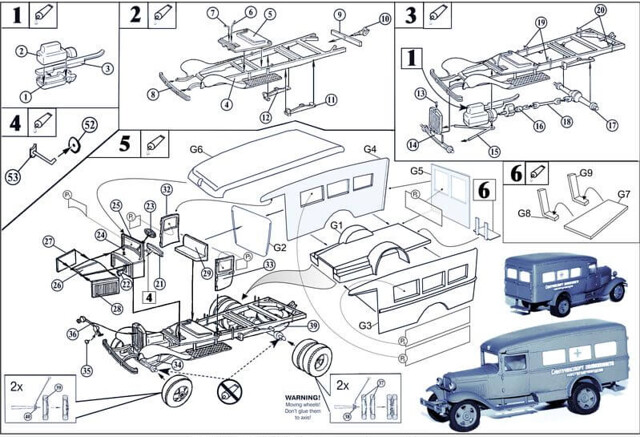
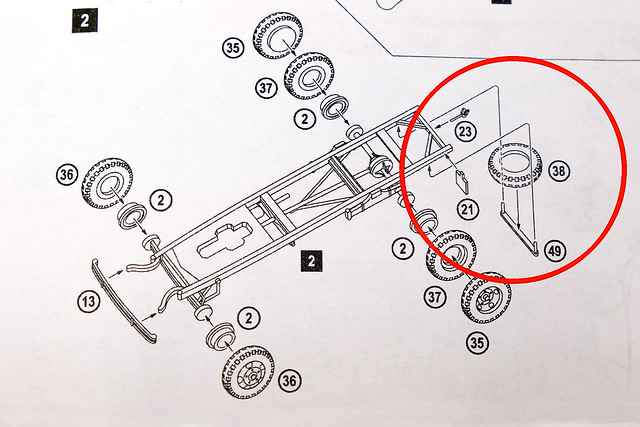
The underside of the chassis is almost complete aside from the spare wheel. The PST instructions are a bit vague about how exactly this attaches to the rear of the chassis. BUT, I happen to have a Military Wheels 1/72 Gaz AA truck kit and it's instructions show where the spare wheel goes and how it's attached to the chassis...
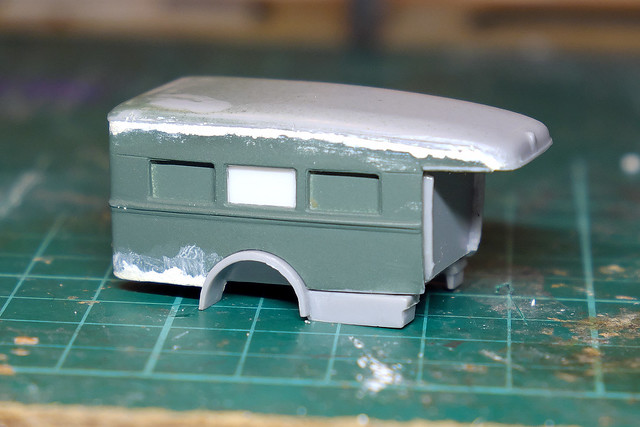
All good, just one final thing for this session and that's to apply some modelling putty to some of the gaps in the ambulance body component...
Well, that's it for today. Once the Milliput putty has dried I will sand it smooth and then start to give the components a primer coat. Then it will be on to painting cab interior (and driver) ready for assembly.
To recap, I hit a bit of a brick wall with the PST kit as it wasn't long into the assembly that I discovered that some things didn't fit like they were supposed to. Namely, the ambulance body didn't mate seamlessly with the Gaz truck cab.
If, as I did, you assemble the chassis and truck cab and the ambulance body as two separate major components and then try, then, to fit the two together then you are in for a nasty surprise...
You'll notice that the cab's doors do not meet the ambulance body flush, instead, there is a recess of about a half a millimetre between the two assemblies. I guess it was my fault for trusting PST and not doing a dry fit first, I stupidly thought that this would be a straight forward build. When will I learn that there's no such thing as a straight forward build!
Anyway, I now feel ready to return to this project, but in order to get it to completion, I first had to take a step backwards and disassemble the cab by removing the doors again...
Now, the tricky part begins - working out the best way to align the doors and fit the major components together. To begin with, I tried refitting the doors first just to see if they could fit seamlessly with the ambulance body...
Well, that looks OK, but it isn't an easy fit. It may be easier if I get the ambulance body and chassis correctly mated together and then fit the doors last.
There are a couple of other issues that means I may have to do some more filling and trimming and jigging about to get everything to align properly. At the moment, with the body and chassis together the wheelbase is slightly too short (by a fraction of a millimetre) and so the rear axel is not central to the rear wheel arch.
One of the other issues is that the cab's running boards are warped. I may try softening them with hot water and then I'll attempt to straighten them out again...
I've also created a driver figure. He's a bit of a Frankenstein, the body is a 20mm (1/76) driver figure by S&S Models while the Head is a 1/72 Hat Austrian infantryman. As I have mentioned before, in order to fit a figure inside a 1/72 scale truck cab I have found that you have to go for a slightly smaller sized figure, even then I have had to amputate his feet!
The underside of the chassis is almost complete aside from the spare wheel. The PST instructions are a bit vague about how exactly this attaches to the rear of the chassis. BUT, I happen to have a Military Wheels 1/72 Gaz AA truck kit and it's instructions show where the spare wheel goes and how it's attached to the chassis...
All good, just one final thing for this session and that's to apply some modelling putty to some of the gaps in the ambulance body component...
Well, that's it for today. Once the Milliput putty has dried I will sand it smooth and then start to give the components a primer coat. Then it will be on to painting cab interior (and driver) ready for assembly.
Friday, 6 January 2017
Thar be Monsters!
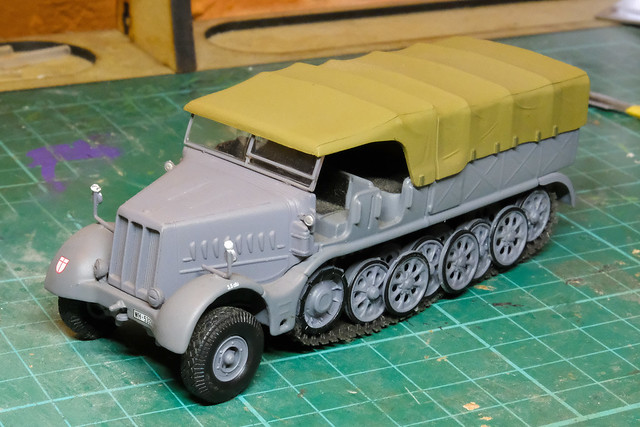
I had nice surprise this morning, one of my belated Christmas presents arrived, a Deagostini 1/72 Combat Tank Collection Schwerer Zugkraftwagen 18 t Sd.Kfz. 9 'FAMO'!
This amazing vehicle was the heaviest half-track produced by the Germans during WW2. It was a prime mover, principally dragging around their larger artillery but it later found a new role as a recovery vehicle for another monster - the Tiger I.
It is as a recovery vehicle that this model interests me, as the Finns purchased a couple of examples from the Germans late in the war as they were desperately short of this sort of extreme pulling power. The Finns relied heavily on captured heavy tanks, as they had no tank manufacture of their own, so being able to recover damaged or abandoned tanks off the field was of major importance to them.
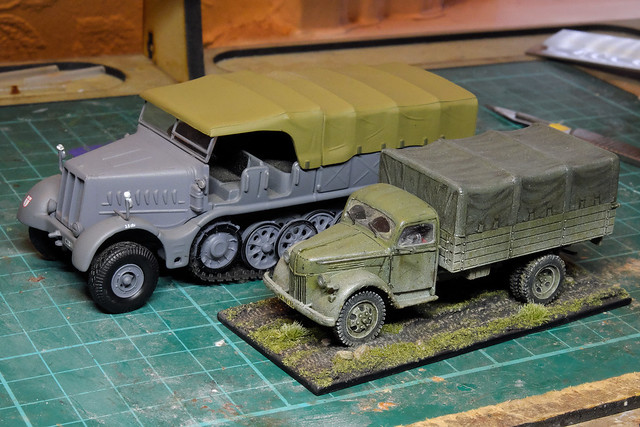
But the sheer size of these astonishing vehicles isn't obvious until you see them compared to a 'normal' sized truck...
The size difference between the Famo and conventional medium trucks of the time is astounding. When you look at the above picture you do find yourself wondering if both vehicles are of the same scale. They are, 1/72.
Sadly, one of the only photos of the Famo in Finnish service during the Continuation War (1941-44) is this half-caught 'photo bomb'...
It does show an interesting 'tiger stripe' camo pattern, though. But does leave me wondering what the two colours are. It's very likely that one of the colours is the colour that the Famo was painted when it left it's German factory (either Field Gray or 'Dunkelgelb'), but what the second colour might be is anyone's' guess (possibly Finnish Brown or Moss Green).
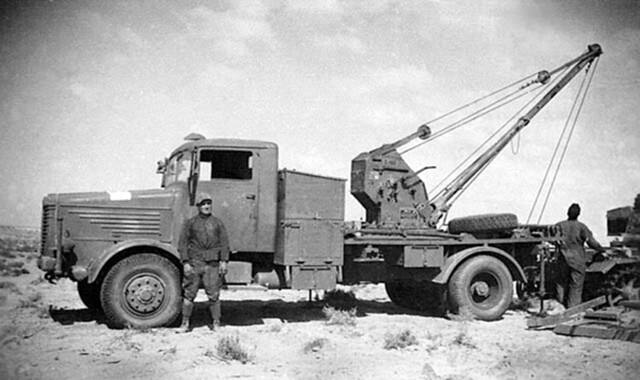
Incidentally, the back end of the other truck you can see in the photo is very likely the other German purchase the Finns made for their recovery operations, a Bussing NAG 4500A w/ Bilstein 3T crane...
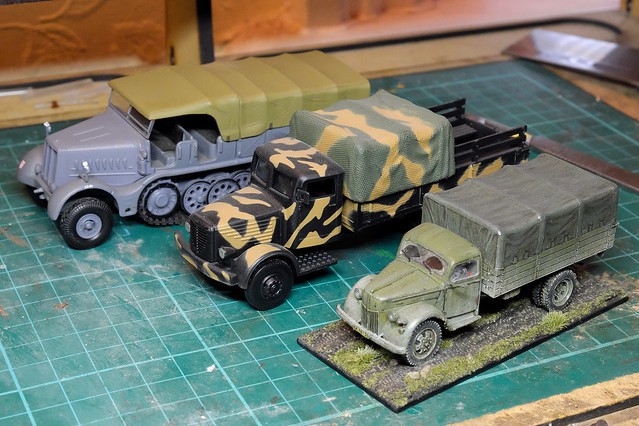
This was another Teutonic monster, a 4.5 tone 4x4 truck which - like the Famo - dwarfed other vehicles. I actually bought a die cast model of this as well and here are the models compared...
I had it in mind to convert the Bussing NAG into the recovery version with crane (the real version of which was capable of lifting 3 tons).
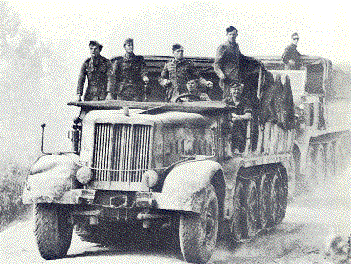
These stunning vehicles would make a smashing addition to my Finnish collection (although they aren't actually needed to fulfil the Rapid Fire wargame rules that I'm using as a guide to my collection). And I can't resist adding this last photo (source unknown) just to illustrate the sheer unbelievable size of these mighty beasts...
This amazing vehicle was the heaviest half-track produced by the Germans during WW2. It was a prime mover, principally dragging around their larger artillery but it later found a new role as a recovery vehicle for another monster - the Tiger I.
It is as a recovery vehicle that this model interests me, as the Finns purchased a couple of examples from the Germans late in the war as they were desperately short of this sort of extreme pulling power. The Finns relied heavily on captured heavy tanks, as they had no tank manufacture of their own, so being able to recover damaged or abandoned tanks off the field was of major importance to them.
But the sheer size of these astonishing vehicles isn't obvious until you see them compared to a 'normal' sized truck...
![]() |
| The giant FAMO compared to a Ford V3000 medium truck of the same period! |
Sadly, one of the only photos of the Famo in Finnish service during the Continuation War (1941-44) is this half-caught 'photo bomb'...
It does show an interesting 'tiger stripe' camo pattern, though. But does leave me wondering what the two colours are. It's very likely that one of the colours is the colour that the Famo was painted when it left it's German factory (either Field Gray or 'Dunkelgelb'), but what the second colour might be is anyone's' guess (possibly Finnish Brown or Moss Green).
Incidentally, the back end of the other truck you can see in the photo is very likely the other German purchase the Finns made for their recovery operations, a Bussing NAG 4500A w/ Bilstein 3T crane...
This was another Teutonic monster, a 4.5 tone 4x4 truck which - like the Famo - dwarfed other vehicles. I actually bought a die cast model of this as well and here are the models compared...
I had it in mind to convert the Bussing NAG into the recovery version with crane (the real version of which was capable of lifting 3 tons).
These stunning vehicles would make a smashing addition to my Finnish collection (although they aren't actually needed to fulfil the Rapid Fire wargame rules that I'm using as a guide to my collection). And I can't resist adding this last photo (source unknown) just to illustrate the sheer unbelievable size of these mighty beasts...
Hunor Model 1939 Ford V8 Truck - Part 2
I keep telling myself 'no more resin kits' and yet, here I am learning just why I swear I'll never do another!
There must be modellers who like resin kits, really there must...The sort of masochists who like wobbling loose teeth until they fall out, or like licking batteries. I guess, to be fair, resin short-run kits fill the dark void where plastic injection manufacturers do not want to tread. Where else would I get an obscure pre-WW2 commercial truck kit if not from resin magicians like Hunor?
Grudging acknowledgement of the important role resin manufacturers have to play in the hobby aside, this kit is already driving me mad...
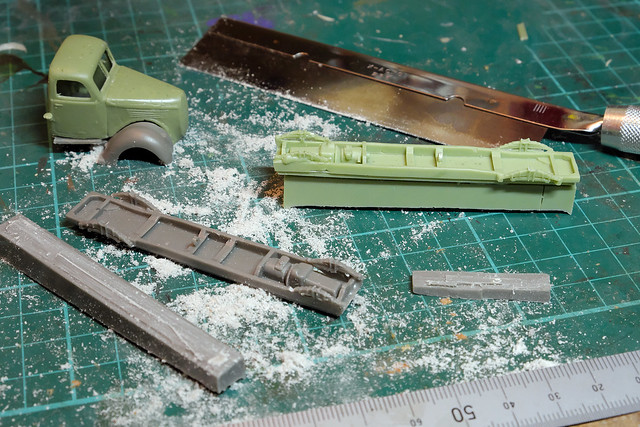
In the above picture, you can see the enormous lump of resin which is attached to the chassis frame as well as a second chassis I have already freed with a modelling saw (I am making two of these Ford kits). Resin isn't the easiest material to cut when it's so thick, but this hefty chunk is taking the mickey.
The reason I'm moaning is that, when you have to cut free delicate components like this it can be so easy to slip and cut or snap the item...So, I saw or cut slowly...
I'd already cut the truck cab floor from a small slab of resin (just about to start the second) and did some general flash removal. Unfortunately, Hunor's quality control isn't on the ball as you may notice that the radiator grill of the cab in the foreground is damaged...
The other niggle I have about having to cut off slabs of resin like this is that I'm not always sure where, exactly, I'm supposed to detach the component. With the cab's floor it was pretty obvious where to cut, but the chassis was less than clear and I may have to trim some more resin off after I have test fitted all the parts.
It's going to take me some time to safely detach all the parts from their resin imprisonment, so don't expect another update on this project any time soon!
(Just one last thing, I have been reminded that I should include a warning about resin dust. As you can see from my photos, cutting or sawing - or sanding - resin does produce a fair amount of dust. Please remember to wear a protective mask while doing this and clean up your work bench as you go, this stuff is not good for your lungs!)
There must be modellers who like resin kits, really there must...The sort of masochists who like wobbling loose teeth until they fall out, or like licking batteries. I guess, to be fair, resin short-run kits fill the dark void where plastic injection manufacturers do not want to tread. Where else would I get an obscure pre-WW2 commercial truck kit if not from resin magicians like Hunor?
Grudging acknowledgement of the important role resin manufacturers have to play in the hobby aside, this kit is already driving me mad...
In the above picture, you can see the enormous lump of resin which is attached to the chassis frame as well as a second chassis I have already freed with a modelling saw (I am making two of these Ford kits). Resin isn't the easiest material to cut when it's so thick, but this hefty chunk is taking the mickey.
The reason I'm moaning is that, when you have to cut free delicate components like this it can be so easy to slip and cut or snap the item...So, I saw or cut slowly...
I'd already cut the truck cab floor from a small slab of resin (just about to start the second) and did some general flash removal. Unfortunately, Hunor's quality control isn't on the ball as you may notice that the radiator grill of the cab in the foreground is damaged...
The other niggle I have about having to cut off slabs of resin like this is that I'm not always sure where, exactly, I'm supposed to detach the component. With the cab's floor it was pretty obvious where to cut, but the chassis was less than clear and I may have to trim some more resin off after I have test fitted all the parts.
It's going to take me some time to safely detach all the parts from their resin imprisonment, so don't expect another update on this project any time soon!
(Just one last thing, I have been reminded that I should include a warning about resin dust. As you can see from my photos, cutting or sawing - or sanding - resin does produce a fair amount of dust. Please remember to wear a protective mask while doing this and clean up your work bench as you go, this stuff is not good for your lungs!)
Tuesday, 3 January 2017
Stash additions for January 2017
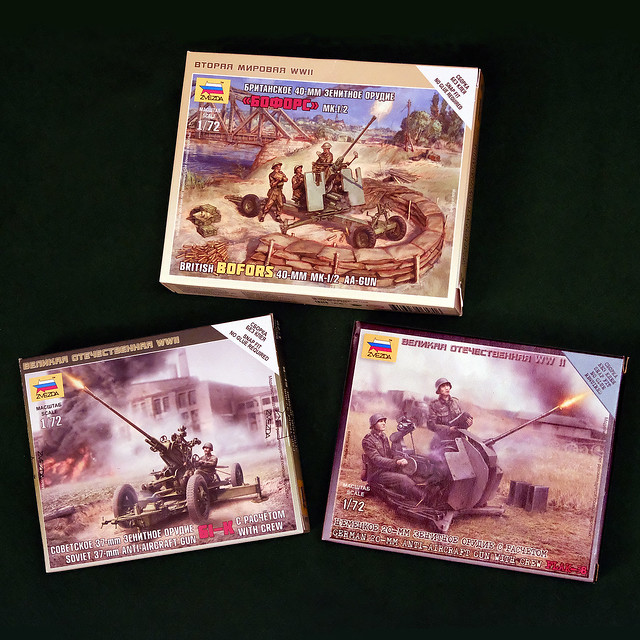
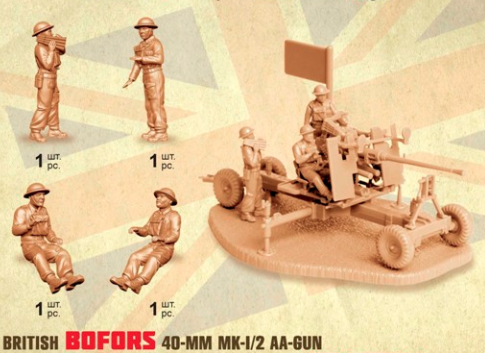
January is 'Anti-Aircraft Month'! All my 'Finnish' project builds are flak related (either AA guns, their crews or towing vehicles). Above Zvesda kits were delivered today, a lovely BEF Bofors set, Soviet 37mm gun set and little Flak 38 set.
The Finns seem to have been reasonably well equipped when it came to AA guns and there is a wonderful reference source over at JaegerPlatoon.Net, including everything from light anti-aircraft machine guns all the way up to the heavy flak guns: www.jaegerplatoon.net/AAMG.htm
![]() |
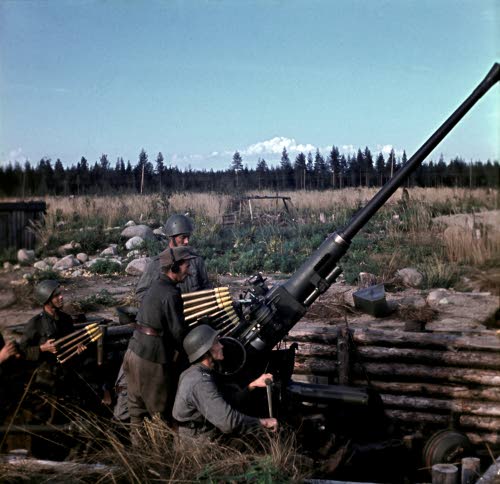
| As usual, SA KUVA - the Finnish WW2 photo archive - is an excellent source of reference photographs. Anti-Aircraft guns seemed to be a very popular subject for propaganda purposes, so there is an abundance of really good material. If you do a search for 'ilmatorjunta' - which I believe is Finnish for 'anti-aircraft', you should come up trumps. |
![]() |
| The Zvezda British Bofors set is actually very detailed and not what you would term an 'easy build' (which many of their 'Art of Tactic' range are). |
I have bought two of the Zvezda Bofors sets so that I can model the gun in both static and mobile modes.
As the war progressed and Finland swapped sides (!), they started to get more and more German equipment. Among this were a number of Flakvierling 38 (or Flak 38 for short) 2cm guns which the Finns designated as theItK/38.
The Zvesda Flak38 is a sweet little kit, with minimal parts but it looks terrific and I can use the German crew as is as they will pass for Finns when painted.
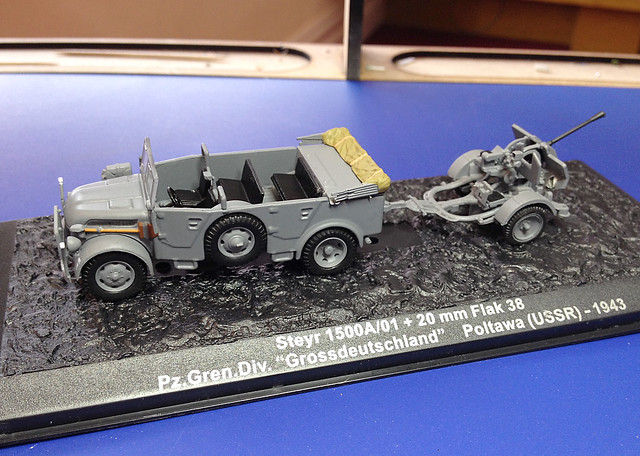
For the towed version (which, because I am using war game rules as my guidelines for this project, I will also need), I was lucky enough to pick up an example of this gun in its mobile configuration with a Deagostini Steyr 1500A/01 car I bought.
![]() |
| I bought this Steyr 1500A/Flak 38 set as I wanted the car to convert into a Finnish Army command car. Handy. |
Subscribe to:
Posts (Atom)