
Here's what I learned…
True panel shading is a very subtle technique and effect. As such it needs subtle application of paint layers - using spray cans was like using a paint roller to colour in a postage stamp!
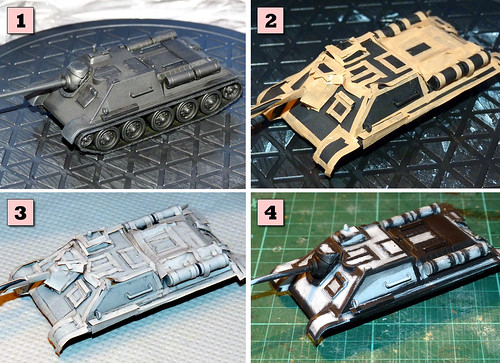
1. The base coat was flatt black enamel (a cheap spray can from the local car body shop)...
2. Next I masked off those areas I wanted to remain pure black...
3. I *tried* to get a light spray of white, but this stuff (Plasticote) just blasted out a thick layer!
4. Masking off - predictably I ended up with a 'hard edged' white patch effect. :(
The two principal properties of a good panel shading job seem to be subtle blending and the opacity of the paint layers. My hard edged and thick paint job was far too ham-fisted to achieve this delicate effect. The blending is important on the white paint layer in order to fade out the edges of the white, blending them into the black. The opacity of the over-coat of green needed to be thin enough to allow the shades bellow it to affect the tones of light and shade in the green layer.
(In particular, the enamel spray I used for the white was completely unsuitable as it put down a layer - despite my care - that was far too thick. You can clearly see the lines which indicate where the edges of the white patches were.)
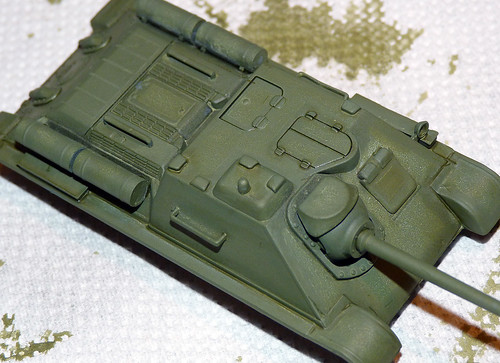
My effort wasn't quite a complete failure - in some areas you can plainly see the effect of a light and dark shaded areas underneath my top coat of Russian Green (it worked best on the front hull panel). And in a way I was lucky as I accidentally achieved a dirty and corrosive paint effect that looked kind of nice - in a weathered sort of way!
But as this wasn't what I was after - just a happy coincidence - I am still disappointed.
Conclusion
I can at least see HOW panel shading works and can imagine how effective it would be had I the proper tools with which to apply it. In the meantime I will work to recover this failed paint job - luckily for me I wanted a heavily weathered effect so it should be easy to disguise my painting mishap.
One last point to bear in mind is that if you are painting a model for war gaming (a 'quick build') then this technique may not be for you. It is quite involved and requires careful planning and preparation and the application time is fairly long as well. I guess that an experienced airbrush user might disagree, but in any case the effect is so subtle that I would say that there are easier and quicker ways to indicate tonal effects that will satisfy the war gamer. Creating a small army of correctly panel shaded models might stretch your patience! Display and competition painters will, on the other hand, find the extra work very satisfying I think.
I will wait until I can afford a proper airbrush kit before trying this again, but will finish his tank off as a bit of practice for my weathering technique.
No comments:
Post a Comment