Showing posts with label X-Ref: PSC/T3485/0412. Show all posts

Friday, 8 April 2016

PSC 1/72 T-34/85, Finnish Armoured Brigade 1944.

Hoorah! Finished - and about time too (my enthusiasm was beginning to wane).


The Plastic Soldier Company kit is - in my opinion - one of the best 'easy build' plastic T-34/85 kits made for wargamers in 1/72 scale. I think it just pips the Pegasus model to the winning post, purely because it has the better tracks.


Although I did tinker around with this kit and made some 'improvements' I didn't go completely mad and did not add any PE refinements. The engine deck is just as PSC designed it and although the 'mesh grills' look a bit derpy I decided to settle for them as they were.

You can tell, from the chunky road wheels, that the track sections are simplified (3-piece components), but I did my best with them.

The one let down with this completion is the photography, as I struggle to get to grips with my new camera (and lighting). Hence, I have not as many finished photos as I normally have. But, on a positive note, I think I have progressed enough to start thinking about taking on a 'premium kit' (like Dragon). I'll just finish off the other two 'wargame quality' T-34/85 kits I have and I have a really nice model waiting!

Monday, 14 March 2016

Finnish T-34/85 nearly finished

What a journey this has been. I started my 'easy build' T-34/85 building project way, way back when I started kit building a few years ago. I got distracted by other models and my PSC T-34/85 got pushed to the back of the shelf, coming to the fore every so often as a testbed for a painting or weathering experiment. But now, here I am finally bringing this long-suffering model to completion.

I am applying the first stages of weathering using cheap oil paints to bleach and stain the base colours. It all gets a bit messy and doesn't look all that attractive, but you have to persevere with oils...

A little messy, at this stage the weathering oils are applied broadly, more like
washes as you streak the colours into stains using a brush dipped in thinners.
Once you are satisfied that you have the basic overall weathered effect you are after (I am aiming for a moderately worn look) you can start to work into the weathering to 'neaten it up' and add finer weathering detail....


Close-up the painting isn't so pretty, but when seen at arms length the effect is far more agreeable. You have to remember to stop painting every so often and hold the model at arms distance to check your work. Some things look too much when they are right in front of you eyes, but at two feet away they look just right (and sometimes not, of course, so you have to readjust those).

I guess I have fallen into my 'style' of painting simply by accident and what feels comfortable. It's a tad 'theatrical' I suppose, I do enjoy weathering a little too much. I don't think I'll ever be one of those 'ultra-realistic' model painters - I'll always want to add more rust and scratches or mud!

I think what I am trying to do with my model painting is to tell a story...My models are caricatures.

The wheels and tracks
The PSC track components are one of the best features of this 'easy build' wargame quality kit, far better than the comparable track by competitors like Armourfast and Pegasus. The 'rollers', or road wheels, are a different matter as - like the rest of the PSC model - they are little on the chunky side.


The level of detail on the road wheels is OK and they represent the 'Full Spider' (very late and post war) T-34/85 wheels. They are just a representation, however, and only have 10 'spokes' whereas the real things had 12 raised reinforcing ridges.* Still, they are attractive enough for wargaming, but you have to remember (I reiterate) that these are a very late-war feature of this tank, so the PSC kit will not do for early/mid-1944 representations of this tank.

* I believe this is due to the PSC model being designed primarily for 15mm scale, the 1/72 version is simply a scaled up version so some features are a little too big really (or 'chunky', as I have described them).

Anyway, back to modelling...The wheels only required a dark green wash, some pin washing to pick out the detail and then - finally - a touch of highlighting on the raised areas.


The tracks got the usual powder-pigment treatment of dark earth colours, with the raise track pattern picked out with a graphite pencil and then some touches of silver paint. This gives the impression of bare steel and I may add little spots of rust here and there (I notice that the T-34 tracks are prone to rusting).


Next: Applying mud and dirt, making the base and mounting the model.

Friday, 16 January 2015

Track weathering experiment No. 3

I've had a few goes at painting model tank tracks and generally I've been quite pleased with my hap-hazard techniques. But now I want to try and find a formula for painting tracks in a consistent manner, so I looked around and found a few possible techniques in order to develop my own 'recipe'.

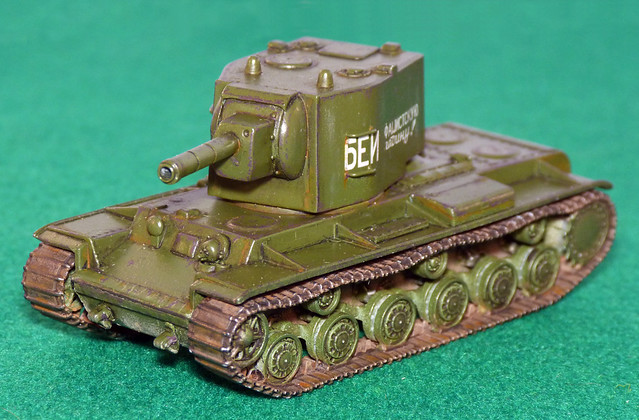
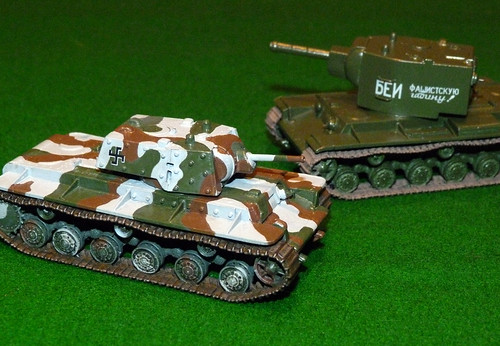
Probably the happiest I've been with a set of tracks that I've weathered was the
set I did for my 1/72 Pegasus KV-2. This was within the 'Goldilocks' range of
weathering - in my opinion - being not too much or too little mud and rust.
Unfortunately, I didn't keep a note of what I did - hence this experiment! Du-oh!
As the title suggests this is my third attempt at a track painting technique, but the first two were a case of 'keep slapping stuff on until it looks right' sort of affairs! That they did turn our OK was more luck than good management. Today I'm trying out some of the things I thought worked along with one new medium - Vallejo's Model Air 'Rust' paint.

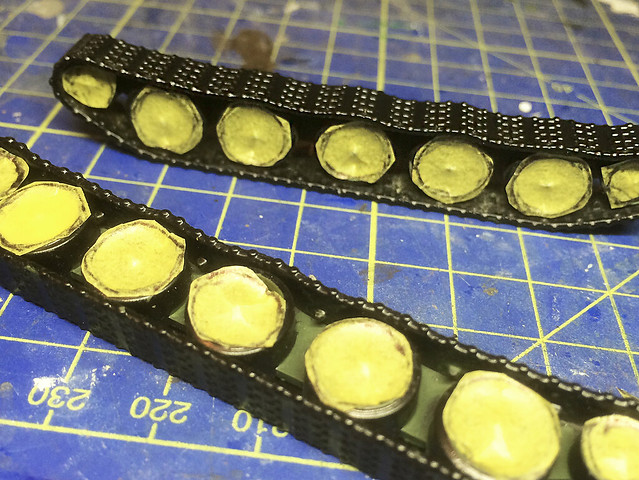
Stage 1 - Flat black base coat


I began by giving these PSC one-piece tracks a spray of Humbrol Matt Black spray and then give it a light coat of Humbrol Satin Varnish on top to protect the base layer from the subsequent experiments (the idea is that I could clean off any further effects/washes without spoiling the basic coat).

I then painted in the 'Russian Green' details behind the road wheels and inside the wheels, which I then masked off for the next stage. (Obviously you will do this slightly differently if you are making a muti-part set of tracks.)

Stage 2 - Vallejo Model Air Rust
Now this is a new medium that I haven't used before. Normally at this stage I would be using a 'rusty' coloured wash or maybe one of AK Interactives enamel washes - I had no idea how this Vallejo paint would look...

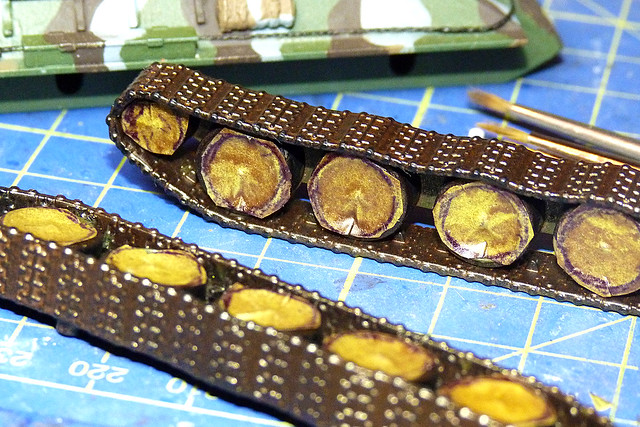
Finding it hard to capture the precise colour of Vallejo's 'Rust' with my camera.
It's a metallic and muddy bronze or tarnished copper, if that makes sense?
Hmmm, interesting...It turns out that the Vallejo paint is a metallic dull browny copper colour. Not sure how this is going to turn out at all!

The Vallejo paint is one of it's 'Model Air' paints which are especially designed to be used with an airbrush. I have no idea how light or thick to go with this so I erred on the lighter side (but it dried quite shiny so I don't think you need much).

Stage 3 - Dark wash
In order to pick out some of the raised detail of the PSC tracks I now paint on a thin dark (I use black but it could be a very dark brown) wash. I'm using Vallejo's (no, I don't work for them) Game Color Wash - 73201 Black Shade. This will dull down the shininess of the metallic 'Rust' colour and settle along the extruded track detail.


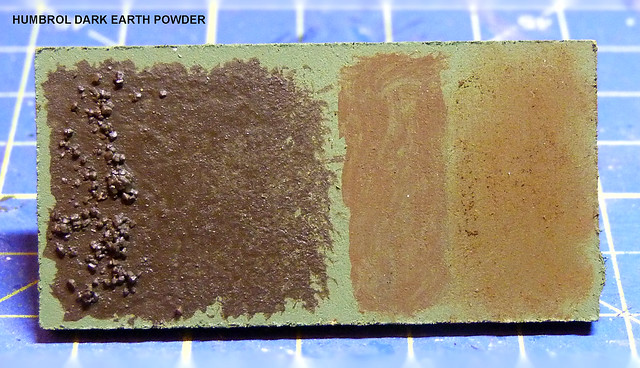
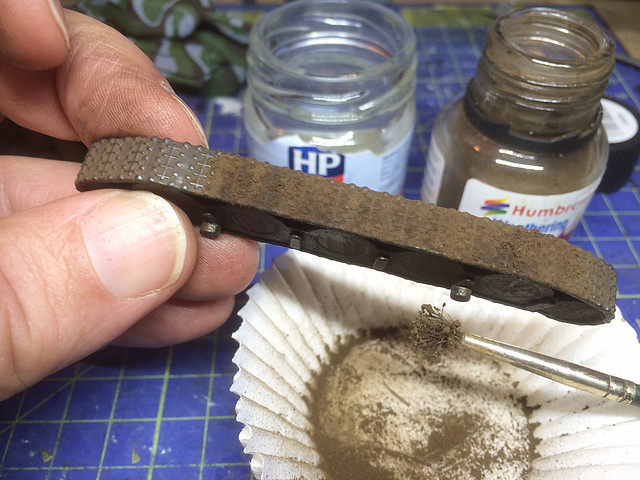
Stage 4 - Adding the mud/earth
I am returning to familiar ground for this stage as I get out my Humbrol and Vallejo pigments. I look for the pigment colour which is closest to the colour of the mud on the base I am making (remember those pigment swatches I made up recently, this is when they come in handy) which turns out to be Humbrol's 'Dark Earth'...


I apply this in powder form, dusting it over the track generously - over a tray so I can return the excess powder back into the bottle - and then keep brushing until I have a light film of pigment powder over the surface.

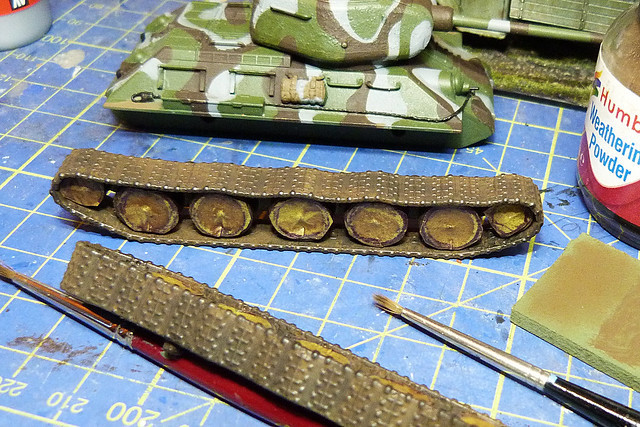
You can gently rub away the pigment powder to expose shiny coat underneath.
I will seal this powder layer with a light coat of spray varnish.
Again this dulls down previous colours, which seems over-kill BUT I do think it builds up a rich and deep multi-tonal colour effect (as opposed to just painting the track a flat khaki colour in the first place).

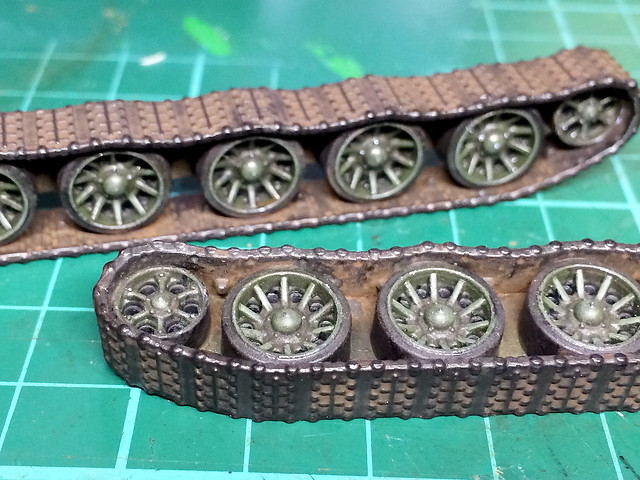
Stage 5 - Highlighting with graphite
This is my favourite fool-proof technique for adding a bare metal accent to any plastic kit. I use a cheap set of Farrel/Gold graphite sketching sticks (but you could use an ordinary graphite pencil) and run the point of a 4B across the raised track detail to produce a steel effect.

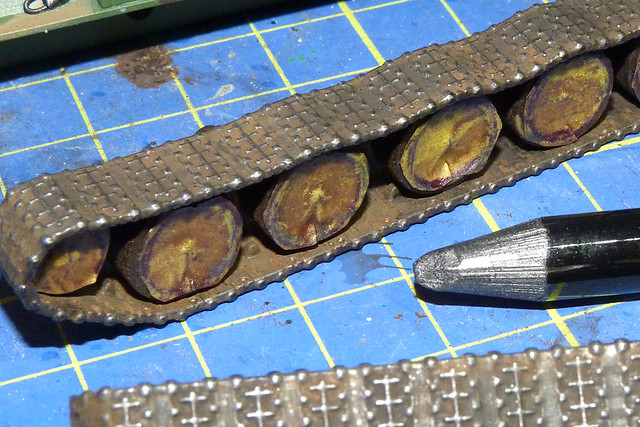
Note: The road wheels are still masked out...It case you were wondering.
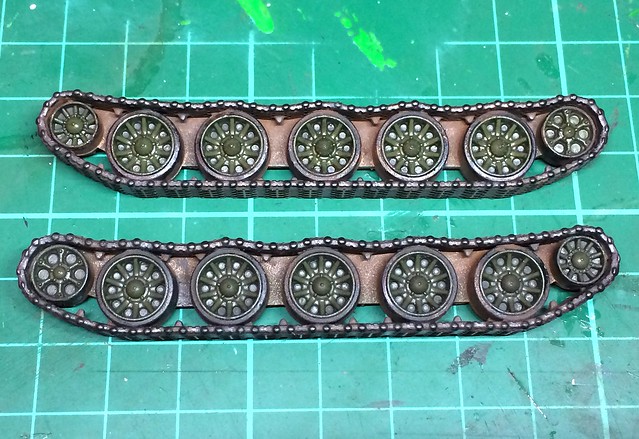
This brings all the previous stages together and all of a sudden you have a dusty set of tank tracks with a worn pattern on them.

Errata: Spraying varnish over the powder pigment was a mistake! The wet varnish reacted with the pigment and turned the powder a darker shade of the earth colour. Basically the tracks looked like they were black(-ish) again!

So I had a second go - this time (going on a tip someone mentioned in one of my comments) I brushed some Johnstone's Klear (acrylic varnish) onto the track and the dusted on the power pigment. Once dry I brushed off the excess with a stiff brush. The powder stuck this time and retained a more reddy-brown colour.

Revised technique: Dust on a heavy layer of powder on top of Johnstone's Klear
varnish whist the varnish is still wet...
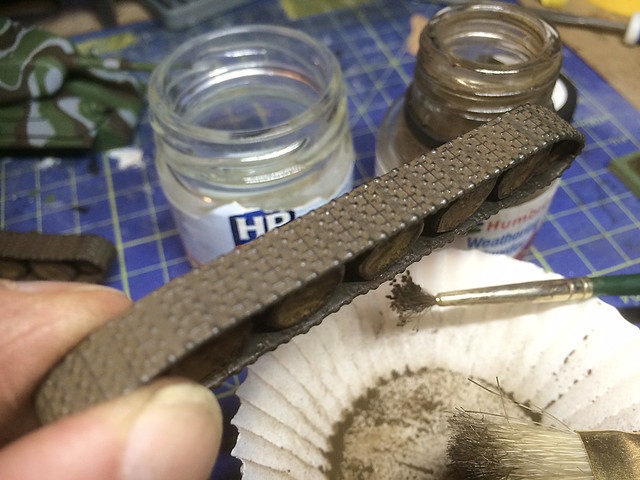
The using a stiff brush clean excess power off.
...Finally re-apply the graphite again.

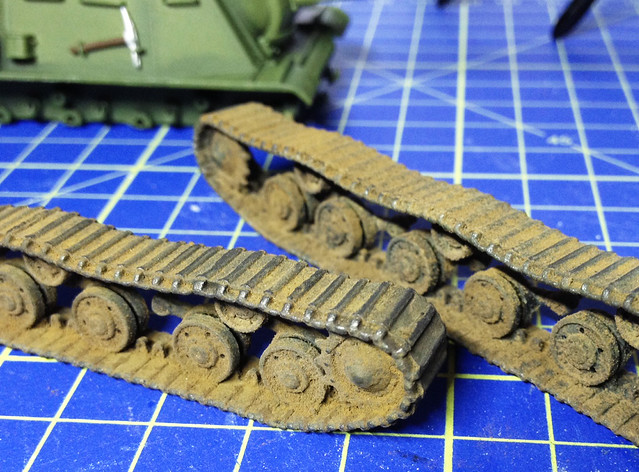
Conclusion - Was this effective?
This is a different and slightly understated look compared to my previous efforts at weathering tracks.

A prior attempt at weathering tracks where I mainly used pigments on a flat
base coat. A nice effect IF you want heavily muddied tracks but otherwise a
bit over-done really (and not much variation in tonal range).
Before I was - as beginners tend to be I think - a little heavy handed in my application of 'mud' on tracks. You tend to get a bit carried away with the excitement of producing a new effect and so exaggerate it - so my previous tracks tended to be heavily caked in mud. All very well if that's what you want, but not every tank track looks like it's just gone through a muddy watering hole after a heard of buffalo!

In this case I was after a set of dusty and worn tracks where the majority of mud had been shaken off due to the tank driving on proper roads or hardened dirt lanes.

One thing I want to mention is that - as usual with me - I make this simple technique look harder (or more time consuming) than it actually is. This is actually a fairly quick method of doing tracks which has taken me no more than an evening (fast for me) to complete. I say this because I am aware that I see-saw between war-game modelling and display modelling techniques - this is one effect that I think would satisfy either camp.


You will have to judge whether you think the end product is effective. I, myself, like it.

Wednesday, 16 May 2012

PSC 1/72 T-34/85 – Finnish camouflage


This is my second attempt at a camouflage paint scheme and as my first try went woefully wrong I have tried a few new ways of doing things to – hopefully – get the effect I am after.

Left: My first attempt at a Finnish camo scheme on my Pegasus KV-1e went a little pare shaped!

The main problems had to do with my choice of paints, the way I used the aerosol spray cans and the subsequent over-painting I had to do to rectify the mistake I made when spraying.

Would I do better with this second attempt?

Friday, 11 May 2012

PSC T-34/85 basic paint coat

I'm almost reticent post my latest T-34/85 work after featuring that wonderful T-34/85 yesterday, but here's my feeble attempt at the same tank anyway...


Once again I have used Humbrol's 'Dark Green' spray as the base for this Finnish themed model. It's a bit of a funny colour to photograph as it always photos lighter than it seems to the naked eye. The other minor fubar I had was that I accidentally sprayed the tracks gloss black instead of matt black by mistake!

The track painting mis-hap isn't really serious as the back is only the base for my rusty weathering, but even so I was a bit annoyed with myself (never spray late at night when you are tired)!

On the plus side the cast metal turret effect looks OK now it has a coat of paint...


NEXT: Masking up for the camo scheme

Sunday, 6 May 2012

T-34/85 cast turret mod


Thought I would try this simple technique for getting a rough cast metal effect on a T-34/85 turret. Here I am experimenting on a PSC T-34/85 before applying it to my Armourfast T-34/85. Here's the tools for the job...


It's a very simple - but effective - technique, you just apply a thin layer of the liquid cement and then allow it to melt the surface plastic for just a couple of seconds. Then you JAB (don't brush) the surface with and old stiff toothbrush. The harder you jab the deeper and more pronounced the effect.

Importantly I include a scrape PSC T-34 turret that I don't want to try out the technique before I use it on a live project. It's a good idea just so you can gauge just how rough you should go, on my practice turret I went a bit over the top and applied a little too much texture...


The good thing about this technique is that there is some wriggle room for reversing the effect if you do go too rough, a bit of sanding will smooth out things and then you can start again.

Here's a shot of one of my PSC T-34/85s showing just how smooth the turret looks before I apply the effect (the Armourfast turret is just as smooth)...


And the effect applied to tank No. 2...


As you can see, because of my earlier practice I knew just how much pressure to use with the toothbrush to get a more subtle effect. Here's a close up...


I'm quite pleased with this technique, especially as it isn't 'undo-able' in that you can reverse it a bit if you don't like what you have done. Of course this technique can be used on any cast turret (the Sherman springs to mind, or the earlier T-34). But do give it a practise first!

Monday, 9 April 2012

Holiday modelling with Soviet tanks

Funny...I didn't get as much model making done over my holiday as I thought I would. So it was small steps forward with the Pegasus KV quick build set and two of my Plastic Soldier Company T-34/85s.


The PSC T-34/85 needed some work to bring up up to scratch. The dreadful gun and mantlet needed a lot of attention, in fact I replaced the monstrous one that came with the kit with a couple of spares I had in my scrap box. Aside from this I added some cosmetic extras, like the grab rails and am modifying the fenders to reflect the Finnish tanks I am basing these models on.

Next up is the Pegasus KV set. I added the Aleran decals and although they aren't exactly plastered with insignia maybe less is more...


I based the placement of the Finnish hakenkreuz (left) on a period photo and there didn't appear to be either any unit or individual vehicle markings. The Soviet KV-2 (right) is rather more dashing with it's slogan which I believe means "Crush the Fascist vipers!".