
While I did say that I had completed the basic construction of this model, I forgot the DIY aerial!
ACE leaves you to make the 'washing line aerial' for the BA-20, you use a length of thin wire - or brass rod in my case - and bend it to shape. It has to fit on top of the 6 support posts that ACE do supply. So, you have to get the measurements and shape of you wire aerial just right.
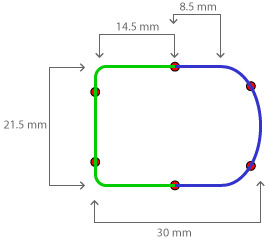
I started by drawing up a template to guide me in how and where I bent the wire - even so I had a couple of goes before I got it right. As shown in my diagram I divided this job up into two halves - front and rear, the rear half was the tricky curved part...
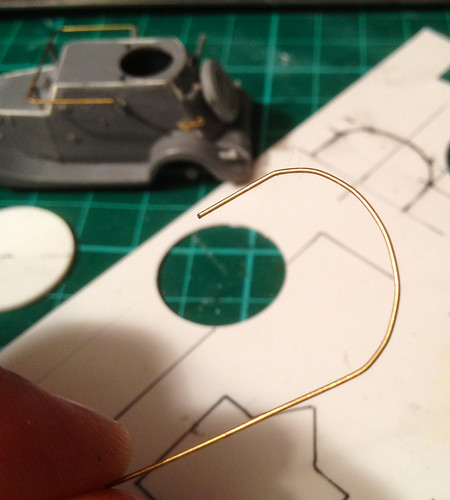
I tried making a small circular template out of plasticard so I could bend my wire into a semi-circle of the exact size I wanted, but this didn't work quite as I imagined. So it was down to good old fudging it and bending the curve by hand (fingers) and checking the shape against my diagram.
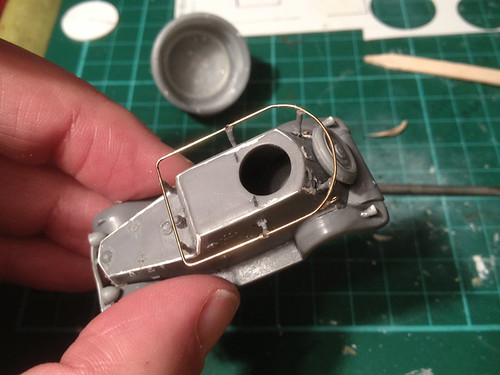
It seemed to work well enough, I also kept checking my aerial's shape against the model and the support posts to make sure the wire would fit just right. Once I was happy with my aerial I glued it into place with super glue...
Hoo-rah! Job done, but now I will pause - I want the accompanying BA-10 armoured car model to be at the same stage so I can paint them together...So, it's on with my UM BA-10 kit.
Excellent! Looking forward for the next step.
ReplyDelete